I admit that I'm a photography nut, and have been since I was a kid, lo these many years ago. I came across this in the Digital Photography Newsletter. It's a review of a camera that was made when "snapshots" were in their infancy, 1914.
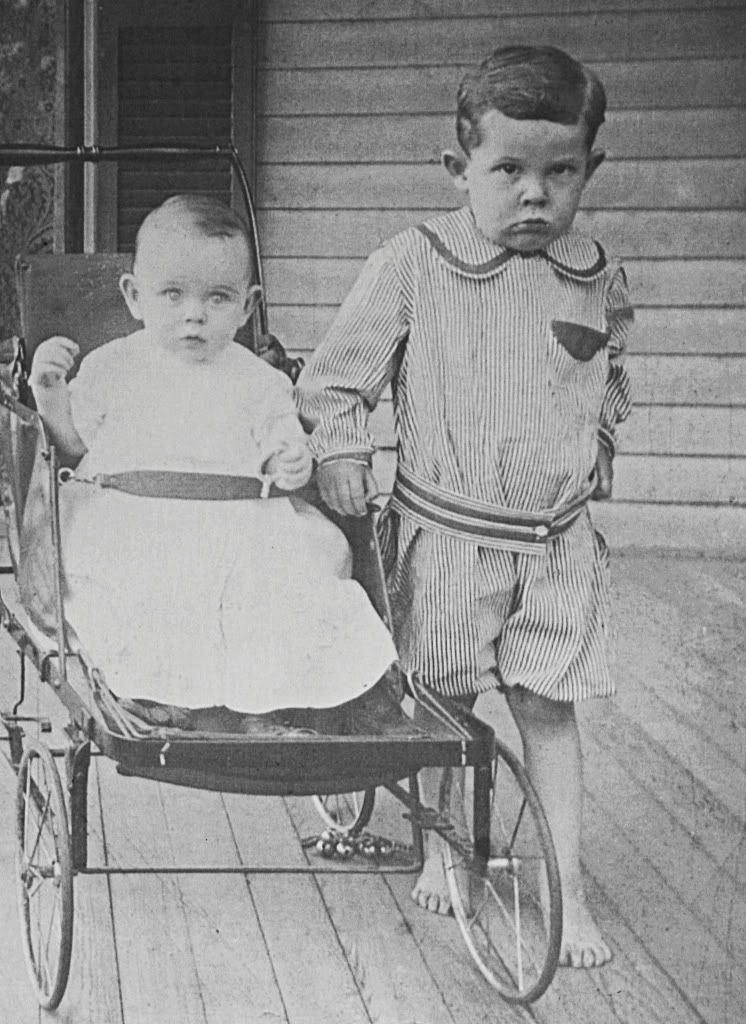
The picture below was taken by my grandmother using such a camera. That's my uncle in the stroller, and my dad, looking very suspiciously at that new-fangled camera, on the right. I estimate it was taken in 1913.
At any rate, here's the review which really describes amateur photography from that era:
"...the other day, we were dusting the shelves here at the bunker and picked up our grandfather's old camera, a No. 1A Autographic Kodak Junior. What if, just for a laugh, we reviewed that? Might put things in perspective, we thought. Gramp would have been a tot when the $13 Autographic was introduced in 1914 (about $275 in 2009 dollars) but it would have been just the ticket a few years later when he was in high school. We don't recall seeing any Autographic prints in the old family albums, but the handwritten captioning (pretty ingenious in itself) was optional anyway.
It's in remarkably good condition. The bellows is light-proof and the seal skin unblemished. It begs to be unfolded, to have its shutter cocked, to fire away. Apparently you can load it with 120 film but we're not even tempted, no matter how much it begs.
We found the manual and, before we started sneezing, flipped through the instructions.
The manual notes the Junior could be outfitted with one of two lenses. Gramp's is the Double Lens known as the Rapid Rectilinear with more aperture settings than the Single Lens alternative. Just like him, we smiled, to go for the deluxe model.
INSTANTANEOUS EXPOSURE
If you've seen one manual, you've seen one manual. They're all different and in the details lies the distraction. But the Junior's manual stopped us dead in our tracks when it talked about the difference between old-fashioned Time exposures and the newfangled Instantaneous exposures the Junior can capture.
Of course, no one called them Instantaneous exposures. By the time you get to the second section of the manual, Kodak has nicknamed them Snap Shots.
Were we writing for Sunny Sixteen Resource in 1914, we'd certainly wouldn't have to explain the advantage of an Instantaneous exposure. But these days it takes a little historical perspective to appreciate the innovation.
It's enough to realize that what we can capture today in 1/250 second took the earliest photographers minutes, usually timed by keeping an eye on their watch. And when we say minutes, we mean a lot of them. In 1839, it took between 15 and 30 minutes. By 1842, it still took between 10 and 60 seconds. That's a long time for a subject to hold still.
Apart from the speed of the film (the Junior was designed to use only one emulsion), the different exposure types depended on the shutter. "Perfect familiarity with the shutter is essential to successful picture-taking with any camera," the text admonishes. A bit less true today, perhaps, with some digicams keeping that information entirely to themselves.
There's a little lever on a dial above the lens to set the shutter speed. It has markings for T, B, 25, 500 and 100. But they are arranged in a graphically delightful 25 B 50 T 100 sequence with the letters standing much taller than the numerals. Compare that to today's silkscreened but unreadably dark icons on a black body.
For an instantaneous exposure, all you have to do is set the lever at 25 or 50. That represents the shutter speed in fractions of a second (1/25 and 1/50). The 100 setting should only be used "when taking moving objects in bright sunshine." And if you use a 1/100 shutter speed, you must remember to change the "iris diaphragm" (aperture), too. No intelligent auto mode here.
The aperture, which is controlled by a lever at the bottom of the lens, can be set to actual f-stop markings on the fancy lens. The simpler lens uses four numbered settings for the Uniform System rather than the f-stop system, all of which is explained in great detail. Available settings include f7.7, f11, f16, f22, f32 and f45. Not very fast glass, even for a digicam, today.
Kodak apparently felt that simplifying the markings would make the camera easier to use. Like the 50 for 1/50 second, f8 becomes just 8 in the manual. So when it says, "No. 8 is the proper opening for ordinary instantaneous exposures," it means f8, which is not marked on the dial.
"When the sunlight is unusually strong and there are not heavy shadows, such as in views on the seashore or on the water, use diaphragm No. 16," the manual advises. "With
light clouds or
slightly smoky atmosphere use No. 5 at 50 or No. 8 at 25." And with heavy clouds, "
do not attempt instantaneous exposures." Yes, in italics.
The A-116 film it used was pretty slow. ISO 1600 was not an option.
To actually fire the shutter you have two choices: the push-pin or release C. The push-pin is a cable release. Release C is what we call a shutter button.
So once you're all set, you only have to press the push-pin or push down on release C "with a firm quick movement, at the same time be sure to hold the Kodak rigid, as a slight jarring will cause a blurred negative." Some things never change.
"To take instantaneous pictures the objects much be in the broad, open sunlight, but the subject should not. The sun should be behind the back or over the shoulder of the operator." Still good advice.
TIME EXPOSURE
Time exposures were leisurely affairs. But they still needed explanation.
Set the shutter to T (for Time). Set the aperture to, well, there's a lot to digest here. Wide open for "all ordinary instantaneous exposures." Stopped down to f8 "when the sun shines." Use f16, as above (strong sunlight with no heavy shadows). Use f32 and f64 "for interiors.
Never for instantaneous exposures." You need a one to five second exposure at f128 on cloudy days.
And finally, "
Absolute failure will be the result if you use the smallest stop for instantaneous exposures." Absolute, no kidding.
Then press the push-pin to open the shutter. "Time exposure by a watch." And press the push-pin to close the shutter.
Alternately, you could set the shutter to B (for Bulb), recommended for very short time exposures.
"As a general rule," the manual concludes, "make exposures with the cable release instead of with the release C, as the cable release is less likely to jar the camera."
FOCUS
We won't belabor the rest of the capture process, but we do have to point out that focusing wasn't automatic. You had to set the lens to an index plate of distances screwed alongside the lens rail.
"The index plate is marked for 6, 8, 10, 15, 25 and 100 feet. Everything beyond 100 feet is in the 100-feet focus. Nothing nearer than 6 feet can be focused without using a portrait attachment." Super Macro mode wasn't invented yet.
You could frame either a landscape or portrait shot with the Junior. As you would today, you just have to turn the camera on its side. Kodak provided tripod sockets for both orientations, though. Film speeds made them serious about tripods back then.
After the shot, of course, you had to worry about advancing the film to the next frame. But since we spared you the instructions for loading film, we won't bother you with film advance. It involved a key, that's all we'll say.
Portrait advice is freely given in the manual:
"Place the sitter in a chair partly facing the Kodak (which should be located slightly higher than an ordinary table) and turn the face slightly towards the instrument, having the eyes centered on an object at the same level with the lens. Center the image in the finder. For a three-quarter figure the Kodak should be from 6 to 8 feet from the figure; and for a full figure from 8 to 10 feet. The background should form a contrast with the sitter."
The portrait attachment slipped over the "regular lens" to capture "large head and shoulder portraits." The subject could be placed as close as three feet from the lens.
THERE'S MORE
Section IV details using Eastman Flash Sheets ("Pin to a Card and Touch with a Match, That's all there is to using Eastman Flash Sheets") to take photos at night with flash. You'd be well advised to pick up the Kodak Flash Sheet Holder as well, although a piece of cardboard, a pin and a match will do in a pinch.
The manual goes on (as the job did) to discuss camera maintenance (including dusting), film developing, negative printing (this was all black and white) and mounting prints -- all made easier with Kodak products, of course.
And if you needed a little more instruction, there was the Kodak Correspondence College with a tuition of two dollars (the manual was 10 cents), "which includes a handsome cloth bound copy, library edition, of the School Text Book, 'How to Make Good Pictures'." An application form for membership was also included. Hmm, now there's a thought.
You can probably hear the echoes there of today's digicam ecosystem, no doubt. Constants in the education of a photographer, perhaps.
Our short reading of the Junior manual really did make us appreciate the effort Gramp had put into the images he captured and mounted in the photo books we still have today. Every shot must have been a keeper.
No wonder we treasure them still."
I know I do.
To think that some find digital photography somewhat mystifying today? By comparison, you almost needed a Ph.D. to figure out how to operate the cameras of old. I'm grateful that my grandmother figured it out and took that shot reproduced above.
John


 It's a pretty big lens, and was a petzval


 Linear Mode


