|
|
 |
|

07-21-2014, 06:54 PM
|
 |
Member
|


|
|
Join Date: Aug 2005
Location: Louisiana
Posts: 2,468
Likes: 1,124
Liked 3,067 Times in 839 Posts
|
|
__________________
Corripe Cervisiam
|
|
The Following User Likes This Post:
|
|
07-21-2014, 08:58 PM
|
 |
Member
|

|
|
Join Date: Nov 2012
Location: Earth
Posts: 3,222
Likes: 3,749
Liked 3,780 Times in 1,388 Posts
|
|
[QUOTE=RevolverDen;138013039]Just want to say thanks for pinning this thread as it helped me in my decision process. And since the last post is several years old, I'd thought add a link to a terrific work bench I found and purchased for reloading from Harbor Freight for $160 that my local store had in stock. I can honestly say it's on oar with some benches hundreds of dollars more, a great value!
I just purchased this same bench. It's on sale until the end of the month, and there is a further $20 off coupon you can print up for it. It cost me $139 + tax. I can't say enough about it. Went together flawlessly. The only extra thing that I did was glue all overlapping joints before screwing them together. It's almost too nice to use as a work bench.
|
07-28-2014, 10:06 AM
|
 |
Member
|


|
|
Join Date: Mar 2013
Location: The Great State of Texas
Posts: 1,833
Likes: 2,061
Liked 1,356 Times in 701 Posts
|
|
Posted these in this thread as I was building out!
My reloading sanctuary will hopefully be finished this weekend!
The signs on the couch are for the garage!
__________________
Really? U saw it in Wikipedia?
|
|
The Following User Likes This Post:
|
|
07-28-2014, 01:22 PM
|
 |
US Veteran
|


|
|
Join Date: Apr 2013
Location: Fruitland Idaho
Posts: 5,076
Likes: 1,586
Liked 4,882 Times in 2,025 Posts
|
|
Quote:
Originally Posted by smokindog

|
It looks real good, but I don't like the look of that "octopus" of wires on that outlet. I'd recommend getting a fused power strip to replace that mess. It would be a shame for that nice setup to go up in flames. 
__________________
Minimize the variables
|
07-28-2014, 02:40 PM
|
|
Member
|
|
|
Join Date: Mar 2013
Location: The Great State of Texas
Posts: 1,833
Likes: 2,061
Liked 1,356 Times in 701 Posts
|
|

That octopus is a fused power strip! It contains
- HDBaseT for HDMI over Cat6 from the main house (DirecTV from the game room)
- 1x2 HDMI splitter and connection for other 1/2 of room
- 1000BaseT for network
- Coax for Antenna
- Power for WAP/router, splitter, TV
I unplug everything when I leave as we just completed our lightning strike claim from 11/21/13. THAT was the event that postponed much of my work. It looks worse than it is but I need access. I'm pondering a better solution every time I go to the reading room! Also, you may see the new TV in one of the pictures. This one suffered some damage in that strike. I just need another helping hand to lift it into place, or more precisely, lift THAT beast down. I had only hung that TV days before the strike. Most everything that was connected to an RJ45, an HDMI, or a COAX got sizzled. You know, HIGH potential meets low resistance!
Much of that will actually tuck up behind the TV once replaced.
Quote:
Originally Posted by Bkreutz
It looks real good, but I don't like the look of that "octopus" of wires on that outlet. I'd recommend getting a fused power strip to replace that mess. It would be a shame for that nice setup to go up in flames. |
__________________
Really? U saw it in Wikipedia?
Last edited by smokindog; 07-28-2014 at 02:47 PM.
|
07-28-2014, 09:21 PM
|
|
Member
|
|
|
Join Date: Jan 2013
Location: Ohio
Posts: 647
Likes: 4
Liked 344 Times in 184 Posts
|
|
Mine looks similar to the old reloading association one but I used 4x4's for the legs and bolted it with 5/16" lag bolts. I wanted it heavy and strong.
|
07-29-2014, 11:02 AM
|
|
Member
|
|
|
Join Date: Apr 2014
Location: Southern West Virginia
Posts: 19
Likes: 4
Liked 86 Times in 10 Posts
|
|
Best thing I did for my bench was some reinforcement..
3/4" steel plate for press mounting. Zero bench flex with this.
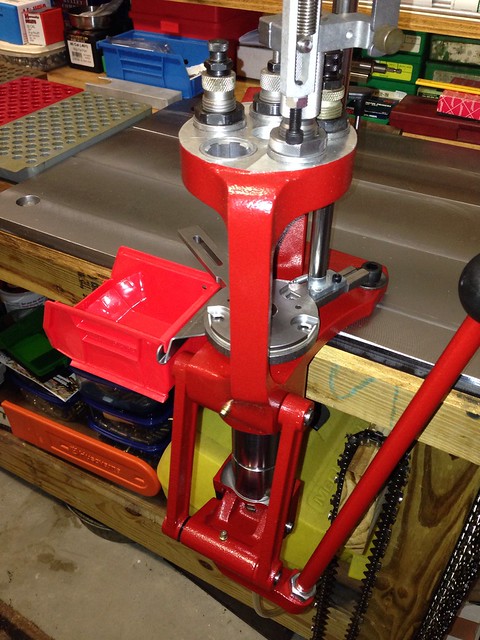 Untitled
 by zweitakt250, on Flickr
The spot to the left of the AP can be used for a single stage, or my bench mounted auto priming tool.
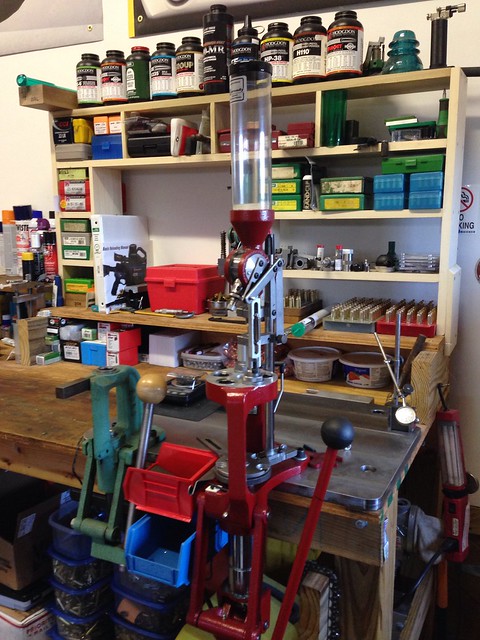 Untitled
 by zweitakt250, on Flickr
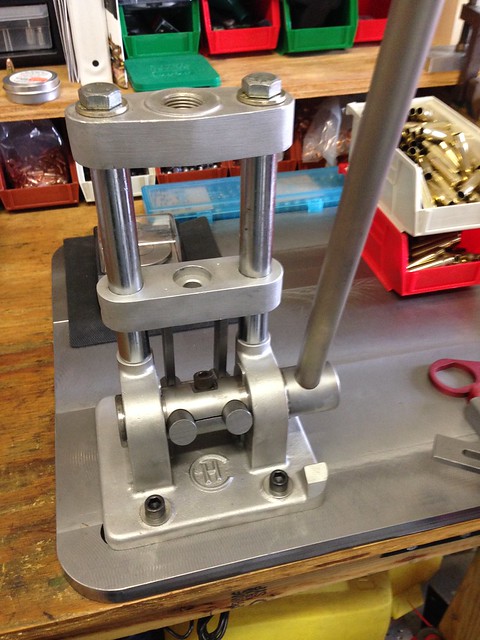 Untitled
 by zweitakt250, on Flickr
__________________
John
|
07-29-2014, 11:57 AM
|
|
US Veteran
|
|
|
Join Date: Sep 2002
Location: IL
Posts: 1,857
Likes: 1,024
Liked 3,604 Times in 956 Posts
|
|
In October 1993, the American Rifleman magazine reprinted designs for a great corner reloading bench that closed on itself to secure materials.
I found a copy of the plans on line:
http://www.ray-vin.com/tech/cornerbe...ench-plans.pdf
Here is what the finished product looks like:
www.ray-vin.com/tech/cornerbench/cornerbench.htm
Might be too small for some of you guys...
__________________
My sgntr is mor thn 30 chrctrs
Last edited by clang444; 07-29-2014 at 12:01 PM.
|
09-12-2014, 07:47 PM
|
 |
Member
|
|
|
Join Date: Jun 2013
Location: Quakertown PA
Posts: 1,474
Likes: 4,772
Liked 1,180 Times in 491 Posts
|
|
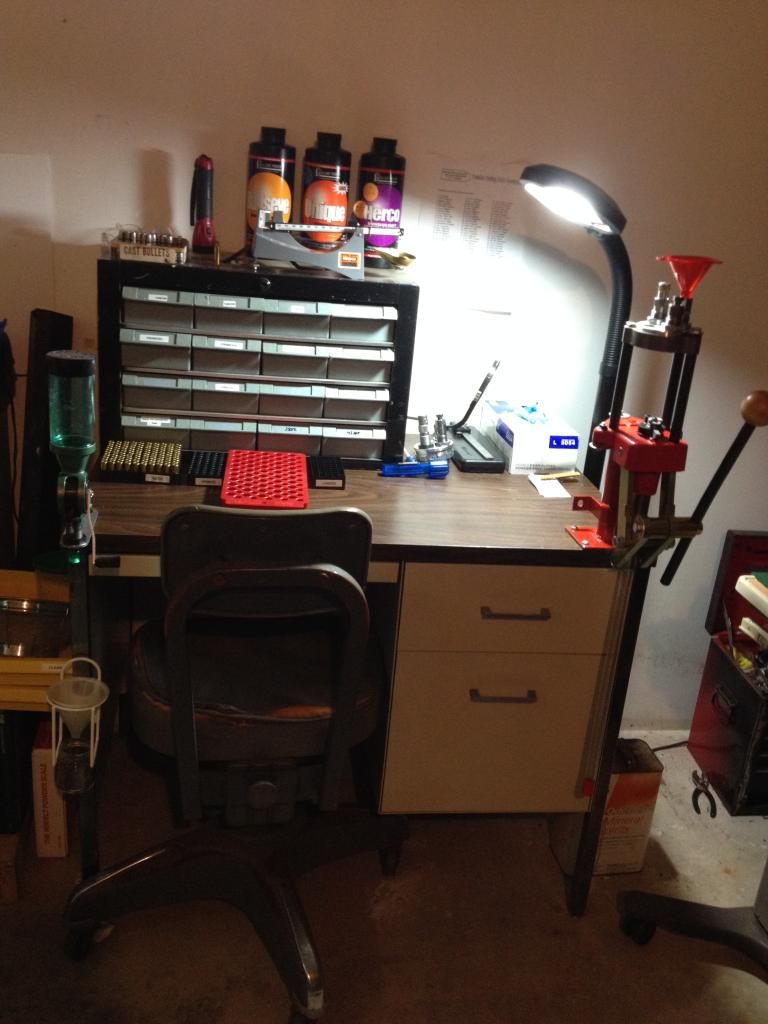
Time to resurrect this thread with my extremely modest bench. It might not have a lot of expensive high tech components, but I really enjoy it!
__________________
Jim
Last edited by Boogsawaste; 09-12-2014 at 08:38 PM.
|
|
The Following User Likes This Post:
|
|
09-13-2014, 09:16 AM
|
 |
Member
|
|
|
Join Date: Apr 2012
Location: The Republic of Texas
Posts: 91
Likes: 21
Liked 123 Times in 39 Posts
|
|
Draw up your plans and dimensions and all you need is plywood, 2x4's, and Simpson Strong Ties. Assemble, cover it with several coats of Sanding Sealer and you're done.
I put 3 or 4 coats of varnish on the top-side of my table-top, but that's optional.
Cheap $$$
|
09-13-2014, 04:32 PM
|
 |
Member
|
|
|
Join Date: Apr 2006
Posts: 17,799
Likes: 7,843
Liked 25,705 Times in 8,685 Posts
|
|
Well the one thing I have found in common with MOST of us Reloader's is that we all seem to be OCD "NEATNIC'S"! Me too!
Here are a few shots of my Workshop & Reloading room, crowded but neat!
By the way, I would suggest making your reloading bench very sturdy, heavy and stable. I venture to say that between all the materials, 2" thick top, supplies and lead on the shelves underneath, mine has to weigh well in excess of 1500 - 2000 pounds easily.
I would also urge you to avoid installing a TV in your reloading area - you need to pay 100% attention while reloading as mistakes happen very quickly when you are distracted.
Last edited by chief38; 09-13-2014 at 04:51 PM.
|
|
The Following User Likes This Post:
|
|
09-13-2014, 11:44 PM
|
|
Member
|
|
|
Join Date: Mar 2012
Posts: 267
Likes: 50
Liked 132 Times in 59 Posts
|
|
Lol, I was looking at the above pics and said, that room looks very familiar. Then I realized....it was chief 38's, a good buddy of mine. I've learned a lot about firearms and reloading in that room. It is also the cleanest room that I have ever seen. Here's mine!
G
|
03-24-2015, 12:33 PM
|
|
Member
|
|
|
Join Date: Mar 2013
Location: Central Texas
Posts: 12
Likes: 20
Liked 3 Times in 2 Posts
|
|
Quote:
Originally Posted by Dale53
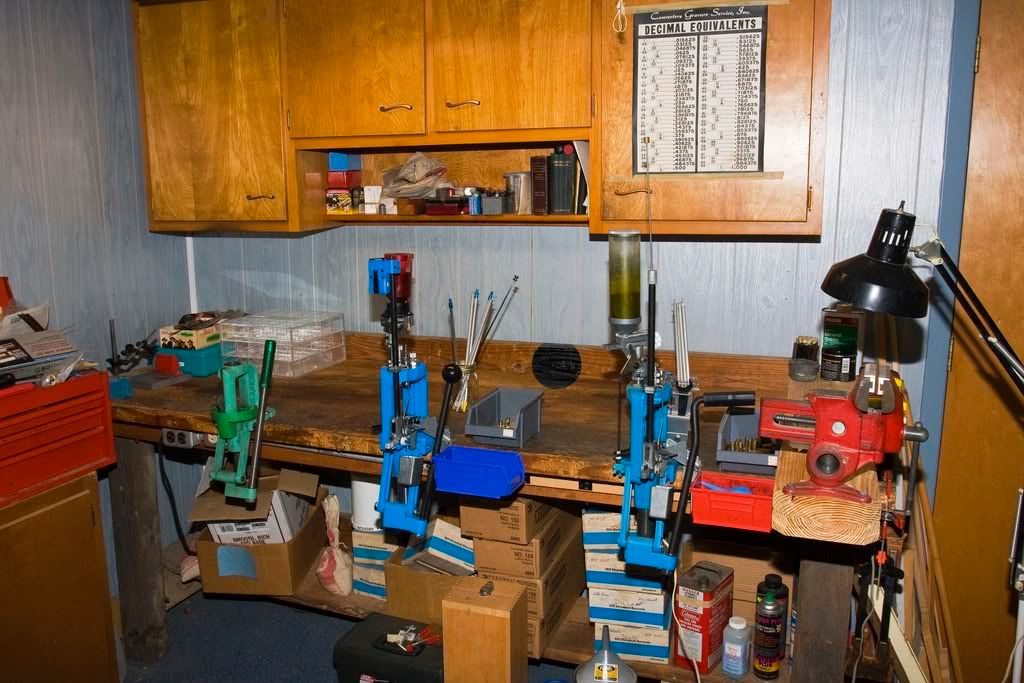
This bench was made entirely of salvage material. The kitchen cabinets were salvaged from a kitchen fire. The bench top was made from three 2X10's with a layer of 1/4" plywood top. The legs were telephone pole cross ties. The base is all bolted together and I have moved three times since it was built in 1962 and I take the top off intact and moved the assembled leg assemblies. It is bolted to the back wall and is EXTREMELY heavy and solid.
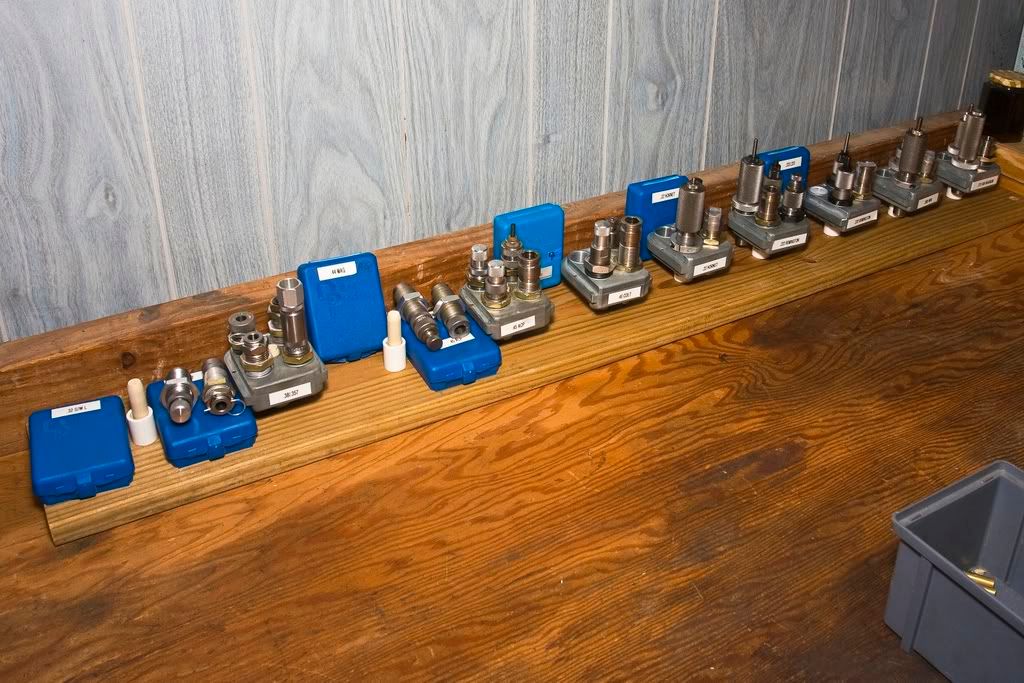
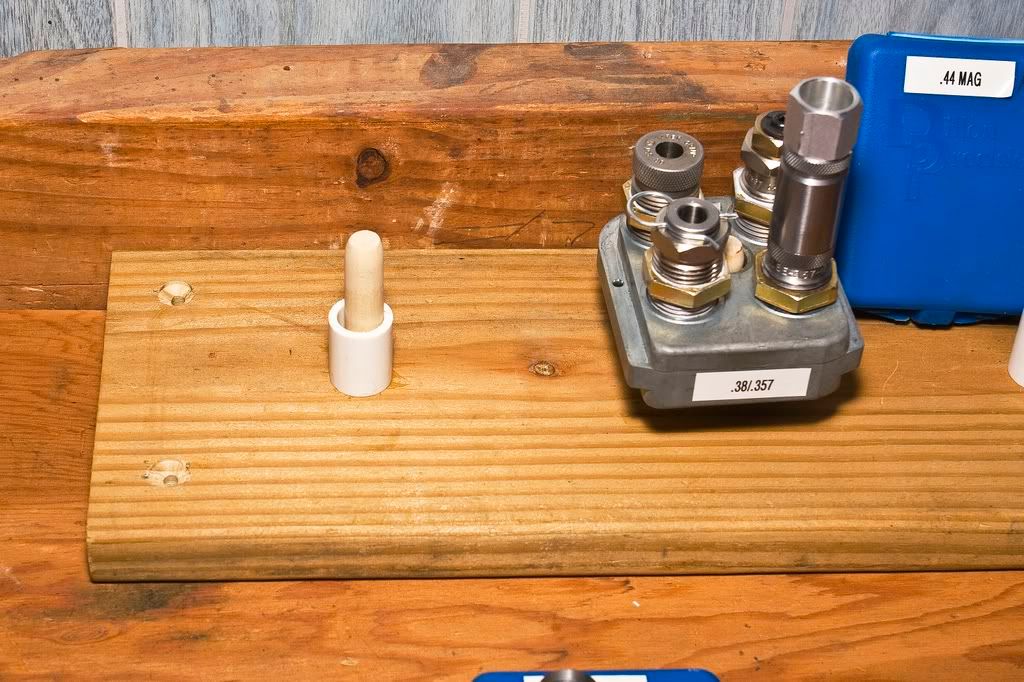
The die rack is simply a base board of 1"x6" (actual measurement) with pegs glued in holes of the appropriate size for the Dillon toolheads (individual Dillon racks were costly as I needed eleven of them). The 1" pvc spacers keep the decapping pins off the deck (don't need to bend them  ).
It cost only time to build and a VERY few dollars. Easily built with a builders saw (or a hand saw) and drill with bits. It is movable (movers just LOVED me (NOT) as it is quite heavy).
Dale53 |
Do you have any detailed plans or schematics for the the bench?

|
03-24-2015, 02:58 PM
|
 |
US Veteran
|
|
|
Join Date: Nov 2008
Location: Colorado
Posts: 7,520
Likes: 19,278
Liked 32,371 Times in 5,476 Posts
|
|
After looking at some of these outstanding set-ups I find my reloading room is kind of cheesy. Couple of Army surplus steel desks with presses, lubri-sizer, powder measures, and other equipment permanently mounted to them. Half a dozen old kitchen cabinets mounted to the walls to store stuff in. Old steel lockers salvaged from a school. Old dinette table to clean guns on or sort out stuff when necessary. Concrete floor that can be swept up every year or two if it really needs it. Plenty of old coffee cans, which are great for keeping brass organized (they don't make coffee cans like they used to so these are becoming precious). Last time I checked I still have a dozen unopened cans of powder that I picked up at a going-out-of-business sale about 30 years ago.
43 years of scavenging here and there. Don't think I have spent more than $20 on everything I couldn't salvage somehow.
I do my bullet casting in the garage where I have two doors and two windows to control airflow and provide good ventilation. Last time I looked I still have 3 five-gallon buckets full of old wheel weights and about 200 lbs. of linotype metal on hand, probably enough for 25,000 rounds or so of handgun ammo, but that won't stop me from salvaging some more when the opportunity arises.
Nothing fancy, but everything works and gets the job done.
|
|
The Following User Likes This Post:
|
|
03-24-2015, 04:11 PM
|
|
Member
|
|
|
Join Date: Aug 2011
Location: central, Ohio
Posts: 1,165
Likes: 1,038
Liked 1,305 Times in 542 Posts
|
|
A 6' x 18" bench top and cabinets I picked up from one of the home improvement stores.
Last edited by old&slow; 03-24-2015 at 04:15 PM.
|
01-24-2016, 02:12 PM
|
|
Member
|
|
|
Join Date: Jan 2016
Posts: 1
Likes: 0
Liked 0 Times in 0 Posts
|
|
Quote:
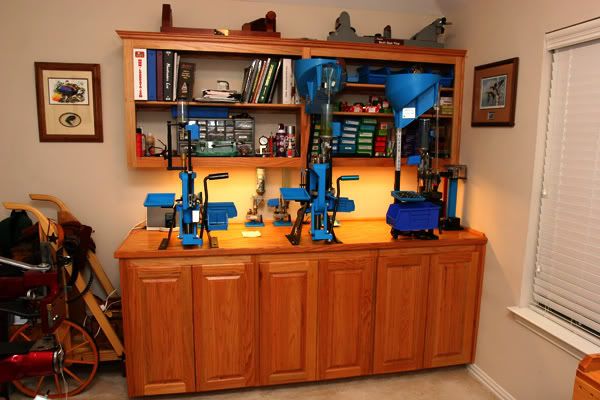
Originally Posted by R. Lewis
Here is a picture of my reloading bench. As mentioned by others, attach the bench to wall or studs for the most stable setup. I like to stand while I reload, so my bench is 36" from the floor.
 |
I know this will upset some, and I apologize for that (cold thread.)
However, I have an almost identical room and found your bench setup to be the best solution I have seen. Could you explain how you made it? I have looked for base cabinets without drawers, credenzas, etc. with no success. Was this custom?
|
01-24-2016, 03:11 PM
|
|
Member
|
|
|
Join Date: Mar 2013
Location: The Great State of Texas
Posts: 1,833
Likes: 2,061
Liked 1,356 Times in 701 Posts
|
|
I've seen base cabinets (34-35"H) with no drawers BUT look at wall cabinets (30"H plus build your own custom height toe kick box). You could also look at sink base cabinets with panel in place of drawer.
Quote:
Originally Posted by styles
I know this will upset some, and I apologize for that (cold thread.)
However, I have an almost identical room and found your bench setup to be the best solution I have seen. Could you explain how you made it? I have looked for base cabinets without drawers, credenzas, etc. with no success. Was this custom?
|
__________________
Really? U saw it in Wikipedia?
Last edited by smokindog; 01-24-2016 at 03:13 PM.
|
01-24-2016, 03:27 PM
|
 |
Member
|
|
|
Join Date: Mar 2006
Location: Colorado
Posts: 15,132
Likes: 91,836
Liked 26,387 Times in 8,412 Posts
|
|
You can get uppers as tall as 48",mount them to a toe kick any distance you like from the wall and fasten the counter to a stringer and the cabinets.Order some fillers and ply to make everything match
|
01-24-2016, 04:13 PM
|
 |
SWCA Member
|


|
|
Join Date: Mar 2011
Location: Nevada, USA section
Posts: 334
Likes: 343
Liked 126 Times in 58 Posts
|
|
Will be adding a second blue press to the bench soon.
__________________
Dave
SWCA #2465
Last edited by S&W HE; 01-24-2016 at 04:15 PM.
|
|
|
 Posting Rules
|
|
|
|
|


 Linear Mode

