|
|
 |
|

05-23-2008, 07:35 PM
|
 |
Member
|


|
|
Join Date: Aug 2005
Location: New Hampshire
Posts: 1,171
Likes: 212
Liked 838 Times in 262 Posts
|
|
I will soon be putting together a new reloading bench. I'm looking for good bench designs or plans. What tips have you got, what sort of "be sure to include...." type of things you can't imagine living without on your reloading bench. Probably 6 feet long at the most. Photos appreciated! Thanks much!
__________________
Geoff. Since 1960.
|
05-23-2008, 07:35 PM
|
|
Member
|
|
|
Join Date: Aug 2005
Location: New Hampshire
Posts: 1,171
Likes: 212
Liked 838 Times in 262 Posts
|
|
I will soon be putting together a new reloading bench. I'm looking for good bench designs or plans. What tips have you got, what sort of "be sure to include...." type of things you can't imagine living without on your reloading bench. Probably 6 feet long at the most. Photos appreciated! Thanks much!
__________________
Geoff. Since 1960.
|
05-24-2008, 04:13 AM
|
|
Banned
|


|
|
Join Date: Mar 2006
Location: Hoosier Land!
Posts: 4,379
Likes: 587
Liked 576 Times in 307 Posts
|
|
Just went through this myself.
It isn't much but it works for me right well.

Got the plans from:
http://www.hammerzone.com/archives/w...h/below20.html
I made a little modification to the width and height to fit in my specific area. Seems the more space I have on the top of the table the more junk seems to accumulate there!
FWIW
p.s. I have way less than $20 in mine as the lumber was free except the OSB.
Last edited by Skip Sackett; 12-22-2010 at 07:12 AM.
|
|
The Following User Likes This Post:
|
|
05-24-2008, 10:48 AM
|
|
Member
|
|
|
Join Date: Sep 2006
Posts: 51
Likes: 0
Liked 4 Times in 3 Posts
|
|

Good luck on your project. I built my bench 15 years ago and no brag, just fact, it's the best reloading bench you can have. The plans are available for $5 (along with other excellent info for beginning reloaders)from The National Reloading Manufacturers Assn www.reload-nrma.com The bench is large, free standing, super sturdy, and has planty of storage. I reload for numerous pistol, rifle, and shotgun rounds and cast bullets. Plenty of room for all. Get the plans and buy the lumber, plywood and hardware called for. Take it all to a local, professional cabinet maker and pay him to cut it all to the specifications. He won't screw it up but if he does he must do it over at no charge to you. You can then assemble it at home with a drill and wrenches. One suggestion I offer not mentioned in the plans is to add to the bench top a sheet of thin Masonite which is very smooth and makes clean up much easier. Also, fasten your presses and sizers to the bench with C-clamps so that they can be easily moved to more convenient places. No need to drill holes in your new banch! Have fun!!

|
05-24-2008, 05:06 PM
|
|
Member
|
|
|
Join Date: Sep 2000
Location: Broomfield, CO, USA
Posts: 102
Likes: 0
Liked 0 Times in 0 Posts
|
|
Best advice I have is to make sure your top is good and strong. Old solid wood door (real wood all the way through), doubled 3/4" plywood, maple butcher block for wood working benches etc. Then put it on a solid support that can be adjusted to the dips etc in the floor. You can buy these leveling glides if you have wooden 4x4 legs, or something similar if you have a metal leg. The last thing you want when you are doing some case-reforming is to have the bench top bend or have the bench rocking due to a leg that's just a little shorter than the other three.
|
05-24-2008, 09:39 PM
|
|
Member
|
|
|
Join Date: Mar 2007
Location: San Diego, CA
Posts: 754
Likes: 1
Liked 129 Times in 58 Posts
|
|
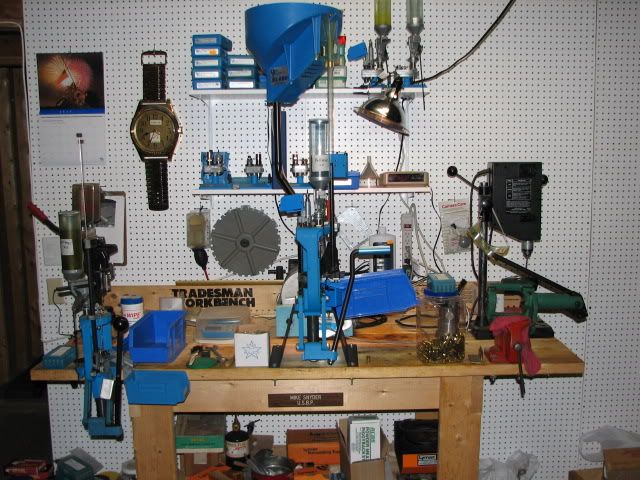
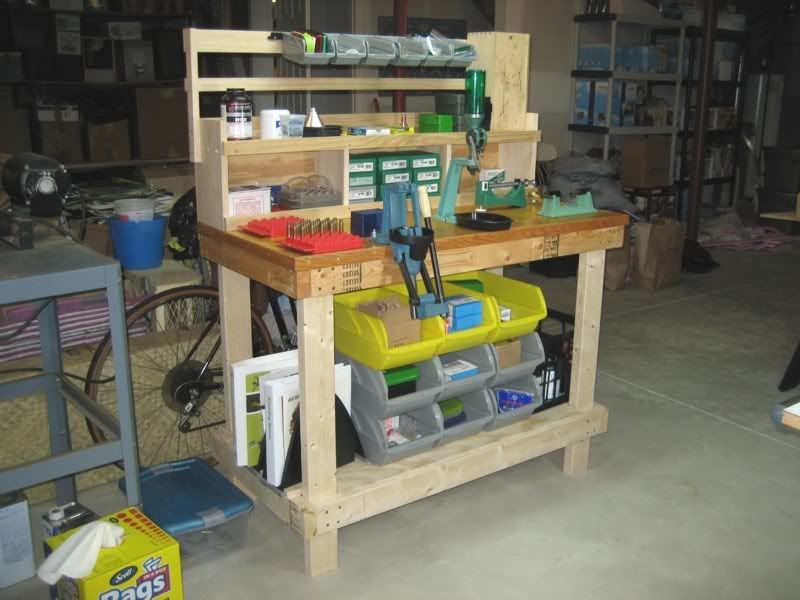
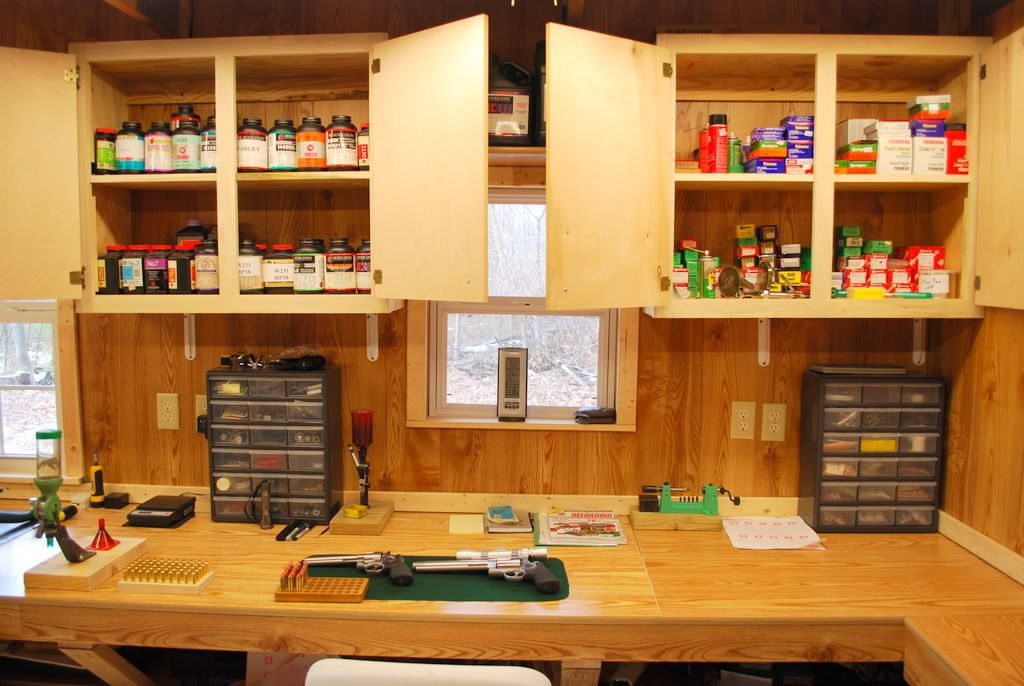
Here is an early pic of my bench, it's about 5 feet long and was initially set up for shotshell reloading (you can see the MEC on the right side) but subsequently I added a metallic area.
The top is made of 2x6's on edge and covered with a galvanized sheet metal top. 4x4 legs with a shelf about 10" off of the floor to keep reloading, gun cases, ammo boxes and stuff on.
It's made of 2x4's covered with 3/4" plywood. A very sturdy bench.
I installed two stainless steel tubes, about 12" long x 1" diameter, just below the benchtop which accept the slightly smaller tubes mounted on the MEC loader. (You can see the tubes at the base of the MEC.) It works rather well and keeps my benchtop available for smithing and such without the clutter. I simply switch the tubes mounted on the loader to another with wingnuts and away I go!
The large grey cabinet houses 4 MEC loaders and sizers, the white cabinets house primers, loading tools, powder and such. (The primers and powder are up high and in separate cabinets to avoid any low flying sparks.)
I really need to take another pic as the bench has progressed so you can see how it functions better.
Oh, the thing hanging overhead is a shot hopper that I made to hold 75# of lead shot, which I use a small hose connector to feed the shot bottle with. I saves the hassle of trying to feed shot bags up high and losing shot. It's on an overhead pulley that is in the rafters so all I do is lower it to the floor and pour the lead in..........works fantastic!

|
05-25-2008, 02:24 AM
|
|
Member
|
|
|
Join Date: Feb 2006
Location: Maine
Posts: 2,406
Likes: 137
Liked 864 Times in 187 Posts
|
|
Geoff,
Whatever your planning ~ It's not big enough 
Double it and add extra storage above it and under it............
I keep two RCBS single stages with powder drop measure between them for rifles and two Dillons next to them. One set up for small primers, the other large. Two lubrisizers are also mounted to the front set up for my usual .44 and .357 loads. Someday I'll add one for .45 Colt. That takes up eight feet of the face of my bench....
Buying used is the way to go. All that equipment cost less then $400 combined...Thank goodness for antique stores, pawn shops, and KTP......
Giz
__________________
Non gratum anus rodentum
|
|
The Following User Likes This Post:
|
|
05-25-2008, 06:00 AM
|
 |
Member
|


|
|
Join Date: Sep 2003
Location: Indiana
Posts: 3,586
Likes: 2,249
Liked 3,495 Times in 1,485 Posts
|
|
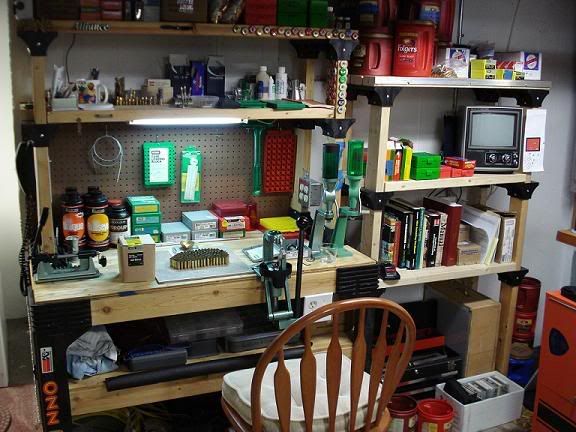
You must not make it too deep. You must consider what kind of press you will be using to consider how high you will make it. If you use a Dillon 650, you will want to reload standing up. With the Dillon "Strong Mount", it will raise the height of the press, so a lower bench top might be just fine. Also, the bench cannot be too sturdy and steady. I strongly advise you to secure it too a wall, if at all possible. This is absolutely necessary if using the Dillon 650 press. You can do this by using steel "L" brackets.
Here is mine:
|
05-25-2008, 07:25 AM
|
|
Member
|
|
|
Join Date: Sep 2007
Location: Southwestern Ohio
Posts: 2,337
Likes: 209
Liked 1,195 Times in 457 Posts
|
|
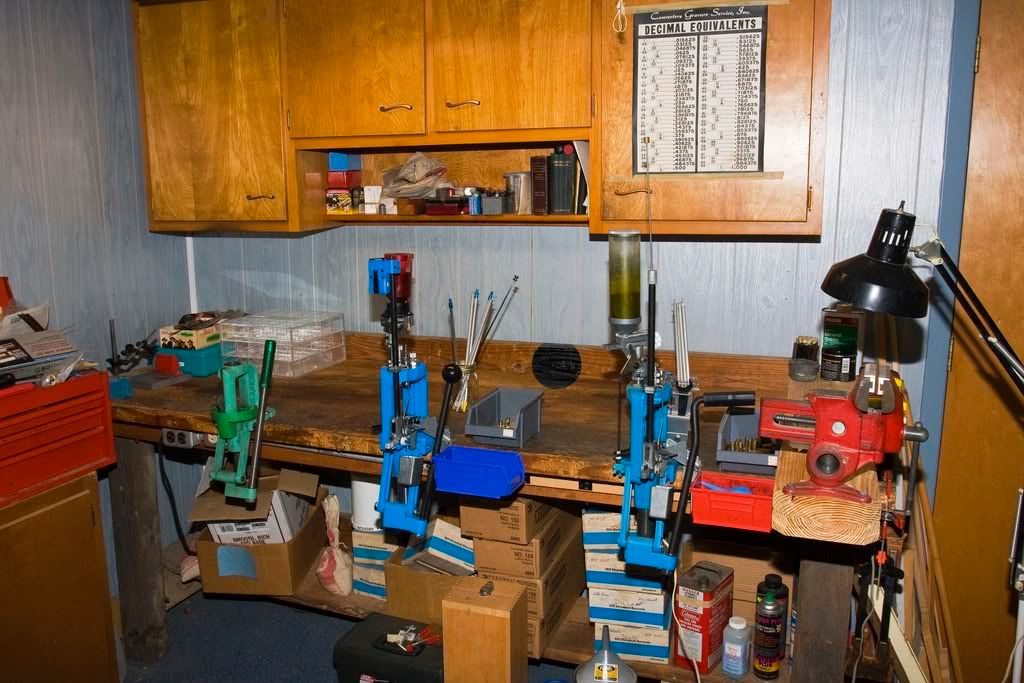
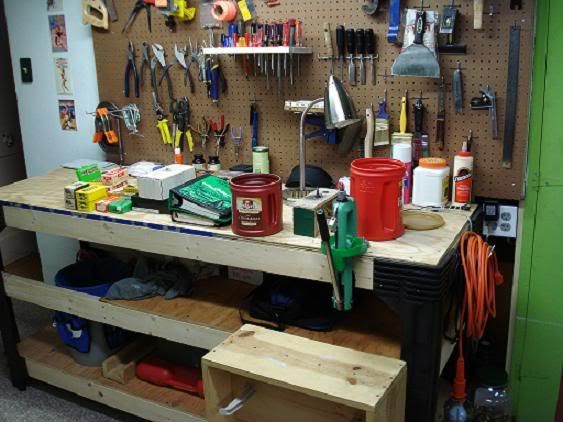
This bench was made entirely of salvage material. The kitchen cabinets were salvaged from a kitchen fire. The bench top was made from three 2X10's with a layer of 1/4" plywood top. The legs were telephone pole cross ties. The base is all bolted together and I have moved three times since it was built in 1962 and I take the top off intact and moved the assembled leg assemblies. It is bolted to the back wall and is EXTREMELY heavy and solid.
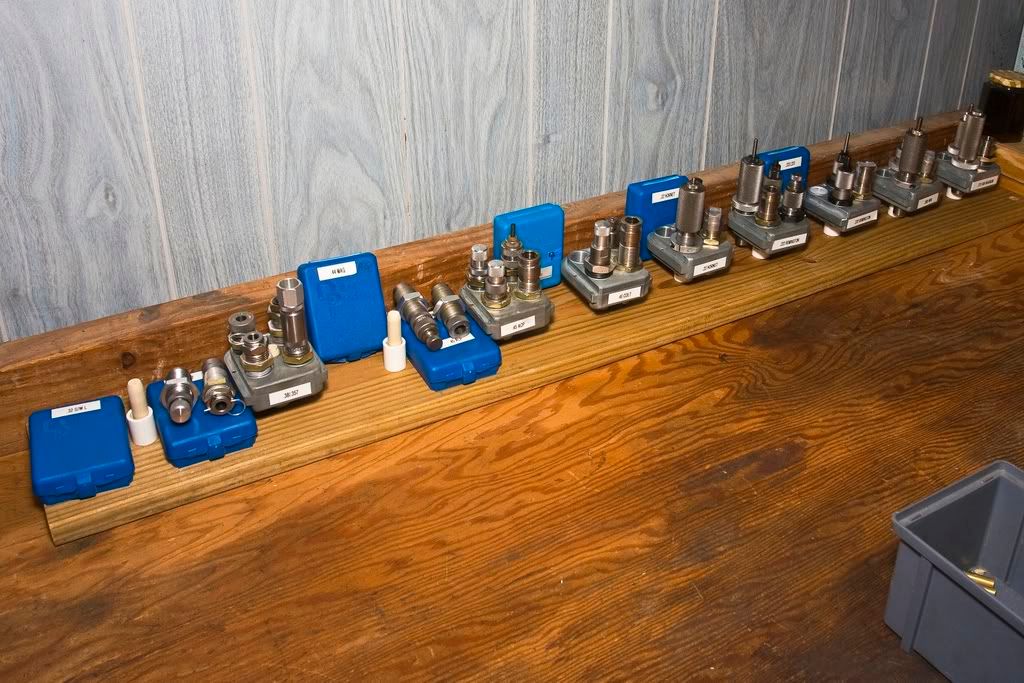
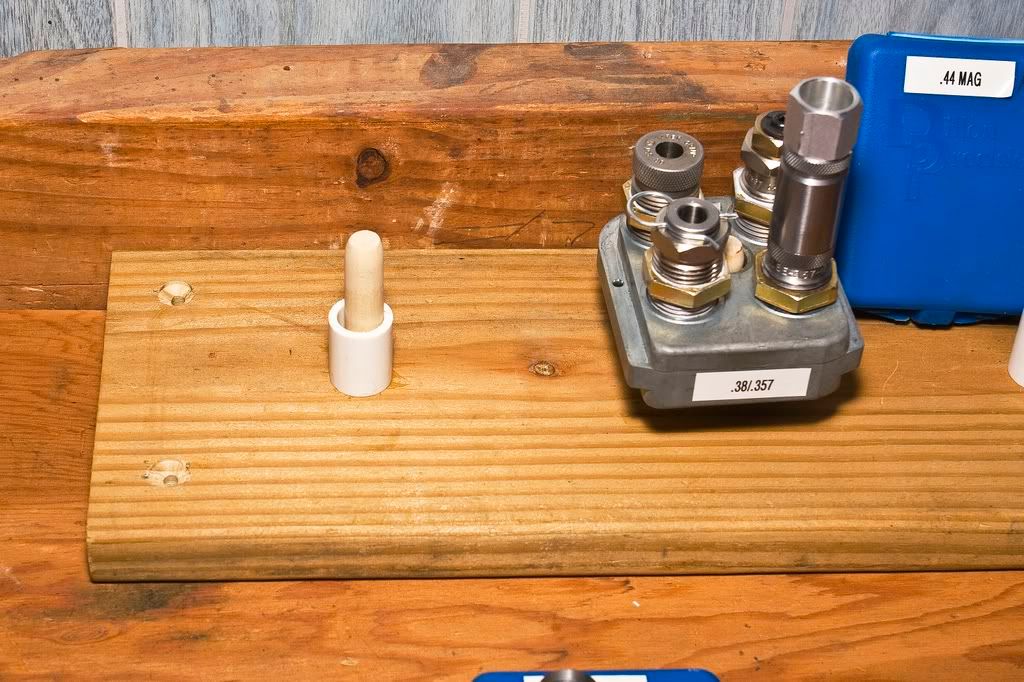
The die rack is simply a base board of 1"x6" (actual measurement) with pegs glued in holes of the appropriate size for the Dillon toolheads (individual Dillon racks were costly as I needed eleven of them). The 1" pvc spacers keep the decapping pins off the deck (don't need to bend them ).
It cost only time to build and a VERY few dollars. Easily built with a builders saw (or a hand saw) and drill with bits. It is movable (movers just LOVED me (NOT) as it is quite heavy).
Dale53
|
|
The Following 2 Users Like Post:
|
|
05-25-2008, 10:20 AM
|
|
Member
|
|
|
Join Date: Nov 2006
Location: Missouri City, TX
Posts: 13
Likes: 0
Liked 1 Time in 1 Post
|
|
Here is a picture of my reloading bench. As mentioned by others, attach the bench to wall or studs for the most stable setup. I like to stand while I reload, so my bench is 36" from the floor.
__________________
Robert Lewis
NRA Life Member
Texas State Rifle Association
Remember the first rule of gunfighting... "have a gun." Jeff Cooper
|
|
The Following User Likes This Post:
|
|
05-25-2008, 06:27 PM
|
|
Member
|
|
|
Join Date: Aug 2005
Location: New Hampshire
Posts: 1,171
Likes: 212
Liked 838 Times in 262 Posts
|
|
Thanks all. Nice bench set ups! I am of course cheap, and frugal is very much the point. I am thinking a 4 footer isn't going to cut it. A Rock Chucker on 1 end, Dillon 550 on the other, some storage, etc. and I want to be able to take it apart without too much trouble. Looks like for the first time in my life I am going to have an entire room, say 8X12 feet but I am not sure 'cuz I haven't measured it, to do with as I want to.  My space, all for me! Reloading, a smaller gun maintenance bench (the 4 footer probably), and I am thinking probably my computer set up. My fly tying will no doubt also end up in this room.
__________________
Geoff. Since 1960.
|
05-25-2008, 08:09 PM
|
 |
Member
|
|
|
Join Date: Jan 2008
Location: sunny Orygun
Posts: 2,910
Likes: 392
Liked 307 Times in 195 Posts
|
|
After a number of configurations, for my convenience I found having a bench separate for reloading, from my 'cleaning & fiddling bench' is very beneficial.
My reloading chamber is a 16'x16' square that incorporates the home canning storage in one end, the pressure tanks for the private well in another corner (all very out of the way and tucked in) and a large amount of 'multi-use room'.
I happened across a pigeon hole cabinet built for holding die boxes; so at 4x12 it server well. In another area I have an old pigeon hole cabinet with bins 6-8" high X 14" that hold a bunch of extra stuff, and another pigeon hole cabinet with 12x16" bins. My 650 is bolted to 2x10" which is one/half of the top (2-2x10"x6' long)
Has 1 1/2" pipe legs screwed into threaded brackets screwed onto bottom. Bottom shelf made of old angle iron that has screw-bolts at each corner. Can take the whole thing apart if needed.
My first bench was of the school of "heavier is better". 2x10 works fine, and it never moves around. Isn't bolted to wall or floor, but probably the considerable supply of cast lead on the bottom shelf stabilizes it.
Have a half-sheet of plywood laying on 2 3-drawer filing cabinets on other side of room for cleaning, etc.
Will try to get a photo up for this, it sounds more complicated than it is.
__________________
Dum vivimus Vivamas
|
05-26-2008, 04:37 PM
|
|
Member
|
|
|
Join Date: Sep 2004
Location: southern Ind
Posts: 12
Likes: 0
Liked 0 Times in 0 Posts
|
|
After building my bench, I had a problem of it flexing when I raised the ram of my lee turrent, so I mounted a 2x4 directly under the press down to the floor, all flex problems solved.
|
05-26-2008, 06:31 PM
|
|
Member
|
|
|
Join Date: Feb 2008
Location: Fayetteville, Arkansas
Posts: 279
Likes: 0
Liked 2 Times in 2 Posts
|
|
Geoff, I hope this helps.
I have attached some photos of my latest bench which I built a couple of years ago.
I think the most important consideration are proper height and sturdiness.
My bench is 39.5 inches high which allows me to load standing or sitting on a stool. It is anchored to the wall by a knee brace which provides rigidity and resists uplift. I am 5 feet 10 inches tall and it works for me.
I use a section of a steel wide flange beam to set my scale and clamp powder measures. It is heavy enough to stay put during operation and can still be moved for convenience. I am an architect and I pay attention to ergonomics.
I am fortunate in that I have a 1500 square foot shop/studio for my toys. My reloading section is heated and cooled with a heat pump to keep everything at a proper temperature.
I hope this helps.
I have also shown a gun vise which I made many years ago from oak. Anyone can make one. I use leather to pad the jaws. It has served me well.
Lafayne
   
|
05-26-2008, 07:01 PM
|
|
Member
|
|
|
Join Date: Feb 2008
Location: Fayetteville, Arkansas
Posts: 279
Likes: 0
Liked 2 Times in 2 Posts
|
|
Geoff,
I looked at the other bench photos and while storage is nice, I personally don't like cabinets under the bench because I like the leg room for a stool - maybe just because I am older and lazier.
Just make sure it works for you. With the proper height - experiment before you build - you can load standing or sitting although some operations I only do standing. Also, 36 inches is the standard kitchen cabinet height and has been forever, but it is not the correct height for me to load. Don't buy base cabinets at Lowes or Home Depot just because they are 36 inches tall with the top. Don't be concerned about drilling the top for bolts - it's just a loading bench and not your dining table. Clamp the presses for a while to get the feel of things then bolt them in place.
Just my opinion. Good luck and good shootin'.
|
|
The Following User Likes This Post:
|
|
05-27-2008, 01:17 PM
|
|
SWCA Member
|

|
|
Join Date: Oct 2003
Location: Massachusetts, USA
Posts: 794
Likes: 0
Liked 968 Times in 219 Posts
|
|
Howdy
Here is my little slice of reloading heaven. No, it does not usually look this neat, I cleaned it up for the photo.
I recommend making a bench as long as the space will allow. This layout developed over time, the bench on the left came first. It is only 5 feet long, and soon prooved to be too short to accomodate all the equipment I wanted to put on it. Six feet would have been better. I agree, don't make it too deep, you can only reach in so far in comfort. Deeper than that and the benchtop becomes a catchall for litter. I also agree that 36" high may not be ideal for everybody. My benches are more like 38" tall. To reload shotshells I sit on a high stool. To use my progressives I sit in a rolling office chair. You can never have too much storage space.
Do make it as heavy and stable as possible. You are exerting an incredible amount of force when you crank the handle of a loading press. I found 3/4" plywood to be too flexible, I doubled up the plywood on the edges to make the bench top stiffer.

|
05-27-2008, 01:47 PM
|
 |
Member
|

|
|
Join Date: Jun 2003
Location: KC Area
Posts: 1,621
Likes: 231
Liked 284 Times in 97 Posts
|
|
Geoff,
Here are a couple thoughts after building this set-up...
Dimensions:
39" deep
39" tall
98" wide
My bench is too deep (for me and I'm tall), needs to be 32-33" deep.
I have mine screwed into the wall studs.
I added the center support "leg" to cut vibration.
I keep the middle shelf full of heavy things...bullets etc...again to cut vibration.
You need LOTS of electrical outlets. Recently added several ceiling & wall outlets...wish I had a power strip along the front...oh well.
Keep a fire extinguisher handy.
White (light reflecting) Pegboard...the KEY to life!!!
Shelves on the pegboard are good.
You can NOT have too much light!
Made of 2/4s and plywood.
Good luck!!!!
Bob

__________________
"Onward thru the Fog"
|
07-23-2008, 02:59 AM
|
|
US Veteran
|
|
|
Join Date: Feb 2008
Location: The Bluegrass state
Posts: 1,445
Likes: 1,046
Liked 1,922 Times in 607 Posts
|
|

fly tying & reloading bench.
this is an old pharmacy work station that was being disposed of, sometimes its worth the effort to beg.
|
07-25-2008, 11:16 AM
|
 |
Absent Comrade
|

|
|
Join Date: Mar 2002
Location: Craig, Montana
Posts: 3,093
Likes: 363
Liked 2,346 Times in 893 Posts
|
|
I strongly suggest the bench design from the NRMA site that TREE posted. I did my original bench exactly from those plans THIRTY years ago.....moved it SEVERAL times and it's still ROCK SOLID.
I've since done two more from basically the same design; a seven and an eight footer. Both solid and a lot of storage space below.
FN in MT
|
|
The Following User Likes This Post:
|
|
12-25-2008, 10:14 AM
|
 |
US Veteran
|


|
|
Join Date: Sep 2006
Location: Occupied Colorado
Posts: 922
Likes: 45
Liked 753 Times in 344 Posts
|
|
This thread needs a boost...

Agreed, LOTS of light, LOTS of support, and you just can't have enough storage. Or enough presses, or bullets, or brass, or powder, or primers, or guns.........
Jeff
__________________
Fight socialism. Never stop.
|
12-28-2008, 04:33 PM
|
 |
Absent Comrade
|
|
|
Join Date: Apr 2007
Location: North Carolina
Posts: 541
Likes: 0
Liked 12 Times in 8 Posts
|
|
Dale53:
I made my own version of your die rack. Great idea! I picked up a 1X4 length of Poplar, drilled 1/2 inch holes 6" on center, and glued in 3-1/2 inch lengths of 1/2 inch dowel. I cut sleeves out of 1/2 inch PVC, about 1-1/4 inch long to keep the pins off the board. It's not a "finished" looking as yours yet, but it is a work in progress. 
Thanks for the idea.
Frank
__________________
sona si latine loqueris .
|
12-28-2008, 05:12 PM
|
|
Member
|
|
|
Join Date: Sep 2007
Location: Southwestern Ohio
Posts: 2,337
Likes: 209
Liked 1,195 Times in 457 Posts
|
|
FrankD45;
I'm glad you found the sharing of ideas helpful. That's the whole idea of these forums.
No one person can possibly "know it all", but with hundreds of us, the answers ARE there for most any endeavor.
Dale53
|
12-29-2008, 09:50 PM
|
|
Member
|
|
|
Join Date: Jun 2003
Location: KC Area
Posts: 1,621
Likes: 231
Liked 284 Times in 97 Posts
|
|
thomashoward,
Nice setup! The cabinet space is a real plus.
Bob
__________________
"Onward thru the Fog"
|
02-07-2009, 09:24 PM
|
|
Member
|
|
|
Join Date: Dec 2008
Posts: 4
Likes: 0
Liked 15 Times in 3 Posts
|
|
|
|
The Following 14 Users Like Post:
|
carl730, Collects, COYOTEHUNTER, Duckford, g8rb8, johnc486, md8232, Nedroe, old&slow, Rule3, Scarbrod, Scott E White, tunaboat |
02-07-2009, 10:01 PM
|
|
Member
|
|
|
Join Date: Sep 2007
Location: Southwestern Ohio
Posts: 2,337
Likes: 209
Liked 1,195 Times in 457 Posts
|
|
Matlock;
That is as pretty as it gets! Entirely too clean and orderly, however ...
Dale53
|
02-07-2009, 10:44 PM
|
|
Member
|
|
|
Join Date: Dec 2008
Posts: 4
Likes: 0
Liked 15 Times in 3 Posts
|
|
Dale,
Thanks! I am just moving into it in these pictures, so it is getting less "orderly" over time. Several things help though. 1. Lots of cabinets to hide things 2. a 12" shelf running the full length of the bench to store stuff 3. a larger area above the rafters to store bulky items (wads, cleaning rods, targets)
The shed has a 3' overhang to keep the barrels dry in rain and the back stop for the rifle range is 4 tractor tires bolted together filled with sand to make a 6' tall ~6' wide backstop.
MarkM
|
02-08-2009, 01:52 AM
|
|
Member
|
|
|
Join Date: Jun 2003
Location: KC Area
Posts: 1,621
Likes: 231
Liked 284 Times in 97 Posts
|
|
MarkM,
That's just way too cool! Thanks for letting me dream!!
Welcome to the Forum!!
Bob
__________________
"Onward thru the Fog"
|
02-09-2009, 07:28 PM
|
|
Member
|
|
|
Join Date: Dec 2007
Posts: 271
Likes: 31
Liked 39 Times in 21 Posts
|
|
Matlock, that's one heck of a setup!
Mine's a bit more humble.


Do you just live right or did you win the lottery or something?
|
02-09-2009, 08:28 PM
|
|
Member
|
|
|
Join Date: Dec 2008
Posts: 4
Likes: 0
Liked 15 Times in 3 Posts
|
|
Bob,
Thanks for the welcome. This looks like a great place to hang out. On the bench I did leave my 629 and 460XVR sitting out so you could tell I'm a S&W fan.
Enidpd804,
A few years ago moved to a place where I could shoot on my property. My reloading bench was in a closet that you can see in pic 2 next to the gun cabinet. Then I had a "workmate" with a top for my MECs that I could set up temporarily to load shotgun shells. We live in Illinois though and it's either too cold or too hot and humid to shoot as much as I would like, so I just decided to build a shooting shed then decided I should make it big enough to reload in as well.
MarkM
|
02-10-2009, 11:07 AM
|
|
Absent Comrade
|
|
|
Join Date: Mar 2002
Location: Craig, Montana
Posts: 3,093
Likes: 363
Liked 2,346 Times in 893 Posts
|
|
Matlock,
Your my new HERO! Great setup. Well lit, and organized too.
I get kidded for being so OCD regarding cleanliness and organization by my shooting buddies regarding my reloading gear and reloading in general. Then again I've never had any issues with my reloads such as double charges or no powder, etc. Organization and cleanliness pay off.

This is a shotshell bench made to the NRMA design; top and bottom shelf bolted to legs, bottom shelf, plywood back and side pieces for strength. Weight of shot and components on the shelf help to make it rigid and stable.
This is 36" deep as I wanted max bench space. Length is a full eight feet. This was before I mounted a STAR lubrisizer on the left side opposite the Spolar shotshell loader.
FN in MT
|
02-10-2009, 11:12 AM
|
|
Absent Comrade
|
|
|
Join Date: Mar 2002
Location: Craig, Montana
Posts: 3,093
Likes: 363
Liked 2,346 Times in 893 Posts
|
|

This is the NRMA bench made exactly to their plans. My Dad and I built this 30+ years ago. It's been broken down and rebuilt multiple times over the years. Yet is still as stable as a the day we built it.
Sorry that this is a bit dark. In retrospect I should have never had finished it in dark stain. LIGHT stain or natural is THE way to go.
My shotshell bench and my work/cleaning bench are both natural with Varathane matte finish and they look much nicer. And the light finish reflects light too.
FN in MT
|
|
The Following User Likes This Post:
|
|
02-10-2009, 01:04 PM
|
|
Member
|
|
|
Join Date: Jan 2009
Location: E. Ohio
Posts: 76
Likes: 2
Liked 17 Times in 13 Posts
|
|
Matlock that is the best setup I have ever seen! My dream is to have a place where I can have my own range, but your "shooting/reloading house" takes the cake.
Joe
|
02-10-2009, 09:32 PM
|
|
Member
|
|
|
Join Date: Dec 2008
Posts: 4
Likes: 0
Liked 15 Times in 3 Posts
|
|
Frank, Joe,
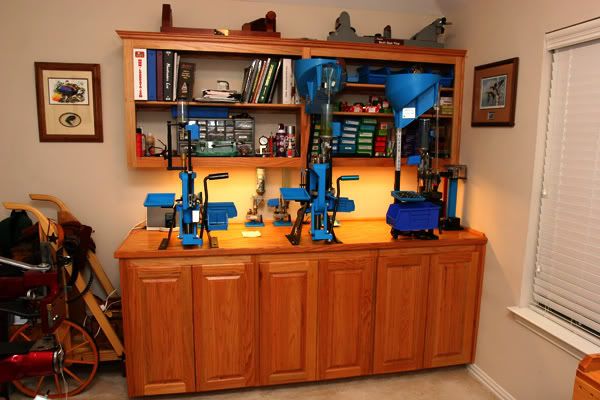
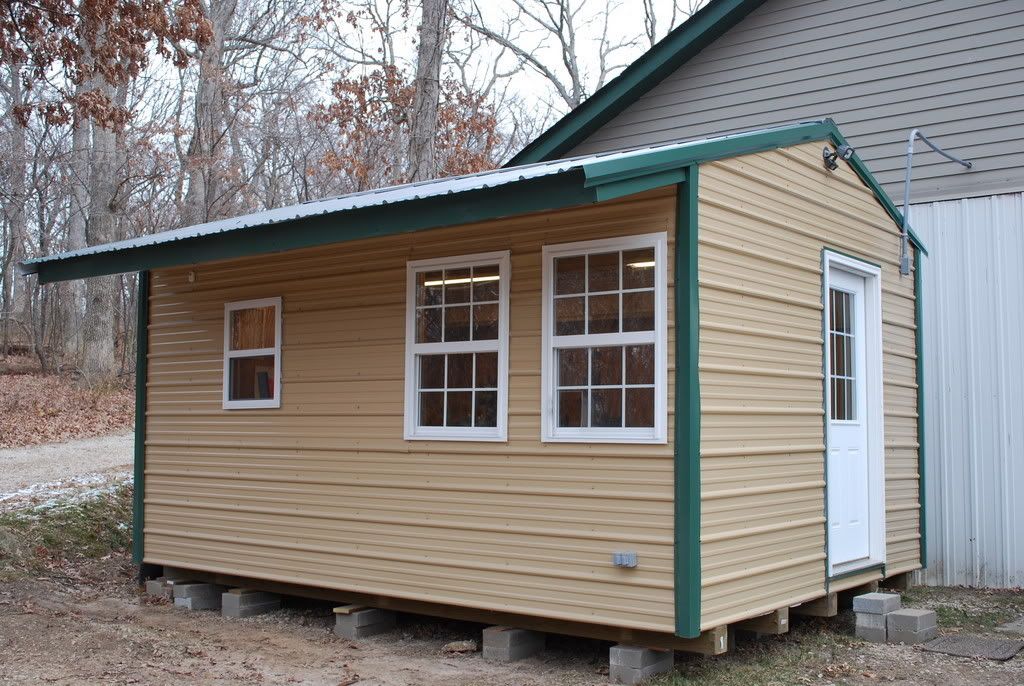
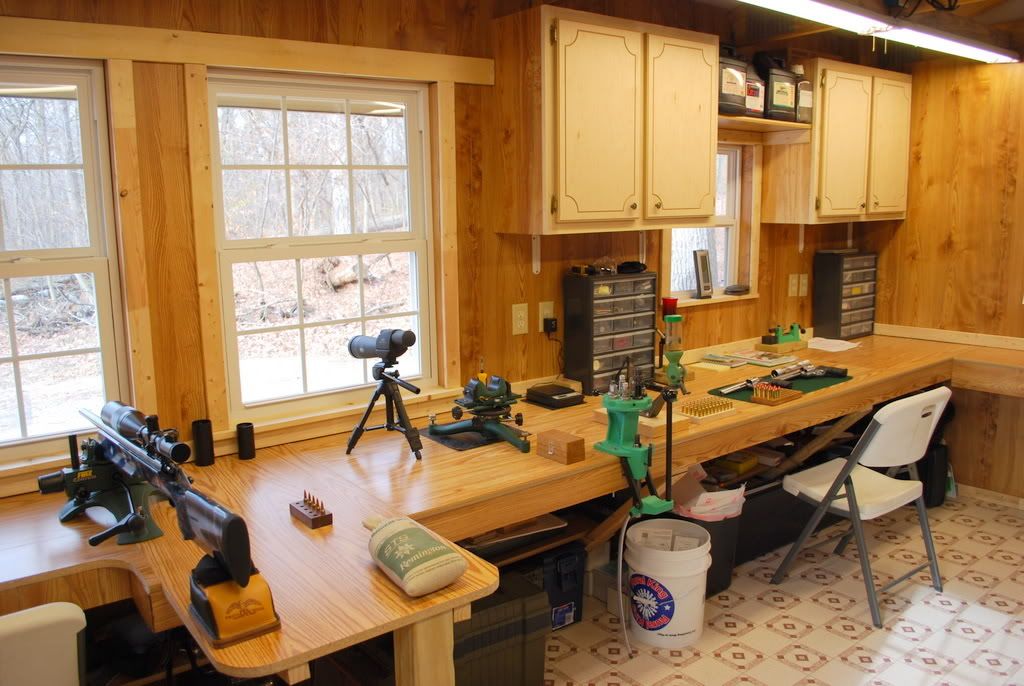
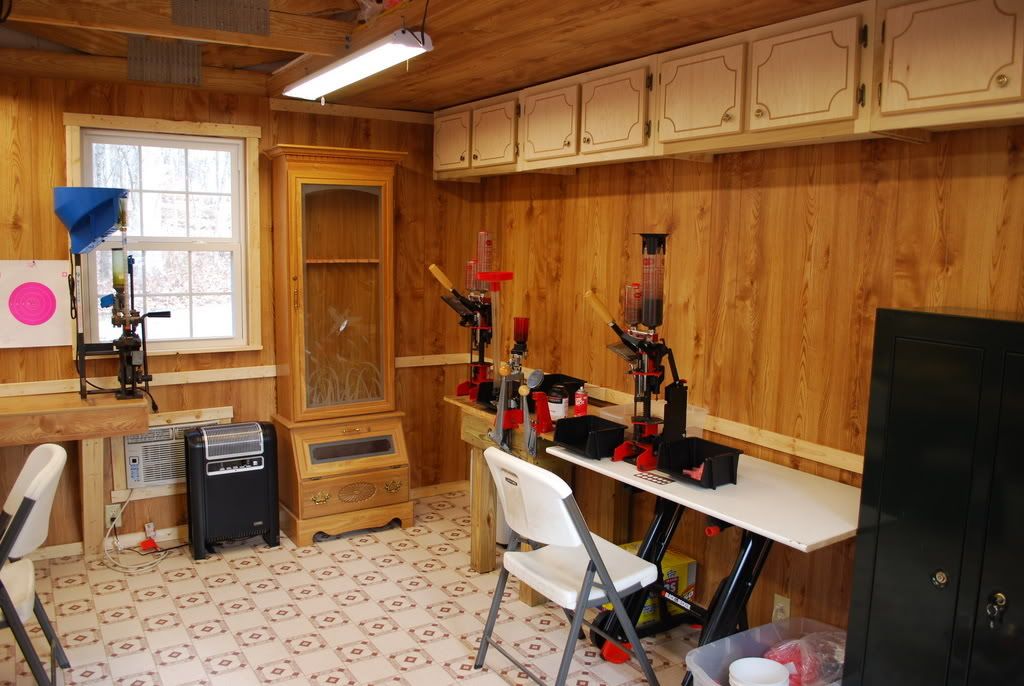
Thanks for the kind words. To give everyone a bit better idea of the construction, below is a picture of the exterior. You can see the two windows (for the shooter and spotter) as well as the overhang to keep the rain away from the windows. The small window provides extra light at the metallic reloading bench. R11 insulation is in the walls, ceiling and floor. This winter 1500 watts could keep the inside temperature 40-45 degrees above the outside temperature. If you open the window then a second electric or portable propane can make it very warm. The building is on five 6"x6" beams supported on 25 concrete block pads. The eliminated having to deal with a building permit.
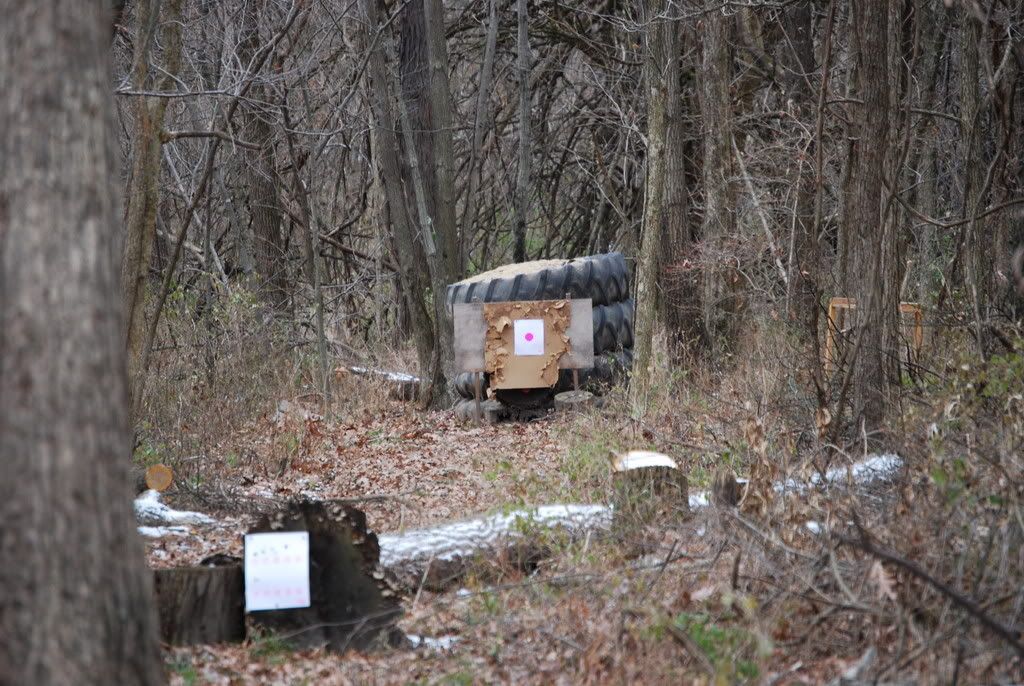
The next picture shows the sand filled tractor tire backstop for center fire rifles. I also use tree stumps for rimfire targets and have a metal plate(at 45 degrees)/wood support for targets at for various distance pistol shooting.
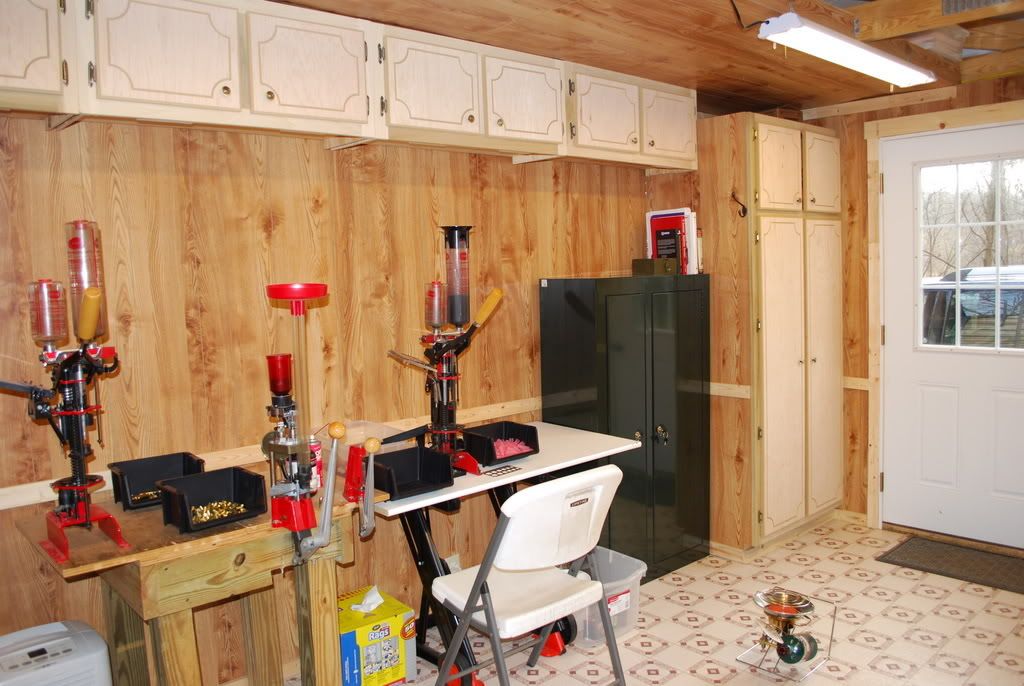
This last picture shows the interior entrance and a closet in which the brass tumbler, spare MECs and other larger stuff is stored. Frank commented on having enough light and he is exactly right. I put in five overhead florescent shop lights and it is just enough. They are switched in groups and when shooting I may turn some off to brighten the scope image.
Joe just like you I always dreamed of my own range and a few years ago that became possible. The lots in this area are narrow but a 1/4 mile long so it fit the need perfectly. Many of my neighbors also shoot judging by the amount of gunfire I hear on a pretty day.
Matlock
|
|
The Following User Likes This Post:
|
|
02-11-2009, 05:02 AM
|
|
Absent Comrade
|
|
|
Join Date: Apr 2007
Location: North Carolina
Posts: 541
Likes: 0
Liked 12 Times in 8 Posts
|
|
Matlock, you are living my dream! I probably shouldn't complain because I only have to drive about 30 miles to get to an outdoor range and I can buy and shoot just about anything I lust after. That said, you have put together one of the nicest set ups I have seen.
FrankD
__________________
sona si latine loqueris .
|
02-12-2009, 08:55 PM
|
|
Member
|
|
|
Join Date: Mar 2007
Location: Chagrin Falls, Ohio
Posts: 5
Likes: 0
Liked 0 Times in 0 Posts
|
|
My reloading bench is pretty plain and simple. It's made of 2 x 4 lumber and plywood. It is rock solid and heavy with pretty usable space. I've probably got $100 in it. I bought all clear and straight lumber for some what of a premium but I built the whole thing in about a day.
|
02-13-2009, 06:57 AM
|
|
Absent Comrade
|
|
|
Join Date: Apr 2007
Location: North Carolina
Posts: 541
Likes: 0
Liked 12 Times in 8 Posts
|
|
First, welcome to the forum. Lots of very sharp guys here, lots to learn and contribute.
That looks like a really nice, repeatable design. If you add a press or other stuff you can just build another bench and bolt them together. Good work!
Frank
__________________
sona si latine loqueris .
|
02-15-2009, 06:55 AM
|
|
Member
|
|
|
Join Date: Mar 2006
Location: Assumption, IL
Posts: 3
Likes: 0
Liked 0 Times in 0 Posts
|
|
Hey Mark,
Those are pretty impressive pictures of your "shootin' shed". I can't imagine where you came up with the idea of a "shootin' shed". Just kidding - Mark is my brother and we do lots of shooting together. In my back yard, I have a 300 yard shooting range with a converted chicken into a wood stove heated and air conditioned "shootin' shed". My reloading stuff is in my basement however.
Mark did have a little help in design and lining up the builder from his little brother "Mikey".
|
02-15-2009, 08:13 AM
|
 |
US Veteran
|
|
|
Join Date: Oct 2005
Location: S.E. USA
Posts: 1,942
Likes: 0
Liked 63 Times in 37 Posts
|
|
Matlock, there just has to be something illegal or immoral about having such a great set up! Not that I'm jealous mind you.
|
02-15-2009, 08:24 AM
|
|
Banned
|
|
|
Join Date: Jan 2004
Location: Columbia, SC
Posts: 225
Likes: 0
Liked 0 Times in 0 Posts
|
|
Try going to your local big box construction store like Home Depot or Lowes. Look for the Simpson StrongTies display. They are metal hangers and clips that form the corners and angles that you nail through. They will have a boatload of plans hanging up to take with the ties. It really makes for a strong bench. Use at least 3/4" plywood for the top and I would put a formica like laminate on it with contact cement.
http://www.strongtie.com/ftp/fliers/DIY-PROJECTKT06.pdf
|
02-15-2009, 10:16 AM
|
|
Member
|
|
|
Join Date: Nov 2006
Location: NE ohio
Posts: 314
Likes: 14
Liked 11 Times in 7 Posts
|
|
Matlock- the shed looks nice but the four tires is an accident waiting to happen... bounceback is a reality with that set up!
Security of the shed would be a concern... especially with the non shaded windows etc.
|
02-15-2009, 12:07 PM
|
 |
Member
|
|
|
Join Date: Mar 2007
Location: Eastern PA
Posts: 32
Likes: 5
Liked 1 Time in 1 Post
|
|
A lot of people have some great set-ups here... Similar to the Strong Tie bench corners are some products I used to make my benches and shelves. They are from 2x4 Basics ( www.2x4basics.com) and are extremely sturdy. The kit comes with the resin parts as well as screws and some plastic hangers, etc. Home Depot used to carry them, but don't seem to anymore. I purchased a bench and shelves kit on Amazon for $30 with free shipping. Some examples:
|
12-25-2010, 05:17 PM
|
|
Banned
|
|
|
Join Date: Mar 2006
Location: Hoosier Land!
Posts: 4,379
Likes: 587
Liked 576 Times in 307 Posts
|
|
 Since you asked!
Since there is a thread already dedicated to the "man cave" I guess I will just add to it rather than create a new one!
So, here goes!
Enter only if you qualify!
Storage Shelves:
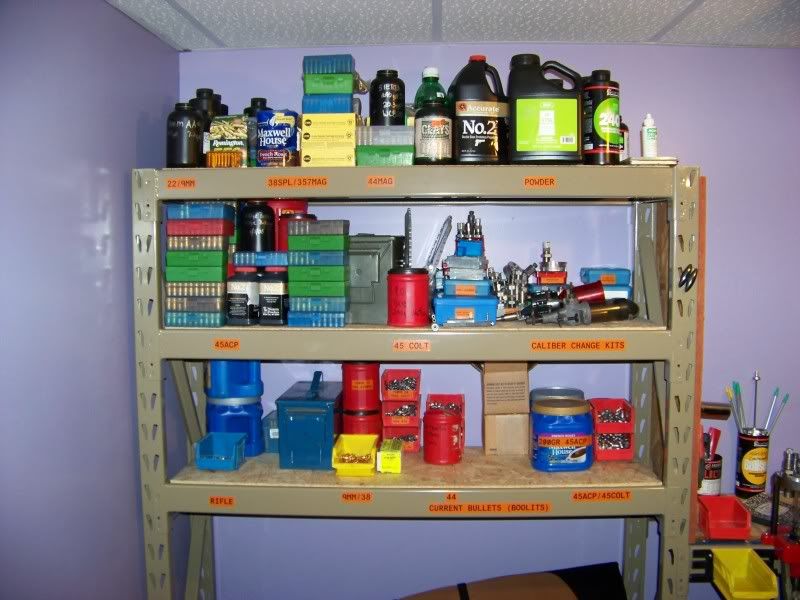
(I think I have enough 45ACP!)
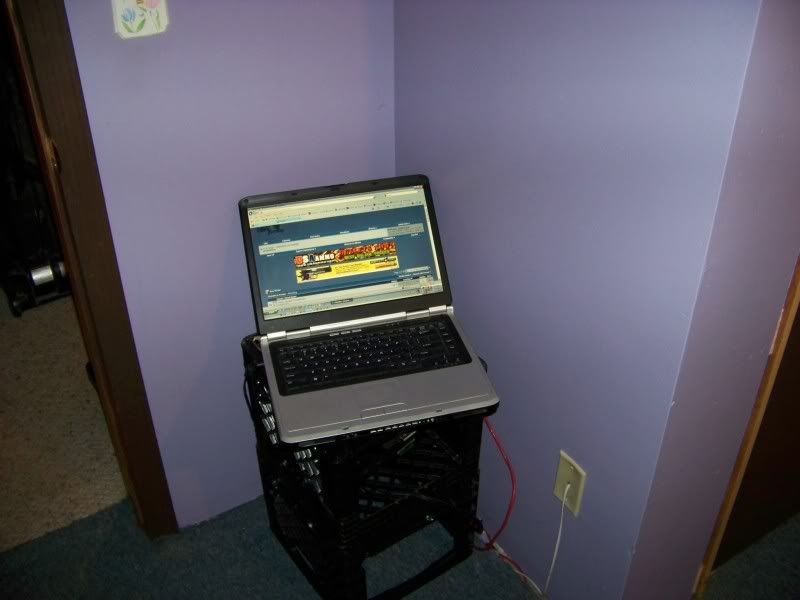
Computer in the corner: (On the Smith & Wesson Forum of course!)
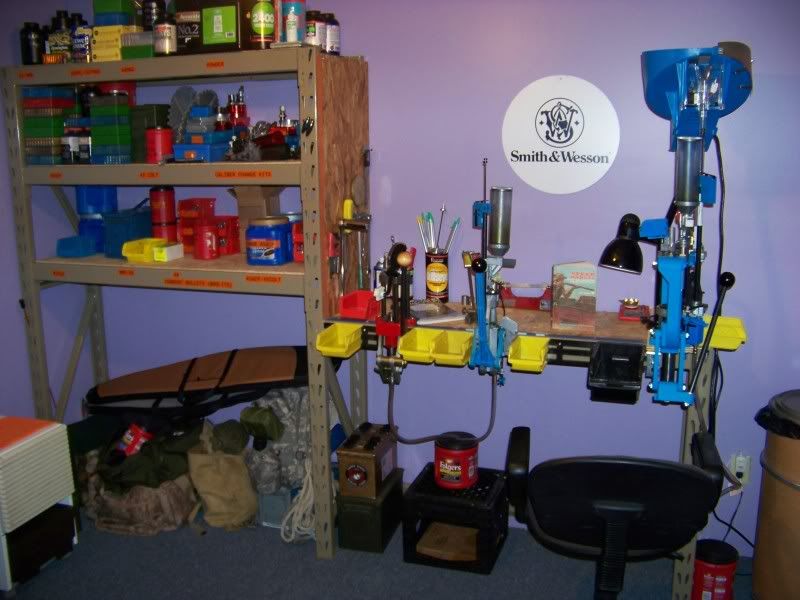
Bench with presses. XL650 on the right, Square Deal B in the middle and a Lee Classic Cast Turret Press on the left: (Notice the manual on the bench!)
While I was organizing things, I found several empty ammo boxes. Since everything was clean and organized, I felt it my duty to "christen" it today too. I chose the load that I started it all with a couple of decades ago. 3.5gr of Bullseye under a 160gr LSWC! (Bet you thought it would have been "THE LOAD"!  )
Primers are in the old room. It will get cleaned up and will be my primer/bullet lubing/bullet storage area.
At any rate, Merry Christmas. All of the kids are coming over on Monday for our Christmas.
p.s. I loaded 150 of those loads on the XL650 in about a tenth of the time I did when I started loading, even with a caliber change!
|
12-26-2010, 09:05 AM
|
|
Member
|
|
|
Join Date: Oct 2002
Location: Indiana USA
Posts: 1,145
Likes: 3
Liked 203 Times in 108 Posts
|
|
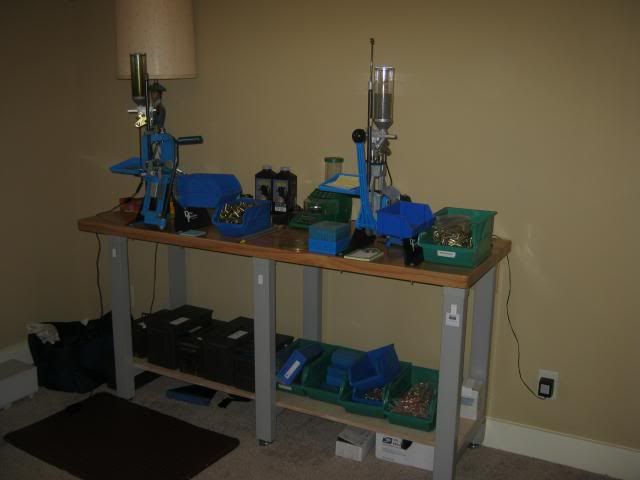
Baker's Table/Reloading Bench............
Several years ago I decided to move my reloading area from the basement to an extra bedroom on the upper level of my home. I wanted a nicer bench than the one I had in the basement. I selected a baker's table from the local unfinished furniture store along with a high back swivel bar stool and a small bookshelf. I stained and finished the three pieces to match and mounted three eyeball lights in the ceiling over the bench. I designed a quick change mount for my presses and accessories as I did not want to drill a lot of holes in a bench this nice. My mount is made of aluminum since I am a home shop machinist, I have seen similar designs made from wood that work just as well. I have a Bose wave radio for entertainment and plan to add a small TV sometime soon. My gun vault sits in one corner and the walls are covered with sporting prints, etchings and vintage firearm advertizing. The closet stores all my hunting clothes, backpacks etc.. It is my man cave and I look forward to spending more time at the loading bench when retired.
|
12-26-2010, 10:27 AM
|
|
Member
|
|
|
Join Date: Jan 2008
Location: Lafayette, Tennessee
Posts: 6,926
Likes: 6,833
Liked 8,936 Times in 2,910 Posts
|
|

I just went to Lowe's and picked up a bunch of 2x lumber.


This old heavy plywood cabinet serves well as ammo and component storage.
|
12-26-2010, 04:32 PM
|
|
Member
|
|
|
Join Date: Jul 2005
Location: NC
Posts: 30,787
Likes: 57,921
Liked 53,033 Times in 16,539 Posts
|
|
Quote:
Originally Posted by Matlock

|
Game over, doesn't get better than this.  
__________________
Sure you did
|
|
The Following User Likes This Post:
|
|
12-26-2010, 10:40 PM
|
|
Member
|
|
|
Join Date: Jul 2007
Location: Central Oregon
Posts: 600
Likes: 0
Liked 13 Times in 8 Posts
|
|
double it.
Boy, some great rooms. My only advice, like garages and decks, figure out how big you need it to be, then DOUBLE IT. Matlock, your room/range is outstanding. I officially don't like you. Your friend for life, Beaver.
__________________
beaver
Last edited by Beaver; 12-26-2010 at 10:44 PM.
|
02-06-2011, 03:37 PM
|
|
Banned
|
|
|
Join Date: Mar 2006
Location: Hoosier Land!
Posts: 4,379
Likes: 587
Liked 576 Times in 307 Posts
|
|
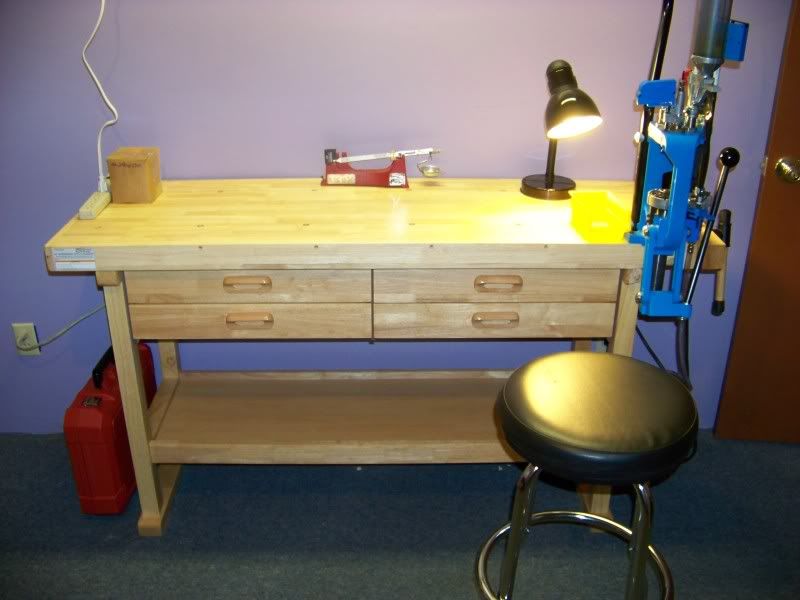
Here is my new addition to the man cave. I came home from work yesterday and the wife was just pulling in too. She had said that she had a present for me. I asked: "Why?" Well, it was our anniversary Friday and she just felt like getting me something!
At any rate, this is from Harbor Freight. It was on sale and since it was a gift, I didn't ask how much it cost!
This is a heavy bench and with the few 45Colt loads that I made today, it doesn't seem to need to be anchored to the wall. Now, for a press that seats primers on the up stroke, that is amazing! The XL650 looks kind of lonely on there, doesn't it?
At some time in the future, I will probably move the Star luber/sizer over there from the other room.
At any rate, seems sturdy enough. Solid Oak is a bit of a stretch. There is a bit of particle board in the drawer bottoms and one brace is. Went together pretty easily.
I'll let you know how she holds up! 
|
02-06-2011, 05:17 PM
|
|
Member
|
|
|
Join Date: Mar 2007
Location: Eastern PA
Posts: 32
Likes: 5
Liked 1 Time in 1 Post
|
|
Skip, happy anniversary and congrats on the new piece of "cave furniture". That looks like a sturdy addition to the shop, I may stop by our local harbor freight one of these days and see if they have ones like that around here. I think my workshop real estate is dwindling though...
Also, I see you use as many folgers plastic coffee cans as I do!
|
07-21-2014, 12:14 PM
|
 |
Member
|
|
|
Join Date: Jun 2014
Posts: 266
Likes: 145
Liked 223 Times in 108 Posts
|
|
Just want to say thanks for pinning this thread as it helped me in my decision process. And since the last post is several years old, I'd thought add a link to a terrific work bench I found and purchased for reloading from Harbor Freight for $160 that my local store had in stock. I can honestly say it's on oar with some benches hundreds of dollars more, a great value!
60 in. 4 Drawer Hardwood Workbench
|
07-21-2014, 12:37 PM
|
|
Member
|
|
|
Join Date: Jun 2009
Location: America
Posts: 1,562
Likes: 17
Liked 775 Times in 378 Posts
|
|

Sam's sell work benches that work very well as loading benches. I dropped a piece of plywood on the bottom to make a storage shelf and then bolted them to the studs in the wall. One bench is set up for pistol rounds with Dillon Presses and the other is set for rifle rounds.
__________________
The American dream is alive
|
|
|
 Posting Rules
|
|
|
|
|


 Linear Mode

