|
|
 |

10-17-2011, 09:39 AM
|
 |
Member
|


|
|
Join Date: Jul 2007
Location: Florida,South,hell.
Posts: 2,781
Likes: 143
Liked 2,499 Times in 368 Posts
|
|
 The Heavy Duty project; pictures are back 10 21 11, nearing completion
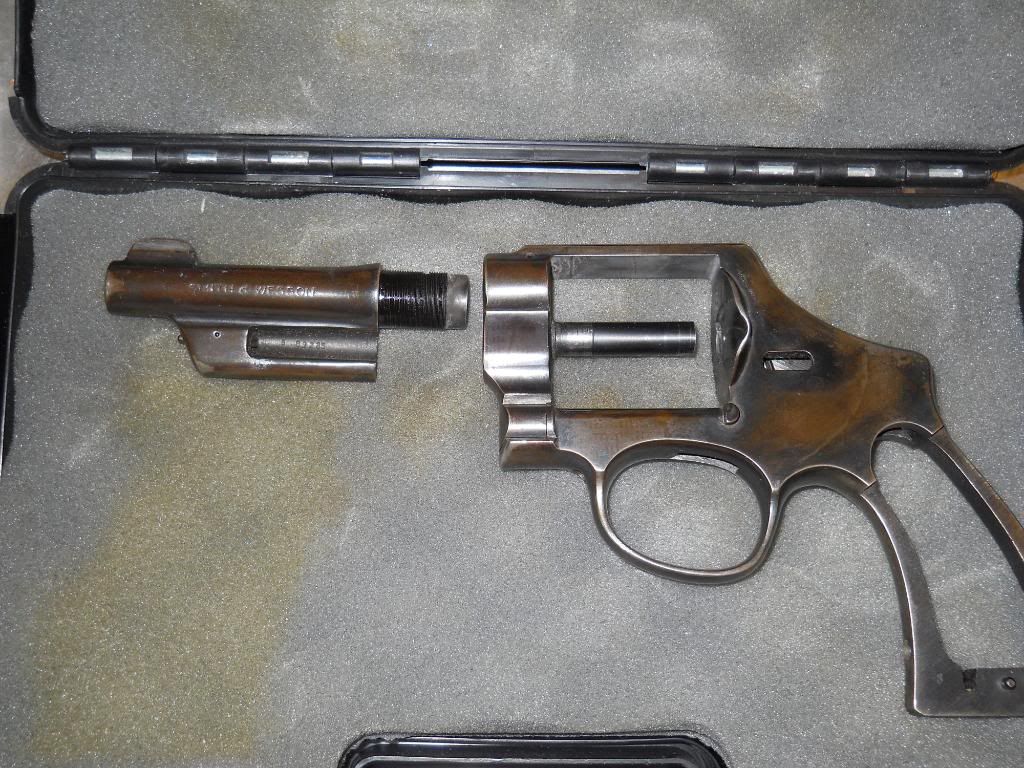
Let's see. Where do I start? O.K. I guess this project started with a
stainless 45 Colt cylinder. I bought 2 years ago for $50 bucks at a small
show inOakland park.
Then, a mountain gun barrel on Gone broker for $36.
11-3150 Smith & Wesson 625-5 45LC 3-3/4" barrel : Barrels at GunBroker.com
So now where to find a gun in need of a 45 Colt conversion.
They are few and far between. Believe me. Especially in stainless.
So, now I remembers. An old Heavy Duty that I paid way too much for.
This was one of those deals we learn from. And learn hard.
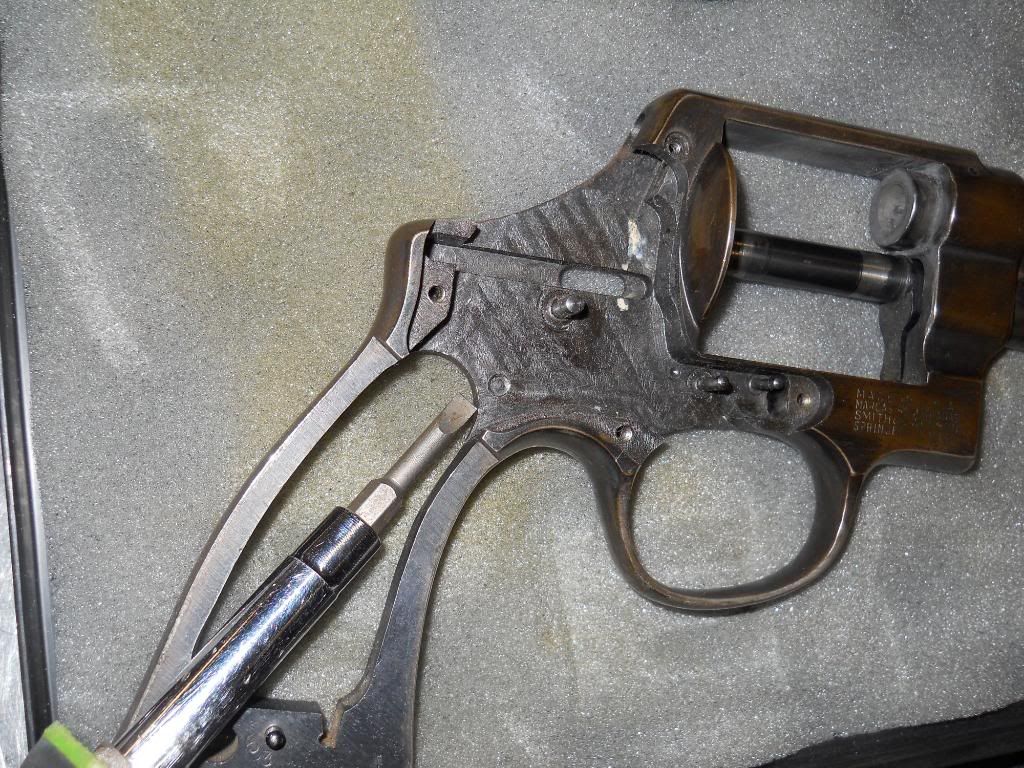
Here was S89285, a 4" H.D. that had been reamed to 357 Magnum,
over buffed and rust blued badly. Top it off it has a ring in the bore.
Then to add insult to injury the trigger rebound slide PIN breaks off.
Sheesh. It has sat in the bottom of the safe for 5 years now.
I've always dreamed of sending it to Clements for a caliber conversion
but the $600. price tag to end up with a H.D. was just too much.
Then my brain puts the two of these ideas together.
Would the modern stainless parts fit on the old Heavy Duty frame?
We could only try.
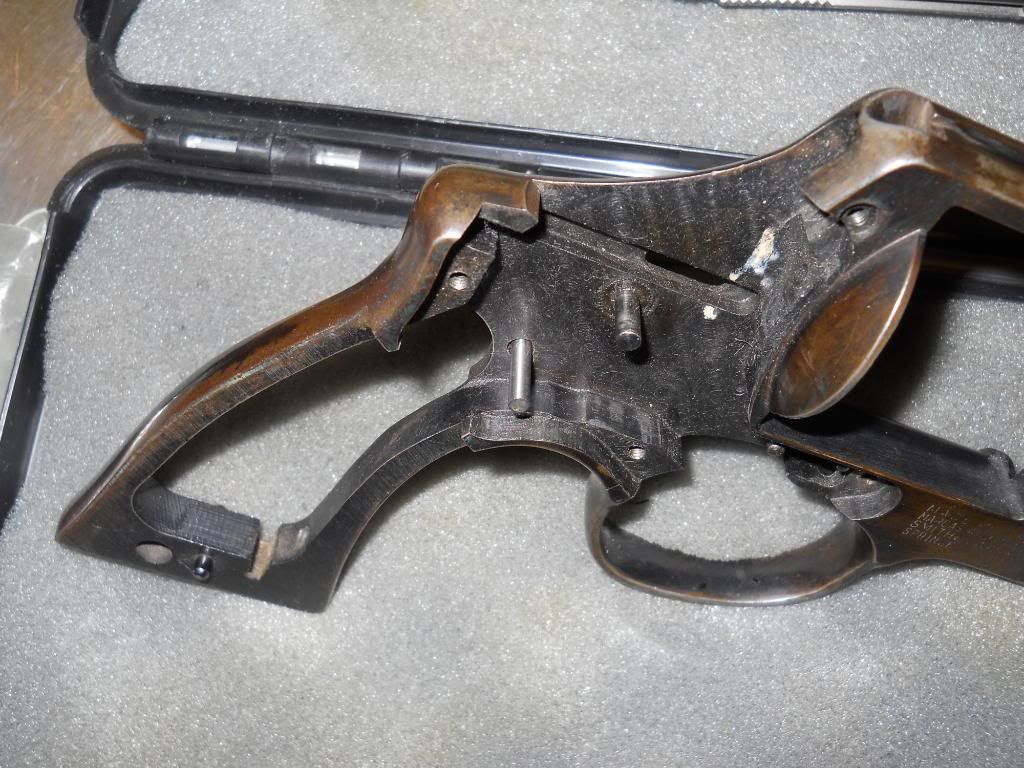
1. The donor gun,,,,,,,,,,,
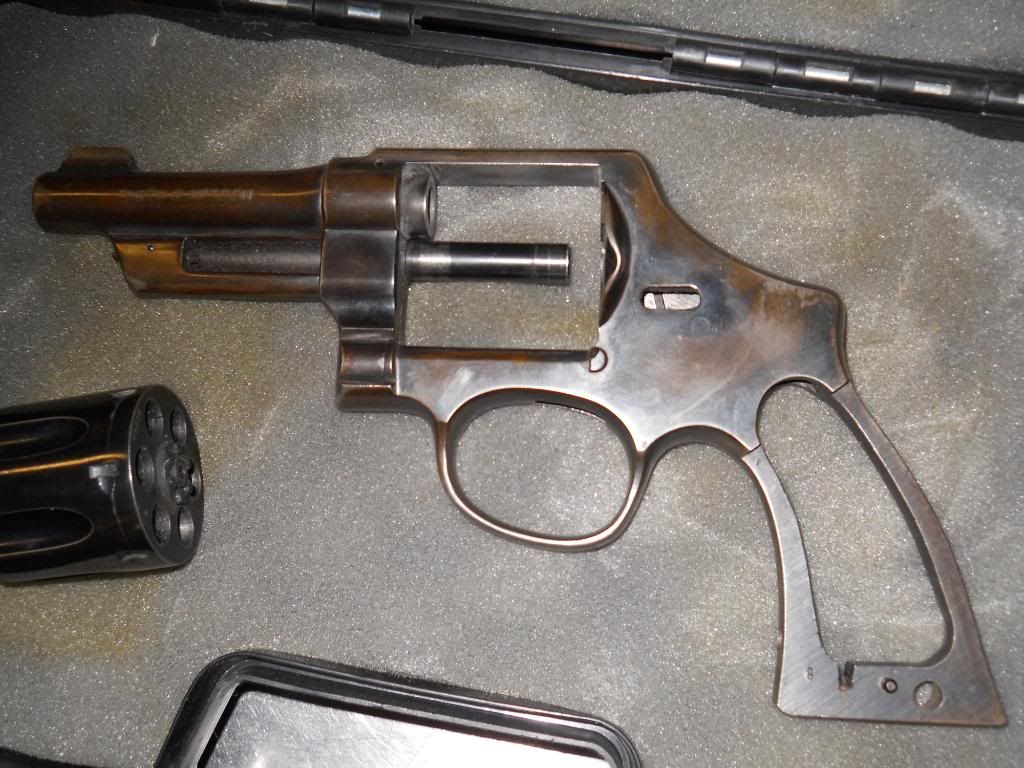
Pretty nasty, huh??

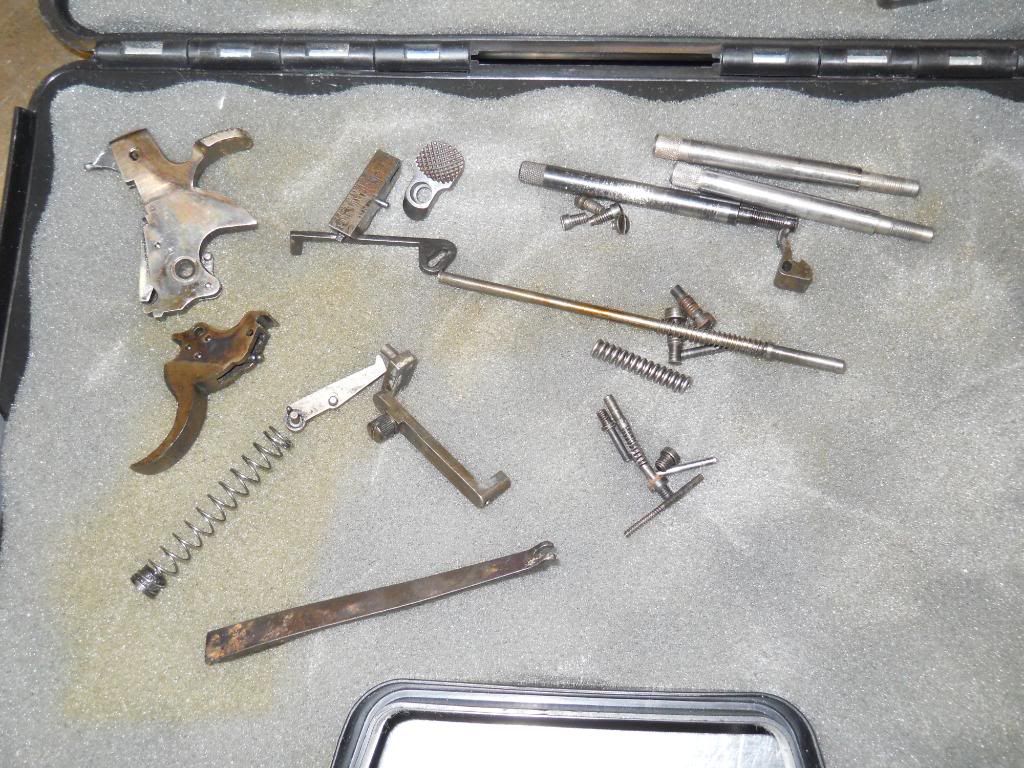
The guts.
The broken off rebound stud.
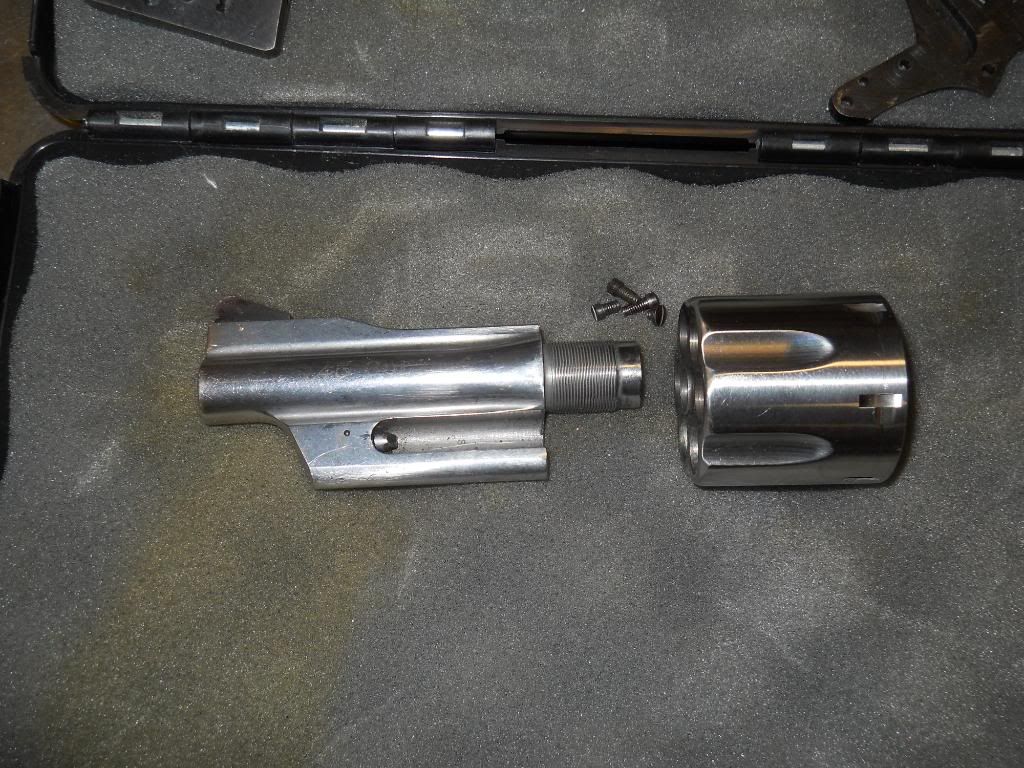
The 625 barrel and cylinder.
Duct tape to protect the frame.
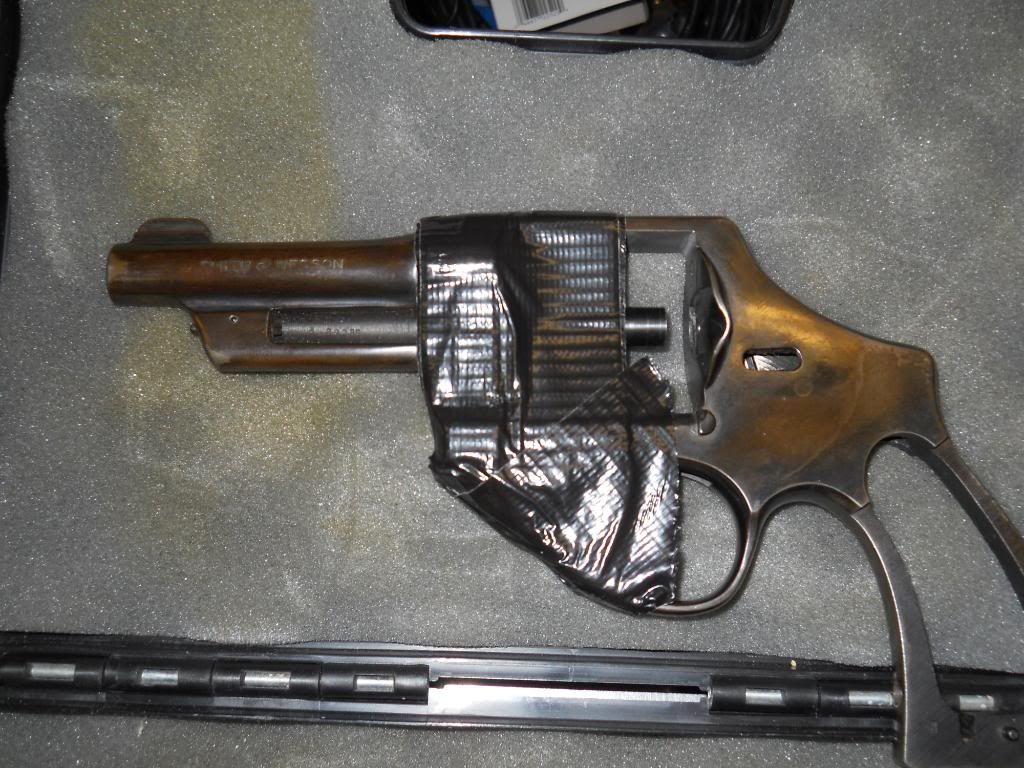
Big giant crescent wrench to grab the frame.
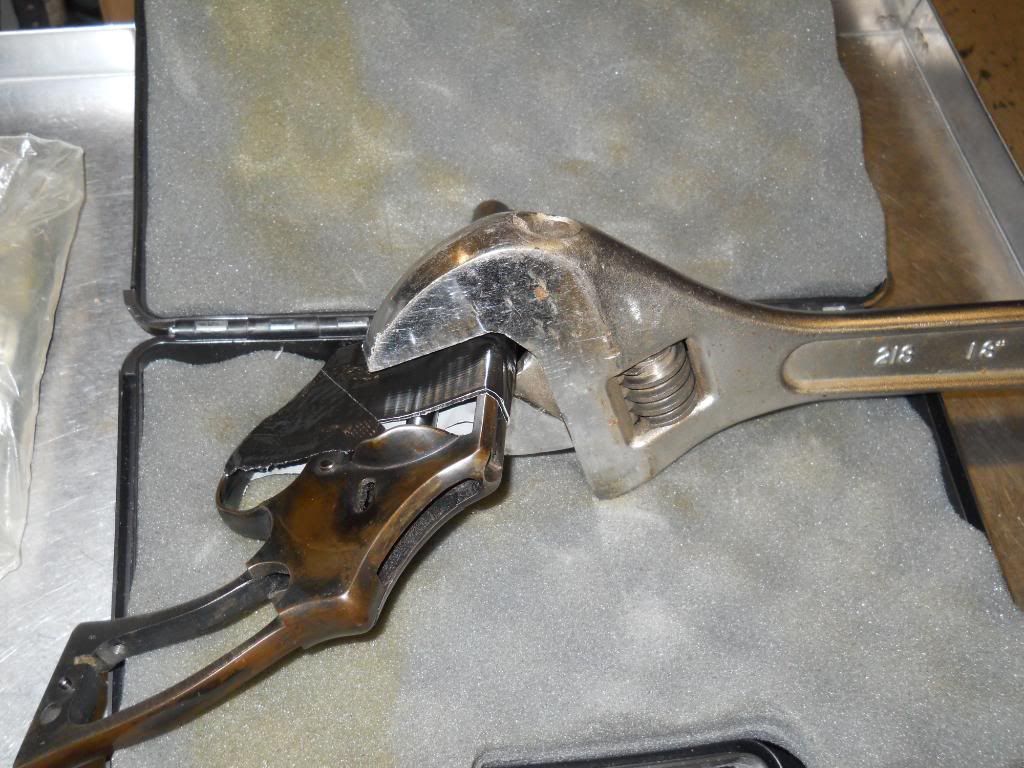
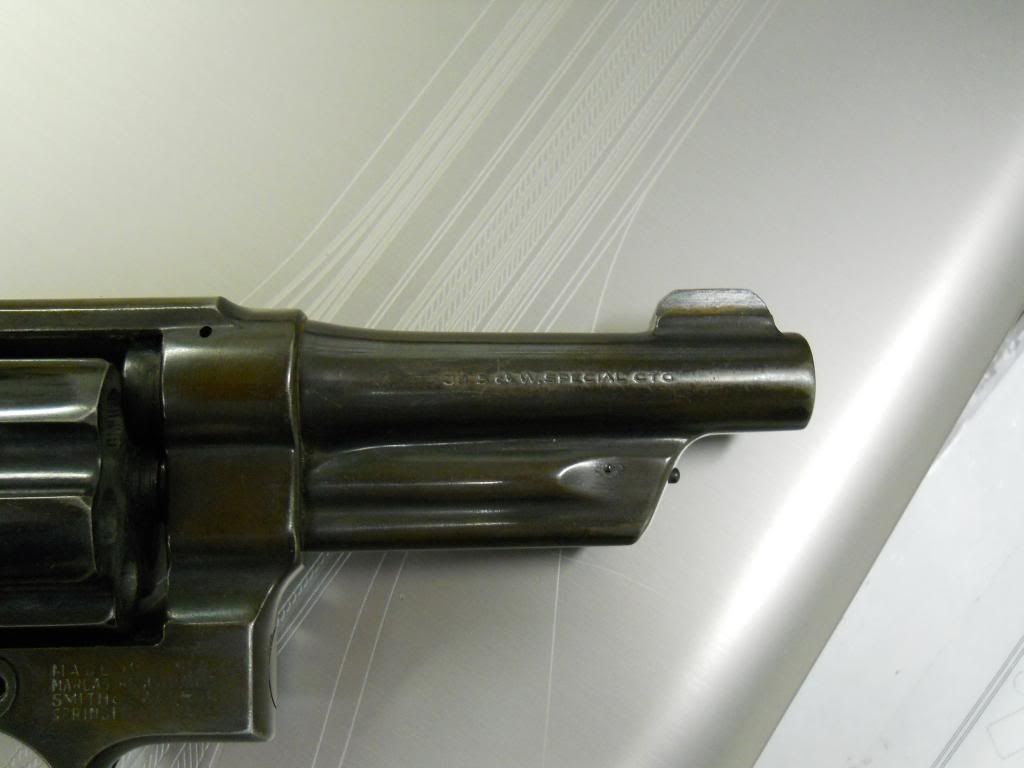
The old barrel removed.
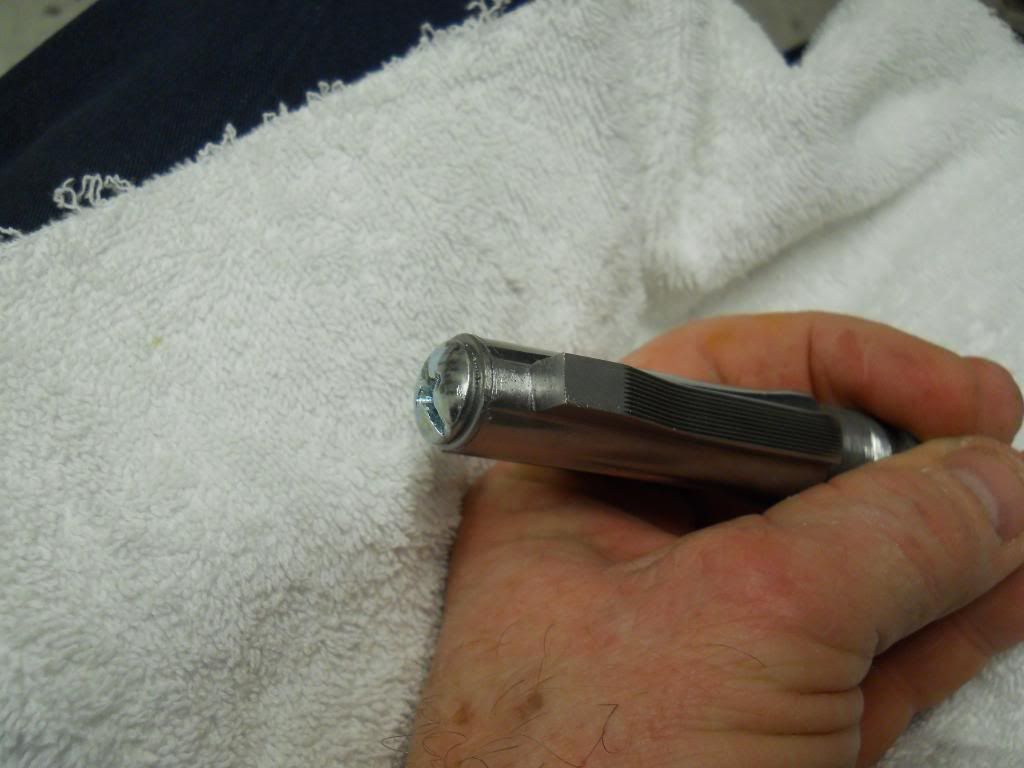
New barrel initial installation. About 1 5th. turn to go.
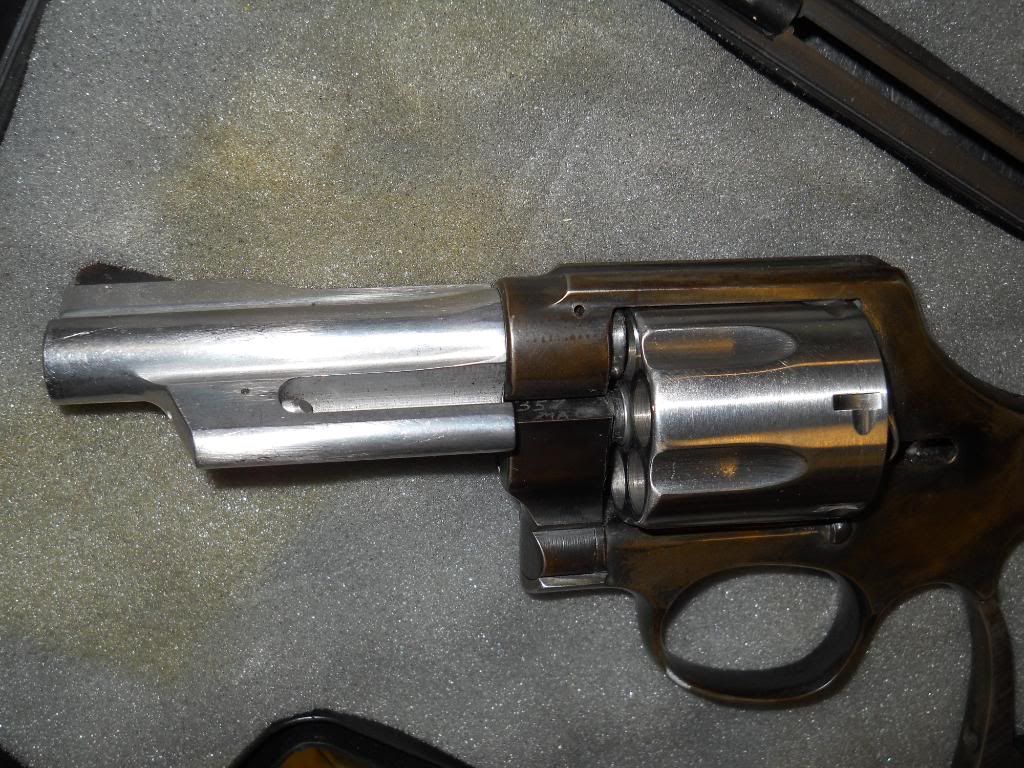
Filing the front of the frame to allow barrel to index properly.
New barrel indexed and torqued into place.
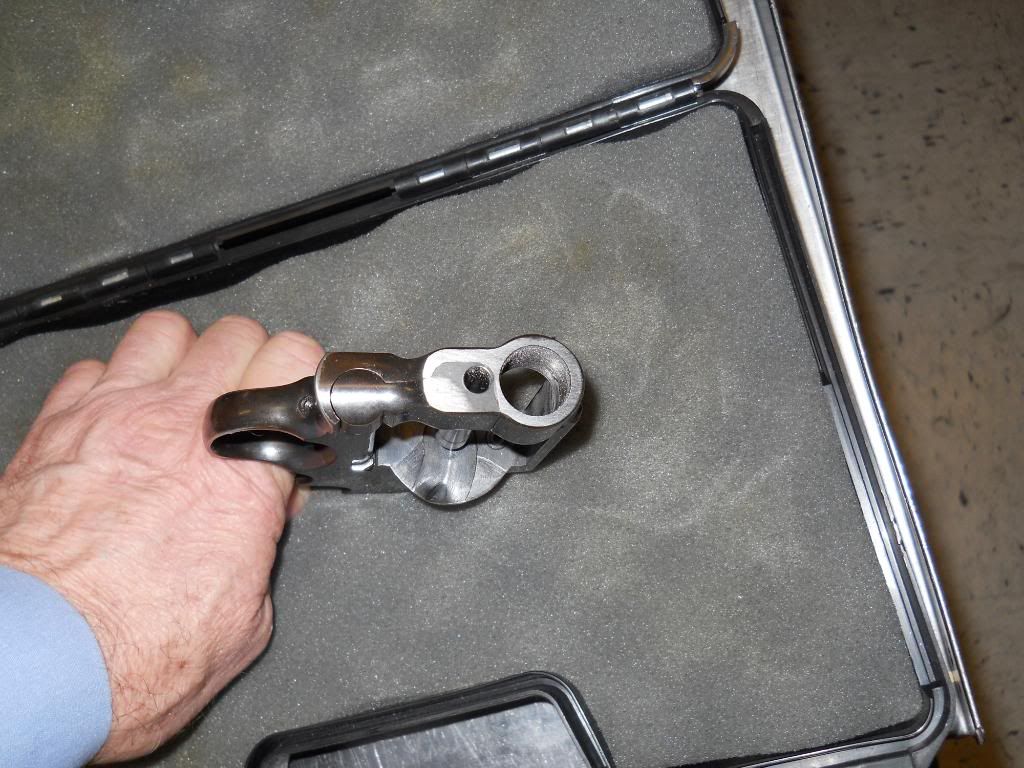
Old rebound stud drilled out from outside of frame.

Using a drill bit to create a new rebound stud.
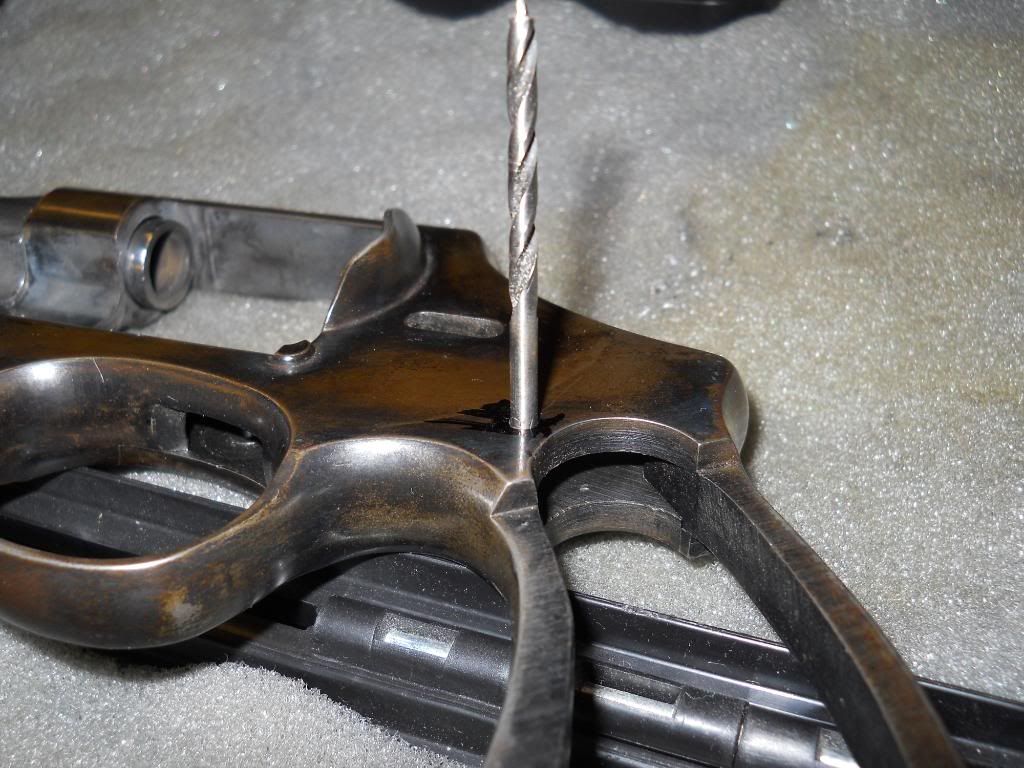
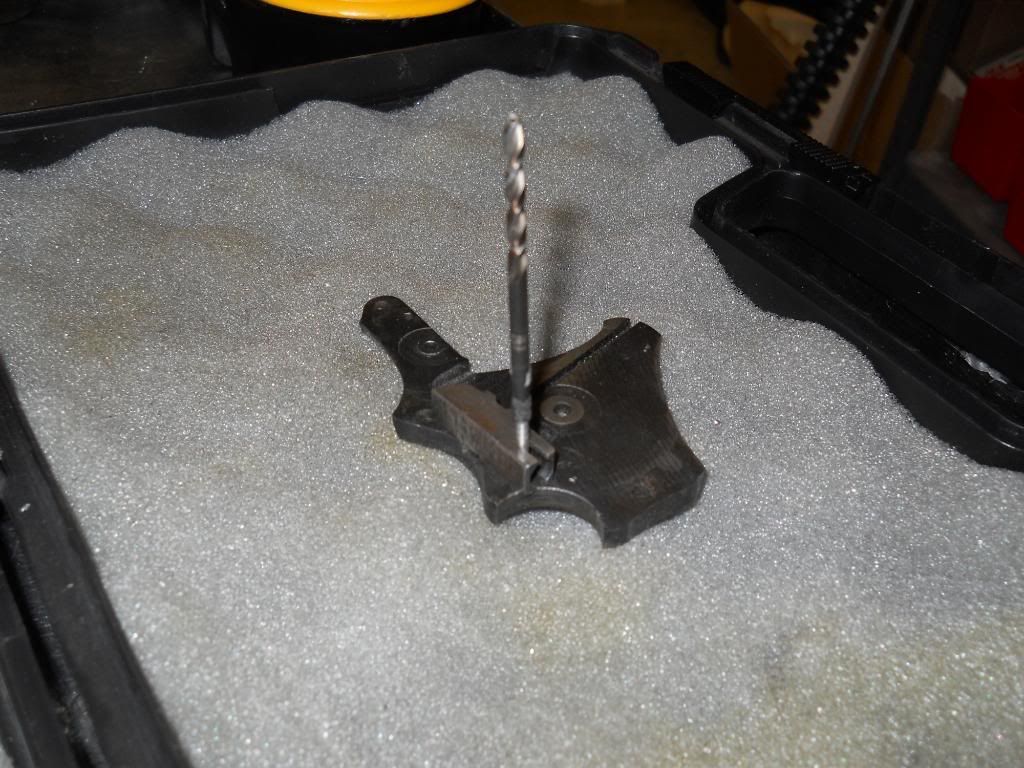
Here is the new rebound stud turned down and ready to go,
 .
.........................................................................................................
This is where I stand so far. Lets see if I can make the rest happen.
Good luck to you.
Regards
Allen Frame
__________________
NRA cert.instructor&R.S.O.
Last edited by Allen-frame; 10-21-2011 at 12:33 PM.
|
10-17-2011, 09:58 AM
|
 |
SWCA Member
|


|
|
Join Date: Jun 2000
Location: Massachusetts USA
Posts: 9,593
Likes: 3,710
Liked 8,948 Times in 3,555 Posts
|
|
Very nice. Are you going to make it a pinto or refinish the gun to one finish?
__________________
James Redfield
LM #497
|
10-17-2011, 10:16 AM
|
|
SWCA Member
|


|
|
Join Date: Jul 2005
Location: Indiana
Posts: 11,943
Likes: 10,119
Liked 10,113 Times in 4,790 Posts
|
|
That's interesting. I understand you are trying to make this a low-budget operation, but I am curious what type of finish you might use, if everything works out OK - or will you just shoot it as-is?
|
10-17-2011, 10:18 AM
|
 |
SWCA Member
|
|
|
Join Date: Dec 2007
Location: Orange County, CA
Posts: 13,995
Likes: 5,005
Liked 7,700 Times in 2,623 Posts
|
|
Fascinating project, Allen. Keep us in the loop! I want to see this one taken all the way to the range report.
__________________
David Wilson
|
10-17-2011, 10:39 AM
|
|
Member
|
|
|
Join Date: Jul 2007
Location: Florida,South,hell.
Posts: 2,781
Likes: 143
Liked 2,499 Times in 368 Posts
|
|
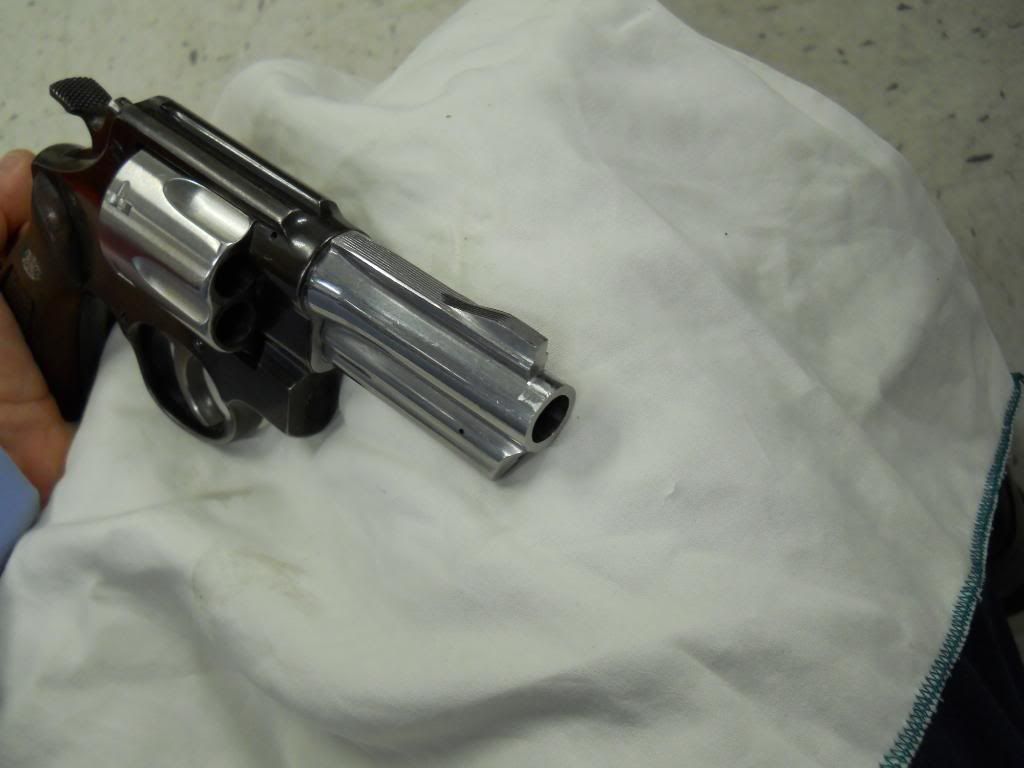
As far as finish goes it all depends on how it shoots in the end.
As I look at it now , the front sight blade will have to be removed.
Once that is done I'm considering cutting and crowning the barrel to 3.5 inches. Then using the ramp base as the front sight assembly.
Kind of like I did with the model 28 project. Only this ramp will be narrowed
to simulate a fixed sight front sight.
IF ,all goes well I imagine sending it to Cogan custom for a hard chrome job.
We'll just have to see how it shoots.
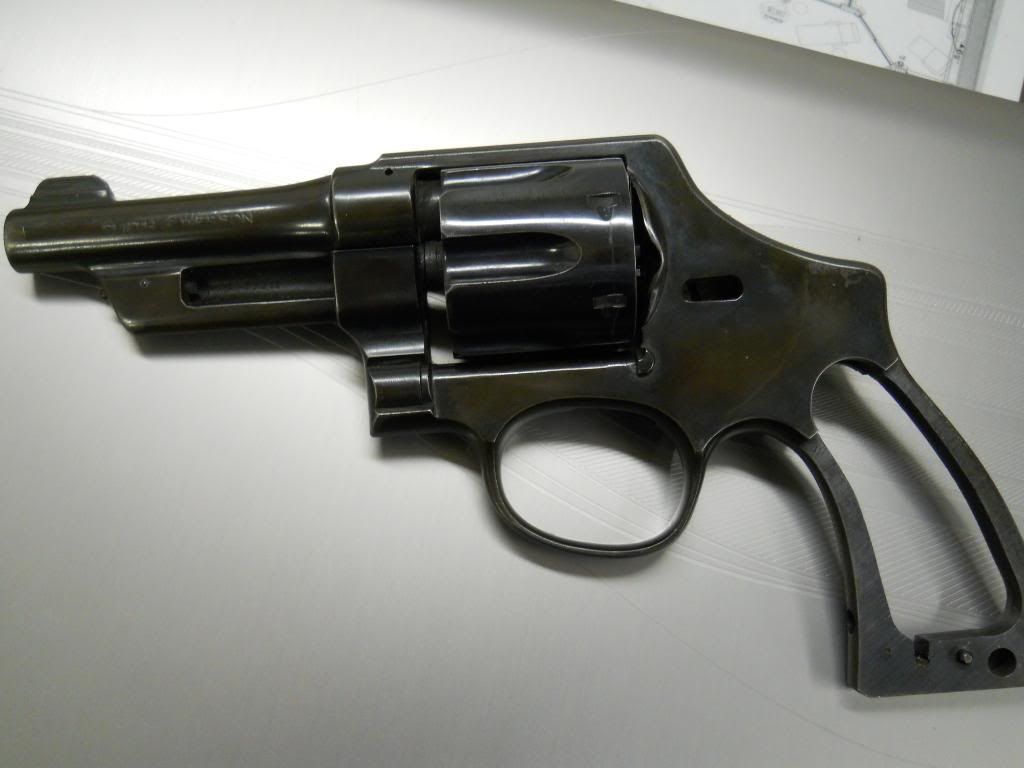
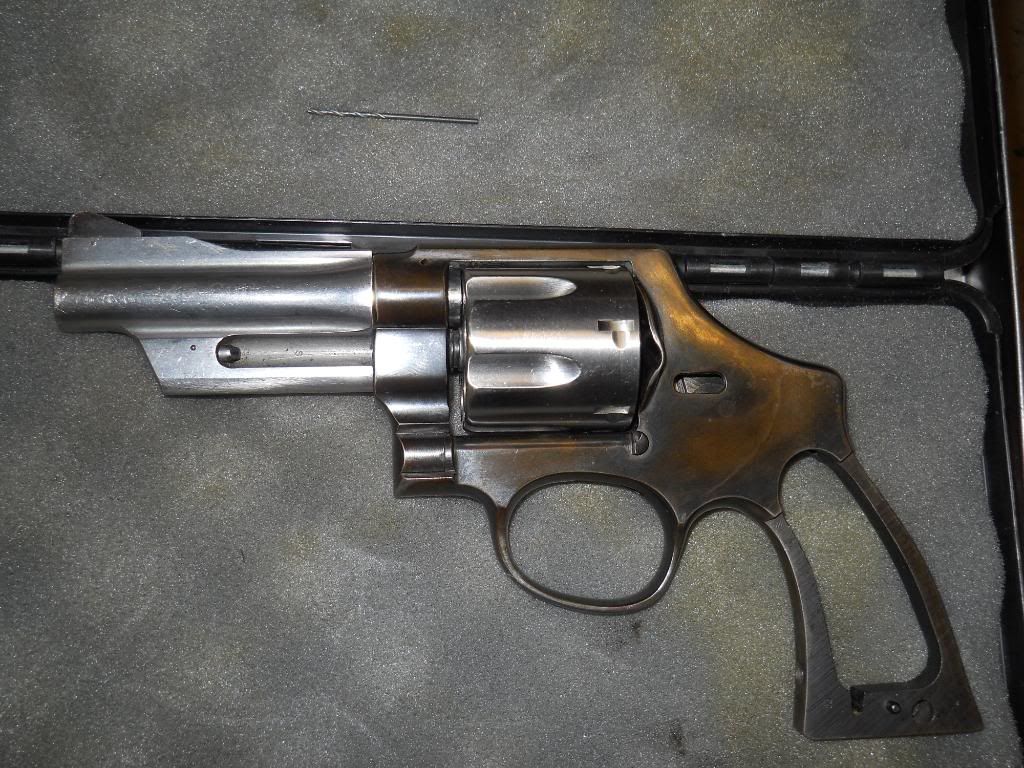
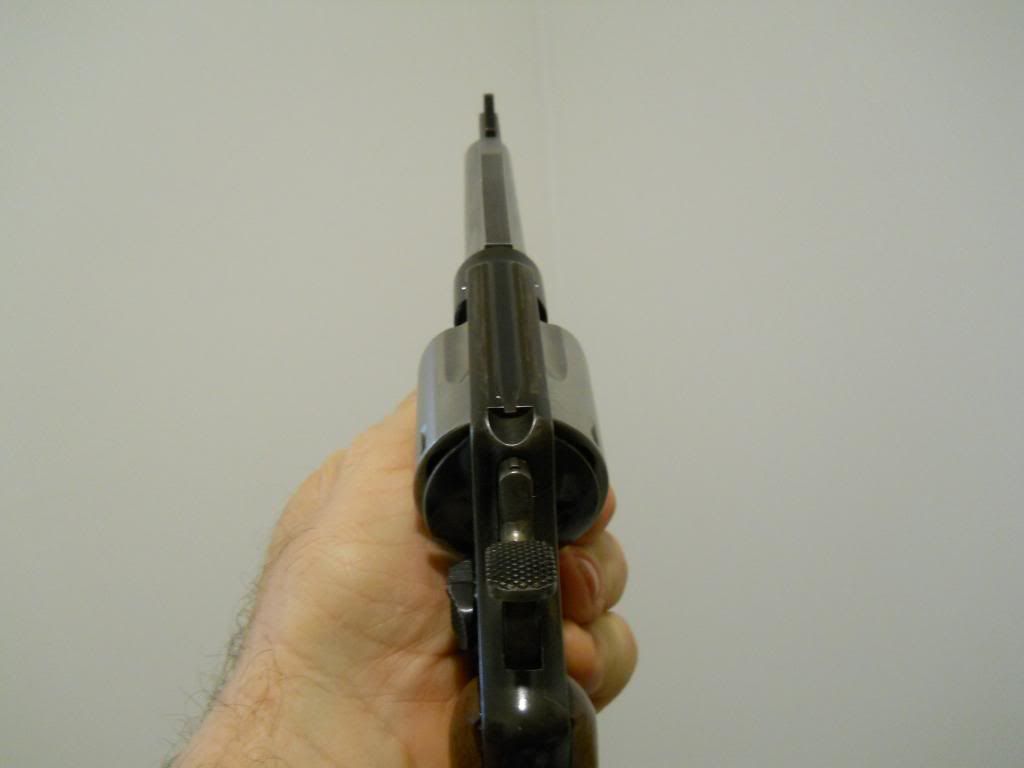
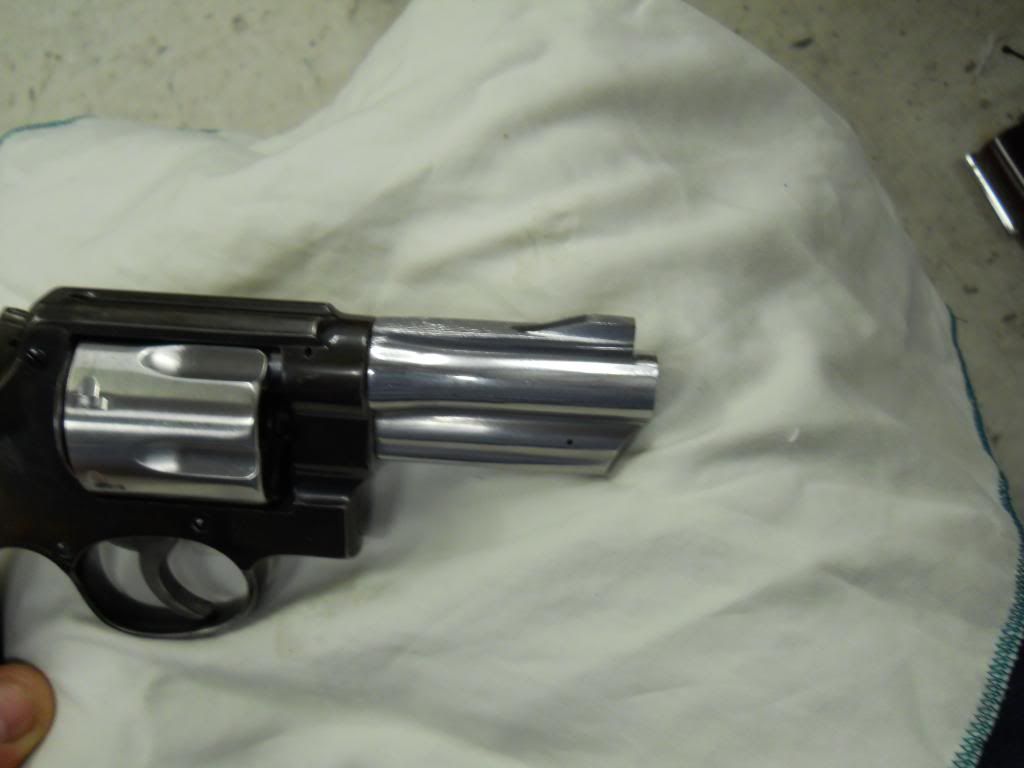
HERE are some pictures of it as it is now assenbled and functioning.
I am working on breaking in the hand to ratchet relationship and it is tight.
There is no side movement and end play is 3 maybe 4 thousandths.
Easily adjustable with a end shake bushing.
I can not round butt it because the serial number is too far back on the grip frame.
A pair of P.C. Magnas or equivalent will have to do.

A
Regards
Allen
__________________
NRA cert.instructor&R.S.O.
Last edited by Allen-frame; 10-17-2011 at 10:49 AM.
|
|
The Following User Likes This Post:
|
|
10-17-2011, 10:55 AM
|
 |
US Veteran
|


|
|
Join Date: Aug 2006
Location: West Central IL
Posts: 22,795
Likes: 18,509
Liked 22,391 Times in 8,268 Posts
|
|
The Pinto idea would intrigue me. A good blue finish on the frame, and hand rub the barrel and cylinder with Mothers Mag Polish to a mirror finish. Keep us posted on the decisions and progress.
__________________
H Richard
SWCA1967 SWHF244
|
10-17-2011, 10:57 AM
|
 |
Member
|

|
|
Join Date: Mar 2005
Location: Palmyra, VA
Posts: 1,226
Likes: 0
Liked 171 Times in 49 Posts
|
|
This has got to be one of the most interesting threads I've seen on S-W Forum. Wish there were more like it.
Keith
|
10-17-2011, 11:19 AM
|
|
Member
|
|
|
Join Date: Jul 2007
Location: Florida,South,hell.
Posts: 2,781
Likes: 143
Liked 2,499 Times in 368 Posts
|
|
I have to tell you all that I was so angry and sad at myself for buying this H.D. in the first place.
I had no one to blame but myself.
Granted the seller was not the nicest guy, but the old adage; Caveat Emptor" "Buyer beware" was too true here.
IF ,this project resurrects this old H.D., and it shoots, I will be Oh, so> happy.
Regards
Allen F
__________________
NRA cert.instructor&R.S.O.
|
10-17-2011, 11:45 AM
|
|
SWCA Member
|
|
|
Join Date: Dec 2007
Location: Orange County, CA
Posts: 13,995
Likes: 5,005
Liked 7,700 Times in 2,623 Posts
|
|
I have also made a couple of bad purchases, or at least less good than I thought they were. I never mind experiences that teach me important lessons. Lemons, lemonade, that kind of thing. Looks to me like you are deep into the creation of a pitcher of delicious lemonade.
Will you get a longer ejector rod so the front pin will latch properly? Or you could perhaps just install a ball detente and do away with the need for a front locking assembly altogether. I have a nice 5" M27 barrel that has no front locking pin, but does have a notch for a frame-mounted detente. I'll be installing a ball when I make use of this barrel in a future project.
I agree this one might look nice as a pinto, but the fact is it will look great no matter what you decide to do with it.
Yes, fascinating thread.
__________________
David Wilson
|
10-17-2011, 02:03 PM
|
 |
Member
|


|
|
Join Date: Oct 2008
Location: Red River Valley
Posts: 7,693
Likes: 13,049
Liked 28,616 Times in 5,154 Posts
|
|
 HD Conversions
Allen-Frame,
One of my HD projects started much like your's...
A well used 4" HD

With a 28 cylinder re-chambered to .44Special and a 3" 624 barrel, wa-laa,

Shaved the rib down in height to mate up to the conture of the frame, milled the front sight blade from the ramp, installed a .100 ivory bead.
Applied a soft glass bead finish and black oxide...All there was to it. 
Su Amigo,
Dave
__________________
"IN GOD WE TRUST"
|
|
The Following User Likes This Post:
|
|
10-17-2011, 02:48 PM
|
|
SWCA Member
|
|
|
Join Date: Jul 2005
Location: Indiana
Posts: 11,943
Likes: 10,119
Liked 10,113 Times in 4,790 Posts
|
|
Nice looking job on the front sight, Dave. 
|
10-17-2011, 03:44 PM
|
|
Member
|
|
|
Join Date: Jul 2007
Location: Florida,South,hell.
Posts: 2,781
Likes: 143
Liked 2,499 Times in 368 Posts
|
|
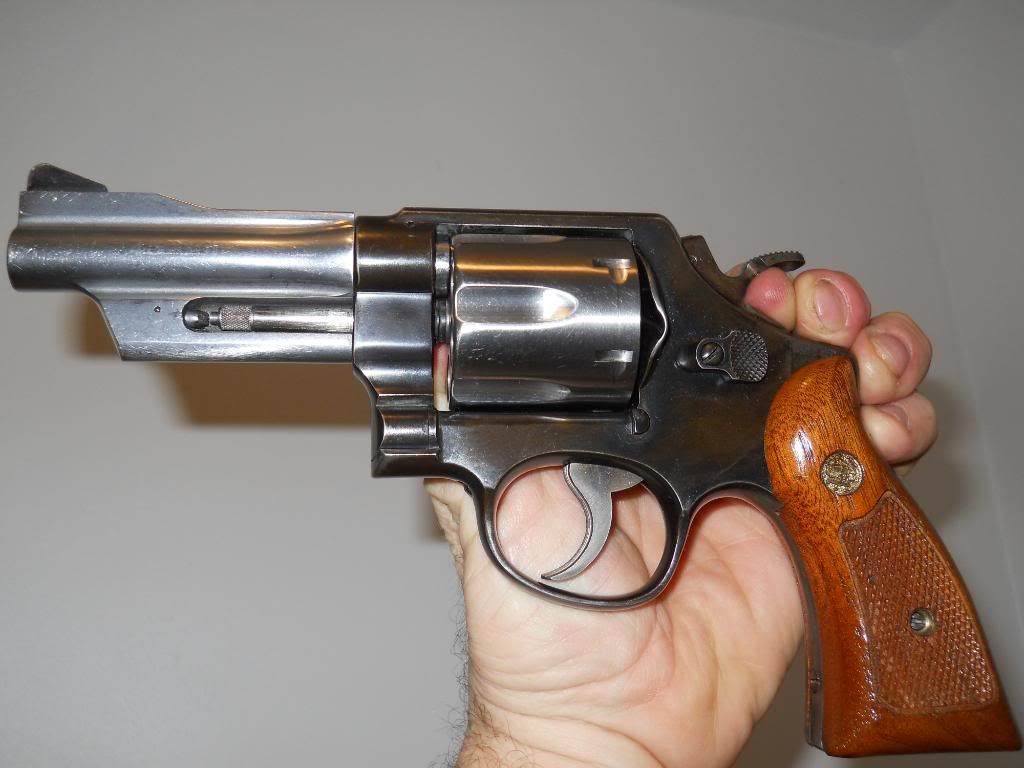
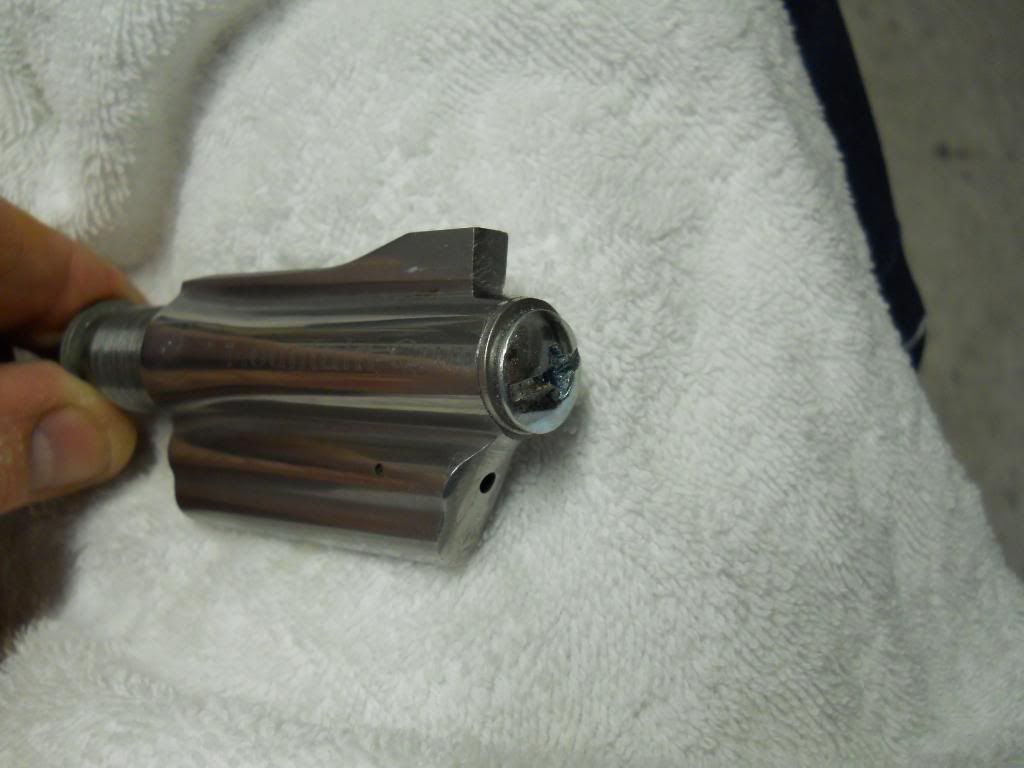
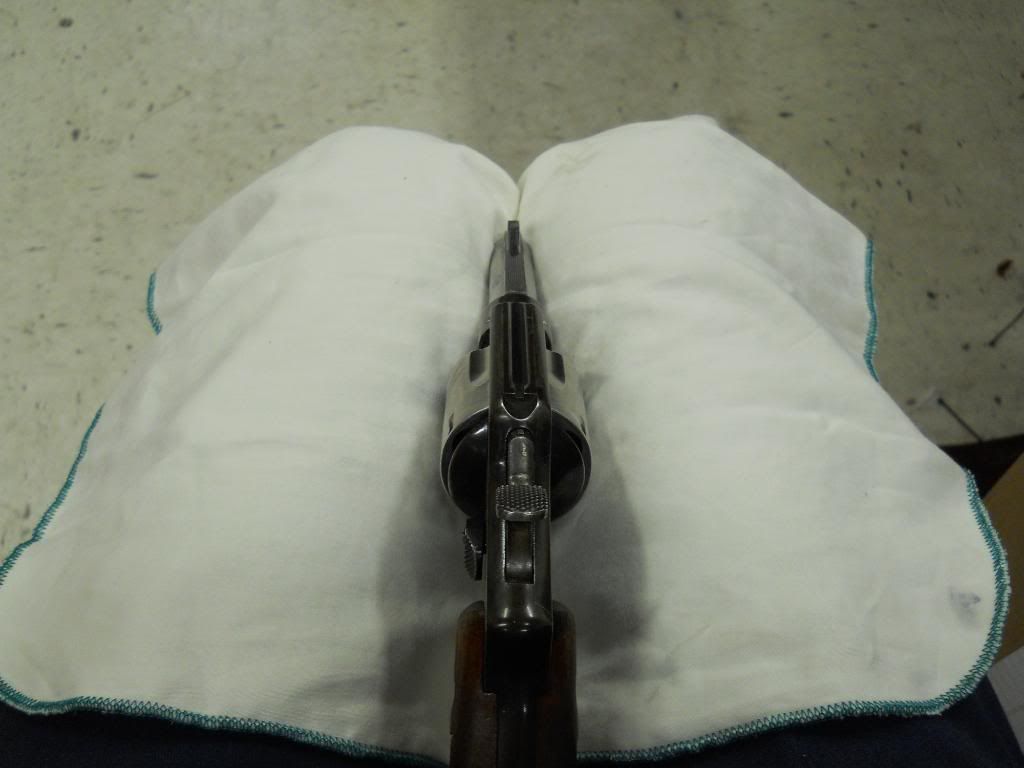
Yes! That's it. Very nice job Amigo.
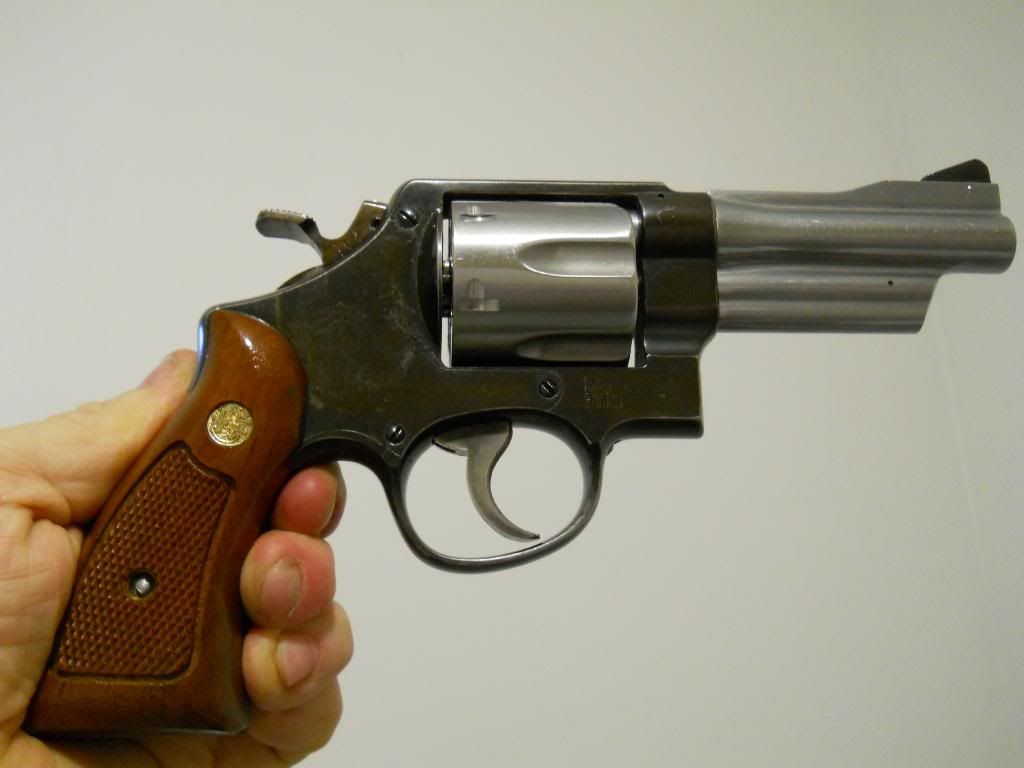
Here are the new pictures of IT , as now the barrel has been cut
and ,with a rudimentary crown done, I shot it at my shop this afternoon.
It works!

Now all that is left is setting the headspace and fashioning a
front sight out of the old ramp base.
And yes, I am thinking a full length ejector rod AND a ball detent
lock on the yoke and frame mating point. A La triple lock.
Allen Frame
__________________
NRA cert.instructor&R.S.O.
|
10-17-2011, 03:53 PM
|
|
SWCA Member
Absent Comrade
|
|
|
Join Date: Apr 2006
Location: Texas
Posts: 1,612
Likes: 107
Liked 387 Times in 188 Posts
|
|
This is my kind of thread. I like saving old war horses.
Charlie
__________________
SWCA # 2294
|
10-17-2011, 04:40 PM
|
|
Member
|
|
|
Join Date: Mar 2005
Location: Palmyra, VA
Posts: 1,226
Likes: 0
Liked 171 Times in 49 Posts
|
|
If you have trouble finding an ejector rod exactly the right length, Hamilton Bowen is supposedly making replacement rods in various lengths.
Keith
|
10-17-2011, 04:49 PM
|
 |
Member
|
|
|
Join Date: Oct 2008
Location: Maine
Posts: 3,289
Likes: 3,076
Liked 3,829 Times in 851 Posts
|
|
Great project and thread. Looking forward to seeing the final product.
__________________
Don't kiss smiling dogs!
|
10-17-2011, 05:15 PM
|
 |
US Veteran
|

|
|
Join Date: Mar 2001
Location: Memphis, TN, USA
Posts: 1,641
Likes: 1,614
Liked 1,670 Times in 441 Posts
|
|
Quote:
Originally Posted by cprher

If you have trouble finding an ejector rod exactly the right length, Hamilton Bowen is supposedly making replacement rods in various lengths.
Keith
|
Since he has installed a cylinder with a left hand thread extractor, a new N-frame factory rod should work. Looks like he has a K-frame in it now, just for fitting.
__________________
S&WCA 1729
|
|
The Following User Likes This Post:
|
|
10-17-2011, 05:21 PM
|
|
Member
|
|
|
Join Date: Jun 2011
Location: LA[lower Alabama
Posts: 714
Likes: 292
Liked 658 Times in 252 Posts
|
|
This is exactly the project I have in mind but I want it in .45 ACP and I want adjustable sights.I just need to find the frame. Nick
|
10-17-2011, 05:38 PM
|
 |
SWCA Member
Absent Comrade
|
|
|
Join Date: Jul 2002
Location: The kidney of Dixie.
Posts: 10,509
Likes: 49
Liked 13,410 Times in 3,290 Posts
|
|
Was grinding the frame the proper way to do that?
|
10-17-2011, 05:43 PM
|
|
Member
|
|
|
Join Date: Jan 2009
Location: Metro Detroit, Michigan
Posts: 6,926
Likes: 179
Liked 4,301 Times in 2,112 Posts
|
|
It may be bit "out there" but I think the if the frame were flame colored and the barrel and cylinder treated to a high polish you'd have a very interesting looking Pinto. Only issue is I have no idea of the effect of flame coloring the frame on the heat treat, might be an absolute disaster. However S&W did have those flame colored Classics a couple of years back, might be worth a call to see if it's possible and if they are willing to do it for a fee.
|
10-17-2011, 08:17 PM
|
|
US Veteran
|

|
|
Join Date: Feb 2005
Location: The SW Va Blue Ridge
Posts: 17,524
Likes: 89,687
Liked 24,881 Times in 8,519 Posts
|
|
"However S&W did have those flame colored Classics a couple of years back"
I believe you are referring to the color casehardened frames.
__________________
John 3:16
WAR EAGLE!
|
10-18-2011, 02:04 AM
|
 |
Member
|
|
|
Join Date: Apr 2007
Location: Farrrrrrrrrr West
Posts: 1,449
Likes: 1,055
Liked 597 Times in 282 Posts
|
|
Quote:
Originally Posted by SaxonPig
Was grinding the frame the proper way to do that?
|
SP
I saw a thread here about that question.
As I recall, some years ago a member sent a Blue .44Mag
to have a factory barrel replacement and it was returned with
the entire front of the frame shaved and left in the white.
Seemed to be incomplete as a factory installation and
surprised me.
__________________
I Love This Site
|
10-18-2011, 02:20 PM
|
|
Member
|
|
|
Join Date: Apr 2005
Location: Flower Mound, Texas
Posts: 75
Likes: 1
Liked 156 Times in 34 Posts
|
|
I guess I'm just ignorant but I have a question about the 5" M27 barrel. Is a ball detent sufficient to hold the cylinder in place during firing without having a latching mechanism at the end of the ejector rod? The reason I ask is that I also have one of these barrels. I was wondering how to go about drilling it for the necessary parts for a conventional lock-up. Thanks in advance. The amount of knowledge on this site is astounding.
|
10-18-2011, 11:39 PM
|
|
US Veteran
|

|
|
Join Date: Jul 2006
Location: OR
Posts: 3,516
Likes: 5,499
Liked 1,026 Times in 350 Posts
|
|
Allen,
Fascinating project! I applaud your imagination. Thanks for great post,
Jerry
|
10-19-2011, 01:58 AM
|
|
SWCA Member
|
|
|
Join Date: May 2011
Location: South Florida
Posts: 39
Likes: 1
Liked 4 Times in 4 Posts
|
|
Allen,
Great job.
If you decide not to send it for hard chrome, somewhere I have a stainless blackening (bluing?) kit that I would be happy to donate to the cause. As I recall, it is some newer chemistry that works at room temperature. I bought it for another purpose, but never used it. Just a different perspective on how to finish the gun, but might be a bit difficult to get an acceptably close match to the steel....
Rgds,
Fred
|
10-19-2011, 06:22 AM
|
|
Member
|
|
|
Join Date: Jul 2007
Location: Florida,South,hell.
Posts: 2,781
Likes: 143
Liked 2,499 Times in 368 Posts
|
|
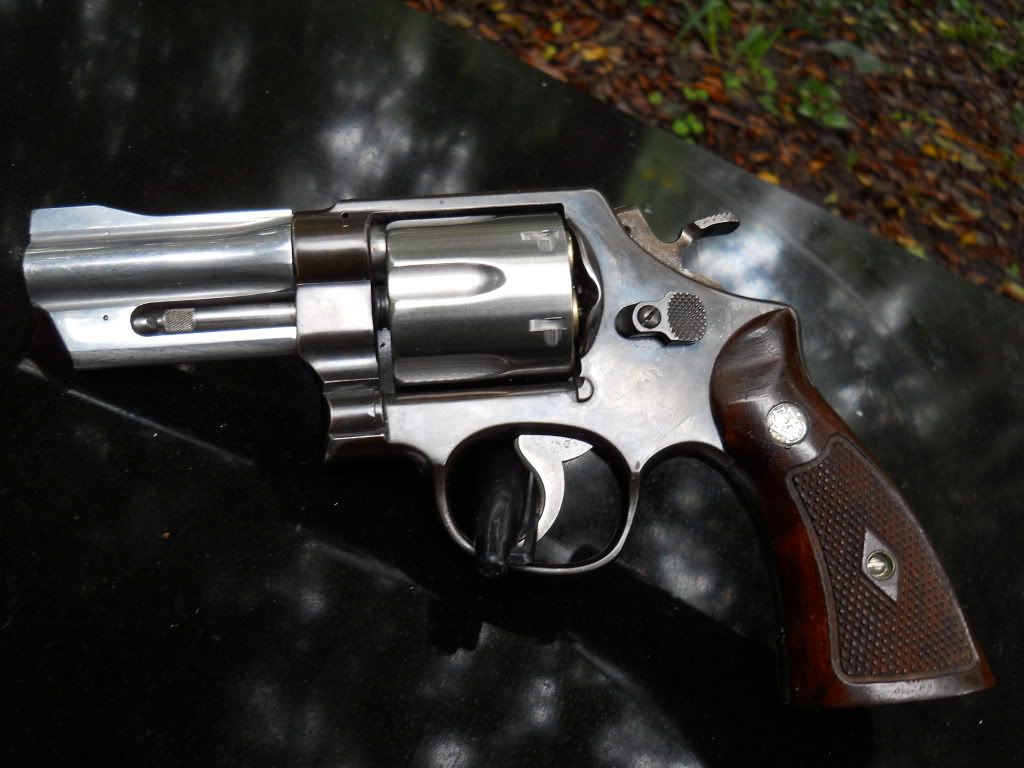
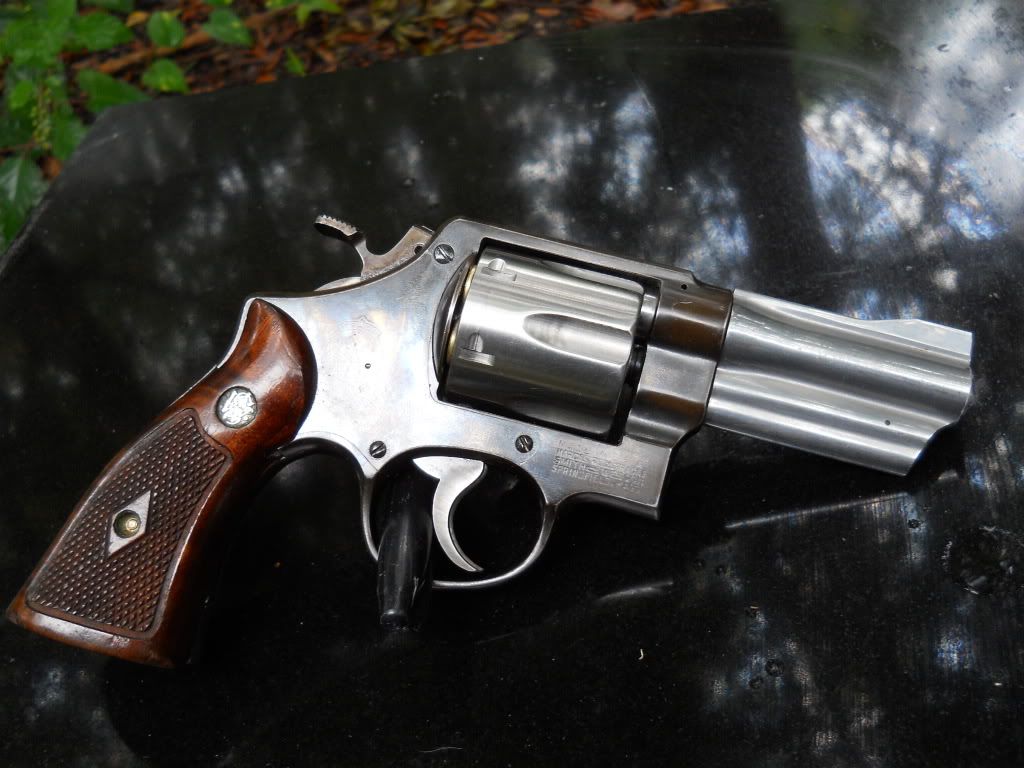
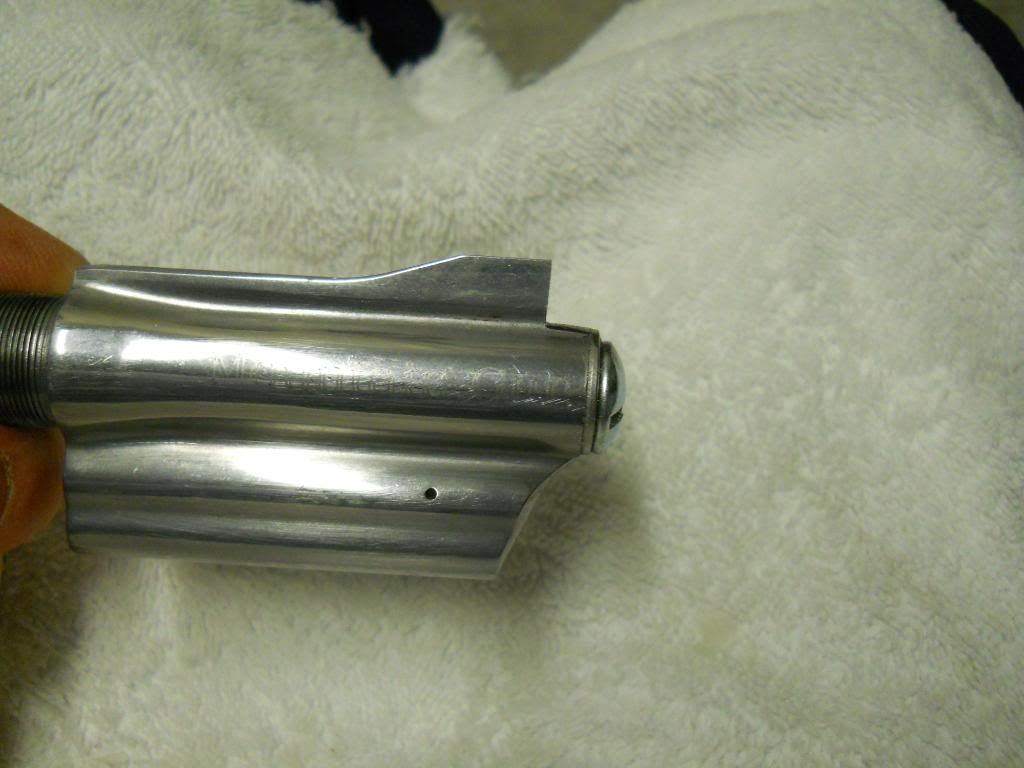
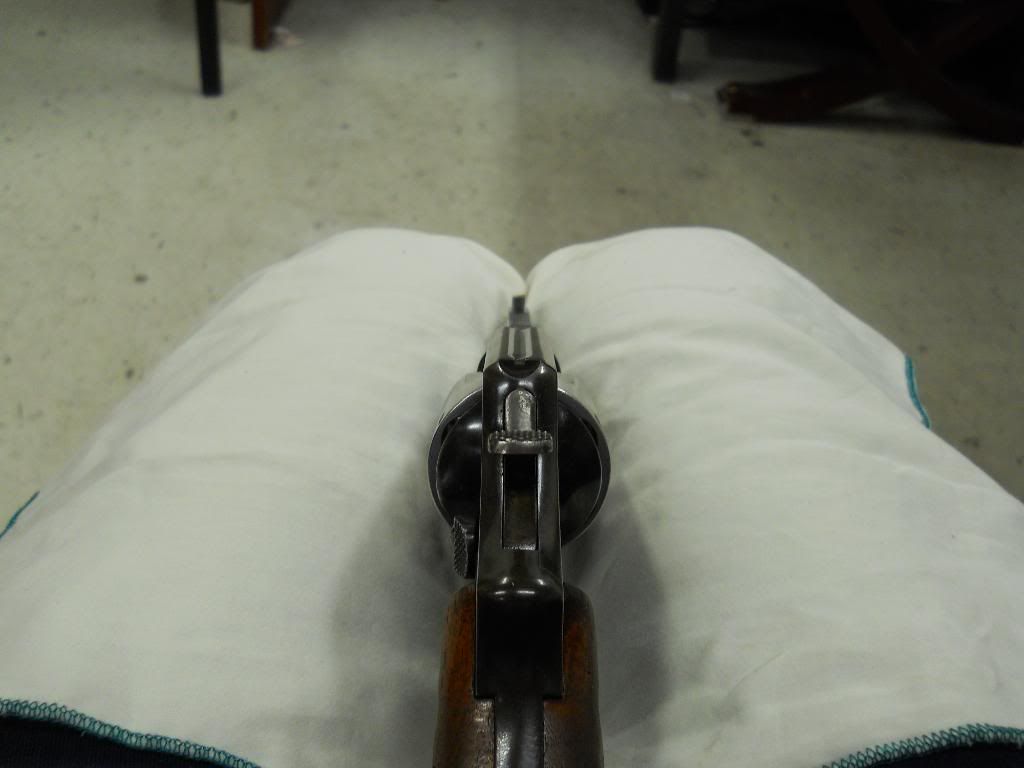
Here are a few more photographs of the barrel work in progress.
It is getting closer each hour.
I used a flat washer and bolt to give a guide for the roundness of the
muzzle.
Then using only files, I worked back from the muzzle and down the sides
of the rib forming the front sight.
What remains is to shoot it and see which way the front sight needs to
be filed to adjust for windage.
So far, so good.

Good luck
Allen Frame
__________________
NRA cert.instructor&R.S.O.
|
10-19-2011, 09:29 AM
|
 |
US Veteran
|
|
|
Join Date: Feb 2003
Location: Homerville, Ohio
Posts: 5,405
Likes: 28,676
Liked 9,261 Times in 2,382 Posts
|
|
Looks good so far. How thin are you going to make the front sight? Could you possibly use a mill and cut the sight thinner with that and keep the rib at the width it is now?
|
11-04-2011, 02:47 AM
|
|
SWCA Member
|
|
|
Join Date: Oct 2007
Location: California
Posts: 19,248
Likes: 11,903
Liked 20,594 Times in 8,582 Posts
|
|
Allen,
Outstanding project. I have a similar project making a
586 into a tapered barrel 596, 5 shot 44 Spl. The barrel
is a 357 Mtn Gun barrel and cylinder from a 696. Need to find
someone to rebore the barrel to 44. I like all blue
guns so it's going to: George Roghaar, Boca Raton,
Florida for an all over matching blue job.
Stainless Steel Blueing

I tapered the front end of the horizontal ridge
on the right hand side of the ER shroud
(yours ahown below) to give it that Heavy Duty/'50s look.
__________________
Jim
S&WCA #819
Last edited by Hondo44; 11-04-2011 at 03:22 AM.
|
11-04-2011, 03:24 AM
|
|
Member
|
|
|
Join Date: Aug 2011
Location: Illinausia
Posts: 271
Likes: 10
Liked 27 Times in 18 Posts
|
|
Fascinating!
I've been over and over this thread. The merging of two different firearms, with parts that didn't match, using mainly hand tools speaks to an astonishing level of skill and talent.
Alan, my hat is off to you sir! This is BY FAR the most interesting BB thread I have read in 10 years or more.
__________________
Ralph J.
|
11-24-2011, 11:29 PM
|
 |
Member
|
|
|
Join Date: Dec 2004
Location: Avery,Tx
Posts: 2,561
Likes: 3,812
Liked 1,863 Times in 938 Posts
|
|
Cool!!!!!!!!!!!
Delta gun shop in the northwest does the reboring for Bowen, and Clements. They bought Cliff LeBounty's equipment and he trained them to use it.
__________________
dd884
JMHO-YMMV
|
11-25-2011, 01:00 AM
|
|
Member
|
|
|
Join Date: Jul 2007
Location: Florida,South,hell.
Posts: 2,781
Likes: 143
Liked 2,499 Times in 368 Posts
|
|
Thanks for the info on Delta. That is good to know.
Herre is the link.
Delta Gun Shop / Clearwater Reboring
Allen Frame
__________________
NRA cert.instructor&R.S.O.
|
|
|
Tags
|
357 magnum, 624, 696, bowen, classics, colt, detent, ejector, extractor, k-frame, lock, m27, model 27, model 28, model 625, mountain gun, n-frame, pinto, round butt, shroud  |
 Posting Rules
|
|
|
|
|


 Linear Mode

