|
|
 |

07-25-2016, 11:33 PM
|
 |
US Veteran
Absent Comrade
|


|
|
Join Date: Jun 2009
Location: Texas
Posts: 7,580
Likes: 13,500
Liked 6,743 Times in 2,526 Posts
|
|
 Sideplate Rermoval
In 1958 I shot at Camp Perry as a member of the Army Air Defense Command Pistol team. I had a brand new Model 41 (still have it) that seemed to shoot a little high although I had the elevation bottomed out. I took it to the S&W tent to have it looked into.
At that time the predominant weapon for the center fire match was the K 38. Thee were a lot of K 38s on the firing line. There were also a lot of them getting free attention in the S&W tent. I watched as the gunsmiths took them apart. First they'd remove the grips There was ribald commentary on the ancestry of the grip maker if the revolver had custom grips with the screw inserted from the right as anyone knows that the proper way to insert grip screws is from the left. Then they'd undo the sideplate screws and remove the cylinder and crane. Then the gunsmith would take the revolver in his hand, flat, with the right side down and slam it down hard on a two inch thick piece of board each one had at his bench. The sideplate would pop off every time. I admit the hair stood up on the back of my head the first time I saw it, but it seemed routine to them.
I've tried it myself with mixed results. I think I'm afraid to slam it down hard enough. Perhaps it's something: "don't try this at home".

|
|
The Following 4 Users Like Post:
|
|
07-25-2016, 11:48 PM
|
|
SWCA Member
Absent Comrade
|


|
|
Join Date: Nov 2002
Location: SLC, Utah
Posts: 5,060
Likes: 739
Liked 3,275 Times in 1,282 Posts
|
|
My guess is that those fitters had, from repetition, developed "the touch." You should have seen how the people at the factory "adjusted" the sights on fixed sight guns like the Model 10 by smacking the barrel on a block of soft metal called "babbit."
|
|
The Following 4 Users Like Post:
|
|
07-25-2016, 11:54 PM
|
 |
US Veteran
|


|
|
Join Date: Jul 2013
Location: Southwest Iowa
Posts: 10,867
Likes: 2,688
Liked 18,970 Times in 5,589 Posts
|
|
I hear ya. I thought long and hard before I whacked the side of the frame of my K38 with the wood handle of my hammer but the side plate popped right off.
Quite a feat of machining.
|
|
The Following 2 Users Like Post:
|
|
07-26-2016, 12:12 AM
|
|
SWCA Member
|


|
|
Join Date: Feb 2006
Location: Pikeville, Tennessee
Posts: 6,068
Likes: 923
Liked 9,963 Times in 3,661 Posts
|
|
Kind'a makes your teeth hurt, doesn't it?!!
Ralph Tremaine
|
|
The Following 2 Users Like Post:
|
|
07-26-2016, 12:14 AM
|
|
Member
|

|
|
Join Date: Aug 2014
Location: West Texas
Posts: 2,447
Likes: 5,289
Liked 3,903 Times in 1,519 Posts
|
|
I can see how that method would work, but for me, it works a good bit better to lay the revolver (with the side plate screws removed, keeping them in order!, along with the cylinder and yoke) on it's left side with the butt of the grip frame away from you. Pick it up with your left hand, grasping around the trigger guard with your finger tips and your thumb around the area between the rear sight and the hammer spur, then hold it flat and horizontal three or four inches above your work bench. Take a wooden hammer handle (with the head away from the frame) or a large screw driver with a fairly heavy plastic handle and rap the rear portion of the grip frame with either handle. It may take two or three whacks. These handles will not damage your grip frame, and the frame will not be solidly against the bench top. The blows will cause the side plate to release from it's well machined position and come loose. I like to place my left index finger on top of the sideplate to keep it from flying loose and scattering things from inside. When it comes loose, lift it off the top of the frame and pay attention to where everything is and how it fits together inside. Taking stuff out, especially the first time, is a topic for another post. I will say that to replace the side plate, I lay the frame down again on it's left side on the workbench, place the upper tip of the sideplate (with it's small protrusion that fits in the corresponding location in the frame up near the rear sight) in the frame first, then lay the side plate down and line it up (making sure the hammer block is in it's correct location so it will fit in it's proper slot) and press down. If you've got it in the right place, it should start into it's place. I usually make certain that the front portion is properly lined up to fit exactly where it's supposed to fit before pressing the side plate down. Once the side plate starts into place, take that plastic screw driver handle, butt down, and tap the side plate and it should fully seat. Don't force it ... if it doesn't go in pretty easily, take a look at your alignment again and try again. Be patient, remember it does not take a lot of force to re-seat the side plate, but things must be in their proper place.
After the side plate is fully seated, install the cylinder and yoke and close the cylinder. I like to cock the hammer and release the trigger while holding that hammer spur until the hammer releases and allow the action to work without the hammer falling hard. Do this a couple or three times just to make sure everything works properly. Then install your side plate screws snugly.
This description probably seems pretty elementary to most all who may read it. It may be mostly elementary to you. But I wish to help take the mystery out of performing this operation. If you own a Smith and Wesson revolver, it's something you need to know how to do, and if I can do it, so can you. After you do it a few times, it will no longer be a mystery. Don't be afraid of it. Just pay attention, don't bugger your sideplate screws while removing them, and take your time and be patient. It's a well designed and put together mechanism. It will fit together and work like it's supposed to when it's done right. And bonus, there is only one right way!
The innards are a bit different on the older revolvers, but the above applies to any revolver with a model number stamped in the frame, and many of the transition and "pre" models that have four or five screws instead of just three in the side plate. The older models are a bit different, but the side plates are all pretty much the same. Good luck with your efforts to do this job. It's well worth the time and effort to learn to do it. If you just don't feel comfortable, I'll bet there is someone around who you can trust to show you how it's done. But be careful ... there are some who use the wrong end of the hammer!!!! Any good gunsmith should be willing and able to show you how it's done. Might cost you a bit for his time, but that would be money well spent if you are really hesitant to try this on your own. I'll bet you can handle it!
__________________
So long ... Ken
|
|
The Following 11 Users Like Post:
|
Dutchguy, Frank46, les.b, loeman, montezumaz, mxbob, opoefc, Protocall_Design, rjm6120, TheoW, two-bit cowboy |
07-26-2016, 02:07 AM
|
|
SWCA Member
|

|
|
Join Date: Oct 2007
Location: California
Posts: 19,250
Likes: 11,925
Liked 20,598 Times in 8,583 Posts
|
|
I too use the plastic screw handle wrap on the bottom side of the grip fame but while cradling the side plate in my left hand to catch it so it doesn't clatter to the bench.
The best thing I ever figured out was the easiest way to get the post war sliding safety hammer block bar lined up with the milled slot on the inside of the side plate. Some put a dab of grease in the slot and the bar sticks in place. But you still have to get the lower end slot aligned over its pin.
I like to install the bar over its pin on the trigger rebound slide first. Then align the slot at the upper tip of the side plate onto the bar as I move the plate up into place. That assures the bar is threaded into the slot for its full length by the time the side plate is in place.
By the way, according to Roy Jinks, the side plates are swaged into the frame opening to get that wonderful, almost seamless fit.
__________________
Jim
S&WCA #819
|
|
The Following 5 Users Like Post:
|
|
07-26-2016, 12:45 PM
|
 |
US Veteran
|
|
|
Join Date: Aug 2006
Location: West Central IL
Posts: 22,804
Likes: 18,554
Liked 22,424 Times in 8,277 Posts
|
|
Way back when I started I read the Kunhausen book, and he advocated using a wooden hammer handle to "tap" the grip frame to loosen the side plate. I have a 2 oz. ball-peen hammer I bought about the same time and it shows the entire surface of the handle well chewed up from tapping grip frames. Out of habit I just don't reach for anything else when popping a side plate off. I wonder how many hundred times it has been used.
__________________
H Richard
SWCA1967 SWHF244
Last edited by H Richard; 07-26-2016 at 12:46 PM.
|
|
The Following 5 Users Like Post:
|
|
07-26-2016, 12:55 PM
|
 |
Member
|
|
|
Join Date: Dec 2009
Location: South Texas & San Antonio
Posts: 33,630
Likes: 241
Liked 29,144 Times in 14,091 Posts
|
|
The ideal instrument to use as a hammer for sideplate removal is a plastic inertia bullet puller. If you have one.
|
|
The Following 3 Users Like Post:
|
|
07-26-2016, 01:53 PM
|
|
US Veteran
|
|
|
Join Date: Jul 2013
Location: Southwest Iowa
Posts: 10,867
Likes: 2,688
Liked 18,970 Times in 5,589 Posts
|
|
Quote:
Originally Posted by kthom

I can see how that method would work, but for me, it works a good bit better to lay the revolver (with the side plate screws removed, keeping them in order!, along with the cylinder and yoke) on it's left side with the butt of the grip frame away from you. Pick it up with your left hand, grasping around the trigger guard with your finger tips and your thumb around the area between the rear sight and the hammer spur, then hold it flat and horizontal three or four inches above your work bench. Take a wooden hammer handle (with the head away from the frame) or a large screw driver with a fairly heavy plastic handle and rap the rear portion of the grip frame with either handle. It may take two or three whacks. These handles will not damage your grip frame, and the frame will not be solidly against the bench top. The blows will cause the side plate to release from it's well machined position and come loose. I like to place my left index finger on top of the sideplate to keep it from flying loose and scattering things from inside. When it comes loose, lift it off the top of the frame and pay attention to where everything is and how it fits together inside. Taking stuff out, especially the first time, is a topic for another post. I will say that to replace the side plate, I lay the frame down again on it's left side on the workbench, place the upper tip of the sideplate (with it's small protrusion that fits in the corresponding location in the frame up near the rear sight) in the frame first, then lay the side plate down and line it up (making sure the hammer block is in it's correct location so it will fit in it's proper slot) and press down. If you've got it in the right place, it should start into it's place. I usually make certain that the front portion is properly lined up to fit exactly where it's supposed to fit before pressing the side plate down. Once the side plate starts into place, take that plastic screw driver handle, butt down, and tap the side plate and it should fully seat. Don't force it ... if it doesn't go in pretty easily, take a look at your alignment again and try again. Be patient, remember it does not take a lot of force to re-seat the side plate, but things must be in their proper place.
After the side plate is fully seated, install the cylinder and yoke and close the cylinder. I like to cock the hammer and release the trigger while holding that hammer spur until the hammer releases and allow the action to work without the hammer falling hard. Do this a couple or three times just to make sure everything works properly. Then install your side plate screws snugly.
This description probably seems pretty elementary to most all who may read it. It may be mostly elementary to you. But I wish to help take the mystery out of performing this operation. If you own a Smith and Wesson revolver, it's something you need to know how to do, and if I can do it, so can you. After you do it a few times, it will no longer be a mystery. Don't be afraid of it. Just pay attention, don't bugger your sideplate screws while removing them, and take your time and be patient. It's a well designed and put together mechanism. It will fit together and work like it's supposed to when it's done right. And bonus, there is only one right way!
The innards are a bit different on the older revolvers, but the above applies to any revolver with a model number stamped in the frame, and many of the transition and "pre" models that have four or five screws instead of just three in the side plate. The older models are a bit different, but the side plates are all pretty much the same. Good luck with your efforts to do this job. It's well worth the time and effort to learn to do it. If you just don't feel comfortable, I'll bet there is someone around who you can trust to show you how it's done. But be careful ... there are some who use the wrong end of the hammer!!!! Any good gunsmith should be willing and able to show you how it's done. Might cost you a bit for his time, but that would be money well spent if you are really hesitant to try this on your own. I'll bet you can handle it!
|
That's a good breakdown. I viewed a lot of video's before I took the big step with pulling the side plate on my K38. I think it was one of the AGI's videos that said to draw the outline of your sideplate in cardboard and punch the screws into their respective location. This has worked very well for me.

You can see my piece of cardboard in the foreground. I still have it and still use it.
|
|
The Following 4 Users Like Post:
|
|
07-26-2016, 01:58 PM
|
 |
Member
|

|
|
Join Date: Dec 2012
Location: Tincup, CO
Posts: 3,694
Likes: 6,290
Liked 7,472 Times in 2,287 Posts
|
|
I tap tap tap with a small mallet, plastic on one side, rubber on the other. Little chance of anything going wrong.
__________________
Some collect art; I shoot it!
|
|
The Following User Likes This Post:
|
|
09-27-2016, 07:21 PM
|
 |
US Veteran
|

|
|
Join Date: May 2015
Location: West Virginia
Posts: 5,372
Likes: 104,950
Liked 22,296 Times in 4,529 Posts
|
|
Targets Guy:
In regards to keeping the sideplate screws in order...I still remember, because I actually followed their advice ever since I attended my first Armorer's school at the S&W factory back in 1977... The stocks are off of the gun then you remove the sideplate screw. Place the front screw in the hole in the back of a stock that fits over the locator pin on the frame when the stock is on the gun. Just fits. That way you always know that that is the fitted screw that tensions the yoke. On modern guns, the other two can't get mixed up, since one is a flathead, and the other is round.
I too was taught to remove the sideplate as Cyrano described. When I was working on department guns, that's the way I always did it, and the other day I did it that way just for old times sake, I guess, and to make sure I remembered how. But mostly, now that I'm working on my own guns, I use the tap the frame method. Just a little more cautious, I guess. But on working, stainless steel guns that we carried and used everyday of the year, I would still use the smack them on the workbench technique. We also had bench pads that cushioned the fall of the plate, or as Cyrano explained, use a block of soft wood, such as a section of 2x4.
I also still have my issued "Babbits" a round one and a square one, designed to correct the point of aim on fixed sight guns as was explained above. Actually I have more than one set, as after that initial school at the factory, I attended a couple of field schools and got new tools each time.
Best Regards, Les
__________________
SWCA 3084, SWHF 495, PGCA 3064
Last edited by les.b; 09-27-2016 at 07:26 PM.
Reason: Correct spelling
|
|
The Following 4 Users Like Post:
|
|
09-27-2016, 07:30 PM
|
|
Member
|
|
|
Join Date: Oct 2007
Location: Arizona
Posts: 3,222
Likes: 2,905
Liked 5,333 Times in 1,869 Posts
|
|
Up until a few years ago S&W would have an annual sales and technical assistance session at the Scottsdale gun Club. I brought in My Model 28 for the factory gunsmiths to look at since I was getting light primer hits on occasion and had done routine maintenance including installing a new mainspring but still had the problem. For a $20 donation to the NRA they would take down your gun and diagnose the problem, They would then fix it on the spot if they had the parts available.
I watched in utter amazement as the gunsmith disassembled my Model 28 and proceeded to pry off the sideplate. I asked and he told me this was SOP at the factory.
I'll fess up and admit I've done the same and gently pried off the sideplate on numerous revolvers for years without any problems. I believe the keyword here is "gently".
Jim
Last edited by italiansport; 09-27-2016 at 07:34 PM.
|
|
The Following User Likes This Post:
|
|
09-27-2016, 08:16 PM
|
|
US Veteran
|
|
|
Join Date: May 2015
Location: West Virginia
Posts: 5,372
Likes: 104,950
Liked 22,296 Times in 4,529 Posts
|
|
Jim:
Well, I have to admit that although I attended several schools, the last one was in the mid 90s, so they may have changed their methods. I'm sure that that would work OK as well, but I'll probably stick to the way that I am comfortable with. Thinking about this, they also showed us how to make a little trigger return slide spring tool out of: gasp! ... a SAT, or sight adjustment tool... Of course, back then they weren't "collectibles", just tools, and we always had bunches of them laying around. You simply file a notch in each side of the blade, until the remaining section of tHe blade is the same width as the inside diameter of the spring, so that it can fit into the spring, and lever it into the slide. I still have mine in my field toolbox.
Best Regards, Les
__________________
SWCA 3084, SWHF 495, PGCA 3064
|
09-27-2016, 08:27 PM
|
 |
Member
|
|
|
Join Date: Jul 2014
Location: Allen County, Indiana
Posts: 59
Likes: 550
Liked 40 Times in 21 Posts
|
|
Quote:
Originally Posted by Cyrano
In 1958 I shot at Camp Perry as a member of the Army Air Defense Command Pistol team. I had a brand new Model 41 (still have it) that seemed to shoot a little high although I had the elevation bottomed out. I took it to the S&W tent to have it looked into.
At that time the predominant weapon for the center fire match was the K 38. Thee were a lot of K 38s on the firing line. There were also a lot of them getting free attention in the S&W tent. I watched as the gunsmiths took them apart. First they'd remove the grips There was ribald commentary on the ancestry of the grip maker if the revolver had custom grips with the screw inserted from the right as anyone knows that the proper way to insert grip screws is from the left. Then they'd undo the sideplate screws and remove the cylinder and crane. Then the gunsmith would take the revolver in his hand, flat, with the right side down and slam it down hard on a two inch thick piece of board each one had at his bench. The sideplate would pop off every time. I admit the hair stood up on the back of my head the first time I saw it, but it seemed routine to them.
I've tried it myself with mixed results. I think I'm afraid to slam it down hard enough. Perhaps it's something: "don't try this at home".
|
I remove cylinder and crane then rap the top of the frame with a wooden mallet and the sideplate falls off.
|
|
The Following User Likes This Post:
|
|
09-27-2016, 08:52 PM
|
 |
US Veteran
|
|
|
Join Date: Feb 2003
Location: Homerville, Ohio
Posts: 5,407
Likes: 28,681
Liked 9,263 Times in 2,384 Posts
|
|
Quote:
Originally Posted by BUFF
My guess is that those fitters had, from repetition, developed "the touch." You should have seen how the people at the factory "adjusted" the sights on fixed sight guns like the Model 10 by smacking the barrel on a block of soft metal called "babbit."
|
Yep, did that a few times myself to adjust the sights. 
|
|
The Following 2 Users Like Post:
|
|
09-27-2016, 09:01 PM
|
|
Member
|
|
|
Join Date: Dec 2009
Location: South Texas & San Antonio
Posts: 33,630
Likes: 241
Liked 29,144 Times in 14,091 Posts
|
|
I have seen several variations on the "Babbitt" story. So does anyone know exactly how/why the Babbitt bars were used?
|
|
The Following User Likes This Post:
|
|
09-27-2016, 09:11 PM
|
|
US Veteran
|
|
|
Join Date: May 2015
Location: West Virginia
Posts: 5,372
Likes: 104,950
Liked 22,296 Times in 4,529 Posts
|
|
DWalt:
I'm gonna cop out and take a rain check on this until I see if I can find my notes. I know that I took extensive notes at Armorer's school on everything that I was taught, partly because I've always been an obsessive note taker since I was a kid. We're talking quite awhile ago, and I am not going to commit to something that I might misremember, especially if it might cause someone to experiment and do harm to a valued firearm. I just saw my old Babbits on my workbench the other day, (they can also be used to tap the frame to remove the sideplate in lieu of the plastic mallet or smacking the frame on the bench) and was reminiscing about this very thing, but let me get back on this.
I'm sure that there are folks here on the forum with much more experience than I have who could answer this question right off the bat, and I would certainly defer to them in that case.
Best Regards, Les
__________________
SWCA 3084, SWHF 495, PGCA 3064
|
09-27-2016, 09:12 PM
|
 |
US Veteran
|

|
|
Join Date: Dec 2009
Location: MI
Posts: 4,569
Likes: 13,995
Liked 5,919 Times in 1,761 Posts
|
|
Babbitt was used because it's heavy enough to do the job, performs like a dead blow (doesn't bounce off metal) and won't mar the finish.
__________________
SWHF #448
Last edited by -db-; 09-27-2016 at 09:13 PM.
|
|
The Following 5 Users Like Post:
|
|
09-27-2016, 09:26 PM
|
|
US Veteran
|
|
|
Join Date: May 2015
Location: West Virginia
Posts: 5,372
Likes: 104,950
Liked 22,296 Times in 4,529 Posts
|
|
OK, I'm still here at my cabin, and most of my tools are at home in my shop, but I just happen to have my old range tool box here, and you guys inspired me to snap a picture so that you can see what "Babbits" look like:
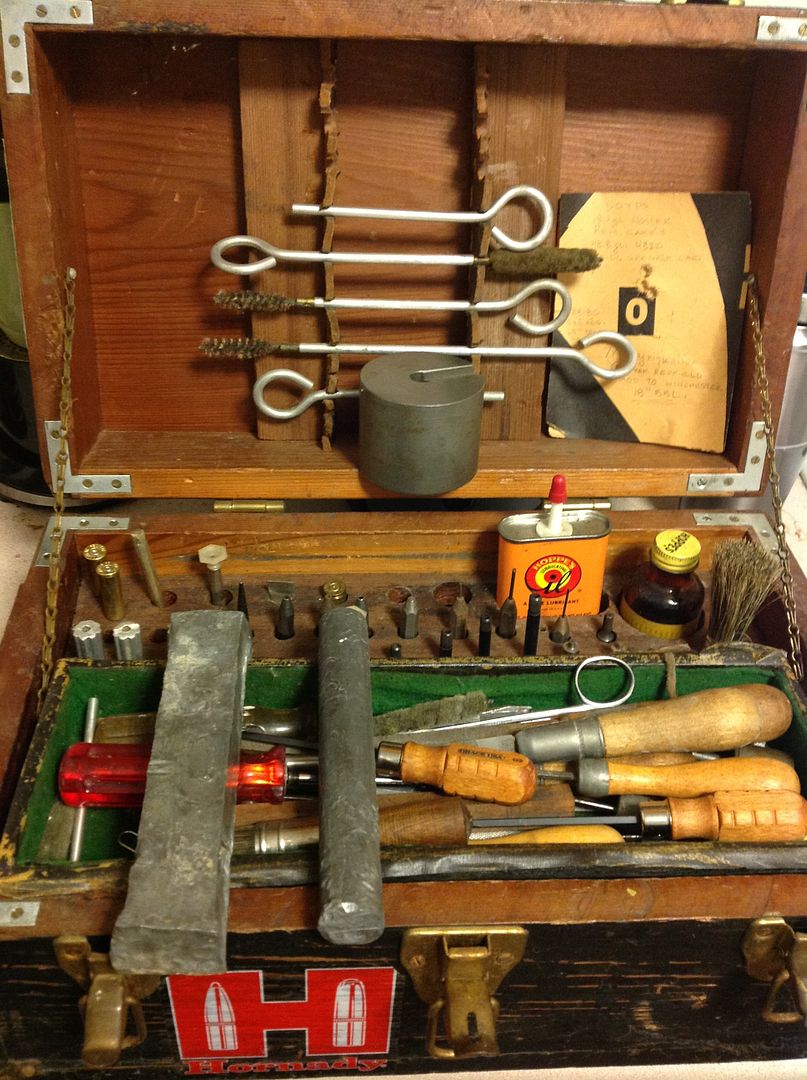
The Babbits are lying crossways across the other tools. In the back you see another proprietary Smith tool, the round steel block which is used for several purposes, such as to support the hammer or trigger and drive pins out. Some of you will recognize other specialized devices and tools.
Best Regards, Les
__________________
SWCA 3084, SWHF 495, PGCA 3064
|
|
The Following 7 Users Like Post:
|
|
09-27-2016, 09:32 PM
|
 |
Member
|
|
|
Join Date: Feb 2013
Location: Baton Rouge, La.
Posts: 426
Likes: 43
Liked 424 Times in 119 Posts
|
|
side plate
After I remove the plate screws I use the end of a rubber screwdriver and tap the bottom of the handle, and the plate will pop off, be sure to hold the plate in hand as it and parts will fall to the floor. It take time and putting plates back to get a feel for them. Some are so close it just takes patience to make the fit, never force it. Take your time, have fun.
__________________
Flipper
|
|
The Following User Likes This Post:
|
|
09-27-2016, 10:25 PM
|
 |
Member
|
|
|
Join Date: Mar 2014
Location: bootheel of Missouri
Posts: 16,891
Likes: 6,992
Liked 28,122 Times in 8,914 Posts
|
|
At the Smith and Wesson armorer's school, they give you a big round hunk of lead. Hold the barrel in one hand, crack the handle (grips removed) real hard one time. Side plate off, no damage to pistol . . .
__________________
Wisdom comes thru fear . . .
|
|
The Following User Likes This Post:
|
|
09-27-2016, 11:27 PM
|
|
Member
|
|
|
Join Date: Jul 2008
Location: Las Vegas, NV
Posts: 3,428
Likes: 5,932
Liked 5,259 Times in 1,732 Posts
|
|
The original gunmakers (note the use of that term) used the babbitt bar to bring barrels back to an alignment of POI/POA. The early spotty metallurgy and rifle/pistol barrel initial bore job often wandered a bit. Rather than junk that barrel it was wacked in the appropriate direction to eliminate the misalignment problem. The gunsmiths then picked up the use of the babbitt bar to realign most any part of the metal frame and barrel assembly of most any gun. This practice originated in the blacksmith/machinist/millwright trades when producing and setting inplace manufacturing machinery. Some of their 'babbitts' were 12 to 15 lb. hammers with a head of lead!
I use a light bar of lead to aid in removal of all revolver sideplates. I was taught to cradle the revolver in my left hand held horizontal with the sideplate down. Then the right hand raps the grip part of the frame from the bottom in an upward manner. Most S&W sideplates fall out into the palm of the left holding hand with one rap. A few have taken a couple more raps. I don't remember ever needing more than three raps. ......
An aside; I have three cast bars (2"w x 1" d x 3.5" l) of lead on my workbench at all times. Midway centered across the 2" face, one has a "V" groove, one has a round trough and one has a square keyway about 1/4" deep x 1/2" wide across its face. I use them for all sorts of events while working on guns in general. The lead will cushion a blued barrel or frame without damage. The lead might 'smear' slightly on a SS finish, but it can be wiped right off. I often use these lead 'helper' blocks while polishing, honing or lightly filing a part. ...........
|
|
The Following 4 Users Like Post:
|
|
09-27-2016, 11:39 PM
|
|
US Veteran
|
|
|
Join Date: May 2010
Location: North Central Florida
Posts: 5,947
Likes: 24,644
Liked 6,195 Times in 2,575 Posts
|
|
Good old rubber hammer.
|
|
The Following User Likes This Post:
|
|
09-28-2016, 12:05 AM
|
 |
SWCA Member
|
|
|
Join Date: Apr 2004
Location: Warrensburg, MO USA
Posts: 5,416
Likes: 2,868
Liked 3,341 Times in 1,705 Posts
|
|
Since we are talking lead babbits here, I will relate my first experience with one. Not me using, but watching!
In 1970 bought a brand new 5 inch model 27, my pride and joy. A Skeeter gun. But, as you turned the cylinder it would get harder, and then easier, so that is was more difficult to turn on about two cylinders. At this time I was a young officer with about three years experience, and we were attending our second National PPC match in Jackson, MS. I took the brand new gun, unfired at that moment, into the trailer where there were two or three Smith factory personnel working on officer's guns all the while chatting away while their hands worked.
When it was guns turn for their attention, I explained the problem, and he took the gun in hand and worked the cylinder around a few turns, then to my complete surprise and astonishment, took the gun in left hand, muzzle skyward, picked up the round babbit that he called German Silver, and whacked the face of the right side of the cylinder with a very solid impact, I think he hit it two or three times. He then checked the rotation of the cylinder and handed it back to me and said it had a burr on it and now it didn't. It worked perfectly after that.
I was shocked to see a gun that I had just bought, a premier gun of the line, and at that time pretty hard to find, just whacked by a lead bar! Not a mark on the gun, but I just barely avoided fainting!
I attended armorer's school in 1986 and now have my own set, along with the other armorers tools. I still shy away from striking guns with the babbits, though!
__________________
Richard Gillespie
FBINA 102
|
|
The Following 2 Users Like Post:
|
|
09-28-2016, 12:45 AM
|
 |
SWCA Member
|


|
|
Join Date: Sep 2006
Location: Henderson,Nevada
Posts: 2,624
Likes: 1,876
Liked 9,107 Times in 1,288 Posts
|
|
The round babbit is also used to true up the yoke if the center pin is not making proper contact with hole in face of recoil shield.
Use hardened center pin to see which way yoke is off then tap the yoke to bring into alignment. I had to do this to a 2nd model 44 HE I bought in February that was very had to close.
|
|
The Following User Likes This Post:
|
|
09-28-2016, 02:42 AM
|
|
Member
|
|
|
Join Date: Apr 2005
Posts: 608
Likes: 2,918
Liked 480 Times in 264 Posts
|
|
I always lay down a cloth, rap the grip part of the frame with a hammer handle, ( right side down) and let the sideplate and hammer block fall onto the cloth. about 2s" above said cloth. No chance of sharp edges of sideplate scratchin the frame.
|
|
The Following User Likes This Post:
|
|
09-28-2016, 03:22 PM
|
|
SWCA Member
|
|
|
Join Date: Aug 2013
Location: Lake Martin, Alabama
Posts: 1,459
Likes: 2,195
Liked 3,245 Times in 830 Posts
|
|
I think of it as "Good Vibrations". DWalt mentioned the inertia bullet puller as a good tool. I think removing the side plate is similar to removing bullets in that it is not a matter of how hard you wack it as much as the type of hit that caused reverberation in the lick.
It is why I strike my bullet puller against the end of a piece of 2 X 4 in my vice. Once again, it is the "Good Vibrations".
|
|
The Following User Likes This Post:
|
|
|
 Posting Rules
|
|
|
|
|


 Linear Mode

