|
|
 |

04-01-2017, 08:05 AM
|
 |
Member
|


|
|
Join Date: Dec 2015
Posts: 595
Likes: 2,901
Liked 1,582 Times in 339 Posts
|
|
 Presentation Cases
Clearly the consensus is that Joe Cebull sets the standard for restoring Smith and Wesson presentation cases. As is so often the case, while my wooden box is in perfect condition the lining is gone.
But instead of shipping my liner off to Joe I'm contemplating going to Joann Fabrics and picking up the appropriate blue cloth and giving it a go myself. That part seems like it wouldn't be too difficult. But what I haven't figured out is how to remove the little S&W emblem/knob on the compartment cover. I've looked at it under magnification but am uneasy about trying to "snap" it off.
Anyone here done their own relining? Besides how to remove/re-install that knob I'm curious as to what adhesive you may have used to secure the fabric. I'm not going the flocking route but using fabric top and bottom.
[IMG] 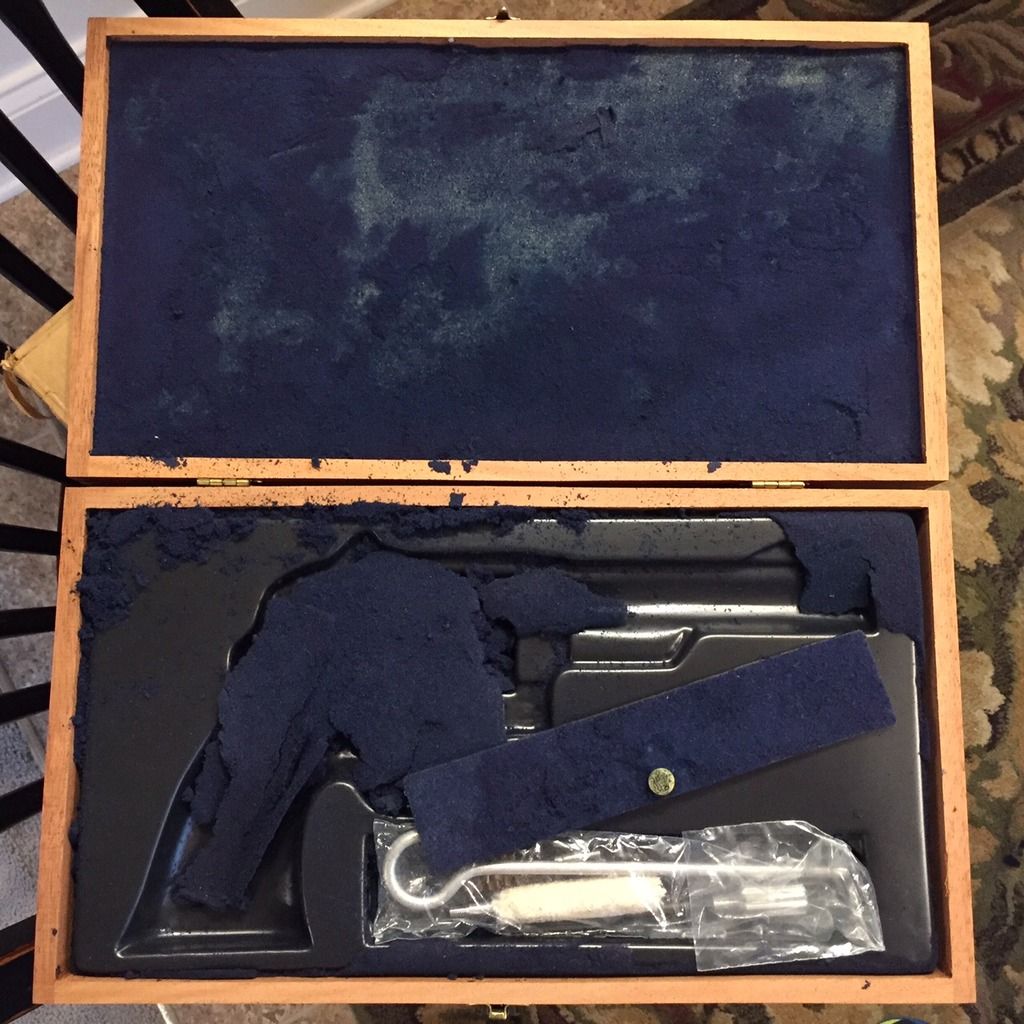 [/IMG]
[IMG] 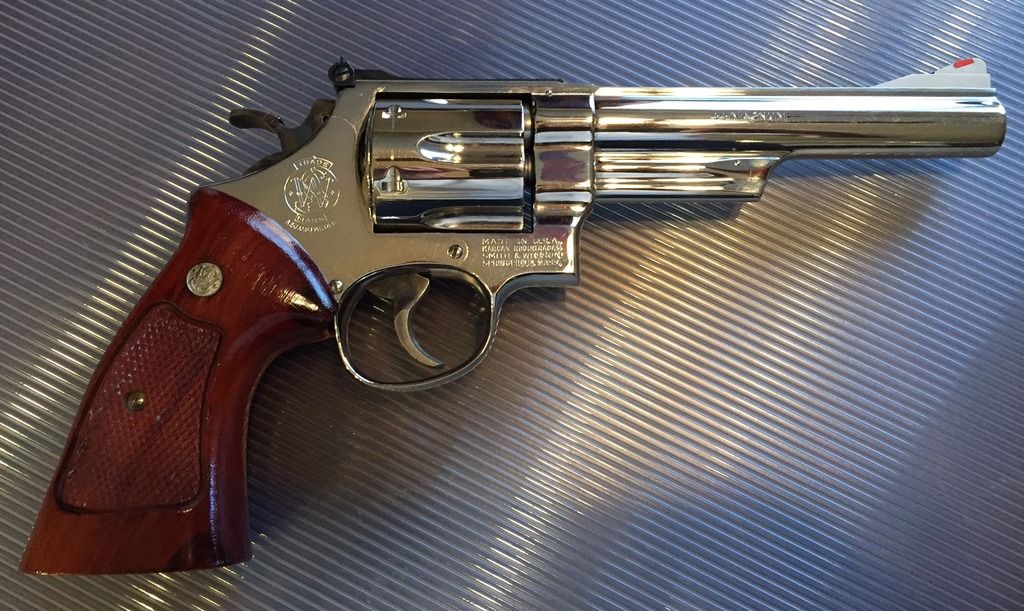 [/IMG]
|
|
The Following 2 Users Like Post:
|
|
04-01-2017, 08:56 AM
|
 |
Member
|

|
|
Join Date: Jan 2017
Location: Whiskey Hill Ma.
Posts: 2,811
Likes: 16,226
Liked 9,122 Times in 1,981 Posts
|
|
It truly is amazing how fast the case innards deteriorated.I have a couple that are softening,but not shedding..yet. Best of luck on your restoration..I'll be watching.
Beautiful revolver,by the way.. 
__________________
My Daddy was a pistol..
Last edited by Breakaway500; 04-01-2017 at 08:58 AM.
|
|
The Following User Likes This Post:
|
|
04-01-2017, 09:36 AM
|
|
Member
|

|
|
Join Date: Jan 2012
Location: God's Country
Posts: 4,711
Likes: 1,235
Liked 3,535 Times in 1,770 Posts
|
|
I relined mine with the appropriate colored synthetic velvet. I used fabric glue available at the local millinery shop to attach the velvet. The velvet has enough stretch when damp with glue that it can be formed to the plastic wrinkle free. The excess was then cut off with scissors and a razor blade after it had dried onto the plastic base.
On my case the button is attached by a ring with four fingers pressed on a shaft. I gently and slowly worked the ring off the shaft with the aid of a small screwdriver.
Attaching the fabric to the top foam piece was no problem at all, but you may wish to replace it if it's starting to get hard and crumble as foam will do simply by being exposed to the ozone in the air.
I suggest that you practice with a piece of irregularly shaped hard plastic first. Apply the glue to the plastic and then apply the fabric. If you apply too much glue, it will show when dried. If you don't apply enough it will be difficult to stretch the fabric.
Good luck.
|
|
The Following User Likes This Post:
|
|
04-01-2017, 09:39 AM
|
|
Member
|
|
|
Join Date: Dec 2015
Posts: 595
Likes: 2,901
Liked 1,582 Times in 339 Posts
|
|
Thanks Scott!!
|
04-01-2017, 09:49 AM
|
|
Member
|
|
|
Join Date: Dec 2015
Posts: 595
Likes: 2,901
Liked 1,582 Times in 339 Posts
|
|
I did exactly as Michigan Scott said, ever so slowly I gently pried under the round four-prong clip. Then POP!! Came off clean in one piece. Scared the **** out of me. You the man Scott!
[IMG]  [/IMG]
|
04-01-2017, 12:47 PM
|
 |
Member
|
|
|
Join Date: Mar 2012
Location: Chicago Suburbs
Posts: 590
Likes: 211
Liked 2,617 Times in 413 Posts
|
|
Interesting endeavor Eric, hope you keep everybody posted on
your progress, curious to see your end result.
Joe's work is about as close to factory as I have ever seen.
But that's just me.
And that's one beautiful N Frame you have by the way.
Last edited by lrb1200; 04-01-2017 at 12:50 PM.
|
|
The Following User Likes This Post:
|
|
04-01-2017, 07:57 PM
|
|
Member
|
|
|
Join Date: Dec 2015
Posts: 595
Likes: 2,901
Liked 1,582 Times in 339 Posts
|
|
The relatively easy parts are done. But I've had my evening refreshments and dinner calls. Should be able to tackle the "bed" of the case sometime tomorrow. Nothing that I've done so far would have been possible were it not for help from Joe Cebull or MichiganScott.
[IMG]  [/IMG]
|
|
The Following User Likes This Post:
|
|
04-01-2017, 08:11 PM
|
 |
Member
|
|
|
Join Date: Feb 2010
Location: Northeast Alabama
Posts: 1,273
Likes: 2,812
Liked 1,926 Times in 710 Posts
|
|
Looking good so far.
|
|
The Following User Likes This Post:
|
|
04-01-2017, 08:59 PM
|
|
Member
|


|
|
Join Date: Nov 2014
Location: Triad NC
Posts: 389
Likes: 689
Liked 753 Times in 169 Posts
|
|
I am interested in how this comes out I have one for my M 25 that is in the exact shape and really need some help!
Keep us up to date!!!
|
04-02-2017, 04:26 PM
|
|
Member
|
|
|
Join Date: Dec 2015
Posts: 595
Likes: 2,901
Liked 1,582 Times in 339 Posts
|
|
Just finished the project. Very pleased. Haven't taken the "money shot" with the 29 in place yet as I want to make sure all the volatiles are gone from the adhesive.
[IMG] 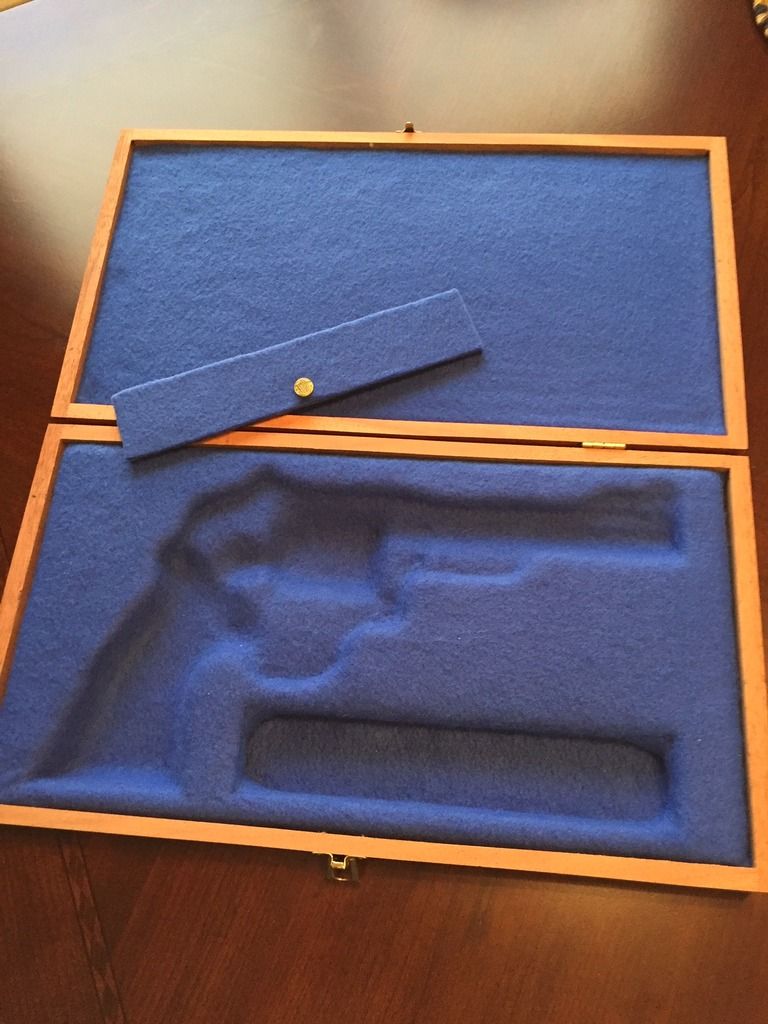 [/IMG]
|
|
The Following 3 Users Like Post:
|
|
04-02-2017, 04:35 PM
|
|
Member
|
|
|
Join Date: Dec 2015
Posts: 595
Likes: 2,901
Liked 1,582 Times in 339 Posts
|
|
At long last..
[IMG] 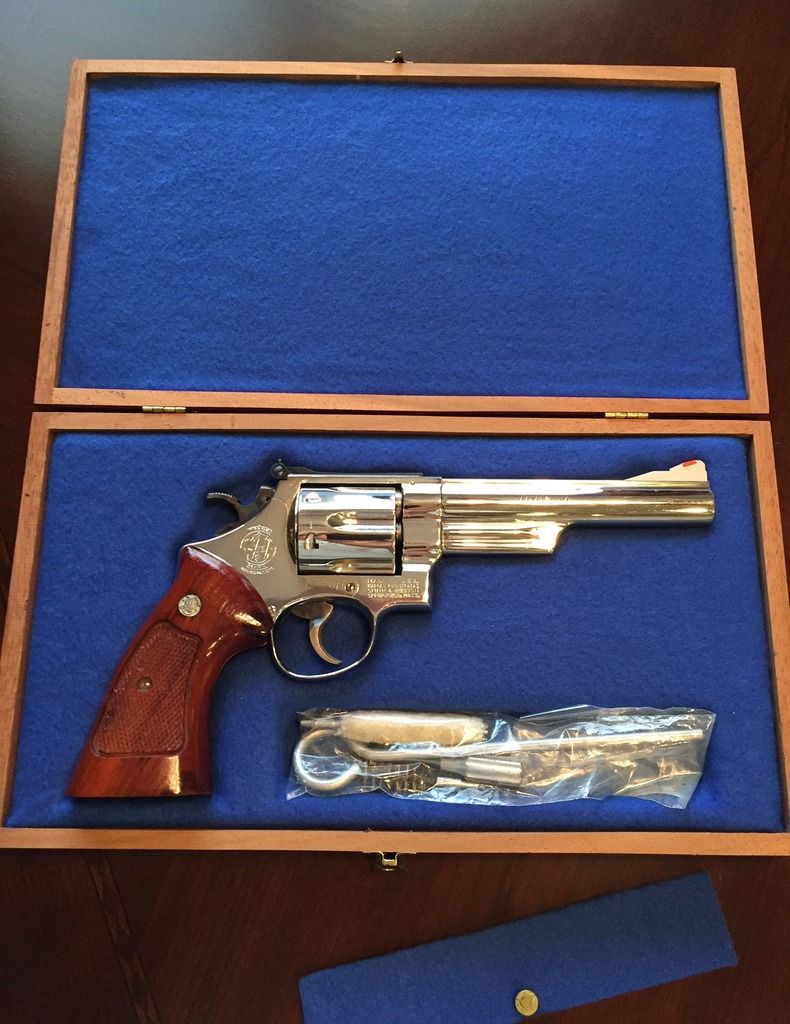 [/IMG]
[IMG] 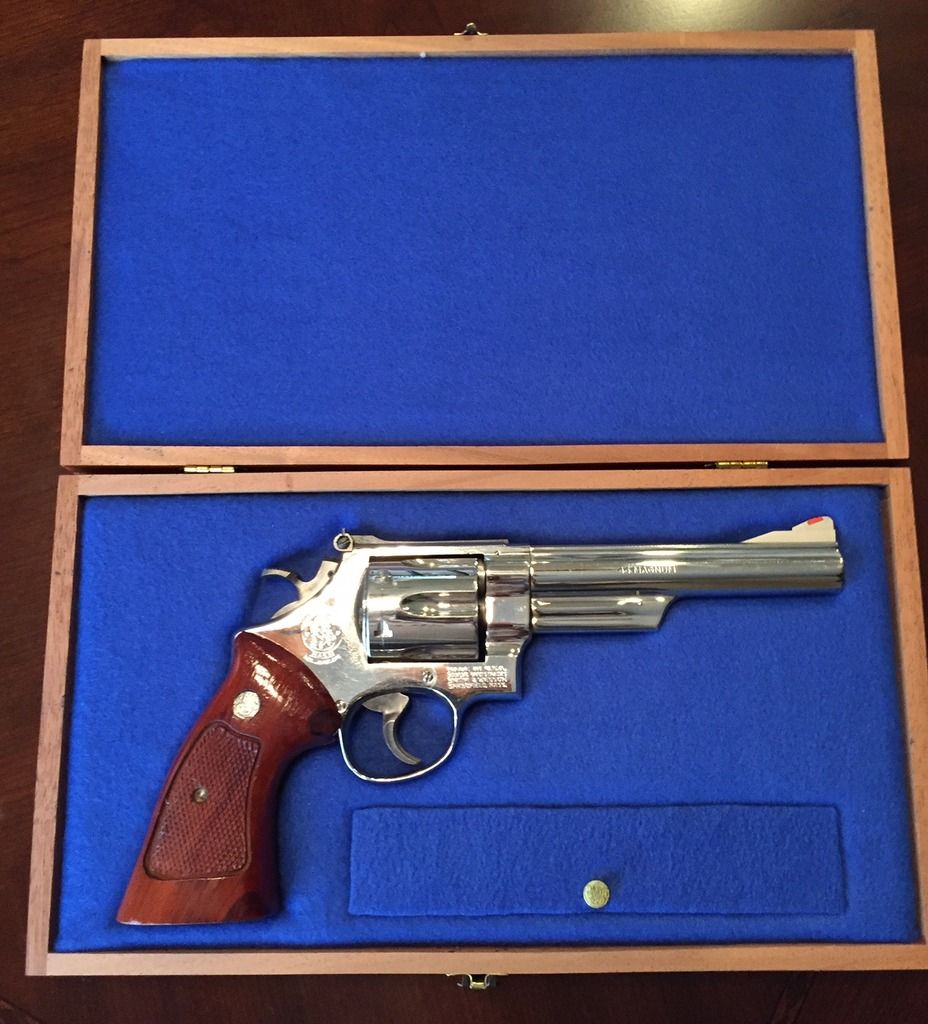 [/IMG]
|
|
The Following 12 Users Like Post:
|
Abflyboy, Arizona Commander, BigDog48, boykinlp, Iggy, JayCeeNC, Jdavis, MAG-NUM, merl67, Omnivore, sureshotbob, wundudnee |
04-02-2017, 08:46 PM
|
|
Member
|
|
|
Join Date: Jan 2012
Location: God's Country
Posts: 4,711
Likes: 1,235
Liked 3,535 Times in 1,770 Posts
|
|
Looks great, Eric.
|
|
The Following User Likes This Post:
|
|
04-02-2017, 09:01 PM
|
|
SWCA Member
|


|
|
Join Date: Apr 2011
Location: Northern Middle Tennessee
Posts: 2,915
Likes: 3,427
Liked 4,120 Times in 1,462 Posts
|
|
That looks great now if I could just find the plastic insert that goes to my box.
|
04-02-2017, 09:42 PM
|
 |
Member
|
|
|
Join Date: Feb 2010
Location: Western PA
Posts: 600
Likes: 1,837
Liked 809 Times in 114 Posts
|
|
|
|
The Following 4 Users Like Post:
|
|
|
 Posting Rules
|
|
|
|
|


 Linear Mode

