Smith & Wesson Forum

Go Back   Smith & Wesson Forum > Ammunition-Gunsmithing > S&W-Smithing

Notices

S&W-Smithing Maintenance, Repair, and Enhancement of Smith & Wesson and Other Firearms.


Reply
 
Thread Tools Display Modes
  #1  
Old 02-04-2011, 05:48 PM
W.E.G.'s Avatar
W.E.G. W.E.G. is offline
Member
Generation 3 semi-auto firing pin removal Generation 3 semi-auto firing pin removal Generation 3 semi-auto firing pin removal Generation 3 semi-auto firing pin removal Generation 3 semi-auto firing pin removal  
Join Date: Dec 2009
Location: Virginia
Posts: 1,368
Likes: 13
Liked 831 Times in 390 Posts
Default Generation 3 semi-auto firing pin removal

Generation 3 semi-auto firing pin removal.

Why remove the firing pin?
Because yours probably looks like this.


Generation 3 semi-auto firing pin removal-firingpinfilthy2-jpg

Remove slide assembly from frame

Remove barrel and recoil spring assembly from slide

Depress firing pin safety plunger (clothespin for tool)


While firing pin safety plunger is depressed, use a narrow punch to push firing pin
as far forward as it will go.
The selector will be in the “FIRE” position for this action.


You can let go of the clothespin and the narrow punch now.
The firing pin will be “trapped” in a forward position by the firing pin safety plunger.
However, the firing pin will not be trapped quite far enough forward to allow you to
remove the selector without further manipulation..


Now, here is your opportunity to lose two important parts.
Do not lose the selector plunger, and the plunger spring.

While the firing pin is trapped in this forward position, move the selector to the “SAFE” position.
Seriously, you need to get the selector to the “SAFE” position, or you will never be able to reach
the tail of the firing pin to push it that little bit extra forward so as to allow the selector to clear
the tail of the firing pin as you remove the selector from the slide.

Insert your narrow punch into the rear of the slide to again push against the tail of the firing pin.
You must push the firing pin past the selector.
I use a Brownells 0.091” diameter punch - Brownells Stock #:080-507-291.
It might be possible to even do this with a straightened paper clip.
I haven’t tried that. Please let us know if you can do it that way.


This punch borders on being too fat for this job. I think a 1/8” diameter punch would be too fat.

While maintaining sufficient pressure with the punch on the on the tail of the firing pin,
use your finger to push against the left side of the selector shaft while jiggling the selector lever
to work the selector out of the slide.

I mean it. This is where you can really lose the selector plunger and the spring.
Select an appropriate work area so you won’t lose these parts when they go flying.


If you are jiggling the selector, and it just won’t come out, you have failed to simultaneously push
the firing pin far enough forward while you jiggle the selector.
There is a real knack to this, and it may seem almost impossible the first time you do it.
A big part of the “art” to doing this is the movement where it will seem like it takes three or four hands at once.
Keep working at it, and you will learn how to do it without pulling your hair out.
Once you develop the right technique, you will want to show everybody how to do it.


Once you get the selector completely out of the slide, the firing pin and spring will still
be trapped in the slide by the firing pin safety plunger.
Use your clothespin to depress the firing pin safety plunger.
Don’t aim the slide at your eyeball, or at the cat, when you do depress the firing pin safety plunger,
as the firing pin will come flying out of the slide with enough force to do damage.

While you are doing all this there is NO NEED WHATSOEVER to jab at the magazine disconnect plunger.
The magazine disconnect plunger is made out of some sort of plastic.
Jabbing at it with pointy tools will only damage it, and there is no need to be messing with it
at all in the first place when you are working on guns that have the firing pin safety.
You can jab at the metal magazine safety plungers when you are working on guns without the firing pin safety.

Re-assemble in reverse order.
It is easier to re-assemble, as it is more obvious how much pressure is needed to push the firing pin
far enough forward to allow re-installation of the selector.
Remember too, you must depress the firing pin safety plunger to allow the firing pin and spring to re-enter the slide.
The firing pin safety plunger should be used to trap the firing pin in a forward position during re-assembly.
Attached Images
File Type: jpg firingpinfilthy2.jpg (31.8 KB, 15 views)
__________________
WWSSD?
What would Skeeter do?

Last edited by W.E.G.; 09-04-2021 at 11:46 PM.
Reply With Quote
The Following 2 Users Like Post:
  #2  
Old 02-04-2011, 06:35 PM
kbm6893 kbm6893 is offline
SWCA Member
Generation 3 semi-auto firing pin removal Generation 3 semi-auto firing pin removal  
Join Date: Apr 2007
Location: Pennsylvania
Posts: 6,634
Likes: 638
Liked 6,872 Times in 2,546 Posts
Default

Excellent post. I used a youtube video on the 4506. If you have an ambi safety, it's a bit trickier, since there are two springs on the right side safety that could get mixed up. My 915 is just like yours. There was an unbelievable amount of lint in there. Crud, too. I'm glad I cleaned it out.
Reply With Quote
  #3  
Old 02-04-2011, 07:52 PM
Tom Beavert's Avatar
Tom Beavert Tom Beavert is offline
US Veteran
Generation 3 semi-auto firing pin removal Generation 3 semi-auto firing pin removal Generation 3 semi-auto firing pin removal Generation 3 semi-auto firing pin removal Generation 3 semi-auto firing pin removal  
Join Date: Mar 2007
Location: Congress, AZ
Posts: 1,191
Likes: 2,338
Liked 1,258 Times in 540 Posts
Default Thanks

you very much, well done.
TB
__________________
frontsightnsqueaz
Reply With Quote
  #4  
Old 02-04-2011, 09:52 PM
Wishoot's Avatar
Wishoot Wishoot is offline
Member
Generation 3 semi-auto firing pin removal Generation 3 semi-auto firing pin removal Generation 3 semi-auto firing pin removal Generation 3 semi-auto firing pin removal Generation 3 semi-auto firing pin removal  
Join Date: Apr 2010
Location: Miwaukee
Posts: 363
Likes: 384
Liked 219 Times in 96 Posts
Default

Awesome post!

Should be a "Sticky"
__________________
-Mike-
Reply With Quote
  #5  
Old 02-05-2011, 11:09 AM
SMSgt's Avatar
SMSgt SMSgt is offline
Member
Generation 3 semi-auto firing pin removal Generation 3 semi-auto firing pin removal Generation 3 semi-auto firing pin removal Generation 3 semi-auto firing pin removal Generation 3 semi-auto firing pin removal  
Join Date: Jul 2010
Location: Florida
Posts: 6,604
Likes: 3,378
Liked 9,243 Times in 3,472 Posts
Default

Is this the same for all Gen 3s, including the "decocker only" versions? My 4566 is spring-loaded to the fire position.

Last edited by SMSgt; 02-05-2011 at 11:12 AM.
Reply With Quote
  #6  
Old 02-05-2011, 12:41 PM
RWJ RWJ is offline
SWCA Member
Generation 3 semi-auto firing pin removal Generation 3 semi-auto firing pin removal Generation 3 semi-auto firing pin removal Generation 3 semi-auto firing pin removal Generation 3 semi-auto firing pin removal  
Join Date: Jun 2003
Location: Northern Neck of VA
Posts: 694
Likes: 238
Liked 353 Times in 177 Posts
Default One helpful hint

When going through Beretta Armorer's School, it was suggested that the safety body removal be done inside a gallon-sized plastic storage or freezer bag to contain any springs and plungers which attempt to flee.
Reply With Quote
The Following User Likes This Post:
  #7  
Old 02-05-2011, 01:28 PM
W.E.G.'s Avatar
W.E.G. W.E.G. is offline
Member
Generation 3 semi-auto firing pin removal Generation 3 semi-auto firing pin removal Generation 3 semi-auto firing pin removal Generation 3 semi-auto firing pin removal Generation 3 semi-auto firing pin removal  
Join Date: Dec 2009
Location: Virginia
Posts: 1,368
Likes: 13
Liked 831 Times in 390 Posts
Default

Quote:
Originally Posted by SMSgt View Post
Is this the same for all Gen 3s, including the "decocker only" versions? My 4566 is spring-loaded to the fire position.

I can't answer that question with 100% certainty.

But, I think the nugget you can take from this for sure is, the tail of the firing pin is what keeps you from being able to just push the selector out of the slide. So, provided you have a punch that is LONG ENOUGH and also SKINNY ENOUGH, and so long as you can figure out how to snake that punch in through the back of the slide so as to push the firing pin forward past the selector shaft, you will be good-to-go for getting the selector out, and for fetching that dirty firing pin out of there.

Selectors that are spring loaded to pop back into the fire position may require a little more ingenuity to hold the lever down while you are pushing on other parts.

Selectors that are two-sided ("ambidextrous") are going to require you to figure out how to get one of the levers off the selector before you can ever get the selector out of the slide. Once you get the extra lever off, the selector should come out pretty much the same as a plain old one-sided selector. I know my 469 came apart that way - although the 469 is not a Generation 3.

Just figure out how to get that firing pin pushed far enough forward to clear the selector shaft, and I think you will do fine, no matter what generation you are working on.
__________________
WWSSD?
What would Skeeter do?
Reply With Quote
  #8  
Old 02-05-2011, 09:16 PM
Big Mike Big Mike is offline
Member
 
Join Date: May 2003
Location: No. Florida
Posts: 198
Likes: 8
Liked 19 Times in 11 Posts
Default

I did it the same way with my 4044, it was a little tougher twisting out the selector with nothing to grip on.
Reply With Quote
  #9  
Old 02-05-2011, 10:09 PM
SW CQB 45's Avatar
SW CQB 45 SW CQB 45 is offline
Member
Generation 3 semi-auto firing pin removal Generation 3 semi-auto firing pin removal Generation 3 semi-auto firing pin removal Generation 3 semi-auto firing pin removal Generation 3 semi-auto firing pin removal  
Join Date: Feb 2002
Location: Victoria, Texas
Posts: 3,322
Likes: 379
Liked 1,016 Times in 358 Posts
Default

the spring loaded decocker does not have the spring and detent in the decocker body since its an auto return.

it does have a coil over spring and once you start pushing, it will want to turn which is ok....

however use caution as once the spring hook clears the provisional hole in the slide, it will slightly snap and could possibly scratch your slide. once you have committed to pushing out the decocker body...keep going. nothing will fly out of the spring loaded decocker body.

Reply With Quote
  #10  
Old 02-05-2011, 10:15 PM
SW CQB 45's Avatar
SW CQB 45 SW CQB 45 is offline
Member
Generation 3 semi-auto firing pin removal Generation 3 semi-auto firing pin removal Generation 3 semi-auto firing pin removal Generation 3 semi-auto firing pin removal Generation 3 semi-auto firing pin removal  
Join Date: Feb 2002
Location: Victoria, Texas
Posts: 3,322
Likes: 379
Liked 1,016 Times in 358 Posts
Default

if you look at the slide where the decocker body rides....you can see the machine cut for the coil over spring. in the area is the hole where the spring hook rides.

Reply With Quote
  #11  
Old 02-05-2011, 10:20 PM
SW CQB 45's Avatar
SW CQB 45 SW CQB 45 is offline
Member
Generation 3 semi-auto firing pin removal Generation 3 semi-auto firing pin removal Generation 3 semi-auto firing pin removal Generation 3 semi-auto firing pin removal Generation 3 semi-auto firing pin removal  
Join Date: Feb 2002
Location: Victoria, Texas
Posts: 3,322
Likes: 379
Liked 1,016 Times in 358 Posts
Default

DAO

the part which is in place of the decocker body which I will refer to as a firing pin retainer

IIRC does have the spring and detent plunger to keep the part from turning when the firing pin is moving.

Reply With Quote
  #12  
Old 02-05-2011, 10:25 PM
SW CQB 45's Avatar
SW CQB 45 SW CQB 45 is offline
Member
Generation 3 semi-auto firing pin removal Generation 3 semi-auto firing pin removal Generation 3 semi-auto firing pin removal Generation 3 semi-auto firing pin removal Generation 3 semi-auto firing pin removal  
Join Date: Feb 2002
Location: Victoria, Texas
Posts: 3,322
Likes: 379
Liked 1,016 Times in 358 Posts
Default

Another thing to consider....if your firing pin is very sticky, grimey and gooey

chances are high your firing pin safety plunger/spring and mag safety plunger/spring are in the same condition.

test by depressing and if they stick or are crunchy feeling....they will also need to be cleaned which means removal of the rear sight.

likely a sight tool will be needed

unless you are familiar with this disassembly....seek out a sw armorer.
Reply With Quote
  #13  
Old 02-06-2011, 10:50 AM
SMSgt's Avatar
SMSgt SMSgt is offline
Member
Generation 3 semi-auto firing pin removal Generation 3 semi-auto firing pin removal Generation 3 semi-auto firing pin removal Generation 3 semi-auto firing pin removal Generation 3 semi-auto firing pin removal  
Join Date: Jul 2010
Location: Florida
Posts: 6,604
Likes: 3,378
Liked 9,243 Times in 3,472 Posts
Default

I think this is probably more than what I care to tackle. I'd really hate to blame myself for a worthless, non-functional 4566. I'll try some Gunblaster and an airhose and see what comes out first.
Reply With Quote
  #14  
Old 02-06-2011, 04:04 PM
W.E.G.'s Avatar
W.E.G. W.E.G. is offline
Member
Generation 3 semi-auto firing pin removal Generation 3 semi-auto firing pin removal Generation 3 semi-auto firing pin removal Generation 3 semi-auto firing pin removal Generation 3 semi-auto firing pin removal  
Join Date: Dec 2009
Location: Virginia
Posts: 1,368
Likes: 13
Liked 831 Times in 390 Posts
Default

Pressing the sight off the slide can be tricky. Fortunately, there is access to the channels for the plungers from the bottom of the slide. You can't get the plungers out without removing the sight, but you can blast CLP into the plunger's drain hole on the bottom of the slide, and then blast compressed air (I use a keyboard duster) to force 96% of the crud and excess CLP out of the plunger channels).

Should be relatively easy to get the firing pin out per the previous instructions.
__________________
WWSSD?
What would Skeeter do?
Reply With Quote
  #15  
Old 05-15-2011, 04:23 PM
Tarheel97 Tarheel97 is offline
Member
Generation 3 semi-auto firing pin removal Generation 3 semi-auto firing pin removal Generation 3 semi-auto firing pin removal Generation 3 semi-auto firing pin removal Generation 3 semi-auto firing pin removal  
Join Date: Apr 2011
Posts: 103
Likes: 2
Liked 6 Times in 5 Posts
Default

Just like to add my thanks to WEG for this post. I cleaned my DAO 3953 today and was able to clean the firing pin and replace the FP spring and plunger spring due to this excellent tutorial. Many thanks.
Reply With Quote
  #16  
Old 05-15-2011, 05:08 PM
W.E.G.'s Avatar
W.E.G. W.E.G. is offline
Member
Generation 3 semi-auto firing pin removal Generation 3 semi-auto firing pin removal Generation 3 semi-auto firing pin removal Generation 3 semi-auto firing pin removal Generation 3 semi-auto firing pin removal  
Join Date: Dec 2009
Location: Virginia
Posts: 1,368
Likes: 13
Liked 831 Times in 390 Posts
Default

beeb-a-dop-bop-bop...beeb-a-dop-bop-bop...bdeeeeeee-ya-bird!

__________________
WWSSD?
What would Skeeter do?
Reply With Quote
  #17  
Old 03-29-2014, 01:10 PM
Rule3's Avatar
Rule3 Rule3 is offline
Member
Generation 3 semi-auto firing pin removal Generation 3 semi-auto firing pin removal Generation 3 semi-auto firing pin removal Generation 3 semi-auto firing pin removal Generation 3 semi-auto firing pin removal  
Join Date: Feb 2008
Location: Florida
Posts: 22,079
Likes: 10,794
Liked 15,506 Times in 6,794 Posts
Thumbs up

Thanks for this post, I was searching google and this came up.
__________________
Still Running Against the Wind
Reply With Quote
  #18  
Old 03-29-2014, 03:01 PM
Fastbolt's Avatar
Fastbolt Fastbolt is offline
Member
Generation 3 semi-auto firing pin removal Generation 3 semi-auto firing pin removal Generation 3 semi-auto firing pin removal Generation 3 semi-auto firing pin removal Generation 3 semi-auto firing pin removal  
Join Date: Jul 2002
Location: CA Central Coast
Posts: 4,647
Likes: 920
Liked 6,611 Times in 2,198 Posts
Default

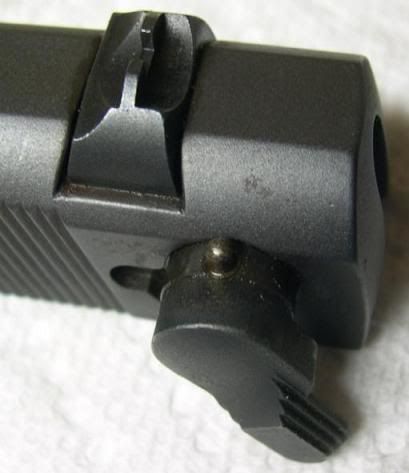
With the slide resting on the sights, upside down on a flat/firm surface ... (My description is done with the slide upside down, the right side of the slide facing me, with the muzzle pointing to my left)

Holding a pin punch in each hand (1/8" works fine for this part), I depress the firing pin safety plunger with 1 punch while pushing the other pin punch against the back of the firing pin, and then release the safety plunger when the firing pin is fully forward, which traps the firing pin partially forward.

Yes, it will not be far enough forward to remove the manual safety assembly body (called a "selector" in the OP's post), which is why you use a long non-tapered 1/16" pin punch to complete the removal.

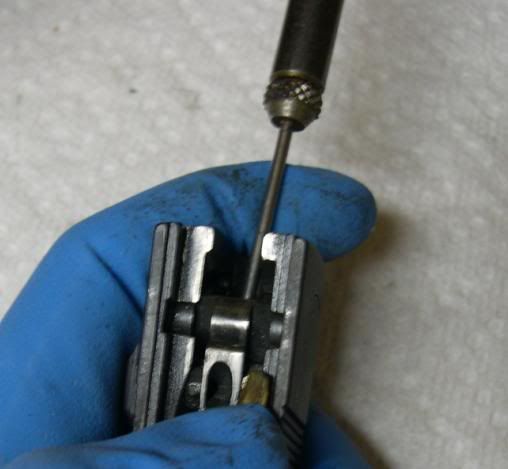
This is done by simply inserting the 1/16" straight pin punch into the space behind the firing pin (leaving the manual safety lever in the forward/ready-to-fire position) ...

... until it reaches the end of the firing pin (which you can't see), which is when you push the firing pin a little bit more forward, until it can't go any farther forward, holding it there with the punch ...

... and then push against the right side (end) of the manual safety body until the thin pin's shaft is "trapped" against the inside of the slide (you're not going to have to push it far) ...

... Then pull the pin punch out, continuing to push the manual safety body to the left side of the slide (away from you, if the right side of the slide is facing you as it's sitting on the bench) ...

... Taking care to carefully reach a finger over the bottom of the slide (since it's facing "up"), to trap the manual safety body plunger as it becomes exposed with the safety body's movement out the left side of the slide. Don't let it go flying (may, or may not, but trap it anyway).

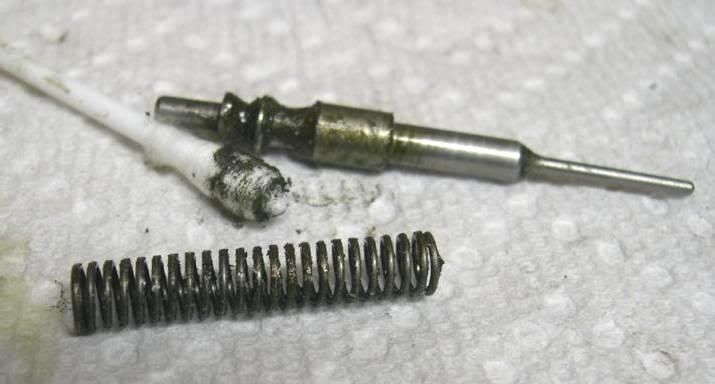
Depress the firing pin safety plunger to release the firing pin & spring.

Badly fouled firing pins which don't fly free when the firing pin safety plunger is depressed (to release it) may have to be carefully pulled from the channel (while the firing pin safety plunger is depressed), and then the firing pin spring may have to be pulled out separately. I use the end of a paperclip, carefully bent into a short hook, to catch the end coil of the spring ... while depressing the firing pin safety plunger and pulling the spring from a nasty channel.

Care must be taken to avoid using the wrong kind of cotton swab inside the firing pin channel. Cosmetic swabs may come apart. The gunsmithing swabs stay together better. Use a strong light to make sure there aren't any fibers or parts of the swab left inside the channel after cleaning.

Reinstallation is mostly the reverse, with an exception ... (and don't forget to install the body plunger and its heavy spring) ...

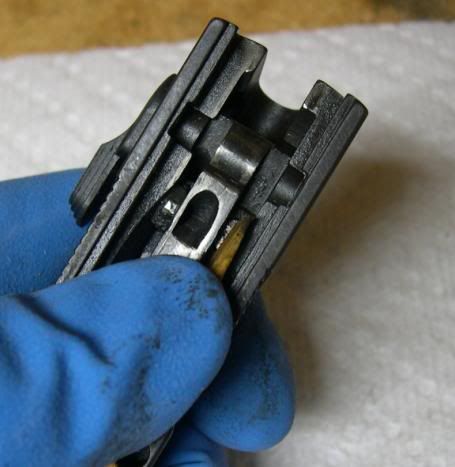
As the manual safety body is pushed into the left side of the slide, it will reach a point where the firing pin (trapped in the forward position by the firing pin safety plunger) stops the manual safety assembly from moving. If you look at the right side of the manual safety body (shaft), through the hole in the right side of the slide, you can see the firing pin as the manual safety body butts up against it.

If the manual safety is an ambi style, and the left side lever is positioned just right (slightly down), the end of the pin can be caught within the machined slot on the right end of the manual safety (for the ambi lever). This actually makes it easy to depress the firing pin that little extra bit needed to complete installation of the manual safety assembly. Using the end of a 1/8" pin punch, the firing pin is simply levered forward (I push the side of the tip of the punch against the firing pin) enough to clear the manual safety (as the manual safety is pushed past it) ...

... as the manual safety reaches a point in its movement, a sharp corner may bump up against the inside of the slide cuts, and it can be freed by a gentle wiggle (you can look into the right side of the slide, through the round hole, and see this). As the manual safety body slides into position, I twist the left manual safety lever "down", as if I were depressing the lever to decock, and the body plunger will easily slide into the machined recess where it normally moves.

I release the firing pin by depressing the firing pin safety lever.

Then, holding the firing pin safety lever depressed with 1 hand/pin punch, I use another pin punch (in my other hand) to push in & out on the end of the firing pin, to confirm it has normal freedom of movement and spring tension.

Of course, it's also a good idea to check the firing pin safety plunger function by pushing on the firing pin, without also pushing on the firing pin safety plunder, to make sure the firing pin is blocked and can't protrude through the breech face hole.

If the gun has an ambi lever assembly, install the spring, plunger & lever.

DO NOT MIX UP THE BODY PLUNGER & SPRING WITH THE AMBI LEVER PLUNGER & SPRING!!! Doing so can result in the gun "decocking itself" and putting itself on-safe when fired. The light ambi lever spring is painted light blue and is significantly lighter than the body plunger spring (which is unpainted). Also, the plungers are different, and the ambi lever plunger mistakenly being put into the body assembly could result in heavy friction and resistance (and marring the inside surface of the slide where the body plunger rubs).

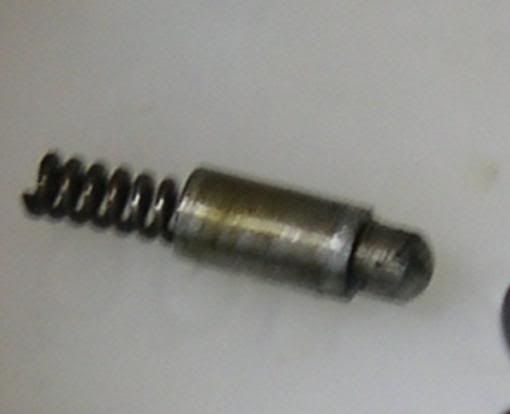
The ambi lever plunger in newer 3rd gen guns has a wide head. The body plunger has a round head and a "shoulder". In this picture the ambi plunger & spring is on the right.


In early 3rd gen guns, the ambi lever plunger has a narrower flat head and a machined shoulder, making it look almost similar to the body plunger ... except under close examination the plunger's head was still flat, not rounded. This also meant that the older ambi levers in 9/.40 guns had smaller plunger head holes (so a newer style ambi plunger won't fit in them) ... except for .45's, which I think may have had the wider headed ambi plungers either earlier, or all along (I'm on the road and don't have access to my older manuals and notes ).

The decock-only assembly requires an additional step toward the end of the assembly's insertion into the slide.

The end of the large spring (wound around the body) must be correctly positioned into the small recessed hole under the left side lever where it's normally captured and rests. I use a thin pin punch to nudge it over the hole, and then gently press the assembly the rest of the way into the slide, watching to make sure the end of the spring went into the hole (and wasn't moved out of line with the hole by any twisting of the assembly body/lever). If it doesn't go into the hole, but is just trapped within the shallow step of the machined cut surrounding the hole, it's not installed properly (and the end of the spring might get bent).

All of this is a lot easier to do and try to write down, however, it does require some knowledge and practice. Once someone is familiar with how to do it properly, it takes less than 1 minute to remove the manual safety assembly and firing pin. This includes removing the ambi lever from an assembly that has one (1/16" pin punch is used, reaching into the lever's hole to depress the plunger while sliding the lever forward).

In older .45 slides there was a machined groove on the outside of the slide, angled just forward & down of the ambi safety lever. This was so the ambi lever could be lowered and removed (after which the manual safety assembly and firing pin could be removed in the normal manner). The 9/.40 slides didn't require/have this extra machined groove for ambi lever removal.

The newer production .45 slides don't have (or need) this machined groove, and the ambi levers are removed in the same manner as in the 9/.40 slides (meaning they could be pulled out of the end of the manual safety body, removed forward, while the levers are in the forward/ready-to-fire position).

If you have an older .45 slide ... modified to accept the spring-loaded, decock-only option ... removing the ambi lever can be ... interesting. The ambi lever must still be removed from the down/lowered position, but you have to hold the other side's lever down against spring tension while dealing with removing ambi lever. This can really make it seem like a 3rd hand would be handy.

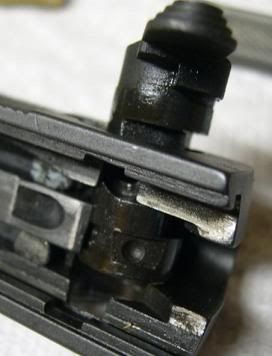
BTW, when the spring-loaded, decock-only assembly is installed in 9/.40 guns, the ambi lever must be the .45 lever. This is because the .45 ambi lever has an additional bit of metal on the inside that keeps the body assembly from shifting inside the slide and interfering with the firing pin's freedom of movement.

This picture shows the tip of a pin punch pointing to the extra metal (spacer tab, if you will) on the .45 ambi lever, which butts up against the outside of the slide and keeps the manual safety body from shifting.


There are some things that can create problems for the hobbyist unfamiliar and untrained to actually work on these guns.

FWIW, removing and reinstalling the rear sight is a subject of its own. In the 9/.40 slides the exposed plunger springs can easily be cut/clipped, bent over or otherwise damaged as the sight base is reinstalled. I've seen guns which had damaged plunger springs under the rear sight. In the .45 slides with the plunger spring cover plates it's easier to avoid this happening, but improperly pressing the cover plate onto the 2 plunger springs (different heights/tensions) can present the potential for 1 of the springs to get bent over and trapped underneath the plate. I don't like to remove rear sights except for repair (replacement), or in the event a gun has been submerged and contaminated (silt, sand, grit, etc, and salt water can corrode things).

Also, spraying some aerosol cleaner up inside small spaces inside the slide may result in condensation and trapped moisture. Not generally a good thing. Even some air compressors can blow moisture under some conditions. Might even trap debris that can't easily "flow" out of the small openings.
__________________
Ret LE Firearms inst & armorer

Last edited by Fastbolt; 04-08-2014 at 10:31 PM.
Reply With Quote
The Following User Likes This Post:
  #19  
Old 03-29-2014, 04:57 PM
Rule3's Avatar
Rule3 Rule3 is offline
Member
Generation 3 semi-auto firing pin removal Generation 3 semi-auto firing pin removal Generation 3 semi-auto firing pin removal Generation 3 semi-auto firing pin removal Generation 3 semi-auto firing pin removal  
Join Date: Feb 2008
Location: Florida
Posts: 22,079
Likes: 10,794
Liked 15,506 Times in 6,794 Posts
Default

I am gearing up to do this on my M 52-2 38 Special Wad cutter gun, 1st generation pistol.

I may be crawling back here for help

No real reason to other than I am replacing the recoil spring and mag springs. Just acquired this gem and it shoots fine.

Just want to know I have new springs. I bought the recoil spring pack so I can adjust to my handloads. The for pin springs come with it.

It has a mag disconnect safety but not a hammer block safety.

No ambi safety either so I am "guessing" the safety will just push out the same as the others do without removing any side lever.

The schematic looks the same.
__________________
Still Running Against the Wind

Last edited by Rule3; 03-29-2014 at 05:00 PM.
Reply With Quote
  #20  
Old 10-12-2018, 12:17 PM
JRen JRen is offline
Member
Generation 3 semi-auto firing pin removal Generation 3 semi-auto firing pin removal Generation 3 semi-auto firing pin removal Generation 3 semi-auto firing pin removal Generation 3 semi-auto firing pin removal  
Join Date: Oct 2018
Location: Florida
Posts: 1
Likes: 0
Liked 0 Times in 0 Posts
Lightbulb Pin Vise handy

I was looking for a better way to hold the firing pin when removing it, on the S&W 52-2 and realized a small pin vise might work. Sure enough, pushing the firing pin all the way in and snugging up a pin vise on it allowed for easy removal and installation of the safety. Still have to watch those flying springs, no help there. Be careful not to use a pin vise with jaws that might cut into your firing pin or bend the pin vise while installed or you will be buying a new firing pin.
Reply With Quote
Reply

Tags
3953, 4506, 4566, 915, ambidextrous, beretta, brownells, detent, selector

Thread Tools
Display Modes

Posting Rules
Forum Jump

Similar Threads
Thread Thread Starter Forum Replies Last Post
Any opinions on the Auto Ordnance semi-auto Tommy Gun? Beemerguy53 Firearms & Knives: Other Brands & General Gun Topics 77 10-04-2018 09:49 PM
S&W semi-auto's, 1st - 3rd Generation armorer951 Smith & Wesson Semi-Auto Pistols 9 12-29-2015 05:36 AM
Grips for 3rd Generation Semi-Auto hgmike S&W-Smithing 1 01-28-2011 08:27 PM
Flitz Polish for 3rd Generation S&W Semi-Auto Jetpilot007 S&W-Smithing 3 11-01-2009 01:33 AM
first generation semi-auto gunsmiths 38man Smith & Wesson Semi-Auto Pistols 1 07-21-2009 02:57 PM

Powered by vBadvanced CMPS v3.2.3
smith-wessonforum.com tested by Norton Internet Security smith-wessonforum.com tested by McAfee Internet Security

All times are GMT -4. The time now is 03:32 PM.


Smith-WessonForum.com is not affiliated with Smith & Wesson Holding Corporation (NASDAQ Global Select: SWHC)