|
|
 |

07-18-2011, 01:22 PM
|
 |
Moderator
|


|
|
Join Date: Jan 2004
Location: Columbus Ohio
Posts: 4,552
Likes: 931
Liked 3,590 Times in 816 Posts
|
|
 I Bubba'd K Targets
OK, they were buggered when I go them, I just went ahead and took them the rest of the way.
They came on my 586 project gun and all the edges had been rounded over.
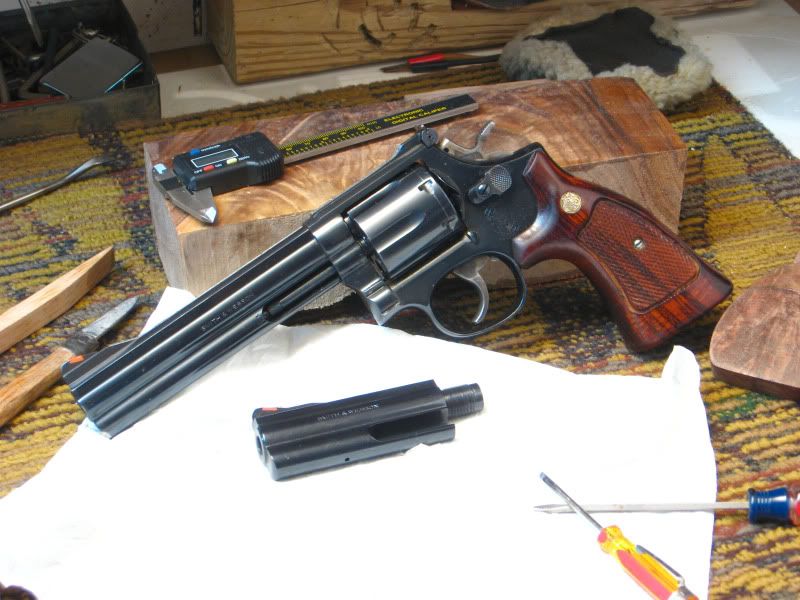
I saw somewhere in another thread where someone had done a complete round over and they looked like J Targets.
__________________
Regards,
Guy-Harold Smith II
|
07-18-2011, 02:01 PM
|
 |
US Veteran
|


|
|
Join Date: Nov 2003
Location: Near Chi-town
Posts: 1,181
Likes: 215
Liked 194 Times in 100 Posts
|
|
Bubba doesn't know how to do that! They look good to me.
|
07-18-2011, 02:52 PM
|
|
Member
|

|
|
Join Date: Oct 2009
Location: NW PA
Posts: 332
Likes: 5
Liked 50 Times in 20 Posts
|
|
WOW! I like those! Very Jerry Miculik. Is this a service you would perform for others?
Have fun and be safe.
Nightshade2x
|
07-18-2011, 03:05 PM
|
 |
Member
|


|
|
Join Date: Oct 2003
Location: Wyoming
Posts: 10,418
Likes: 10,425
Liked 28,230 Times in 5,272 Posts
|
|
Those look great. The other thread might have been mine.
VM has modified a couple of pairs for me.
You did a great job.
Last edited by Iggy; 07-18-2011 at 03:55 PM.
|
07-18-2011, 03:08 PM
|
 |
Member
|
|
|
Join Date: Jun 2011
Location: Scottsdale, AZ
Posts: 1,284
Likes: 401
Liked 845 Times in 405 Posts
|
|
smith,
how did you refinish?
thanks!
|
07-18-2011, 04:45 PM
|
|
Moderator
|
|
|
Join Date: Jan 2004
Location: Columbus Ohio
Posts: 4,552
Likes: 931
Liked 3,590 Times in 816 Posts
|
|
Quote:
Originally Posted by Iggy

Those look great. The other thread might have been mine.
VM has modified a couple of pairs for me.
You did a great job.
|
Now that you mention it I believe you are correct, Thanks for the inspiration.
Quote:
Originally Posted by dcxplant
smith,
how did you refinish?
thanks!
|
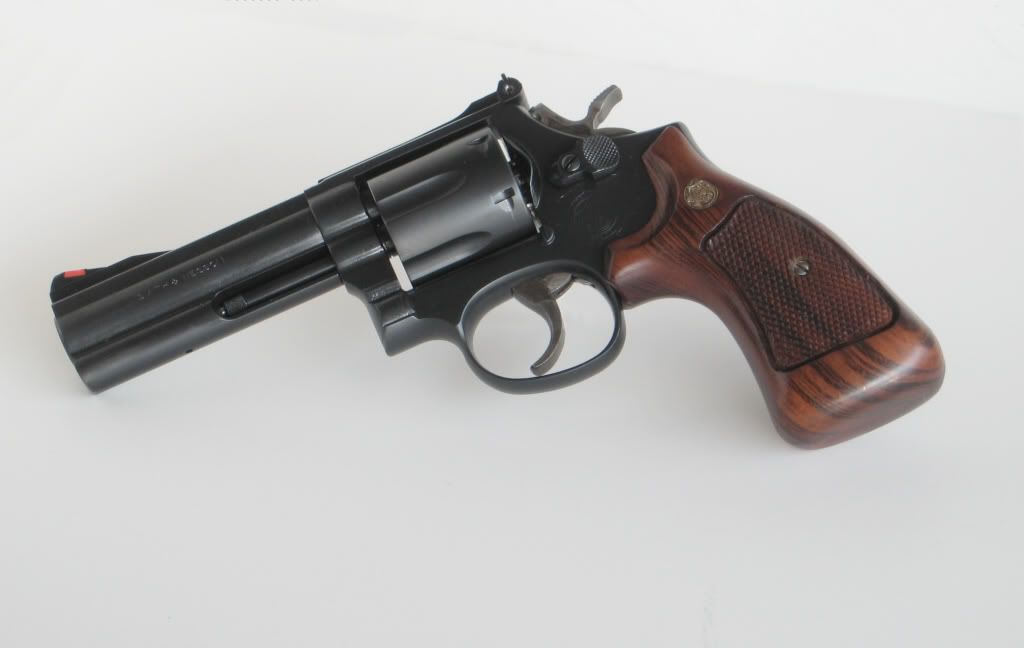
The finish is just 3-4 applications of Formby's Tung Oil Finish it's like Tru-oil only thinner, it applies easier, but takes a tad longer to dry.
__________________
Regards,
Guy-Harold Smith II
|
07-18-2011, 04:51 PM
|
 |
Member
|
|
|
Join Date: Apr 2011
Posts: 718
Likes: 164
Liked 348 Times in 157 Posts
|
|
wow them grips look down right amazing. What color stain is that it looks so good and the grain looks great also. Just wow really really top notch job
|
07-18-2011, 05:22 PM
|
|
Member
|


|
|
Join Date: Jan 2008
Location: South Florida
Posts: 487
Likes: 15
Liked 666 Times in 201 Posts
|
|

Bubba does know how to do this. This is a set of N targets that I picked up for $10 because they had a large chunk missing from the bottom of one grip. I rounded the grips enough to completely remove the chip and now there is a lot less pain when shooting hot .44 magnum loads.
BUBBAblades
|
07-18-2011, 05:30 PM
|
 |
Member
|
|
|
Join Date: Aug 2010
Location: C-Bus
Posts: 6,335
Likes: 4,311
Liked 4,916 Times in 2,086 Posts
|
|
Quote:
Originally Posted by Smith357
... The finish is just 3-4 applications of Formby's Tung Oil Finish it's like Tru-oil only thinner, it applies easier, but takes a tad longer to dry.
|
Best.
Penetrating Oil.
Ever.
Excellent job all around. Can you get into a bit of a step-by-step? Thanks, Alan
|
07-21-2011, 11:35 AM
|
|
Member
|
|
|
Join Date: Oct 2009
Location: NW PA
Posts: 332
Likes: 5
Liked 50 Times in 20 Posts
|
|
Quote:
Originally Posted by nightshade2x
WOW! I like those! Very Jerry Miculik. Is this a service you would perform for others?
Have fun and be safe.
Nightshade2x
|
Hum...Is this a service you would perform for others? Second request...
Have fun and be safe.
Nightshade2x
|
07-21-2011, 11:47 AM
|
|
US Veteran
|
|
|
Join Date: Oct 2002
Location: Tennessee., USA
Posts: 749
Likes: 2
Liked 384 Times in 170 Posts
|
|
Excellent grips.
I did the same thing, with a pair of trashed targets. They fit my hand SO much better now.
Original Smith targets are too blasted thick at the bottom.
__________________
NRA Instructor
|
07-21-2011, 01:31 PM
|
 |
Member
|

|
|
Join Date: Mar 2009
Location: Aiken,SC
Posts: 372
Likes: 0
Liked 32 Times in 4 Posts
|
|
They turned out very nice, nice job. I'd be proud to have those.
|
07-21-2011, 02:53 PM
|
 |
Member
|

|
|
Join Date: Feb 2009
Location: god bless the USA
Posts: 661
Likes: 75
Liked 149 Times in 61 Posts
|
|
Great job, I'll bet they work as well as they look!
/c
|
07-21-2011, 04:01 PM
|
|
Moderator
|
|
|
Join Date: Jan 2004
Location: Columbus Ohio
Posts: 4,552
Likes: 931
Liked 3,590 Times in 816 Posts
|
|
Quote:
Originally Posted by nightshade2x
WOW! I like those! Very Jerry Miculik. Is this a service you would perform for others?
Have fun and be safe.
Nightshade2x
|
Thanks, as for doing it again my shop is not really set up for production, I ran those freehand and not sure I can repeat it. I consider myself lucky to still have all my fingers. 
Quote:
Originally Posted by HotRoderX
wow them grips look down right amazing. What color stain is that it looks so good and the grain looks great also. Just wow really really top notch job
|
No color just raw wood, other than the slight yellow tint of the oil.
Quote:
Originally Posted by blujax01
Best.
Penetrating Oil.
Ever.
Excellent job all around. Can you get into a bit of a step-by-step? Thanks, Alan
|
I love the stuff, and have used it on these as well.
__________________
Regards,
Guy-Harold Smith II
|
07-25-2011, 11:41 AM
|
|
US Veteran
|
|
|
Join Date: Oct 2005
Location: KY
Posts: 3,568
Likes: 4,482
Liked 1,189 Times in 509 Posts
|
|
Yours look great. Here is a set that bubba did that don't look so good.

|
08-03-2011, 08:40 PM
|
|
Moderator
|
|
|
Join Date: Jan 2004
Location: Columbus Ohio
Posts: 4,552
Likes: 931
Liked 3,590 Times in 816 Posts
|
|
Quote:
Originally Posted by blujax01
Best.
Penetrating Oil.
Ever.
Excellent job all around. Can you get into a bit of a step-by-step? Thanks, Alan
|
First thing I did was use a fine small sanding wheel on my dremel to try to bring back the sharp edges of the speedloader cut out. I then finished it shaping it with sandpaper on my finger.
I mounted the grips on my home made grip frame spacer, basically just a stick that I mount the grips to, and masked off the checkering with a couple layers of blue painters tape. Then proceed to round over the bottom edges with a 12" disk sander. When they got close to where I thought they should be I switched to a rasp and then to 200 grit paper. I did a lot of holding them up and checking that both sides contours matched. I then mounted them on the gun and finished them making sure the level the seams with 400 grit paper. I then degreased them them in acetone and gave them one last buff with a gray scratch pad and then applied the Formby's.
__________________
Regards,
Guy-Harold Smith II
|
08-04-2011, 10:52 AM
|
|
Member
|
|
|
Join Date: Feb 2010
Posts: 153
Likes: 0
Liked 5 Times in 5 Posts
|
|
Good work, I like them.
|
|
 Posting Rules
|
|
|
|
|


 Linear Mode

