|
|
 |

06-29-2018, 10:26 AM
|
 |
SWCA Member
|


|
|
Join Date: Jul 2012
Posts: 2,477
Likes: 3,790
Liked 3,912 Times in 1,196 Posts
|
|
 Rust blue question
I have 3 or 4 Smith revolvers that are finish challenged, and I plan to rust blue them. I have watched videos and seen the barrel be plugged. Does something like this need to be done with the cylinder as well? If the "rust" is in the chambers/charge holes, can it just be carded with a wire brush? Any suggestions would be much appreciated. Jim
|
06-29-2018, 10:39 AM
|
|
Member
|


|
|
Join Date: Jul 2010
Location: San Diego
Posts: 356
Likes: 48
Liked 260 Times in 116 Posts
|
|
I rust blued a 1911 i put together Interesting project, came out good but i didn't do the barrel. I think if i was doing a revolver i'd make some plugs out of wood dowels for the cylinder and the barrel during the boiling cycle. I also would recommend making a little "sweat box" for the rust cycle. A cardboard box with a light bulb(for heat) and a open pan of water inside the box to generate a little moisture would be a good thing.
|
|
The Following User Likes This Post:
|
|
06-29-2018, 12:30 PM
|
|
Member
|
|
|
Join Date: Sep 2005
Posts: 7,747
Likes: 1,642
Liked 9,149 Times in 3,379 Posts
|
|
Leave the bbl and cylinder chambers open. They don't get any rust bluing soln applied to them so you won't be doing any carding to those surfaces.
Wipe out the bore and chambers with a clean patch after going thru the boiling water tank is about all I've ever done. The heat of the metal will make sure it dries from there.
Don't apply anything to the bore or chambers, just leave them bare metal. They won't rust or pit during the process as long as you don't put the parts through any extended rusting cycles like a couple days each..
The only time I ever protect the bores is when I do a damascus finish and that's only because betw the rusting cycles, the bbl has to go thru a dunking into an etching soln.
I have to keep that soln from getting at the surface of the bores. So I coat the bores of the bbl's with nothing more than shellac. A couple heavy coats with a swab on a cleaning rod and let dry.
It holds up very well thru the boiling water of the process. I sometimes re-coat at about cycle#6 or 7 just to make sure, but I'm not sure it even needs it. I don't want to find out the hard way though!.
Removal of the coating is not that easy, but plenty of laq.thinner into the plugged bore than wiping it clear w/swabs of the same gets it done,,finally.
Tough stuff.

|
|
The Following 2 Users Like Post:
|
|
06-29-2018, 01:32 PM
|
|
Member
|

|
|
Join Date: Oct 2017
Location: Atlanta GA
Posts: 457
Likes: 25
Liked 582 Times in 227 Posts
|
|
I have used Mark Lee Express Blue on two revolvers and am pleased with the results. Next time though I will use Brownell's slow rust blue. For the barrel I just drop in a section of wood pencil and plug both ends with silicone. The pieces are just going to be dunked into boiling water so it's not as though they are going into molten salts. You just need to limit the amount of air inside the barrel if you plug both ends. The barrel really does not NEED to be plugged as the bluing adds no dimension, it just seems wrong to blue the bore.
Last edited by Arquebus357; 06-29-2018 at 01:35 PM.
|
|
The Following 3 Users Like Post:
|
|
12-26-2020, 09:22 PM
|
|
SWCA Member
|
|
|
Join Date: Jul 2012
Posts: 2,477
Likes: 3,790
Liked 3,912 Times in 1,196 Posts
|
|
Thanks guys. Finally starting these projects as I have retired and moved since the original post. Will post my results here later.
|
01-03-2021, 11:10 AM
|
|
SWCA Member
|
|
|
Join Date: Jul 2012
Posts: 2,477
Likes: 3,790
Liked 3,912 Times in 1,196 Posts
|
|
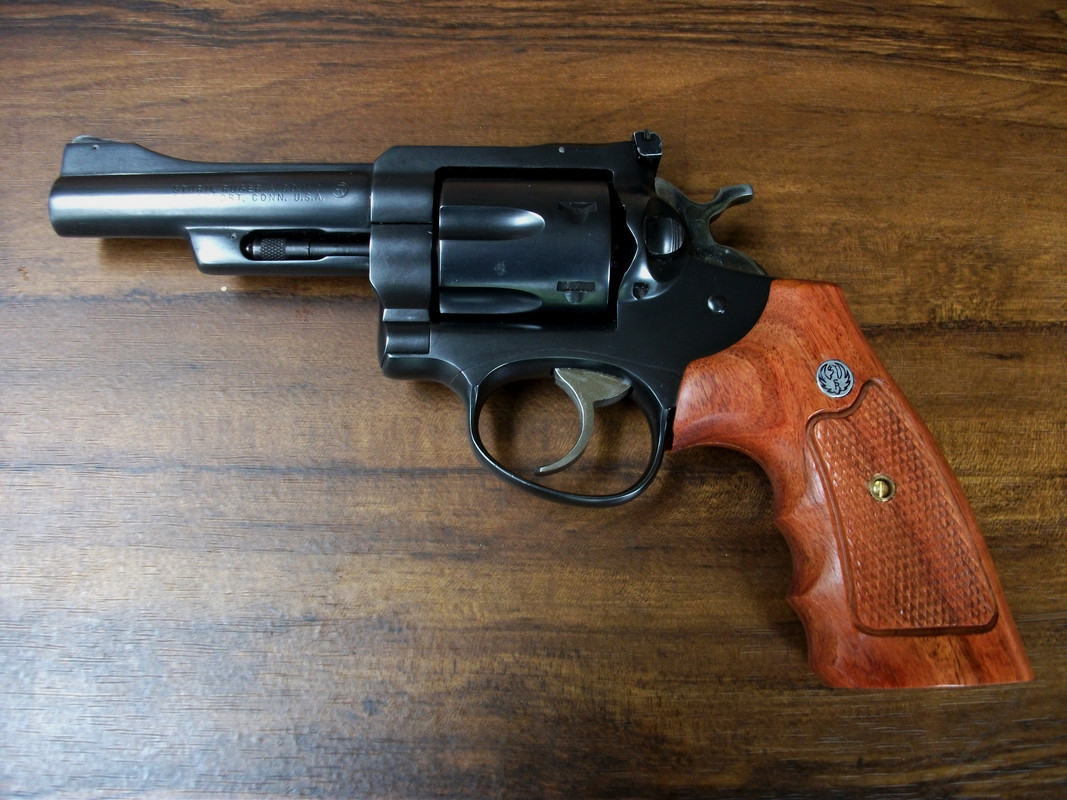
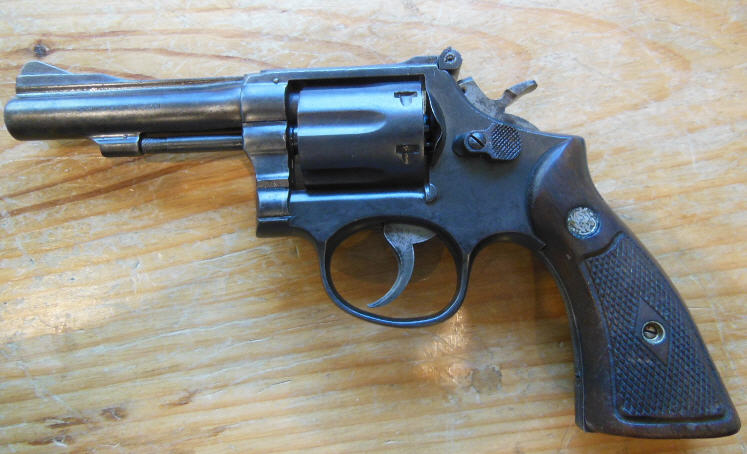
OK - as promised.
Here was a sad Model 15-3 I bought from a sheriff's sale for $75. Filthy inside. Outside looked like someone had sandpapered it with a heavy grit to clean up.

I cleaned it up internally, and it performed great with a smooth action. I cold blued it a year or so ago. Pretty mottled appearance.

I did a rust blue over the weekend. I did 5 rounds of rust-boil-card. The barrel is still a tiny bit mottled. If I did it over again, I would do 6-8 rounds. It would have gotten darker. I still need to do some work on hammer and trigger to make them look better.
Last edited by jmace57; 04-18-2021 at 10:56 AM.
|
|
The Following 12 Users Like Post:
|
cgt4570, CQB27, drgbike, Jebus35745, JH1951, Moo Moo, oldbrownhat, outta_ammo, PPS1980, reddog81, snowman.45, THE PILGRIM |
01-03-2021, 11:53 AM
|
|
Member
|

|
|
Join Date: May 2004
Location: Buckeye, AZ, USA
Posts: 1,085
Likes: 10,373
Liked 1,324 Times in 487 Posts
|
|
Quote:
Originally Posted by jmace57

OK - as promised.
Here was a sad Model 15-3 I bought from a sheriff's sale for $75. Filthy inside. Outside looked like someone had sandpapered it with a heavy grit to clean up.
I cleaned it up internally, and it performed great with a smooth action. I rust blued it. Pretty mottled appearance.
I did a rust blue over the weekend. I did 5 rounds of rust-boil-card. The barrel is still a tiny bit mottled. If I did it over again, I would do 6-8 rounds. It would have gotten darker. I still need to do some work on hammer and trigger to make them look better.
|
Nice job. I've rust blued a couple in the past. Planning on doing the same with a M10 project I'm working on.
__________________
Dave Frost
|
01-03-2021, 12:12 PM
|
 |
SWCA Member
|
|
|
Join Date: Nov 2020
Location: McMinnville, OR
Posts: 503
Likes: 1,432
Liked 1,612 Times in 348 Posts
|
|
Anyone interested in rust blueing should check out this video:
Cheers.
|
|
The Following 2 Users Like Post:
|
|
01-03-2021, 01:39 PM
|
 |
Member
|

|
|
Join Date: Apr 2010
Location: Central New York State
Posts: 1,619
Likes: 3,464
Liked 2,113 Times in 632 Posts
|
|
Im no expert but I have had fantastic results with rust bluing. Looking at your photos Ill ask a few questions....
Were the parts sanded thoroughly to 320 grit and then burnished on the proper size wire wheel?
Were the parts thoroughly degreased with with a proper solvent? I use gasoline believe it or not.
Were you using gloves at all times?
Was there a nice solid coating of orange fuzzy rust prior to the dunking in boiling water? Humidity and time are important here.
Usually after two or three cycles the bluing should be even and solid, if not yet thoroughly dark.
Please dont take offense, as none is intended... just trying to cover the common issues with this type of process.
Last edited by bigmoose; 01-03-2021 at 01:41 PM.
|
|
The Following 2 Users Like Post:
|
|
01-03-2021, 02:34 PM
|
|
Member
|

|
|
Join Date: Jan 2009
Location: Iowa
Posts: 902
Likes: 2,761
Liked 1,036 Times in 443 Posts
|
|
Sometimes during the process if I see mottling if you squirt some dn alcohol on the area and scrub with some gray scotchbrite it will help even things out. When I boil I use distilled water or rain water if I can get it.
|
|
The Following User Likes This Post:
|
|
01-03-2021, 03:01 PM
|
|
Member
|
|
|
Join Date: Apr 2010
Location: Central New York State
Posts: 1,619
Likes: 3,464
Liked 2,113 Times in 632 Posts
|
|
Plus one for distilled water. I was asked to reblue the barrels on a fine old double. They were in horrible shape cosmetically. Preparation is the key here, similar to refinishing wood. Of the two guns pictured one is the reblued barrelled gun, the other untouched factory original.
Last edited by bigmoose; 01-03-2021 at 03:24 PM.
Reason: Photos added
|
|
The Following 4 Users Like Post:
|
|
01-03-2021, 04:06 PM
|
|
Member
|
|
|
Join Date: Aug 2001
Location: WV
Posts: 2,437
Likes: 402
Liked 2,846 Times in 1,265 Posts
|
|
Quote:
Originally Posted by bigmoose
...Preparation is the key here, similar to refinishing wood.
|
Very true. A friend of mine run a small hot bluing business. He once told me that blueing guns was easy. It was the proper metal prep that was hard.
|
01-03-2021, 11:17 PM
|
|
SWCA Member
|
|
|
Join Date: Jul 2012
Posts: 2,477
Likes: 3,790
Liked 3,912 Times in 1,196 Posts
|
|
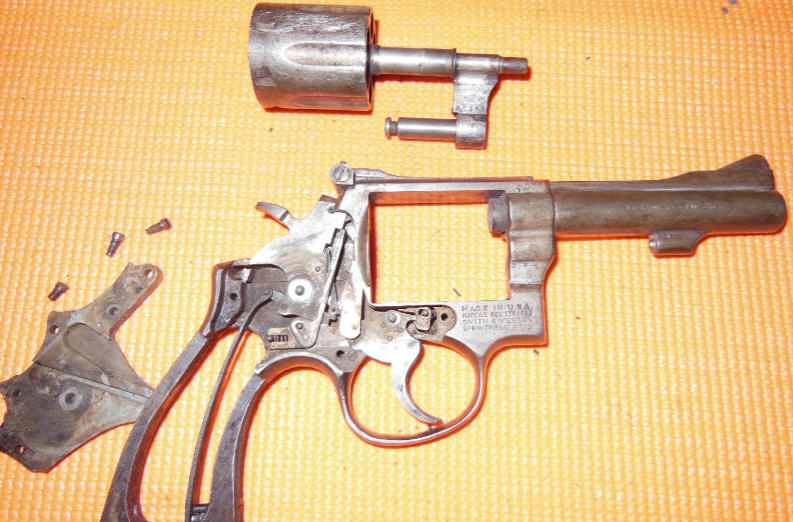
Here's how I did it for those of you who asked. I considered this my "learning" gun to sort of see if I could make my mistakes and learn from them.
I did do the sanding down to 320 grit. I did not burnish with a wire wheel. I cleaned all parts with acetone. I used nitrile gloves while cleaning and putting on solution. I used the Pilkington's solution. I think their instructions say to put two coats of solution on before you do the first rusting. I did not as I didn't have the directions in time.
A friend created sort of a hanging rack made out of PVC pipe that I put in the bathtub (which I filled about 1/4 way with hot water) - hanging the parts on with wire. I then closed the door. Checked back in 2 hours. SOME rust on the parts. I put them in boiling distilled water for about 5 minutes.
It seems like on YouTube, everybody does it different. Some people say scalding water, some say boiling - some say pour the water over the parts, some say just dip them, some say boil for 5, or 10, or 20 minutes.
I always wore cotton gloves (got a big package of 50 like jewellers use) to handle the parts and used a large and small carding brushes bought from Brownell's.
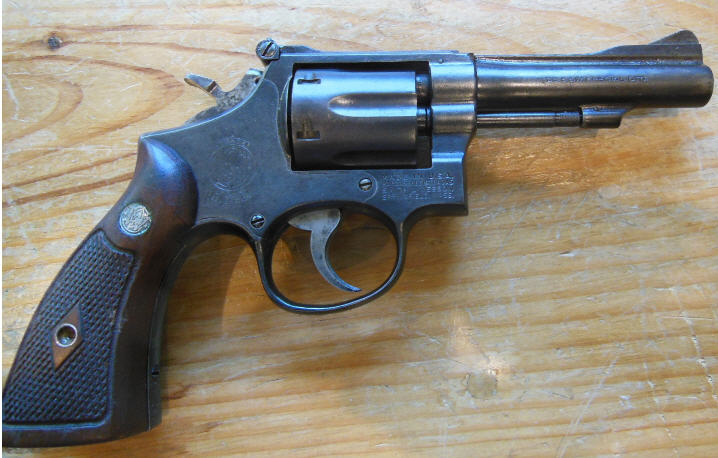
The second round, I tried something additional. I did everything the same as the first round, but put a space heater in the bathroom with the hot water in the tub. When I checked in 2 hours, it was 90 degrees and humidity extremely high in the bathroom. Gun parts were WAY better rusted. I decided to leave the parts in boiling water for 10 minutes this time.
I repeated this 3 more times. The smaller parts were getting darker, faster than the frame and cylinder.
I'm generally happy with how it went for a first attempt on a "test" gun. I do wonder if I had put 2 coats the first time...and had used the space heater if the first coat would have been a lot better (and made the whole job better).
Last edited by jmace57; 01-03-2021 at 11:24 PM.
|
01-03-2021, 11:51 PM
|
|
Member
|
|
|
Join Date: Aug 2009
Location: Seattle
Posts: 3,422
Likes: 1,000
Liked 3,595 Times in 1,521 Posts
|
|
Quote:
Originally Posted by bigmoose
Im no expert but I have had fantastic results with rust bluing. Looking at your photos Ill ask a few questions....
Were the parts sanded thoroughly to 320 grit and then burnished on the proper size wire wheel?
Were the parts thoroughly degreased with with a proper solvent? I use gasoline believe it or not.
Were you using gloves at all times?
Was there a nice solid coating of orange fuzzy rust prior to the dunking in boiling water? Humidity and time are important here.
Usually after two or three cycles the bluing should be even and solid, if not yet thoroughly dark.
Please dont take offense, as none is intended... just trying to cover the common issues with this type of process.
|
Wouldn't gasoline leave an oily residue?
|
01-04-2021, 05:16 AM
|
|
Member
|
|
|
Join Date: Apr 2010
Location: Central New York State
Posts: 1,619
Likes: 3,464
Liked 2,113 Times in 632 Posts
|
|
In answer to the gasoline question... I would have thought that it was a less than ideal solvent for this application, but an old time gunsmith, who has been mentoring me, has always used it and said thats what I should use.
OP, your process is correct, except that I may offer that using the wirewheel (I forgot the mil spec for it) would enable you to get a more consistent end finish to the complicated and many faceted surfaces of a barrel/frame assembly. The more uniform the surface, the more uniform the bluing will be. Also be sure to degrease the wheel and the carding tools before use.
|
|
The Following User Likes This Post:
|
|
01-06-2021, 12:55 PM
|
|
Member
|
|
|
Join Date: Sep 2005
Posts: 7,747
Likes: 1,642
Liked 9,149 Times in 3,379 Posts
|
|
Gasoline used as a parts cleaning solvent prior to bluing was what was recommended back when the Carbona Oil blue system (American Gas Furnace) was in use.
I imagine the gasoline back then (just prior to WW1 and up to just prior to WW2) was quite different than what is pumped today in that it lacked a lot of extra additives.
I tried using it back when I first started rust bluing,,or trying to! That was in the 60's.
I didn't have good luck with it. Maybe I just didn't do a good job using it.
Now I've settled on using a scrub down of a hot water (not boiling) soln of Tri-Sodium Phosphate cleaning powder.
It's the same stuff Brownells will sell you as their '909 Cleaner' for bluing.
A scrub brush and that stuff in a fairly concentrated soln and it'll cut and remove any oil, grease, finger prints ,ect.
Don't use it in a boiling soln,,,it'll leave strange colored (green & yellow) deposits on the steel as well as lightly etch it.
Brownells advises the same for their stuff.
After the scrub, a warm water rinse and then a cool water rinse. PAt dry with 'plain' paper towels. Plain Paper,,not the type with perfume scents, soap, or pretty printed designs on it.
Those raspy brown public rest room type paper towels are the best.
The pretty white and print ones will leave traces of all those nice hummingbird pictures and flowery smells back onto the chemically clean metal and screw up the bluing.
If you are Slow Rust Bluing,,don't apply the rusting soln unless the metal parts are at room temp. Applying it with the parts warm or hot will risk a copper plate look from many of the commercial soln's as they have a trace of copper sulfate in them as a rule.
Those plated areas will not rust or rust the same as none plated areas and back to polishing you will go.
If Express (Quick Rust) Bluing,,as long as the parts are hot, go right ahead and apply the soln.
Rusting soln made for Express Bluing IS NOT the same stuff as soln made for Slow Rust bluing.
Slow rust bluing you can use a lot of common products.
SalAmmoniac was popular. Ammonium Chloride by chemical name.
It's soft soldering flux in a bar or small block form. Most welding supply stores will have it or off the Web it can be bought. Very inexpensive.
It's fairly soft and you simply cut chips off and disolve it in water. Then use that soln to apply to the metal to slow rust it.
Works well.
A weak soln of Hydrochloric acid (muriadic acid) will do it. Keep it weak as you want a controlled rusting, not a canker mess of rust.
Dissolving iron in Hydrochloric acid has always been a favorite slow rust soln
Makes a lot of smoke and gives off chlorine gas in the process, so don't do it in the kitchen. When you can't disolve anymore nails or steel wool into the acid, let it settle and then pour off the stuff from the top and leave the crud in the bottom of the jar.
You have made Ferric Chloride. Or you could just go buy some off of Ebay.
Good etchant for use in Damascus bbl finishing too. You use it at only about a 5% solution though it that procedure.
I like to use Laurel Mtn Rust Brown for slow rust blue. Rust blown turns blue in the boiling process.
For Express Blue I use Mark Lee Express Blue.
I've used about every brand available and tried more home brews than I care to think about and have settled on these two for rust bluing.
Others work just as well, it's technique and small details that can make or destroy a fine bluing effort.
Keep oil out of the process.
If you see the slightest hint of an oil slick on the water surface in the tank, dump the water and scrub the tank clean.
If you think there might be some in there and you already have parts in the tank and it's boiling,,just before you remove the parts run the heat way up to bring the water to a rolling boil. That breaks up the surface and keeps any oil slick on the surface from forming in any size.
Then when you yank the parts out, they come through the surface and there's less of a chance of being covered with a film of oil.
If you transfer oil to the carding brushes or wheel,,you will get oil onto all the parts that you card with it.
It'll be there when you apply the next coating of rusting soln and that will just spread any oil out across the parts surface again.
If you get a streak or blemish in the bluing as you go along but the rest of the finish looks fine,,take a small patch and wet it with acetone and rub it over that steak/blemish. That'll remove any oil or dirt in that area.
Throw that patch away...
Then take a small piece of scotchbrite,,I like the Maroon or Grey colored stuff and carefully scrub that area down till the blemish is gone.
Yes you will remove the bluing in that area along with the blemish or streak. But you want the blemish gone.
Then carefully blend the edges of the now polished out area iinto the surrounding blued finish.
When satisfied, go right on with your next coat of soln. Doesn't matter if you are doing Express Rust or Slow Rust.
That scrubbed out area will return to catch up in color with the surrounding bluing in 1 or 2 cycles.
The reason is that you have not removed any of the bluing that is down in the pores of the steel.
9 times out of 10 you'll be able to just continue on with applying cycles of soln, boiling and carding and not have to stop bluing and repolish the entire bbl/part and start bluing all over again.
If there are gold or silver inlays (or copper or brass) in the steel, be careful not to apply rusting soln that has any Mercury compounds in it.
This is especially true of Express Blue compounds which most all used to have Bi-Chloride of Mercury in them.
The compound made the soln's rust really well, but the mercury in those compounds will 'plate' onto any non-ferris metal when applied hot,,just as you do when Express Bluing.
The mercury 'plating' looks for all the world like a silver or nickel plating. In fact it used to be an old 'trick' to touch up worn nickel plate on brass framed revolvers by using it.
The plate of mercury is tough and won't just rub off. You have to polish or scrape it off.
So if there's an gold inlay or two on the Kornbrath engraved '03Sporter floor plate that you're figuring to touch up the looks a little by a coating or two of Express Rust Blue,,think twice before turning the 2 critters into silver inlays.
Brass/gold sight beads, any gold line inlay, any of it will end up mercury plated.
The good news is that Mercury compounds have been mostly removed from society and bluing soln's.
The old Herters Belgian Blue Express soln was one that used it.
That was discontinued with the fading of Herters. But Brownells brought the Belgian Blue back onto the market some years back and they said it was the same as the orig. I wondered if it still had Mercury.
I bought a small bottle and tried the swab it onto warm brass trick and sure enough it plated Mercury (or a silver colored metal) onto the brass surface. I wouldn't have thought they'd have brought a merc compound to the market. but....
I stayed away from it and still use the two mentioned above.
Another was Birchwood Casey quick Brown soln.
Boil the browned parts and you got a beautiful blue with the stuff. But it also had the mercury in it. B/Casey changed the formula in the stuff in the 80's sometime.
Stay away from the dangerous chemicals, then you won't shake like me.
Sorry for the long post.
|
|
The Following 2 Users Like Post:
|
|
|
| Thread Tools |
|
|
| Display Modes |
 Linear Mode Linear Mode
|
 Posting Rules
|
|
|
|
|


