Expoxy Putty that closely resembles Stainless Steel ?

RoadVirus

Member
Joined
Apr 3, 2015
Messages
105
Reaction score
416
Location
Kansas
Been rehabbing Stainless Smith revolvers for some time and find that most nicks and dings can be blended out using anything from a file to high grit sandpaper. This 686-0 2.5 Lew Horton has a pretty significant ding in an inconvenient spot though. Picture was taken towards the end of me chasing the back strap grooves with a three sided jewelers file to clear the smashed grooves. My question is , has anyone ever found an epoxy putty that closely resembles stainless ? Thanks.
 

Attachments

  • 686 dent.jpg
    686 dent.jpg
    56.4 KB · Views: 194
Register to hide this ad
You can check J-B Weld's epoxies, in person at a home depot type store.
Their steel stick does look too dark.
Silver solder, plumbers type, might be close once polished.
Not as strong as welding but that area doesn't require that.

Will try to post a picture of a 63 and silver solder tonight.
 
Last edited:
Silver solder on copper next to gun

1. solder
2. same solder area filed a bit then medium emery cloth
3. thin solder flow

No hire a different plumber jokes. :D
 

Attachments

  • C770DC79-8565-4553-8D78-E47778FD9035.jpg
    C770DC79-8565-4553-8D78-E47778FD9035.jpg
    43.7 KB · Views: 169
  • A89AE24D-76E8-441A-923E-EE83BB095064.jpg
    A89AE24D-76E8-441A-923E-EE83BB095064.jpg
    33.2 KB · Views: 155
  • 9A04F23E-98EC-46E3-A4F4-E2126C3A524E.jpg
    9A04F23E-98EC-46E3-A4F4-E2126C3A524E.jpg
    43.6 KB · Views: 155
Last edited:
Try looking on the internet for industrial metal matrix epoxy or polyester bonding products. This type of metal machine repair components are not going to show up like a JB-weld. You might have to use different key words in your search like: "key way repair", "ball bearing", "tool and die" etc. In the stone industry there's a lot of epoxies that you can get pigment additives for. Its going to take a lot of trial and error to get not only the right color but also the same "shine". One trick I've used in my industry is to take the same material as your trying to repair make it into a powder and use it for a filler. hope this helps, Rick.
 
I might add that when powdering anything to mix with epoxies etc, best to use file/grinder type tools as abrasives contaminate the powder with grit.
As stated, color matching epoxy is by trial and error.

Varnishing a yacht in South Florida's Summer weather is something only few can do, and not have it be similar to hardened maple syrup.

Not a welder but can it just get a spot added?
 
Last edited:
Go and check out a business called Progressive Polymers. Ive used his standard epoxies to build an 18' sailboat and it has held up as well as WEST.
While that has noting to do with you querry Paul, the owners name is Paul Oman, has a very large selection of fillers along with many types and formulas of epoxy. I know he has copper and aluminum fillers, I used the copper for the bottom of that boat as an ablative, he may have SS now too. Fairly certain he has a high temp formula if that is what you seek.

That copper is unimaginably fine, like you take off the lid and any air movement will lift the copper into the air so obviously a mask, rather a respirator is an absolute must. The aluminum has been used by municipalities to preserve and protect olf metal bridges. Maybe worth a look.
 
On dents that are right on the edge of a metal part and one edge will be covered,,in this case by the grip panel when assembled...
You can push the metal upwards from the side of the grip frame where the grip panel will cover.

Bump it up in other words making it bulge the metal upwards in the area where the dent is now.

Then peen that 'bump' of metal back down to a level where you need it and shape it towards the edge.
A flat file will then quickly clean up the edge and make it blend in with the rest of the backstrap.
The top will have more than enough metal bumps up for you to then carefully file, polish and then cut the line back into the strap.

Of course there will be very small small 'stake' punch marks on the side of the strap where you bumped up the metal,,probably 2 is all that's needed.

For a punch, I usually use a common nail set that is ground to a chisel point. It only needs be a 1/16" across the face or even less.
The frame metal is soft and easily upsets.

I'll get a pic or two up if you are interested in doing it this way.
But no matter, they will be covered with the grip panel when installed.

Added:
Some pics to explain the process:

Plain piece of key stock for demonstration. I gave two surfaces a quick belt
grind polish, then marked one with a couple sharpie lines to indicate what would be the outside surface of the backstrap.


Next I wacked a dent into the edge of the piece with a punch layed across it and hit it with a hammer. I filed the upset metal off of both edges so there was nothing there to simply push back into place.


Then with the part securely held in a vise, take the punch and slightly below the dent on what will be the hidden edge of the part,,punch into the stell so as to upset and push the steel including the dent upwards.
It can take a couple of strikes. Here it took 3.


this operation will leave small marks in the hidden side of the part but it lifts the steel on the side you see and will give you the extra matr'l needed to 'fill' the dent or other disfigurement in the surface .

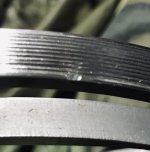
This is what the hidden side of what would be the grip back strap would look like after the three punch stake strikes were done. Notice how the metal is raised above the original surface on the top of the backstrap. That's what we need.
Looks pretty crude right now,,but with some light hammer work, it'll look a lot better in just a very short time.


***********************

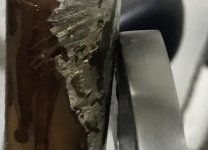
This is the same view as the prior pic. This is the side of what would be the backstrap, the hidden from view side when the grips were on.
The only thing done additionaly here from the prior pic was to gently peen the upset metal flat to the surface with a small ball peen hammer (2oz,,my engraving hammer) and then a couple swipes along the side with a fine cut file to smooth it up. Nothing more.
Those small stake marks are all that remains of the work.
(Those can be closed if needed by inlaying suitible wire (carbon steel or stainless) into the surface. It's not really much different than inlaying precious metals. But here, probably let it go as is.


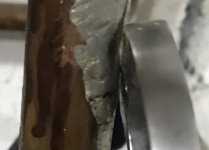
This pic is the part so you can see the top and the same thing was done to the area,,the upset metal peened down and a fine file gone over the surface to smooth it out. You can see the stake marks on the side (kind of in a shadow) so you can see where the orig damage was.


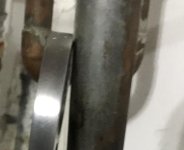
Here's some pics of the staking tool. Actually an undercut tool in the way it's shaped. Nothing magical about it as long as it drives in and lifts the metal. The rounded edge makes for a stronger tip when they get this small yet receive some hefty hammering.


Last edited:
Epoxy filler

There is a metal powder epoxy, DEVCON it comes in stainless steel,steel,aluminum, and copper. It is available in the Detroit area from Production Tool Co.
Dennis Vertrees
 
There is a metal powder epoxy, DEVCON it comes in stainless steel,steel,aluminum, and copper. It is available in the Detroit area from Production Tool Co.
Dennis Vertrees
I have used Devcon on aircraft surfaces and have some on hand. It will cure darker than desired and does not take paint well. Probably the toughest epoxy I've ever used , you can actually build up wear areas with it on flap tracks.
 
Back
Top