|
|
 |

06-20-2009, 12:04 PM
|
|
Member
|
|
|
Join Date: May 2009
Posts: 13
Likes: 0
Liked 0 Times in 0 Posts
|
|
 How does the hand spring fit on 442/642
Greetings and thanks in advance for any assistance.
But how does the hand spring install in a Smith 442/642?
I have one apart and can't figure out how that little spring goes back in.
Any help/links would be appreciated.
|
06-20-2009, 01:45 PM
|
 |
Member
|


|
|
Join Date: May 2004
Location: Connecticut, USA
Posts: 1,525
Likes: 0
Liked 145 Times in 48 Posts
|
|
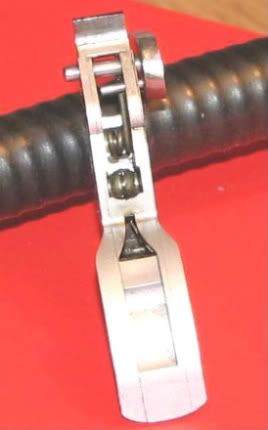
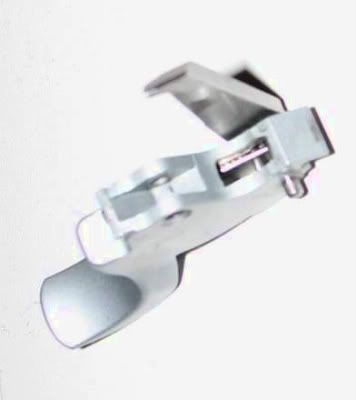
On the new MIM guns the hand spring is different. The pictures below is how it looks assembled. If it fly's apart, look at the pictures to aid you in reassembling it. Remember that there is a "blind" cutout area where the short side of the spring fits, inside the trigger. The other side of the spring gets bent behind the hand stud in the normal way and when all assembled it's fine. Remember, the spring fits on the side that the hand is positioned.
__________________
NRA Benefactor Member
|
|
The Following 3 Users Like Post:
|
|
06-20-2009, 02:51 PM
|
|
Member
|
|
|
Join Date: May 2009
Posts: 13
Likes: 0
Liked 0 Times in 0 Posts
|
|
So trigger removal is pretty much mandatory?
I don't see anyway of fishing that thing in with the trigger installed.
If this is right, can you give me a guide on removing the trigger? I have removed just about everything else.
Thanks for the help.
|
06-20-2009, 04:29 PM
|
|
Member
|
|
|
Join Date: May 2004
Location: Connecticut, USA
Posts: 1,525
Likes: 0
Liked 145 Times in 48 Posts
|
|
These notes apply to all S&W revolvers. Only minor differences:
Find a perfect fitting screwdriver.
Remove the grip.
Unscrew all the screws on the side plate, don't mix them up.
Roll gun over, push the thumb latch in and open the cylinder.
Slide yoke and cylinder off the frame, go easy not to scratch it.
Roll gun back and find a plastic hammer and tap the frame (near where the grips would be) and the side plate will come loose.
Remove slide plate.
Lift out the hammer block (sheet metal part with a hole on one end, hook on the other CENTENIAL MODELS OMIT).
Loosen strain screw and remove main spring. (J frame insert cotter pin into hole, remove from stirrup).
Pull thumb piece to rear. Press trigger to cock hammer, lift hammer up and off the stud.
Find a screwdriver, and pry the rebound slide off the stud, rebound spring and stem will fly out so keep a finger over opening.
Pull back the hand to clear window, then wiggle trigger off the stud.
You can remove the cylinder stop and bolt but the gains are not worth the trouble.
But if you must, then flip gun over and unscrew thumb piece.
Flip gun back, pull bolt to rear and lift out of frame, watch out for plunger and tiny spring.
Pry out spring for cylinder stop, let the stop drop down and remove stop.
Reverse the operation to put it back together. Find a special rebound slide tool to put the rebound spring back on. It looks like this:

Remember all the guns from J frame to X are nearly all the same internally.
The hammer block sits all the way up before the slide plate goes back on. One end sits on the stud of the rebound slide, the other end sits in front of the hammer. Picture of 500:
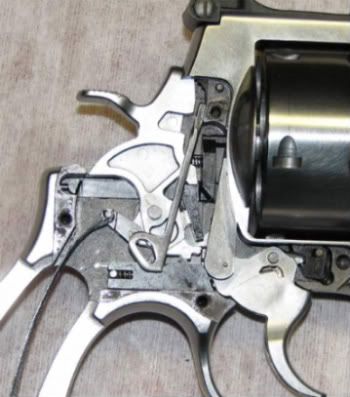
Here is a picture of a 686 without the hammer block:

__________________
NRA Benefactor Member
|
06-20-2009, 09:31 PM
|
|
Member
|
|
|
Join Date: May 2009
Posts: 13
Likes: 0
Liked 0 Times in 0 Posts
|
|
It's the wiggling the trigger off the stud part I am stuck at.
It doesn't want to budge.
Do I have to relieve the pressure of the trigger return spring to get the trigger and the part behind the trigger that encases the return spring out? Do these parts come out together?
Gonna give it a rest for today and hit it again fresh in the a.m. Starting to give me a headache.
Thanks again.
|
06-20-2009, 10:03 PM
|
|
Member
|
|
|
Join Date: May 2009
Posts: 13
Likes: 0
Liked 0 Times in 0 Posts
|
|
Okay,
I got mad and wiggled that trigger off.
Now I am gonna attempt to get the hand back on the trigger. I may be seeing light at the end of the tunnel.
|
06-21-2009, 07:25 AM
|
|
Member
|
|
|
Join Date: May 2009
Posts: 13
Likes: 0
Liked 0 Times in 0 Posts
|
|
Got her put back together now. All seems well but I have a shooting session planned for early Monday morning to ensure it is all right.
Many thanks to you sir for the help. The pics made all the difference.
That spring is a bear to get installed.
|
07-26-2009, 01:38 PM
|
 |
SWCA Member
|


|
|
Join Date: Dec 2007
Location: Orange County, CA
Posts: 13,995
Likes: 5,005
Liked 7,701 Times in 2,623 Posts
|
|
MIM trigger in 296 and fitting hand spring
Let me just add a word to 500 Magnum Nut's excellent post No. 2 above about hand springs inside MIM triggers. The 296 I was just tinkering with has a smaller and less complex configuration than the one in his example, and it took me longer than it should have to extrapolate from his pictures to my situation. Fitting the hand spring turns out to be simple if you know how to approach it, and an exercise in frustration if you just monkey around with it in the dark. Recommendation: if you have old eyes like mine, do this in a deep box in bright sunlight or under heavy desktop task lighting.
The hand spring has a short arm and a long arm. Put the short arm into the blind pocket that 500MN mentioned, and make sure the coil in the spring is back against the metal of the trigger; there is a semi-circular relief in the MIM part to accommodate it.
Then using a pin punch or narrow bladed screwdriver the same width as the slot in the trigger, push the long end of the hand spring back far enough to slip the two pegs of the hand into their holes in the trigger.
Then with the hand firmly seated, release pressure on the spring and you are good to go.
Sorry, no pictures. The next time I take the gun apart I will try to remember to take some. But really, if you remember short end down and coil against the metal, that's all you need to know to make reinstallation of the hand spring work.
__________________
David Wilson
Last edited by DCWilson; 04-17-2013 at 12:34 PM.
Reason: fix duplicated word
|
|
The Following 4 Users Like Post:
|
|
07-29-2009, 07:13 PM
|
|
Banned
|

|
|
Join Date: Nov 2001
Location: Se. Pa.
Posts: 1,330
Likes: 67
Liked 81 Times in 50 Posts
|
|
Tagged for future reference.
|
08-01-2009, 11:24 PM
|
 |
US Veteran
|

|
|
Join Date: May 2009
Location: los angeles
Posts: 6
Likes: 0
Liked 1 Time in 1 Post
|
|
Quote:
Originally Posted by allglock

Tagged for future reference.
|
+1 to that. I just took apart my Model 66 for the first time. That hand torsion spring is a little beetch to get back in there.
edit to add: I talked to a gunsmith who has devised a wire tool that makes holding the spring in position a lot easier than the screwdriver trick.
He attaches the wire to the bench with a screw, then loops the other end over the spring arm that needs to be forward of the pegs, and pulls back on the trigger assembly
whilst he inserts the hand into the trigger.
neat.
Last edited by bodger; 08-03-2009 at 01:28 PM.
|
|
The Following User Likes This Post:
|
|
04-14-2010, 08:19 PM
|
|
Member
|
|
|
Join Date: May 2008
Location: Wyoming
Posts: 2
Likes: 0
Liked 0 Times in 0 Posts
|
|
Quote:
Originally Posted by allglock
Tagged for future reference.
|
+2 I guess! great info thanks
|
04-27-2010, 03:23 PM
|
 |
Member
|


|
|
Join Date: Sep 2003
Location: Indiana
Posts: 3,586
Likes: 2,249
Liked 3,495 Times in 1,485 Posts
|
|
I've been replacing the springs on my father's 642. He is getting up in age and doesn't have the strength to pull a hard double action pull any more. Although I've worked on a lot of the older S&W revolvers, I have limited experience with those with MIM parts. I can't tell you just how much help this thread has been in getting the hand spring back in place. It can't be stressed too much just how important it is to get the short leg of that spring solidly in that blind hole in the trigger. Muchisimas gracias!
|
05-08-2011, 10:37 AM
|
|
Member
|

|
|
Join Date: May 2011
Posts: 10
Likes: 0
Liked 2 Times in 2 Posts
|
|
+1 to entire thread!
I know I am late to the party, but I'm sure others will view this thread going forward, wanted to share my experience.
I have a 642-2 and wanted to remove the lock mechanism. A little too exuberant in removing the hammer and the spring popped from the hand. Doh!!!
Took me a while to find the hidden pocket. Bright task lighting was critical for this discovery. Once I discovered the pocket, the pictures made a lot more sense to me, making the assembly more logical.
Found that a flat end allen wrench (vs. the ball ends I have so many of) that was small enough to fit into the slot and large enough to fill most of the slot worked very well for pushing the spring back to get behind the hand pins.
Thanks to all for your help in this perplexing challenge. Have the pistol back together now (whew!!!) and am ready to go to the range to run it again, to make certain my assembly technique was correct.
Last edited by otis2011; 05-08-2011 at 10:40 AM.
|
|
The Following User Likes This Post:
|
|
05-09-2011, 11:44 PM
|
|
Member
|
|
|
Join Date: May 2011
Posts: 9
Likes: 0
Liked 1 Time in 1 Post
|
|
Thanks!
Just wanted to say thanks to all that contributed to this thread. The comments and photos were invaluable when I was reassembling my 60 after putting lighter main and rebound springs in.
|
|
The Following User Likes This Post:
|
|
09-19-2012, 06:03 PM
|
|
Member
|

|
|
Join Date: Jan 2006
Location: Coast of Maine
Posts: 221
Likes: 199
Liked 30 Times in 22 Posts
|
|
Thanks!! Fooled with this for an hour before I found these pictures, ten minuets later, All back together!!
__________________
NRA Life Member
AF&AM #129
|
09-19-2012, 07:43 PM
|
 |
US Veteran
|


|
|
Join Date: Aug 2006
Location: West Central IL
Posts: 22,795
Likes: 18,509
Liked 22,392 Times in 8,269 Posts
|
|
There is very seldom a reason to remove the "hand" from the trigger, just leave it in place when you remove the trigger. Only when you need to work on the hand do you need to remove it.
__________________
H Richard
SWCA1967 SWHF244
|
|
The Following User Likes This Post:
|
|
09-19-2012, 11:04 PM
|
|
Member
|
|
|
Join Date: Jan 2006
Location: Coast of Maine
Posts: 221
Likes: 199
Liked 30 Times in 22 Posts
|
|
Quote:
Originally Posted by H Richard
There is very seldom a reason to remove the "hand" from the trigger, just leave it in place when you remove the trigger. Only when you need to work on the hand do you need to remove it.
|
Agreed. Had to smooth some sharp edges on my 625 hand. I pulled the hand out of the trigger and suddenly realized, this isn't like the rest.
__________________
NRA Life Member
AF&AM #129
|
05-30-2015, 10:33 AM
|
 |
Member
|
|
|
Join Date: Mar 2013
Location: Richardson, Texas
Posts: 217
Likes: 95
Liked 192 Times in 65 Posts
|
|
Otis211 thanks for the Allen wrench idea. I an enrolled in an NRA Smith and Wesson Revolver Armorers class to be held in June.so I took the side plate off an old .38 M&P. I had never removed a side plate. I certainly learned a lot of helpful info by doing that. The only issue I had was getting the hand back into the trigger. This thread came up when I did a search. The Allen wrench did the trick. Thanks to all who contributed. The pictures were a great help. This forum is amazing. There a good people here who have the info we need when we need it.
__________________
I'm just buying one more.
|
|
The Following User Likes This Post:
|
|
06-01-2015, 07:11 PM
|
 |
Member
|
|
|
Join Date: Jun 2013
Location: Quakertown PA
Posts: 1,474
Likes: 4,773
Liked 1,180 Times in 491 Posts
|
|
I also use the allen wrench trick. Works beautifully!
__________________
Jim
|
|
The Following User Likes This Post:
|
|
08-16-2015, 12:56 PM
|
|
Member
|
|
|
Join Date: Jan 2015
Location: STL MO area
Posts: 57
Likes: 2
Liked 4 Times in 4 Posts
|
|
schematics
One of the biggest problems Ive had with this and other projects on these newer guns is the lack of schematics that pertain to this specific gun.
I have a 686-6 and have looked everywhere, at all the sights including S and W to find a parts breakdown for it. Not a -5, not a dash 4 but one for a 686-6.
I am trying to buy some new hand springs and can get a straight answer on what the part number is or where to even buy it.
Id also like to buy a new hand but that may be more than the system can handle.
__________________
Former LEO & firearms trainer
|
05-21-2016, 09:17 PM
|
|
Member
|
|
|
Join Date: Nov 2010
Posts: 10
Likes: 1
Liked 39 Times in 3 Posts
|
|
Nerve saving thread. Thank you for this one!!!!
|
06-23-2016, 10:50 AM
|
|
Member
|
|
|
Join Date: Jan 2013
Posts: 8
Likes: 4
Liked 2 Times in 1 Post
|
|
My 642-1 had a problem with the cylinder not revolving after installing an Apex spring kit. I found that little spring in the trigger that tensions the hand. I had no clue on how to assemble the spring back in. Gave up over night. A new Google this am led me to this thread. The pictures gave me the insight to re-assemble the hand spring. My gun did not quite match the pictures but the idea was there. Good to go now. Thanx to the poster.
|
10-08-2016, 07:12 PM
|
 |
Member
|
|
|
Join Date: Jan 2012
Location: Jamestown NY
Posts: 813
Likes: 7,785
Liked 518 Times in 281 Posts
|
|
well i want to thank u ....i spent part of my day trying to fix my Dad's gun and this was just what i was looking for...thank u and God Bless,John
|
03-07-2017, 10:38 PM
|
|
Member
|
|
|
Join Date: Mar 2017
Posts: 3
Likes: 3
Liked 1 Time in 1 Post
|
|
success
Quote:
Originally Posted by 500 Magnum Nut
On the new MIM guns the hand spring is different. The pictures below is how it looks assembled. If it fly's apart, look at the pictures to aid you in reassembling it. Remember that there is a "blind" cutout area where the short side of the spring fits, inside the trigger. The other side of the spring gets bent behind the hand stud in the normal way and when all assembled it's fine. Remember, the spring fits on the side that the hand is positioned.
|
Got it thanks
|
|
The Following User Likes This Post:
|
|
06-15-2017, 08:28 PM
|
 |
Member
|

|
|
Join Date: Mar 2011
Location: Huntsville, Alabama
Posts: 34
Likes: 6
Liked 2 Times in 2 Posts
|
|
Quote:
Originally Posted by 500 Magnum Nut
These notes apply to all S&W revolvers. Only minor differences:
Find a perfect fitting screwdriver.
|
Thank you for the photos. I am apparently in a condition of dotage but by using your photos I was able to get the hand spring back in place.
|
08-07-2017, 07:28 PM
|
 |
Member
|
|
|
Join Date: Mar 2015
Location: PA
Posts: 3
Likes: 3
Liked 2 Times in 2 Posts
|
|
Could someone please repost the pics, the links are dead...and my 340 is in pieces. Thanks!
Sent from my SM-G930V using Tapatalk
|
|
 Posting Rules
|
|
|
|
|


 Linear Mode

