|
|
 |
|

03-07-2014, 02:50 AM
|
 |
US Veteran
|


|
|
Join Date: Dec 2005
Location: Birmingham, Alabama
Posts: 4,483
Likes: 228
Liked 2,398 Times in 1,082 Posts
|
|
 Shield sight change Picture heavy
In
I promised a few days ago to chronicle the change out of the sights on two Shields, my 9 and a .40 which belongs to my 88 year old Father-in-Law. My 9 will be getting a new factory rear to replace the one I chewed up in development of a proper push pin to deal with the sight profile. The .40 is getting new FO's, front and rear.
To accomplish this task, you are going to have to have a sight pusher, plain and simple. I know a lot of folks swear by the punch and hammer method, but IMHO your prospect of success is very limited in this case. There are a number of sight pushers on the market and not all of them are up to the task. I know for fact the MGW with Shield adapter will work, as will my JMT line of pushers. A lot of the pushers on the market are made from square tubing and employ the same operating principle as the MGW tool, ie a bar that travels on a threaded rod. Some of these may be capable, but many have disclaimers in their advertising indicating that they may not work with really tight sights. Inquire before you buy is the best advise I can give here.The Shield rear sights are quite tight. Maybe not as tight as some XD's or as tight as some Gen3 S&W's, but they nonetheless take some significant force to move.
After choosing your tools, the first step is going to be to remove the rear sight set screw. You will need a 1/16" Allen wrench, and a pretty good quality one. You may need to heat the screw since they are installed with Loctite. There a re a lot of ways to do this. I use a small "pencil" torch I swiped out of the kitchen. Used to heat some sort of baked stuff I think. The wife doesn't know I have it. Shhhh. I was 50/50 on the two I worked with. One wouldn't budge without heating the screw; the other broke loose with only moderate pressure. Once the set screw has been removed, spray some penetrating oil down the hole and allow it to sit for a while.
The sight is installed from right to left as you view the slide from the rear, as if shooting. Removal is best accomplished in the opposite direction, ie back out the way it came in.
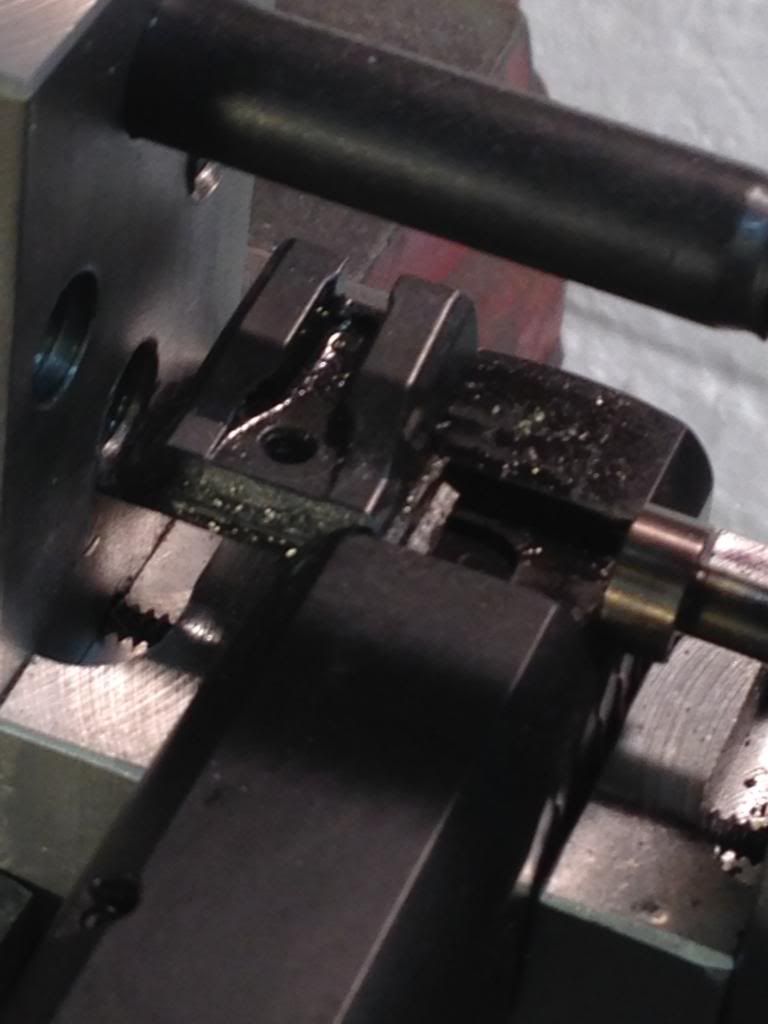
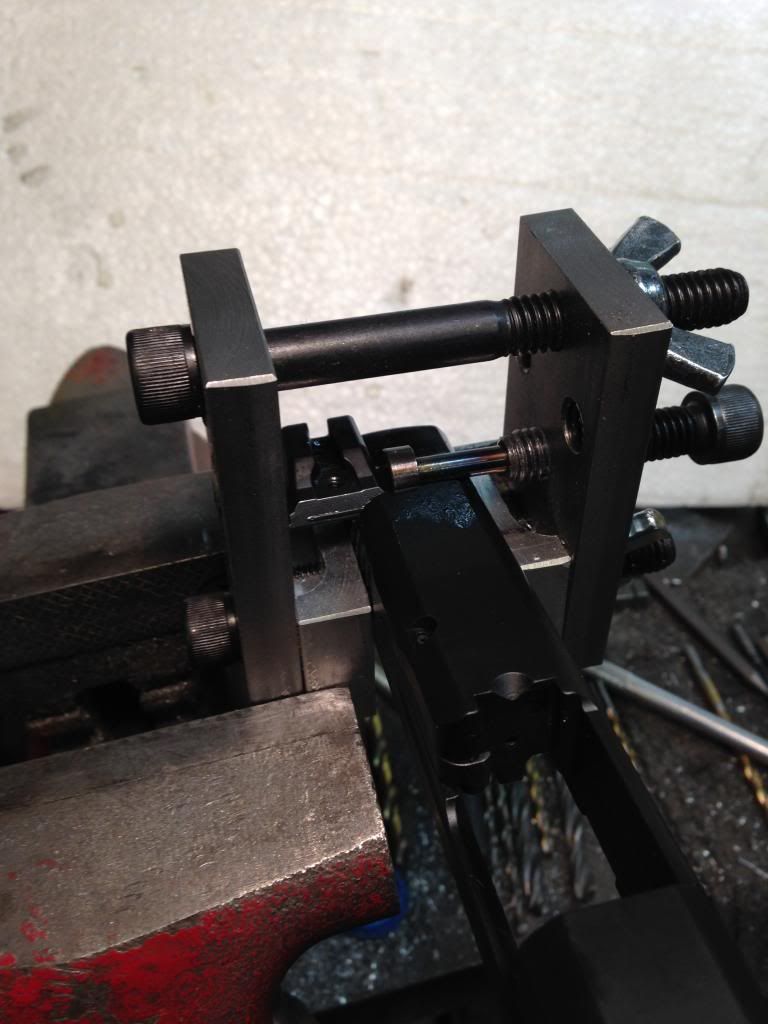
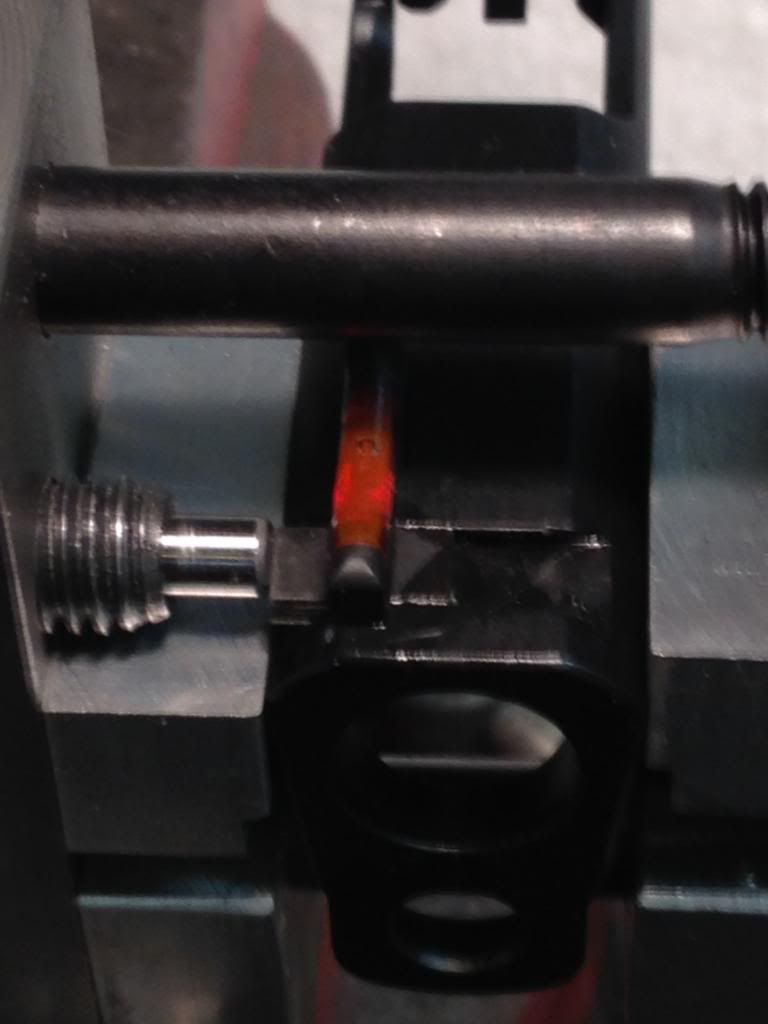
Time to set up the pusher and remove the rear sight:

Note that even as far as the sight has pushed out of the dovetail, the plunger is still captured under the sight. The plunger is spring loaded, but by the time the sight is moved far enough to release it everything is hand tight. Just be aware it's there. You can easily capture it when you pull the sight all the way out.
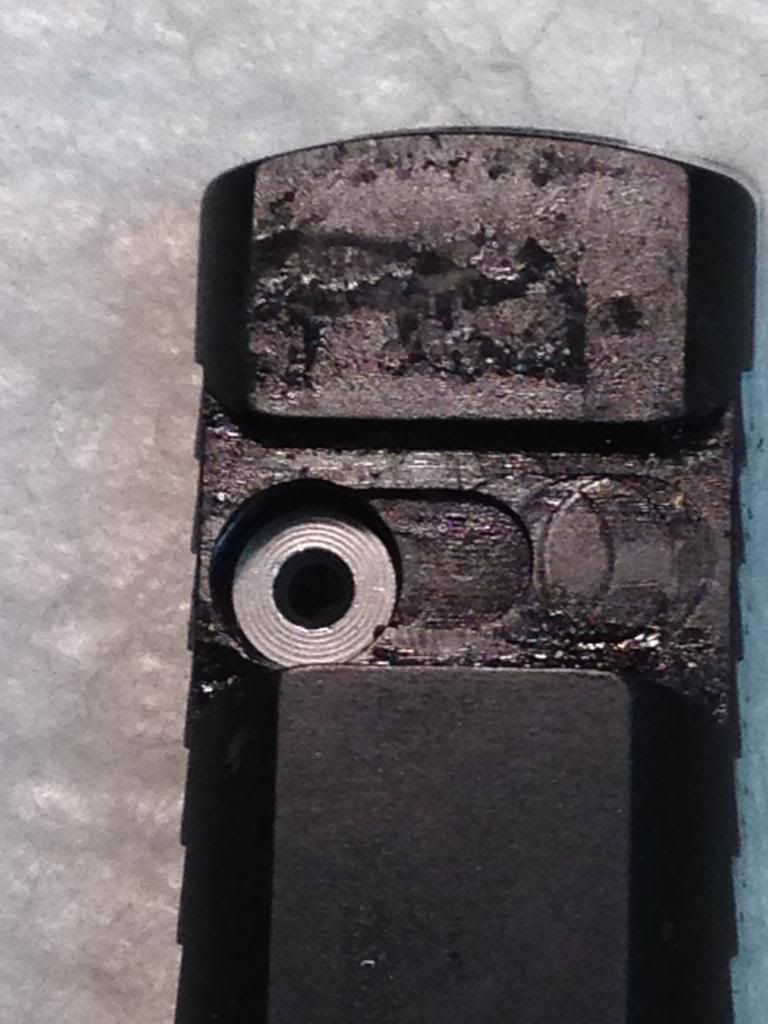
This gooey stuff was all underneath the 9 rear sight. Don't know what it is, but solvent removed it. You can see the location and size of the plunger
After cleaning the goo off, I reversed the pusher jackscrew and pressed the new sight in. The only fitting required was to smooth the bottom of the dovetail with a few light strokes on a fine stone. The sight pressed in far enough by hand to capture the plunger.
I then repeated the process on the .40
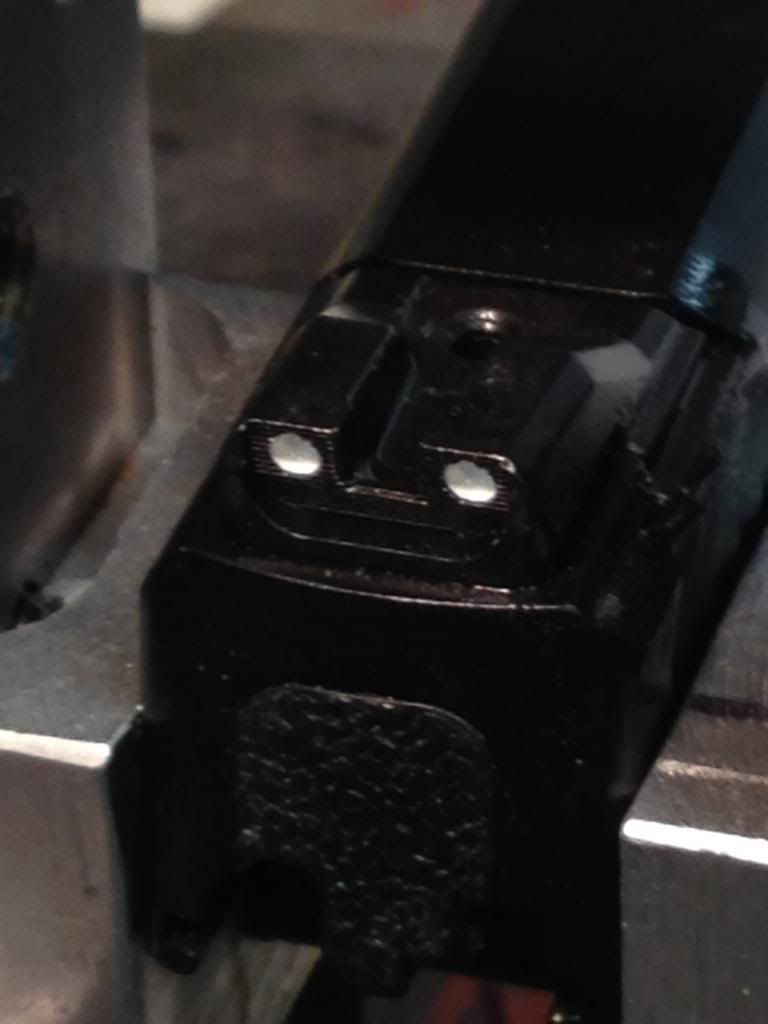
The new FO rear is pressed in from the right just like the original.

And the rear is done. 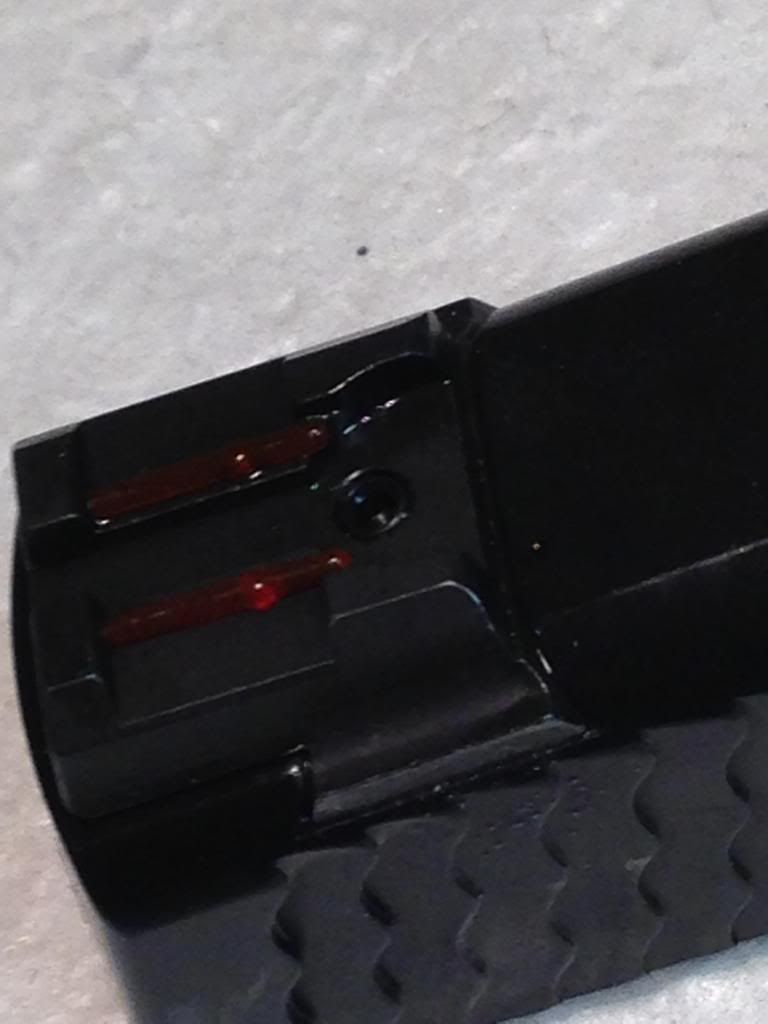
The stock front pressed out pretty easily. No unexpected drama.

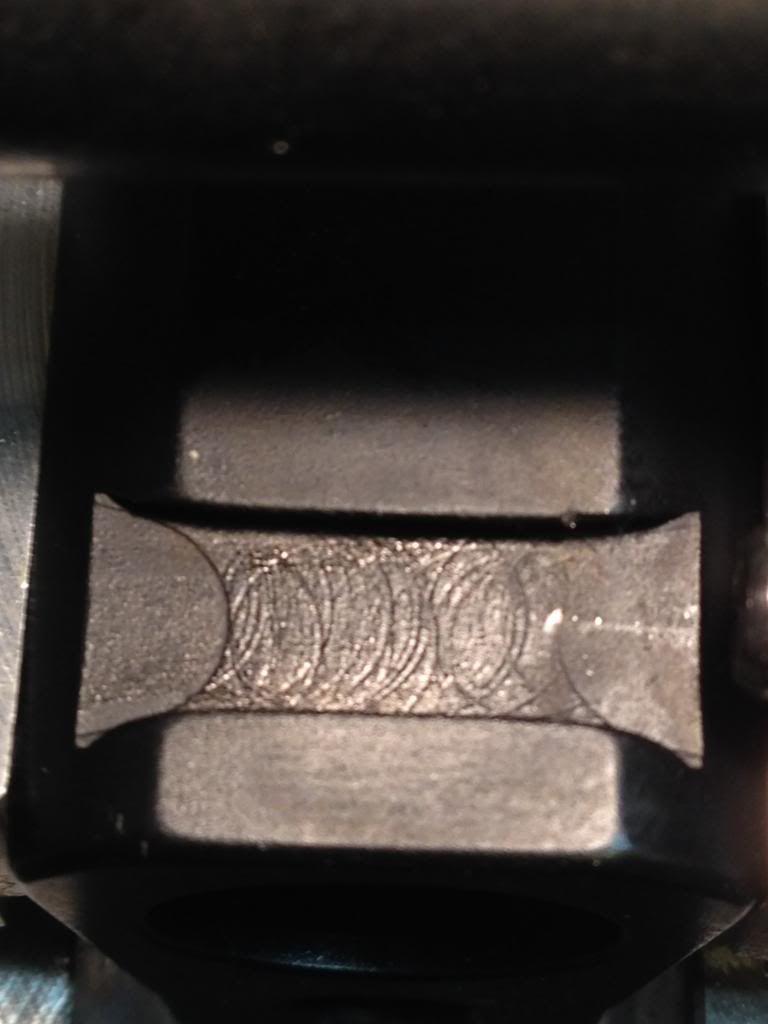
Nice machining job on the front dovetail 
New front going in
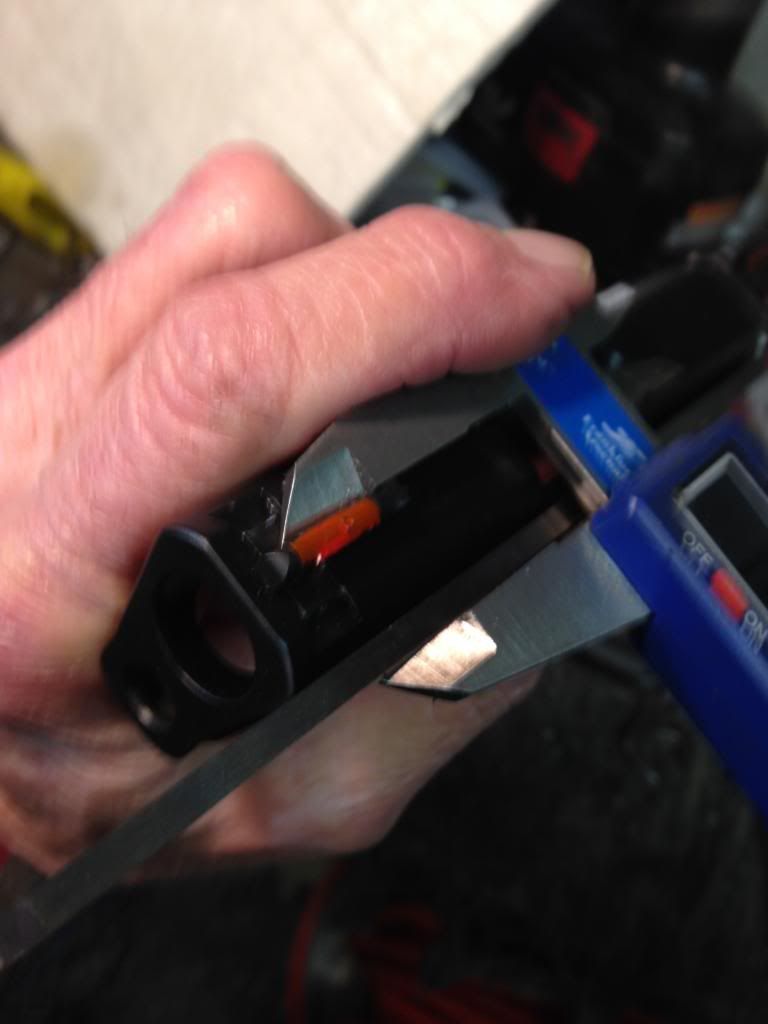
This is how to tell if you have the sight centered. This one came out to within .001 on the first try. Pure luck, I might add. Usually takes me several tries. Place a straight edge on the side of the slide and measure in both directions until they are equal. Same for rears on many models.
A few more random thoughts:
Freezing the slide probably doesn't help much. All materials have a coefficient of expansion. The steel slide and the steel sight, though slightly different materials, won't expand (contract) at enough different a rate to matter. Same goes for heating the slide/sight. If you can spray the sight with something like nitrogen and freeze the sight only, it might make it contract enough to make a difference. Not necessary if you have the proper tools to start with.
Use extreme caution heating the set screw. The plastic plunger is well off to one side, but you still don't want to heat the sight any if you can help it. The screw may break loose without heat, but be careful not to strip it.
I'll come back and edit as I think of more things. Sorry for the cell phone pics. I just didn't feel like dragging the good camera/tripod/etc. out for this project. Next time I will.
Added a couple of updated pictures of the front sight set up.
Last edited by epj; 04-23-2021 at 03:13 PM.
Reason: Added how to view pics.
|
|
The Following 34 Users Like Post:
|
.41 Magnum, AxeOgre, bdmeyer, Big Cholla, Bruce Morrison, cardguy, Chief Illiniwek, Don 73, DroneGuy, GerSan69, ginzo, gonerydin, Gtwralph, Horn, iouri, JackH816, jim46ok, Jwjarrett, mustangman, OakleyFreak, Offshell, okiegtrider, oloung1, paulw350, Pef, Protected One, Rav, red feather, roccity9, slickracer, TailRunner, Tom Beavert, webfarmer, Will2 |
03-07-2014, 10:05 PM
|
 |
Member
|

|
|
Join Date: Jan 2013
Location: North Port, FL
Posts: 1,195
Likes: 2,314
Liked 918 Times in 421 Posts
|
|
Nice instructional class on sight R&R. I would attempt my own sight upgrade from this. What kind of pusher is that? Where can a person get one?
__________________
Criminals don't register guns.
|
|
The Following User Likes This Post:
|
|
03-07-2014, 10:50 PM
|
 |
Member
|


|
|
Join Date: Jul 2012
Location: Du Bois, PA
Posts: 373
Likes: 175
Liked 246 Times in 87 Posts
|
|
I used a depth micrometer to center my rear sight.
|
|
The Following 3 Users Like Post:
|
|
03-08-2014, 02:12 AM
|
|
US Veteran
|
|
|
Join Date: Dec 2005
Location: Birmingham, Alabama
Posts: 4,483
Likes: 228
Liked 2,398 Times in 1,082 Posts
|
|
Quote:
Originally Posted by ginzo

Nice instructional class on sight R&R. I would attempt my own sight upgrade from this. What kind of pusher is that? Where can a person get one?
|
The one used to illustrate the procedure is a JMT. It's no particular model, just my shop test tool. The production tools are available here in the classifieds , as well as GB, eBay, and several other forums. The MGW tool is available from several on line sources.
|
03-08-2014, 04:16 PM
|
 |
Member
|

|
|
Join Date: Mar 2000
Location: Texas
Posts: 272
Likes: 35
Liked 41 Times in 32 Posts
|
|
I don't think I got a pin with the round end with the recent JMT pusher I bought. Did I read I can buy pins made for the Shield to fit it?
|
03-08-2014, 08:59 PM
|
|
US Veteran
|
|
|
Join Date: Dec 2005
Location: Birmingham, Alabama
Posts: 4,483
Likes: 228
Liked 2,398 Times in 1,082 Posts
|
|
Yes, please PM me for more info.
|
03-08-2014, 09:03 PM
|
|
US Veteran
|
|
|
Join Date: Dec 2005
Location: Birmingham, Alabama
Posts: 4,483
Likes: 228
Liked 2,398 Times in 1,082 Posts
|
|
Quote:
Originally Posted by joestacey06
I used a depth micrometer to center my rear sight.
|
That will do exactly the same thing. Just compare the two measurements until they are equal. I use a machinist's parallel on the side of the slide to insure I have a flat, parallel surface to measure from.
|
|
The Following User Likes This Post:
|
|
03-08-2014, 09:15 PM
|
|
Member
|
|
|
Join Date: Jul 2013
Location: On the Edge-MA
Posts: 65
Likes: 22
Liked 11 Times in 5 Posts
|
|
Please share about the pins for the shield
__________________
M&P 9C-G19-Shield 9-Kahr PM9
|
03-09-2014, 09:34 AM
|
|
US Veteran
|
|
|
Join Date: Dec 2005
Location: Birmingham, Alabama
Posts: 4,483
Likes: 228
Liked 2,398 Times in 1,082 Posts
|
|
Quote:
Originally Posted by Bagstrap
Please share about the pins for the shield
|
Actually, these fit the whole M&P line as well as the S&W 1911 sights. It's a 3/16 pin with a half round head. It's flat on the bottom and the flat edge fits on the first step of the sight. It just works better than the round pin. Not essential, but very handy. It can also be used to some advantage on a Novak style sight, assuming the dovetail is 3/8" or wider.
|
03-12-2014, 10:41 PM
|
|
US Veteran
|
|
|
Join Date: Dec 2005
Location: Birmingham, Alabama
Posts: 4,483
Likes: 228
Liked 2,398 Times in 1,082 Posts
|
|
Info added
Fixed a mislabeled picture and added some info.
|
|
The Following User Likes This Post:
|
|
03-15-2014, 08:37 AM
|
|
US Veteran
|
|
|
Join Date: Dec 2005
Location: Birmingham, Alabama
Posts: 4,483
Likes: 228
Liked 2,398 Times in 1,082 Posts
|
|
Sight fitting
I feel the need to expand just a bit on the subject of fitting new sights. Most if not all of the aftermarket sights I have encountered have been oversize. Not necessarily Shield or M&P sights, just aftermarket sights in general. My rule of thumb is that if the sight will not start in the dovetail about a quarter to a third of the way by hand or with a light tap with a plastic hammer, it's too durn tight. For example, the factory rear sight on the 9mm went in far enough to cover the plunger almost entirely. The replacement on the 40 had to be filed on. Bit to get it going. Care needs to be taken that one does not overdo or you can end up with a loose sight. There are remedies for that problem, such as dimpling the bottom of the sight or using loctite. You may have a different outlook, but I don't want my sights on so tight they are extremely difficult to move. After all,
I may decide I want to change to something else or may need to access the striker again. OTOH, I want them tight enough to stay put under normal use.

|
03-24-2014, 07:12 PM
|
|
Member
|
|
|
Join Date: Mar 2014
Posts: 13
Likes: 0
Liked 0 Times in 0 Posts
|
|
nice job! makes me want to try my own but I am scared I'll mess it up!
|
03-24-2014, 08:15 PM
|
|
US Veteran
|
|
|
Join Date: Dec 2005
Location: Birmingham, Alabama
Posts: 4,483
Likes: 228
Liked 2,398 Times in 1,082 Posts
|
|
IF you understand the process. And IF you have the proper tools, there isn't that much to worry about. I'm sure there are those who can do this with a punch and hammer. That's not something I would want to attempt.
|
02-24-2015, 12:55 PM
|
|
Member
|

|
|
Join Date: May 2014
Location: Green Valley, Arizona
Posts: 376
Likes: 1,154
Liked 197 Times in 119 Posts
|
|
Quote:
Originally Posted by epj
I promised a few days ago to chronicle the change out of the sights on two Shields, my 9 and a .40 which belongs to my 88 year old Father-in-Law. My 9 will be getting a new factory rear to replace the one I chewed up in development of a proper push pin to deal with the sight profile. The .40 is getting new FO's, front and rear.
To accomplish this task, you are going to have to have a sight pusher, plain and simple. I know a lot of folks swear by the punch and hammer method, but IMHO your prospect of success is very limited in this case. There are a number of sight pushers on the market and not all of them are up to the task. I know for fact the MGW with Shield adapter will work, as will my JMT line of pushers. A lot of the pushers on the market are made from square tubing and employ the same operating principle as the MGW tool, ie a bar that travels on a threaded rod. Some of these may be capable, but many have disclaimers in their advertising indicating that they may not work with really tight sights. Inquire before you buy is the best advise I can give here.The Shield rear sights are quite tight. Maybe not as tight as some XD's or as tight as some Gen3 S&W's, but they nonetheless take some significant force to move.
After choosing your tools, the first step is going to be to remove the rear sight set screw. You will need a 1/16" Allen wrench, and a pretty good quality one. You may need to heat the screw since they are installed with Loctite. There a re a lot of ways to do this. I use a small "pencil" torch I swiped out of the kitchen. Used to heat some sort of baked stuff I think. The wife doesn't know I have it. Shhhh. I was 50/50 on the two I worked with. One wouldn't budge without heating the screw; the other broke loose with only moderate pressure. Once the set screw has been removed, spray some penetrating oil down the hole and allow it to sit for a while.
The sight is installed from right to left as you view the slide from the rear, as if shooting. Removal is best accomplished in the opposite direction, ie back out the way it came in.
Time to set up the pusher and remove the rear sight:
Note that even as far as the sight has pushed out of the dovetail, the plunger is still captured under the sight. The plunger is spring loaded, but by the time the sight is moved far enough to release it everything is hand tight. Just be aware it's there. You can easily capture it when you pull the sight all the way out.
This gooey stuff was all underneath the 9 rear sight. Don't know what it is, but solvent removed it. You can see the location and size of the plunger
After cleaning the goo off, I reversed the pusher jackscrew and pressed the new sight in. The only fitting required was to smooth the bottom of the dovetail with a few light strokes on a fine stone. The sight pressed in far enough by hand to capture the plunger.
I then repeated the process on the .40
The new FO rear is pressed in from the right just like the original.
And the rear is done.
The stock front pressed out pretty easily. No unexpected drama.
Nice machining job on the front dovetail
New front going in
This is how to tell if you have the sight centered. This one came out to within .001 on the first try. Pure luck, I might add. Usually takes me several tries. Place a straight edge on the side of the slide and measure in both directions until they are equal. Same for rears on many models.
A few more random thoughts:
Freezing the slide probably doesn't help much. All materials have a coefficient of expansion. The steel slide and the steel sight, though slightly different materials, won't expand (contract) at enough different a rate to matter. Same goes for heating the slide/sight. If you can spray the sight with something like nitrogen and freeze the sight only, it might make it contract enough to make a difference. Not necessary if you have the proper tools to start with.
Use extreme caution heating the set screw. The plastic plunger is well off to one side, but you still don't want to heat the sight any if you can help it. The screw may break loose without heat, but be careful not to strip it.
I'll come back and edit as I think of more things. Sorry for the cell phone pics. I just didn't feel like dragging the good camera/tripod/etc. out for this project. Next time I will. |
My thought. Maybe heating the end of the head of the allen wrench before attempting to remove the hex screw in place of using a torch on the hex screw. Would likely have to hold the wrench with a pliers or vice grip?
This should transfer the heat to the hex screw.
|
02-24-2015, 01:02 PM
|
|
US Veteran
|
|
|
Join Date: Dec 2005
Location: Birmingham, Alabama
Posts: 4,483
Likes: 228
Liked 2,398 Times in 1,082 Posts
|
|
You have to be careful about heating the Allen wrench too much and taking the temper out of it. I'd just turn the slide upside down and pass a cigarette lighter over the set screw for a few seconds. Not all of them are killer tight, but apparently a lot of them are.
|
02-24-2015, 02:21 PM
|
|
Member
|

|
|
Join Date: Jan 2014
Location: Texas
Posts: 150
Likes: 32
Liked 47 Times in 30 Posts
|
|
I use a small butane pencil torch with a soldering tip to heat the screw. Mine has a tip that will just fit in the hex of the screw. Works great, once the Loctite is hot enough the screw will come out with very little effort.
Here is a link to the one I have Butane Pencil Torch
Last edited by curlysir; 02-24-2015 at 02:24 PM.
|
|
The Following 2 Users Like Post:
|
|
02-24-2015, 02:27 PM
|
|
US Veteran
|
|
|
Join Date: Dec 2005
Location: Birmingham, Alabama
Posts: 4,483
Likes: 228
Liked 2,398 Times in 1,082 Posts
|
|
That's similar to what I use as well.
|
02-24-2015, 04:23 PM
|
|
Member
|
|
|
Join Date: May 2014
Location: Green Valley, Arizona
Posts: 376
Likes: 1,154
Liked 197 Times in 119 Posts
|
|
How About Heating the hex Wrench?
My thought is hold the end of the hex wrench over a small flame
(charcoal lighter?) while holding the wrench with pliers. Then inserting the hot hex wrench tip into the set screw. The heat
should transfer to the locktite holding the set screw.
Wow! I'm thinking of buying one of these after your post. It was
outstanding.
For the cost of an armorer for two pistols, this might be as good or better way to go.
"People sleep peaceably in their beds at night only because rough men stand ready to do violence on their behalf."
-- George Orwell
|
|
The Following User Likes This Post:
|
|
02-24-2015, 04:48 PM
|
|
US Veteran
|
|
|
Join Date: Dec 2005
Location: Birmingham, Alabama
Posts: 4,483
Likes: 228
Liked 2,398 Times in 1,082 Posts
|
|
Also be sure to use a good quality, heat treated hex wrench. The cheap ones are likely to bend/break/strip.
|
02-24-2015, 10:01 PM
|
|
Member
|
|
|
Join Date: Jul 2010
Location: Upstate New York
Posts: 516
Likes: 2,407
Liked 391 Times in 178 Posts
|
|
I have used a heat gun on the lower setting to soften thread locker with good success. A bit safer than an open flame and you can control the amount of heat applied easily by varying the distance. A hair dryer will work too.
|
02-28-2015, 02:52 PM
|
|
Member
|

|
|
Join Date: Feb 2015
Location: New Mexico
Posts: 2
Likes: 1
Liked 0 Times in 0 Posts
|
|
Thanks for the instructions. I will get a tool for this.
|
02-28-2015, 04:23 PM
|
|
Member
|
|
|
Join Date: Nov 2013
Posts: 178
Likes: 2
Liked 128 Times in 40 Posts
|
|
Quote:
Originally Posted by Horn
My thought. Maybe heating the end of the head of the allen wrench before attempting to remove the hex screw in place of using a torch on the hex screw. Would likely have to hold the wrench with a pliers or vice grip?
This should transfer the heat to the hex screw.
|
I use a 25 watt soldering iron. Hold the tip close to the set screw just barely touching for a minute or two. The set screw came out on my FS M&P without any trouble at all.
|
02-28-2015, 04:35 PM
|
|
US Veteran
|
|
|
Join Date: Dec 2005
Location: Birmingham, Alabama
Posts: 4,483
Likes: 228
Liked 2,398 Times in 1,082 Posts
|
|
Gents, it doesn't take much heat to get the set screw out. Be cautious of beating the hex wrench. They can lose their temper easily, especially thin ones. Some of the set screws require no heat at all. Try a little pressure prior to heating. It may pop loose all on its own.
|
02-28-2015, 09:14 PM
|
|
Member
|
|
|
Join Date: Jun 2010
Location: Washington State
Posts: 831
Likes: 815
Liked 467 Times in 244 Posts
|
|
I used the hex wrench included with my new Ameriglo sights and applied slow & firm pressure and it came loose, no heat required. JMT sight pusher made quick work of removing the factory sights and installing the Ameriglo's, no sanding or filing of them was needed.
|
03-06-2015, 09:20 PM
|
|
Member
|
|
|
Join Date: Jan 2014
Location: Texas
Posts: 150
Likes: 32
Liked 47 Times in 30 Posts
|
|
Quote:
Originally Posted by epj
Gents, it doesn't take much heat to get the set screw out. Be cautious of beating the hex wrench. They can lose their temper easily, especially thin ones. Some of the set screws require no heat at all. Try a little pressure prior to heating. It may pop loose all on its own.
|
The last 2 M&P's I bought (a shield and a 40C) have not required any heat to break the screw loose. The first ones I bought would not break loose without heat. One of the problems with the screws S&W uses are that they are a very loose 1/16". I tried several hex wrenches until I found one that fit the tightest.
|
03-08-2015, 06:04 PM
|
|
US Veteran
|
|
|
Join Date: Dec 2005
Location: Birmingham, Alabama
Posts: 4,483
Likes: 228
Liked 2,398 Times in 1,082 Posts
|
|
Wonder if they may have gotten a batch of set screws with Imperial threads and a metric socket. I've run into hex head bolts made that way, imperial threads and a metric head. More likely just a sloppy tolerance.
|
03-10-2015, 07:44 PM
|
|
Member
|
|
|
Join Date: Jan 2014
Location: Texas
Posts: 150
Likes: 32
Liked 47 Times in 30 Posts
|
|
I recently bought one of your Mark IV with the S&W pins, I have a question. On the front sight how is the best way to keep the round pin from riding up on the sight. The rear came off without a problem using the S&W pins, but I had problems with the front. I ended up using my MGW Shield pusher to remove the front. After removal it is obvious that I did not have the pin down as far as it should have been as the pin hit the sight close to the top edge of the sight base. It would be nice to have something similar to the half circle pins that are used on the rear.
|
03-10-2015, 07:51 PM
|
|
US Veteran
|
|
|
Join Date: Dec 2005
Location: Birmingham, Alabama
Posts: 4,483
Likes: 228
Liked 2,398 Times in 1,082 Posts
|
|
I try to keep the pin riding on the bottom of the dovetail, or if it won't, I just push on the sight blade. I know folks are scared of breaking or bending them, but the only issue I ever had was with a XD. That one broke the sight base. If you know how thin they are, you'll immediately see why.
I have been looking at some sort of improved push pins for the front sights. If I can find a source of material, I'd make some like the ones for the rear with a smaller head. So far, I've not been able to locate what I need. I still looking.
|
03-22-2015, 07:41 PM
|
|
Member
|
|
|
Join Date: Sep 2012
Location: South Dakota
Posts: 56
Likes: 28
Liked 25 Times in 18 Posts
|
|
Sure wish I had looked here first
I'm one of those old fools that always think they can do this kind of stuff. I'm in the midst of installing an Apex trigger kit and Apex RAM. Of course, my M&P 9 was purchased in 2008, so I had to buy a new sear block assembly from Brownells to get the required 1/8" spring for the replacement sear. Then I got to where I tried to push the rear sight off with various punches, hammers, and vises. After that didn't work I bought an inexpensive (this simple project was starting to cost some significant $) sight pusher on Ebay. Well, of course it was advertised for a Glock, but they also claimed it could be used for most any striker fired semi-auto. Well, it won't move the sight, either. Now I'm either going to have to take it to the LGS or buy a better tool.
Rant over, I can't give too much praise for this thread.  I really wish I would have thought to look here first.
|
03-22-2015, 09:51 PM
|
|
US Veteran
|
|
|
Join Date: Dec 2005
Location: Birmingham, Alabama
Posts: 4,483
Likes: 228
Liked 2,398 Times in 1,082 Posts
|
|
Quote:
Originally Posted by .41 Magnum
I'm one of those old fools that always think they can do this kind of stuff. I'm in the midst of installing an Apex trigger kit and Apex RAM. Of course, my M&P 9 was purchased in 2008, so I had to buy a new sear block assembly from Brownells to get the required 1/8" spring for the replacement sear. Then I got to where I tried to push the rear sight off with various punches, hammers, and vises. After that didn't work I bought an inexpensive (this simple project was starting to cost some significant $) sight pusher on Ebay. Well, of course it was advertised for a Glock, but they also claimed it could be used for most any striker fired semi-auto. Well, it won't move the sight, either. Now I'm either going to have to take it to the LGS or buy a better tool.
Rant over, I can't give too much praise for this thread. I really wish I would have thought to look here first. |
Those eBay sight pushers made from square tubing typically work ok on sights that aren't very tight. That leaves out the entire S&W brand. The gen 3 sights tend to be even tighter than the M&P sights, with the possible exception of the Shield rear. The design tends to pull up on the sight rather than push on a line parallel to the dovetail.
|
03-22-2015, 10:57 PM
|
|
Member
|
|
|
Join Date: Mar 2015
Location: Upstate NY
Posts: 19
Likes: 9
Liked 5 Times in 5 Posts
|
|
I recently tried to remove the rear sight on my new shield with no luck. The set screw loosened and was removed easily and I soaked the rear sight in penetrating oil, but I literally pounded the sight with a brass punch and a 2 lb sledge and the thing didn't budge. Looks like the sights on the newer Shields are not removable. Will either have to take it to a smith or buy a sight pusher and hope for the best.
|
03-23-2015, 12:26 AM
|
 |
Member
|
|
|
Join Date: Feb 2013
Location: South of Omaha, NE
Posts: 252
Likes: 37
Liked 126 Times in 69 Posts
|
|
Quote:
Originally Posted by jradisch
I recently tried to remove the rear sight on my new shield with no luck. The set screw loosened and was removed easily and I soaked the rear sight in penetrating oil, but I literally pounded the sight with a brass punch and a 2 lb sledge and the thing didn't budge. Looks like the sights on the newer Shields are not removable. Will either have to take it to a smith or buy a sight pusher and hope for the best.
|
Some people have been successful using a punch to remove the Shield rear sight but few. Buy the sight pusher tool and don't look back. I did and it has earned its pay many times over.
|
11-18-2015, 12:40 AM
|
|
Member
|
|
|
Join Date: Nov 2014
Posts: 17
Likes: 17
Liked 7 Times in 3 Posts
|
|
I've heard S&W installs these sights with a hydraulic press. That's why they are so tuff to get out. I have replaced factory sights on my M&P9 Shield & Compact with a sight pusher and with a punch and hammer. The shield was the toughest.
|
11-18-2015, 03:34 PM
|
 |
Member
|

|
|
Join Date: Oct 2011
Location: San Antonio
Posts: 113
Likes: 138
Liked 99 Times in 59 Posts
|
|
Great thread. Too bad the pictures no longer work, but I appreciate the OP's effort and the subsequent discussion. In any case, I'm normally game to try DIY, but after reading through this I've decided I'll let a good gunsmith handle this task.
__________________
Southern Comfort
Retired USAF
|
11-18-2015, 03:54 PM
|
|
US Veteran
|
|
|
Join Date: Dec 2005
Location: Birmingham, Alabama
Posts: 4,483
Likes: 228
Liked 2,398 Times in 1,082 Posts
|
|
The pictures are still on Photobucket. I'll try to see why they don't work.
|
11-18-2015, 04:36 PM
|
|
US Veteran
|
|
|
Join Date: Dec 2005
Location: Birmingham, Alabama
Posts: 4,483
Likes: 228
Liked 2,398 Times in 1,082 Posts
|
|
Ok. The pictures are working now. You might find its not all that hard to do if you have the proper tools.
|
11-18-2015, 07:44 PM
|
|
Member
|
|
|
Join Date: Jun 2013
Location: Idaho
Posts: 571
Likes: 167
Liked 234 Times in 152 Posts
|
|
Quote:
Originally Posted by southerncomfort
Great thread. Too bad the pictures no longer work, but I appreciate the OP's effort and the subsequent discussion. In any case, I'm normally game to try DIY, but after reading through this I've decided I'll let a good gunsmith handle this task.
|
If you buy a good sightpusher, and have a vice, you will be just fine. Take it slow; it's a little scary if you've never done 'em before but it's really not that bad.
|
11-28-2015, 01:26 PM
|
|
US Veteran
|
|
|
Join Date: Dec 2005
Location: Birmingham, Alabama
Posts: 4,483
Likes: 228
Liked 2,398 Times in 1,082 Posts
|
|
You don't have to have a vise, but it does make set up a bit easier.
|
11-29-2015, 06:50 AM
|
|
Member
|
|
|
Join Date: Jul 2013
Location: Waynesville NC
Posts: 113
Likes: 12
Liked 77 Times in 33 Posts
|
|
nice instructional, i use one of those polymer barrel flags that comes in a new gun as a punch and a tack hammer, ive used this on several guns, works great and wont scratch or mess up your finish on the sight or gun!
__________________
prepare to defend yourselves
|
03-03-2016, 10:32 PM
|
|
Member
|
|
|
Join Date: Feb 2016
Location: North Carolina
Posts: 2
Likes: 3
Liked 0 Times in 0 Posts
|
|
 MK III sight pusher
Very good information. I will be trying out my new sight pusher this weekend!
|
03-31-2016, 02:57 PM
|
 |
Member
|

|
|
Join Date: Mar 2016
Posts: 1
Likes: 1
Liked 0 Times in 0 Posts
|
|
Is there any alignment for the rear sight? I'm looking at my new sight and it seems to be of similar width. I'm supposing it can be eyeballed pretty well. I'll be getting one of your sight tools soon.
Last edited by osprey_chief; 03-31-2016 at 02:59 PM.
|
03-31-2016, 03:23 PM
|
|
US Veteran
|
|
|
Join Date: Dec 2005
Location: Birmingham, Alabama
Posts: 4,483
Likes: 228
Liked 2,398 Times in 1,082 Posts
|
|
Quote:
Originally Posted by osprey_chief
Is there any alignment for the rear sight? I'm looking at my new sight and it seems to be of similar width. I'm supposing it can be eyeballed pretty well. I'll be getting one of your sight tools soon.
|
You can do it the same way you check the front sight, but on a Shield the rear sight pretty much fills the dovetail. At least with the factory sight. Some aftermarket sights may be narrower.
|
04-02-2016, 10:30 PM
|
|
Member
|
|
|
Join Date: Aug 2011
Location: Iowa
Posts: 106
Likes: 219
Liked 40 Times in 26 Posts
|
|
I used Kroil and a punch without any difficulty.
__________________
Life Member NRA
Acts 2:38-39
|
05-22-2016, 04:10 AM
|
|
Member
|
|
|
Join Date: Mar 2016
Location: Boise Idaho
Posts: 24
Likes: 48
Liked 14 Times in 6 Posts
|
|
Sigh, figures I would try and do it the hard way. I guess I need to add yet another tool to my wish list.
|
05-22-2016, 10:25 AM
|
|
US Veteran
|
|
|
Join Date: Dec 2005
Location: Birmingham, Alabama
Posts: 4,483
Likes: 228
Liked 2,398 Times in 1,082 Posts
|
|
Quote:
Originally Posted by kzaske
Sigh, figures I would try and do it the hard way. I guess I need to add yet another tool to my wish list.
|
If you don't already own a good vise and sturdy work bench, the sight tools are less expensive.
|
05-28-2016, 09:11 PM
|
 |
Member
|
|
|
Join Date: Jan 2015
Location: Oklahoma
Posts: 1,928
Likes: 2,548
Liked 3,840 Times in 1,134 Posts
|
|
Very helpful stuff epj. Thanks for putting this out there.
|
05-30-2016, 03:06 PM
|
|
US Veteran
|
|
|
Join Date: Dec 2005
Location: Birmingham, Alabama
Posts: 4,483
Likes: 228
Liked 2,398 Times in 1,082 Posts
|
|
I had no idea until today that this thread has been viewed nearly 12,000 times! Had I known, I'd have taken some better pictures lol. 
|
|
The Following 2 Users Like Post:
|
|
08-02-2016, 09:45 AM
|
 |
Member
|
|
|
Join Date: Mar 2015
Location: Coastal Northeast
Posts: 73
Likes: 11
Liked 31 Times in 19 Posts
|
|
I just bought another pusher the newer MKIII just to use on my Shield and XDS. What did you use between the slide and pusher to prevent any buggers? I have rainbow packing and old credit cards which worked with my older pusher and my 1911s.
|
08-02-2016, 11:22 AM
|
|
US Veteran
|
|
|
Join Date: Dec 2005
Location: Birmingham, Alabama
Posts: 4,483
Likes: 228
Liked 2,398 Times in 1,082 Posts
|
|
I send a strip of Delrin with the current pushers. On the Shield rear, you'll need the special pins. If the XD rear sight dovetail is wide enough, you can use the M&P pins on it as well. Credit card material is good, too. My real preference is some thin brass. I haven't yet found a good supply of it with the right dimensions. Some folks swear by leather, but my one experience trying it was less than satisfactory.
For the slide, I send some felt type material, but I don't use it myself. I just put a couple of layers of masking tape on the slide and call it good. The finish on those guns is a lot tougher than the aluminum blocks that come in contact with it.
Last edited by epj; 08-02-2016 at 11:27 AM.
|
10-14-2016, 03:53 PM
|
 |
Member
|
|
|
Join Date: Jul 2014
Location: Central Washington state
Posts: 327
Likes: 182
Liked 161 Times in 93 Posts
|
|
Quote:
Originally Posted by epj
I have been looking at some sort of improved push pins for the front sights. If I can find a source of material, I'd make some like the ones for the rear with a smaller head. So far, I've not been able to locate what I need. I still looking.
|
It looks like you have a square push pin on the Mk V model. Will that pin work on the front sight of a Shield? If so, can it be purchased separately? I also damaged my front sight using the round pin and would prefer a square one or one like is used on the rear sight.
|
|
The Following User Likes This Post:
|
|
|
|
 Posting Rules
|
|
|
|
|


 Linear Mode

