|
|
 |

05-28-2017, 06:28 PM
|
|
Member
|


|
|
Join Date: May 2017
Posts: 1
Likes: 0
Liked 0 Times in 0 Posts
|
|
 What to polish?
I see a lot of posts that mention we could polish parts to get rid of gritty feel and make things smoother. My questions are, what do we polish and with what? What are we polishing out of the parts?
Thanks Tim
Sent from my SM-G900V using Tapatalk
|
05-28-2017, 06:49 PM
|
 |
US Veteran
|


|
|
Join Date: Sep 2013
Location: SoCal, CA
Posts: 2,239
Likes: 735
Liked 1,039 Times in 671 Posts
|
|
Check out:
S&W M&P Trigger Job
However, I must caution you. If you're unsure what you are doing, do not attempt this. The link is provided for instructional purposes only.
Last edited by Saudade; 05-28-2017 at 06:51 PM.
Reason: Disclaimer
|
|
The Following User Likes This Post:
|
|
05-28-2017, 07:23 PM
|
|
Member
|

|
|
Join Date: Jun 2014
Location: South-FL
Posts: 1,082
Likes: 190
Liked 470 Times in 322 Posts
|
|
Quote:
Originally Posted by timma11

I see a lot of posts that mention we could polish parts to get rid of gritty feel and make things smoother. My questions are, what do we polish and with what? What are we polishing out of the parts?
Thanks Tim
Sent from my SM-G900V using Tapatalk
|
You polish the contact points of the trigger mechanism, like trigger bar, striker block safety with a dremel and polishing compound. Mayor disassembly is required don't do it if you are not familiar with the process of taking it apart.
__________________
M&P 9, Shield9.
|
05-28-2017, 08:44 PM
|
|
Member
|
|
|
Join Date: Oct 2006
Posts: 6,636
Likes: 1,816
Liked 5,386 Times in 2,713 Posts
|
|
You can get many of the benefits of a polish job by dry-firing. Basically all the polishing does is remove minor machining marks and burrs. Dry firing will do that too with much less chance of screwing it up.
By the time we finished transitional training to the M&P, they were a lot smoother than when we started. But then it was free ammo.
In fact, the M&P armorers are encouraged not to disassemble sear blocks. Apparently, they're real fun to re-assemble. Although they did make an exception when they did a running upgrade to sears with larger springs and furnished agencies with the original version with new sears. Many gunsmiths charge extra for "cigar box jobs" even if all the parts are there.
Last edited by WR Moore; 05-28-2017 at 08:48 PM.
|
05-28-2017, 09:47 PM
|
 |
Member
|

|
|
Join Date: Jan 2014
Location: Utah
Posts: 1,966
Likes: 2,383
Liked 2,954 Times in 1,054 Posts
|
|
Polishing metal parts makes their surfaces smoother and reduces friction and wear.
Often folks talk about polishing firing system components to make trigger pulls smoother, even a little lighter. All parts that are machined or stamped will have rough surfaces. When two such mating surfaces are rubbing against each other, you can get the gritty feel that many new factory triggers (guns) exhibit. Over time, all parts that wear against each other will become smoother, but it could take thousands of rounds to get them as smooth and polished as doing a polish job on mating surfaces initially.
You can feel a distinct difference between a polished (or well used) gun and a new one. However, a true polish job does require almost complete disassembly and reassembly. Some experience and the right tools are a big help. There are many videos that can help, and you have to start somewhere.
I completely polish every metal mating surface of every new gun before I even fire it. I have discovered and corrected minor imperfections that might have have caused a stoppage or at least an inconvenience, so when the gun goes to the range it is already "broken in" and reliable, with a good trigger pull.
Dry firing (rather than using a lot of expensive ammo to wear parts in) is a good method of helping to smooth out the functioning of a new gun. I do this after polishing. A few hundred dry fires is helpful, but you'll really get results when you hit about 1,000 or more cycles.
Last edited by CB3; 05-28-2017 at 09:48 PM.
|
|
The Following 2 Users Like Post:
|
|
05-28-2017, 11:11 PM
|
 |
Member
|
|
|
Join Date: Dec 2011
Location: So Cal (Near Edwards AFB)
Posts: 14,710
Likes: 2,926
Liked 17,102 Times in 6,271 Posts
|
|
First we have to define what that so called "gritty" part is. It has nothing to do with the trigger sear. The only time you'll feel any grit in an M&P trigger is in the slack or take up.
This trigger has a lot of slack. That is the movement of the trigger just before you feel it come up against the sear. You'll only ever feel this grit if you're examining the trigger by very slowly pressing it. If you're using it with proper trigger control, you won't notice the grit at all.
So, what causes that gritty feel anyway? This is the edge of the trigger bar moving the striker block. (Here's a list of part names so we're all on the same page with terminology: M&P Parts Identification )
Take a look at this picture:
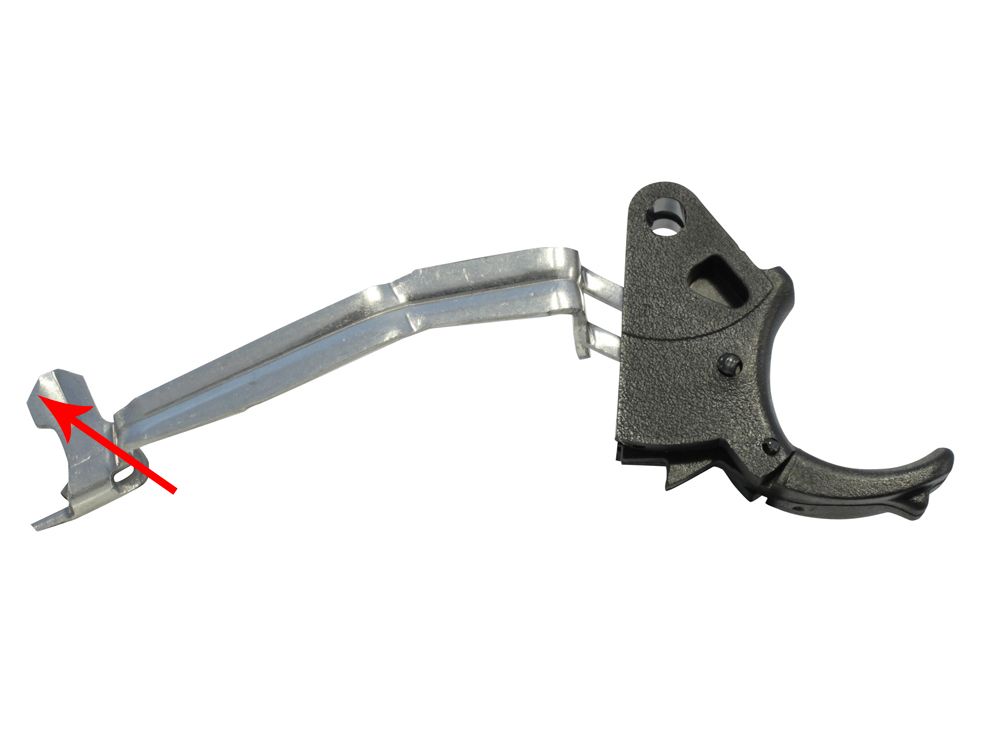
The red arrow is pointing to the surface that operates the striker block. If you look closely at that edge, you'll see that it's not smooth. This is due to it being just a stamped part.
You can polish this edge and it will reduce the grit you feel in the slack. I stress POLISH. Do not use a Dremel and do not use sand paper any more coarse than 600 grit.
Even so, I recommend not doing anything. Use proper trigger control and you'll never notice this grit anyway.
__________________
Freedom isn't free.
|
|
The Following 3 Users Like Post:
|
|
05-28-2017, 11:55 PM
|
|
Member
|
|
|
Join Date: Nov 2016
Posts: 102
Likes: 84
Liked 71 Times in 39 Posts
|
|
I mused 2000 grit SP on my G23, You will be much happier buying a package from APEX
|
05-29-2017, 03:05 AM
|
|
Member
|
|
|
Join Date: Jan 2016
Posts: 335
Likes: 189
Liked 148 Times in 96 Posts
|
|
Seems to me that the majority of the grit on an M&P generally is due to the striker block. A radiused (or aftermarket striker block) and possibly polishing up the striker block channel should work wonders. My Shield was fine. My full size was terrible.
|
|
The Following User Likes This Post:
|
|
05-29-2017, 08:07 AM
|
|
Member
|
|
|
Join Date: Jan 2014
Location: Utah
Posts: 1,966
Likes: 2,383
Liked 2,954 Times in 1,054 Posts
|
|
While the majority of the grittiness in an new factory M&P trigger pull is caused by rough machining/stamping of parts and channels, anywhere metal touches metal in the fire control system will stack negative friction tolerances. Some triggers come better than others.
If your local gun store has more than one gun for you to try, even dry firing, do so. In pulling a trigger slowly you will discover the best of the lot. It may be good enough to let dry firing of a few hundred rounds smooth and lighten it, at the additional cost of a gradually, inconsistent evolving gun.
I use a Dremel hispeed rotary tool and have for years. Never wrecked a part. Just go slowly. Felt tip, jewelers ruoge.
I polish the whole trigger bar, everywhere. It onl takes a minute. The RDS trigger bar interfaces with numerous surfaces in the gun, so I polish them all.
The striker BLOCK (safety) gets a lot of attention, as does its channel which is always rough and has machining burns at each end.
The trigger bar interface with the sear has a specific geometry for proper release. Polishing this area incorrectly and changing precise angles will produce a less desirable trigger, but polishing the trigger bar sear mating surface is helpful.
My first Shield five years ago, the only one left in the store, had a gritty pull that punched in about 9# on a digital gauge. Polishing components made it a much smoother, more consistently controllable trigger that broke at 7#, better, but still to heavy for quick shooting with accuracy for me.
So I ordered an Apex kit, installed it myself and immediately improved the feel of the gun for me.
The factory could take a little extra time to polish and fit parts, but since the average shooter doesn't demand it and the rough gun still sells, they save manufacturer time and costs.
I do hand polish many parts with wet/dry sandpaper. Used properly, the Dremel will do as good or better a job of polishing in less time. As with any power tool, one could overuse it quickly, but a measured, considered approach will yield great results.

|
05-29-2017, 04:03 PM
|
|
Member
|
|
|
Join Date: Nov 2016
Posts: 157
Likes: 643
Liked 112 Times in 69 Posts
|
|
I have heard...never tried it myself...too chicken. But some folks say they have filled the working parts with toothpaste,  and dry fired their gun a lot. Toothpaste is a mild abrasive, so should remove burrs, etc. Has anyone ever tried this, and what was your experience, especially with revolvers? Inquiring minds want to know!
Last edited by Jupiter01; 05-29-2017 at 04:04 PM.
|
05-29-2017, 04:18 PM
|
 |
US Veteran
|

|
|
Join Date: Jan 2010
Location: The wet side of Oregon
Posts: 6,292
Likes: 8,814
Liked 7,785 Times in 2,377 Posts
|
|
I have done a number of these action polish jobs.
Some of the stamped parts may have burrs or rolled edges.
These get smoothed with EZE-Lap diamond hones.
Then I finish off with a Dremel, using red then white polishing compound on hard felt buffing wheels.
The result is a chrome-like finish on these parts.
__________________
-jwk-
US Army '72-'95
|
05-29-2017, 07:08 PM
|
|
Member
|
|
|
Join Date: Dec 2011
Location: So Cal (Near Edwards AFB)
Posts: 14,710
Likes: 2,926
Liked 17,102 Times in 6,271 Posts
|
|
Quote:
Originally Posted by Jupiter01
I have heard...never tried it myself...too chicken. But some folks say they have filled the working parts with toothpaste, and dry fired their gun a lot. Toothpaste is a mild abrasive, so should remove burrs, etc. Has anyone ever tried this, and what was your experience, especially with revolvers? Inquiring minds want to know! |
Toothpaste is an abrasive, but it's uncontrolled. For someone who's too cheap to actually go buy some Mother's polish (or other specific polishing compound) toothpaste will work. I just don't recommend it.
Each brand carries a different level of abrasive. So, one brand might be very light while another would be more than you need.
When working on metal, stick to the metal specific stuff.
__________________
Freedom isn't free.
|
|
The Following User Likes This Post:
|
|
05-30-2017, 10:40 AM
|
|
Member
|

|
|
Join Date: Jun 2016
Location: Idaho
Posts: 415
Likes: 34
Liked 156 Times in 103 Posts
|
|
Quote:
Originally Posted by Jupiter01
I have heard...never tried it myself...too chicken. But some folks say they have filled the working parts with toothpaste, and dry fired their gun a lot. Toothpaste is a mild abrasive, so should remove burrs, etc. Has anyone ever tried this, and what was your experience, especially with revolvers? Inquiring minds want to know! |
On these guns if you disassemble them far enough to effectively
add toothpaste (striker block, etc) then you may as well just polish correctly and avoid the toothpaste cleanup later. The link to Burwell above is right on, good info.
__________________
CERAKOTE Svcs.
Class 01 FFL
|
|
The Following User Likes This Post:
|
|
05-30-2017, 10:41 AM
|
|
Member
|
|
|
Join Date: Jun 2016
Location: Idaho
Posts: 415
Likes: 34
Liked 156 Times in 103 Posts
|
|
Quote:
Originally Posted by Saudade
Check out:
S&W M&P Trigger Job
However, I must caution you. If you're unsure what you are doing, do not attempt this. The link is provided for instructional purposes only. |
Should be a sticky!
__________________
CERAKOTE Svcs.
Class 01 FFL
|
05-30-2017, 11:52 PM
|
|
Member
|
|
|
Join Date: Jan 2016
Posts: 335
Likes: 189
Liked 148 Times in 96 Posts
|
|
Shoot, I thought it was. Maybe I'm confusing Sticky with Bookmark.
|
|
 Posting Rules
|
|
|
|
|


 Linear Mode

