|
|
 |
|

06-30-2012, 01:25 PM
|
 |
US Veteran
|


|
|
Join Date: Jun 2012
Location: SW Mississippi
Posts: 1,350
Likes: 2,227
Liked 6,219 Times in 1,043 Posts
|
|
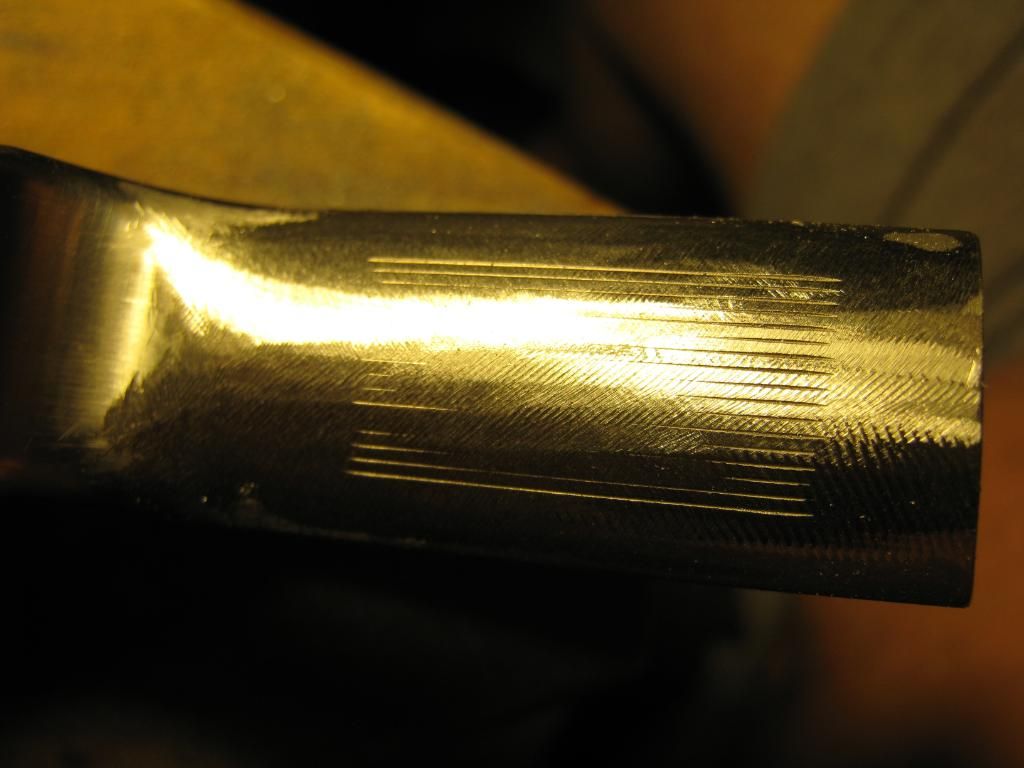
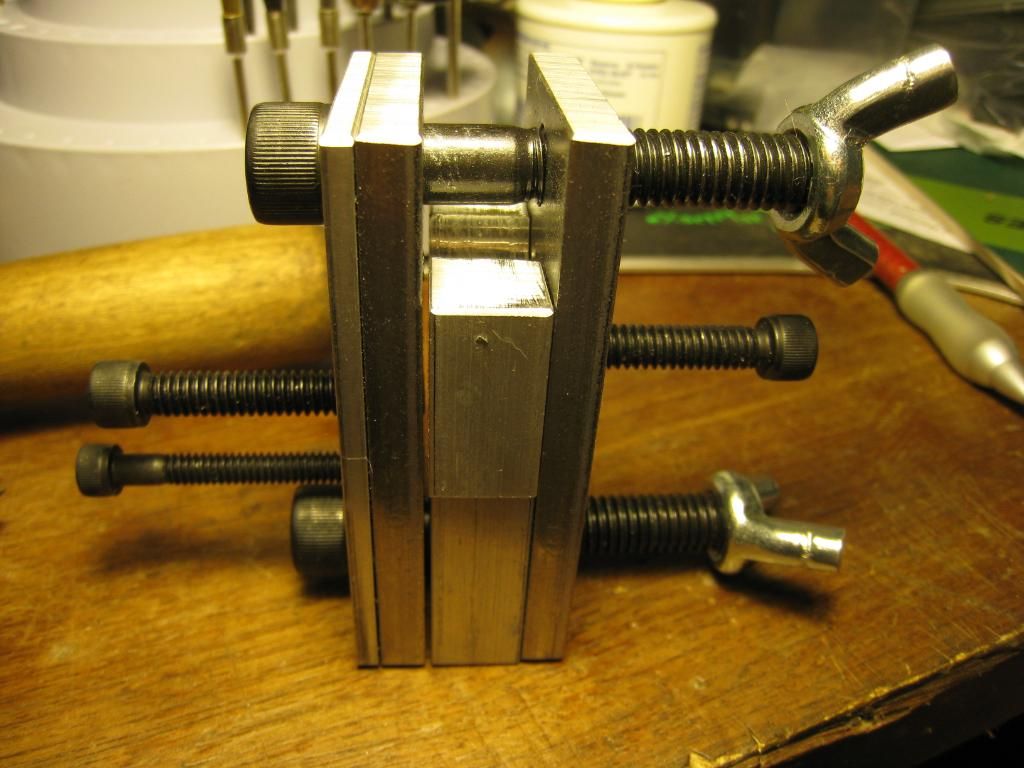
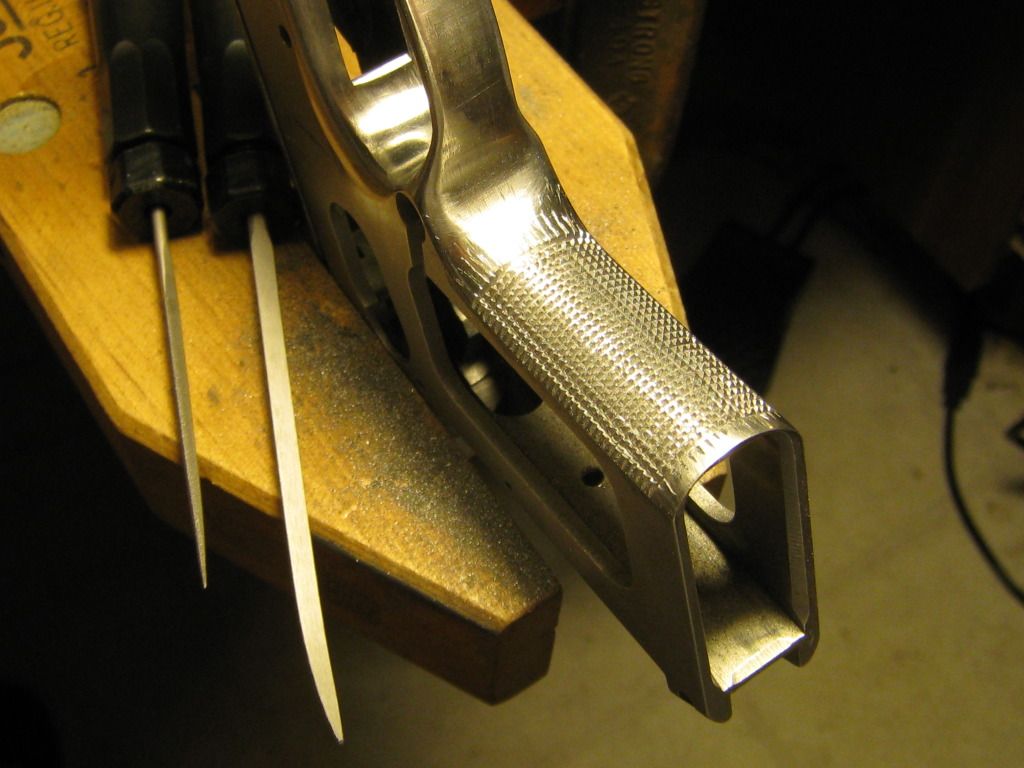
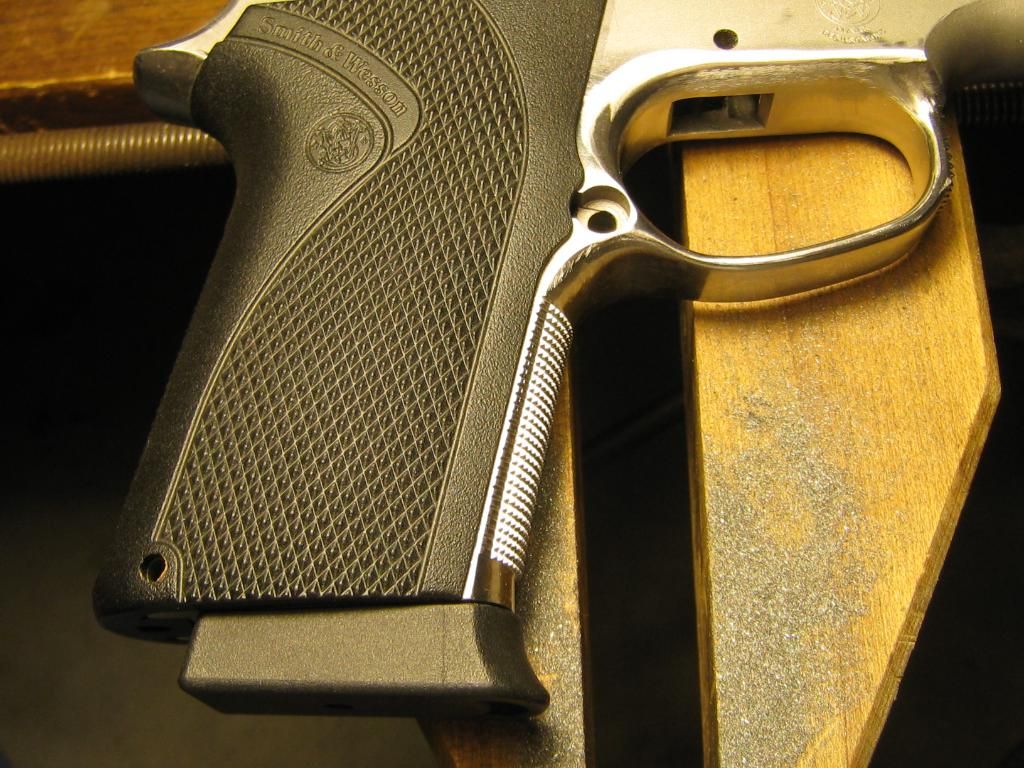
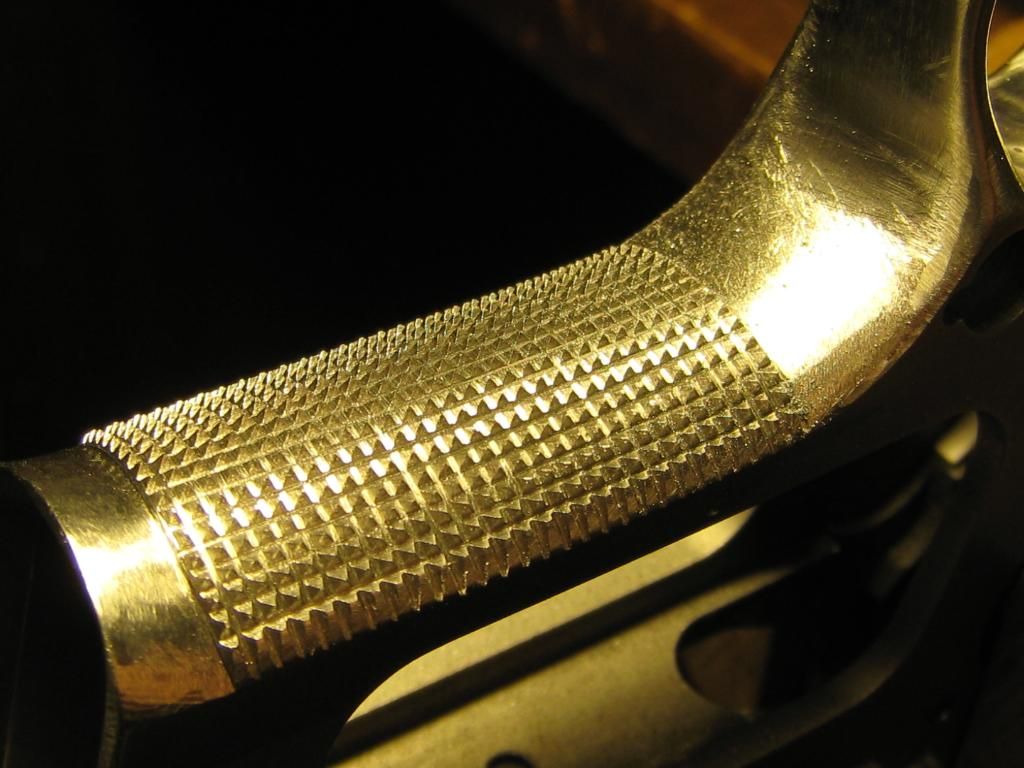
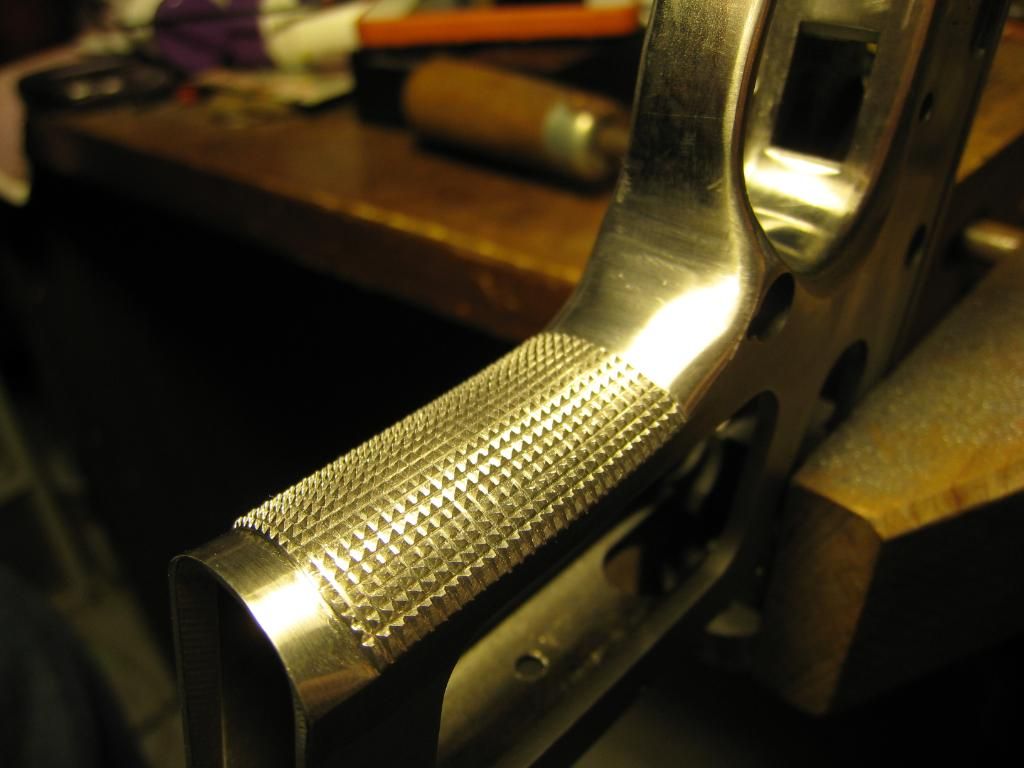
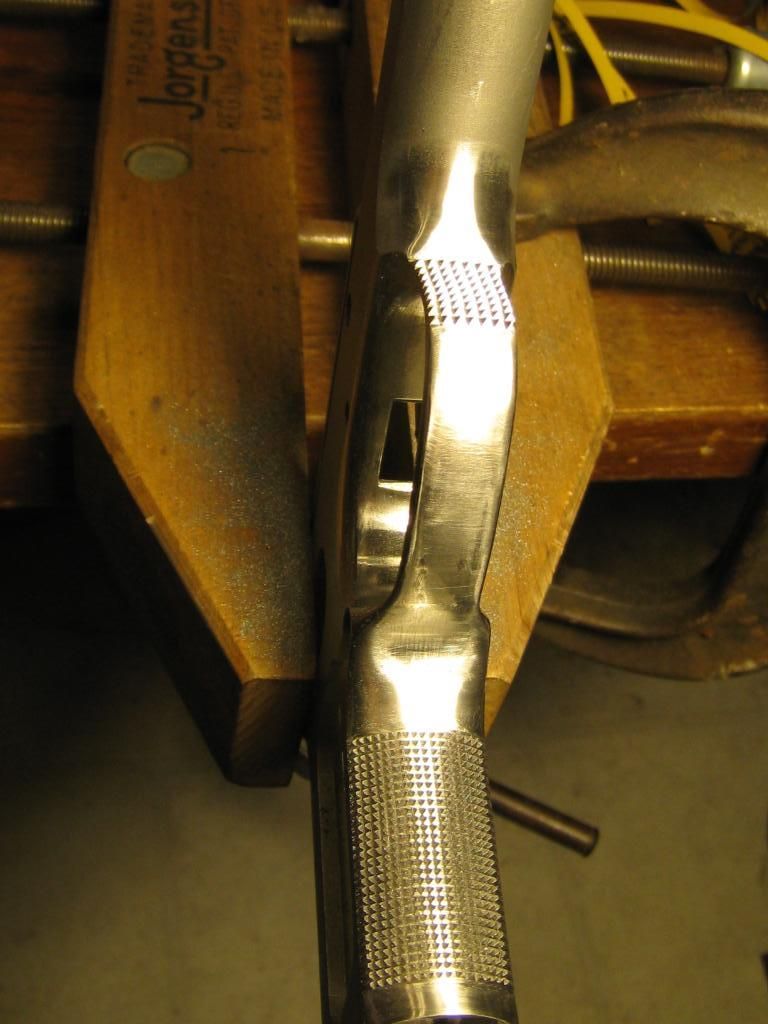
Been messing with the checkering on the trigger guard. This work is very slow going, one slip of the file and the whole job is trashed.
Here we are in progress:
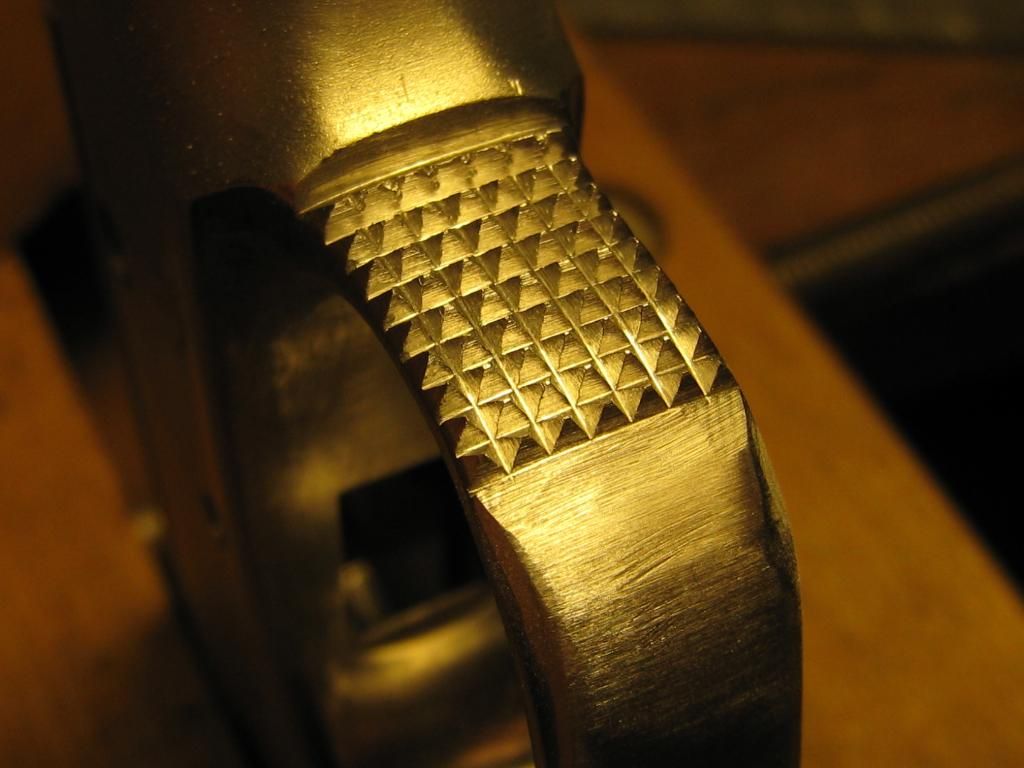
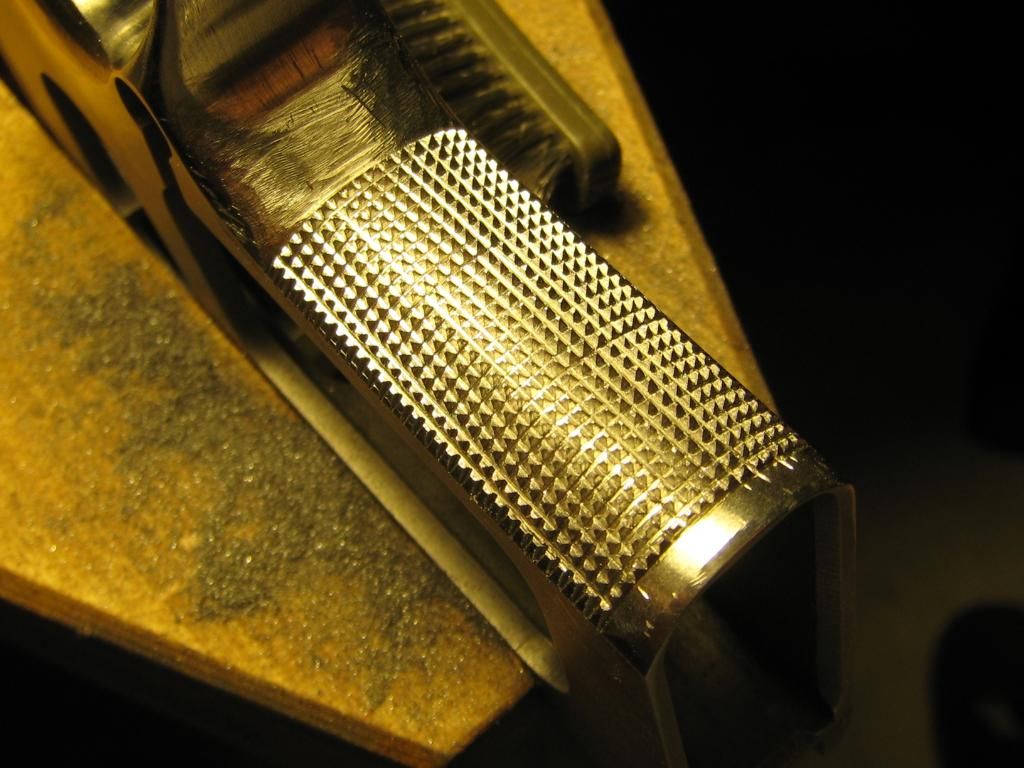
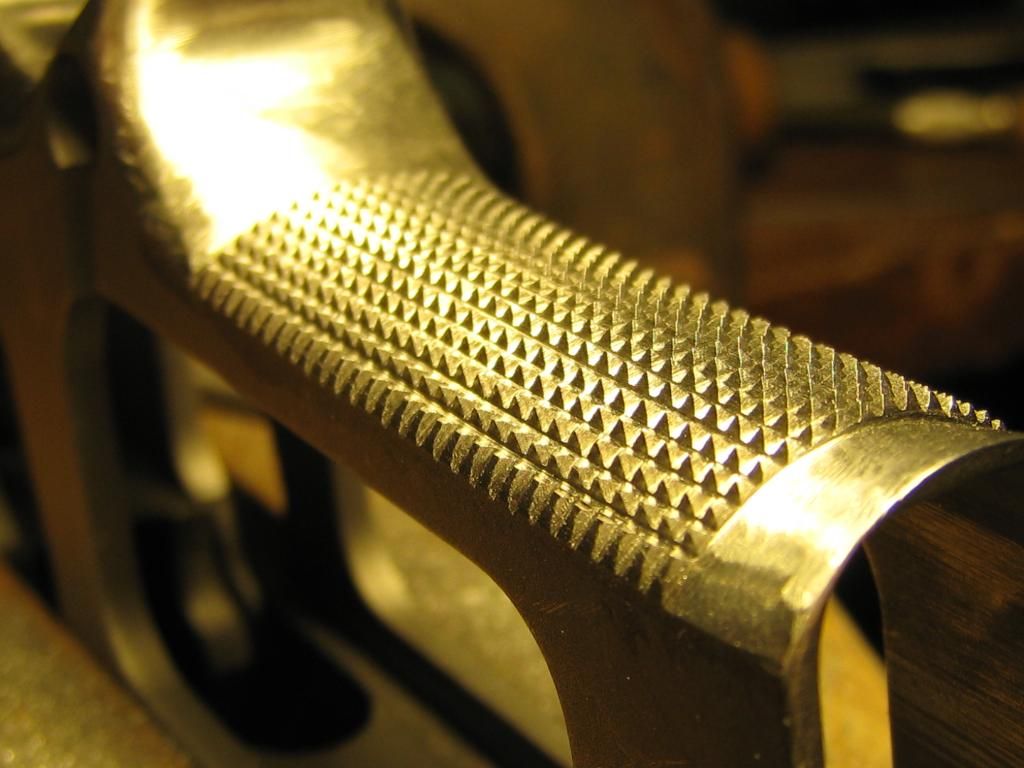
And... here's a couple shots of completed job:
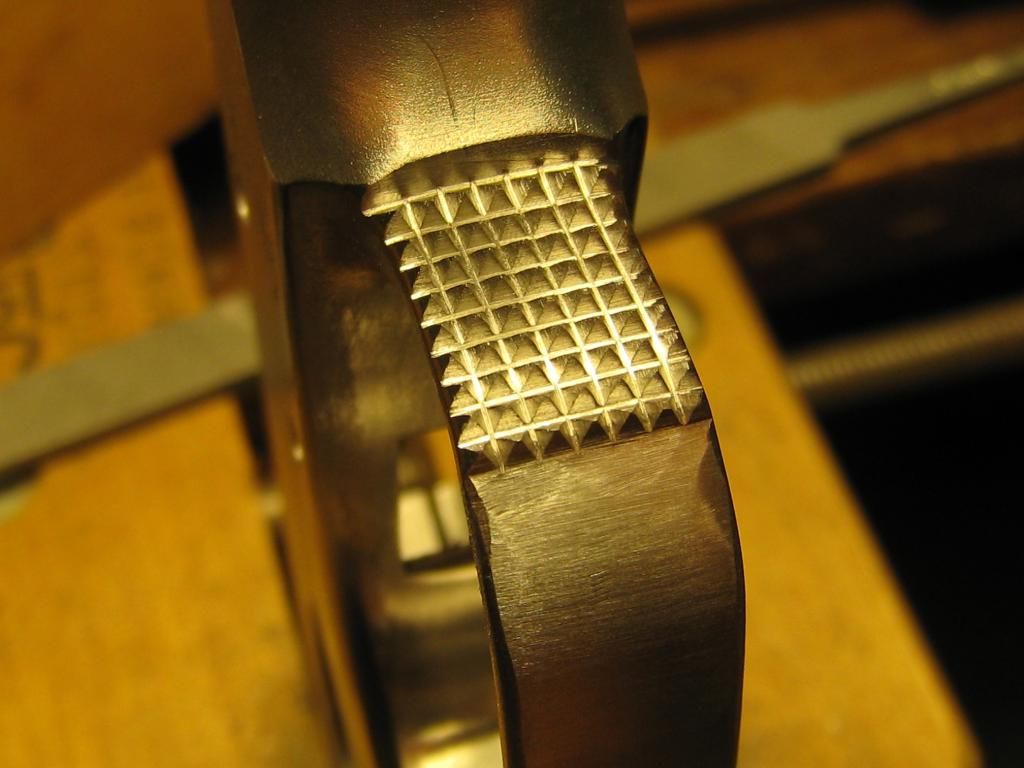
And...

Next I'll be laying out and cutting the checkering on the frame.
Cheers
Bill
|
|
The Following 11 Users Like Post:
|
627 city hunter, Big Shrek, blujax01, bronco45, Ervin, lefty60, M29since14, Shorty 45 MK2, Steve912, TAROMAN, Wiregrassguy |
06-30-2012, 04:57 PM
|
 |
Member
|


|
|
Join Date: Feb 2002
Location: Victoria, Texas
Posts: 3,323
Likes: 380
Liked 1,016 Times in 358 Posts
|
|
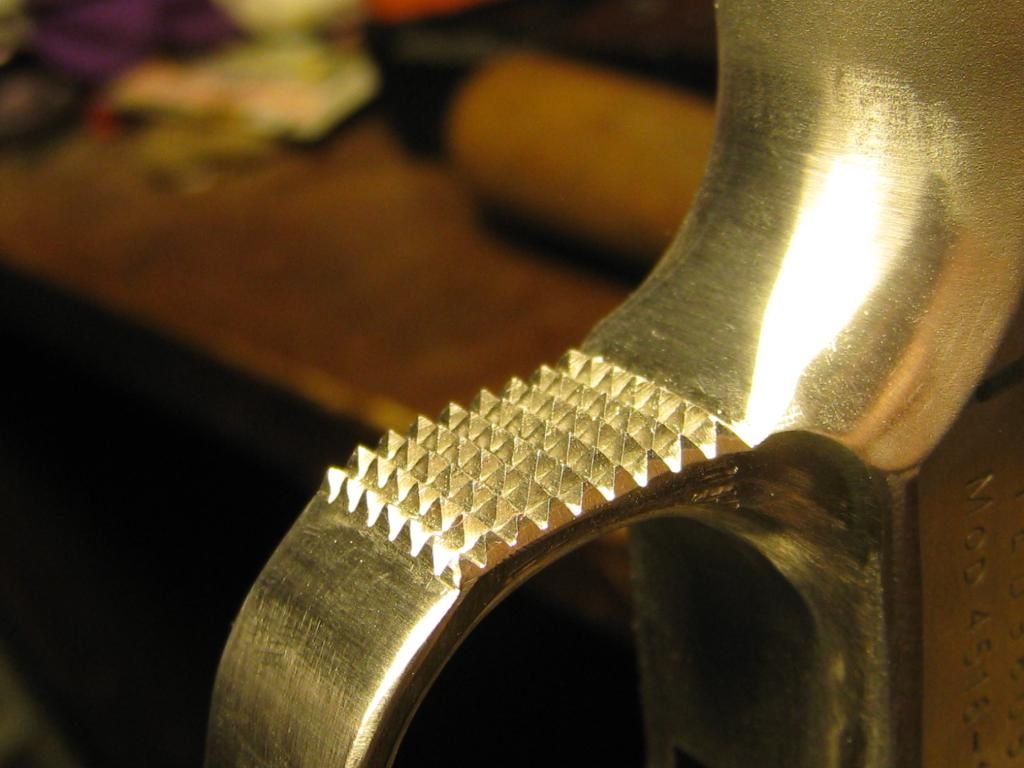
3 rows to the right and 6 down, that lil pyramid needs some pointing compared to the others..........nah.....just kidding.
looks good.
what is your plan for the front strap? inquiring minds want to know?
20/25/30/40 LPI?????
|
|
The Following User Likes This Post:
|
|
06-30-2012, 10:17 PM
|
|
US Veteran
|
|
|
Join Date: Jun 2012
Location: SW Mississippi
Posts: 1,350
Likes: 2,227
Liked 6,219 Times in 1,043 Posts
|
|
Quote:
Originally Posted by SW CQB 45

3 rows to the right and 6 down, that lil pyramid needs some pointing compared to the others..........nah.....just kidding.
looks good.
what is your plan for the front strap? inquiring minds want to know?
20/25/30/40 LPI?????
|
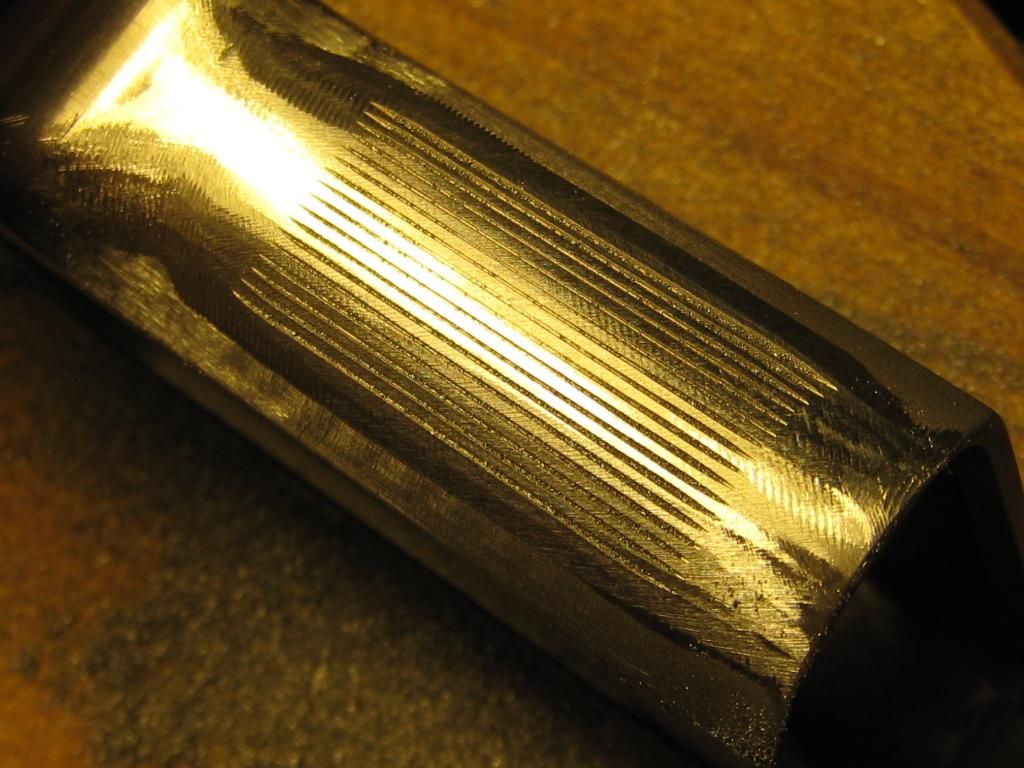
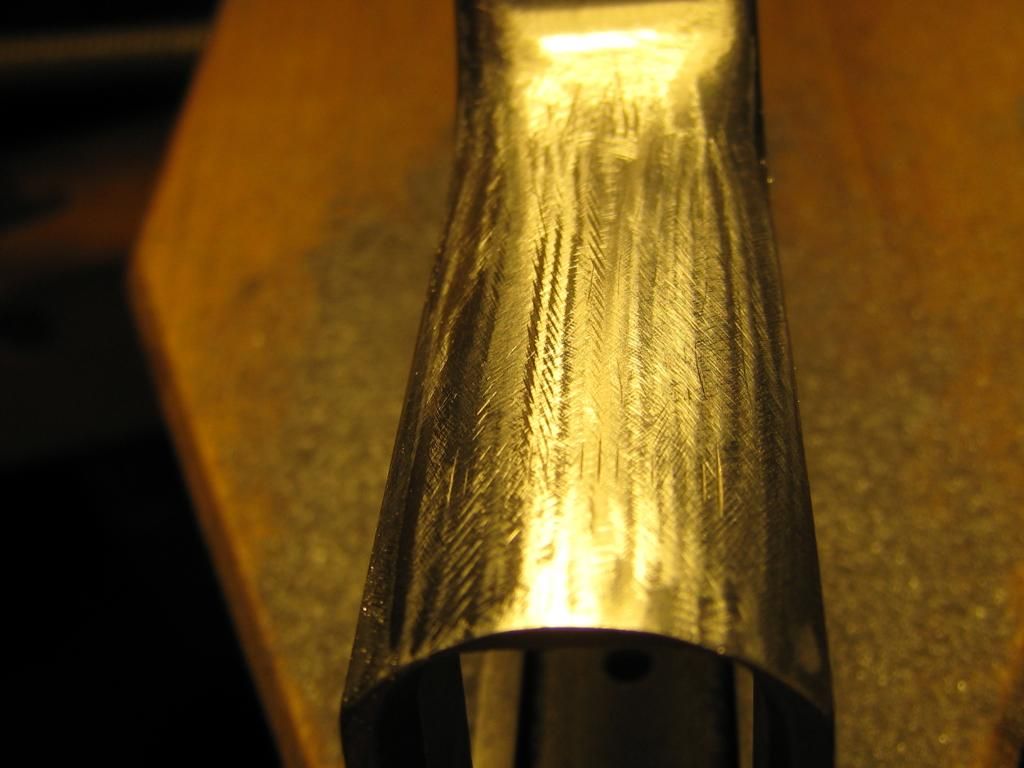
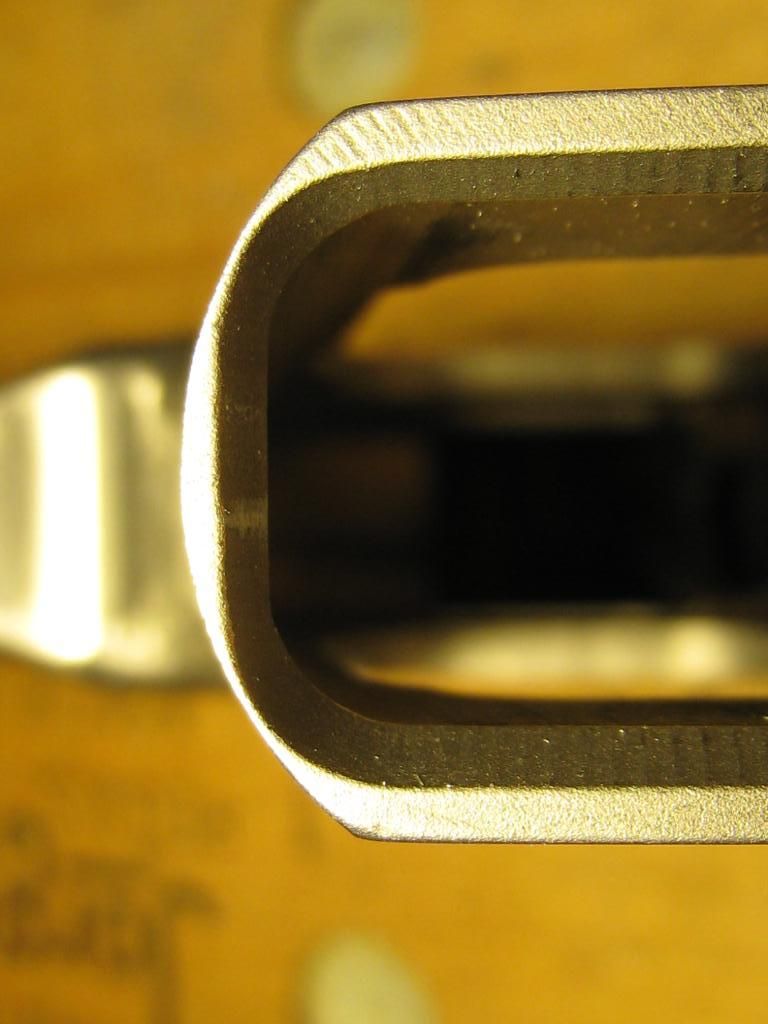
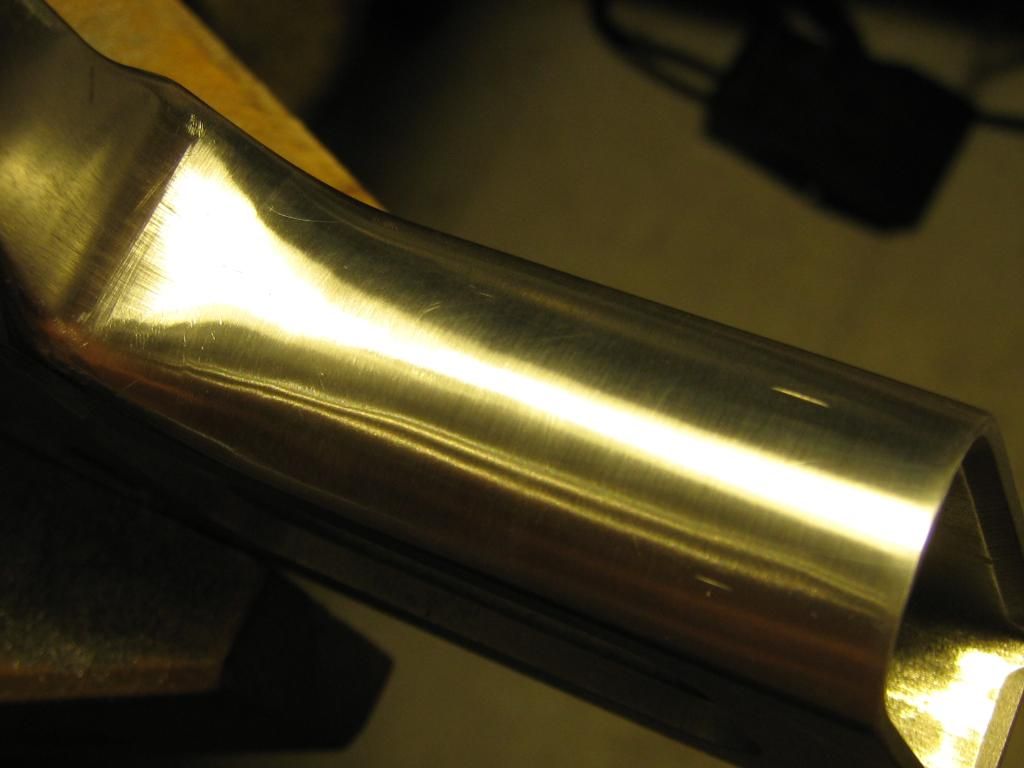
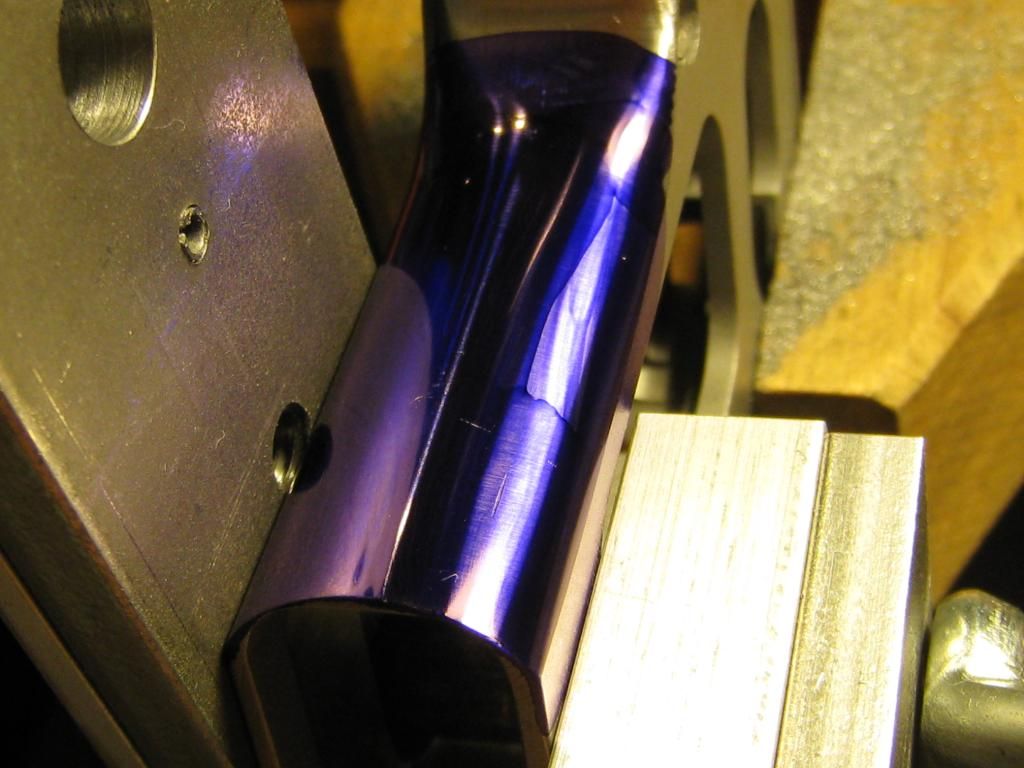
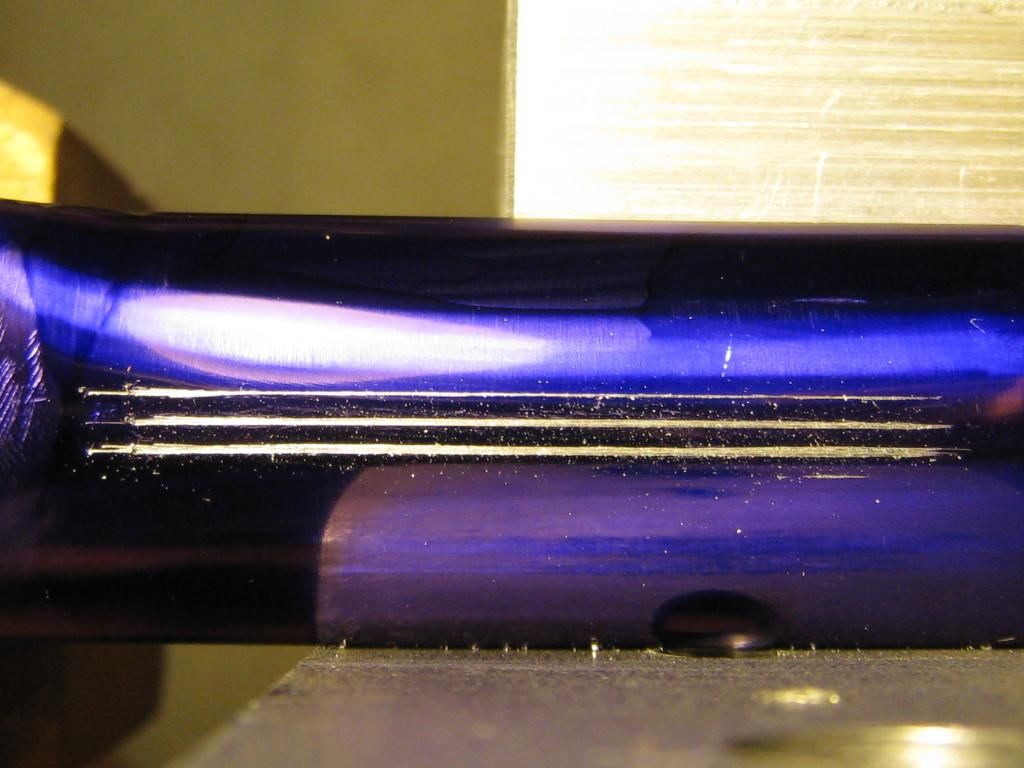
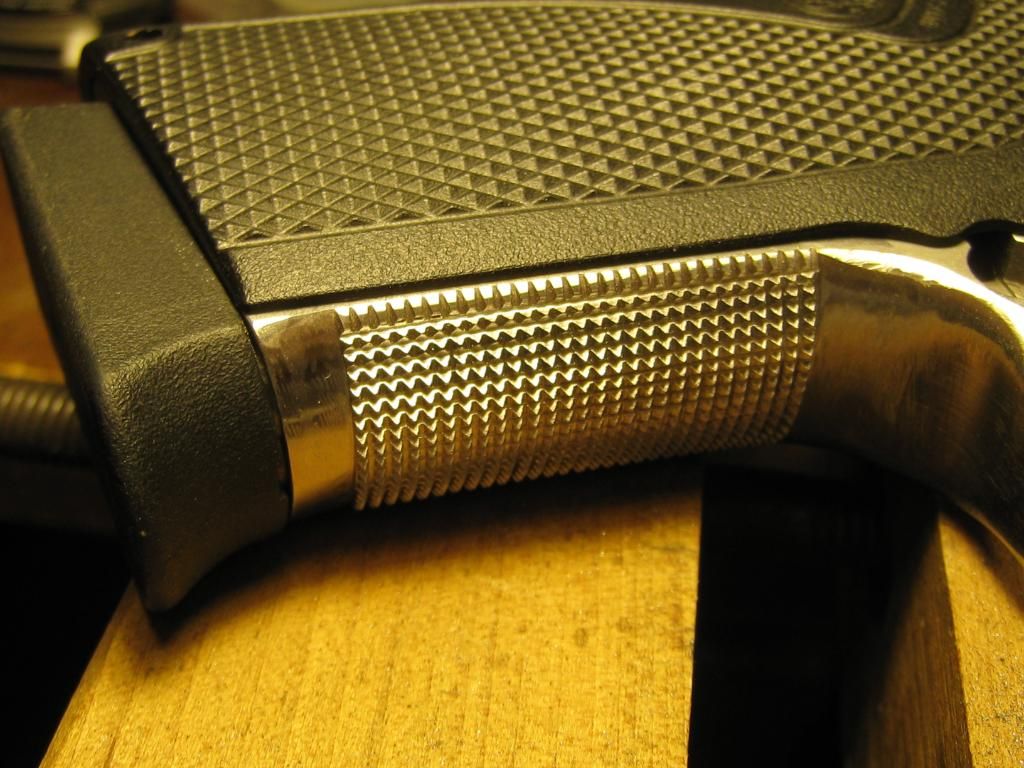
Here's the target area for the next mission:
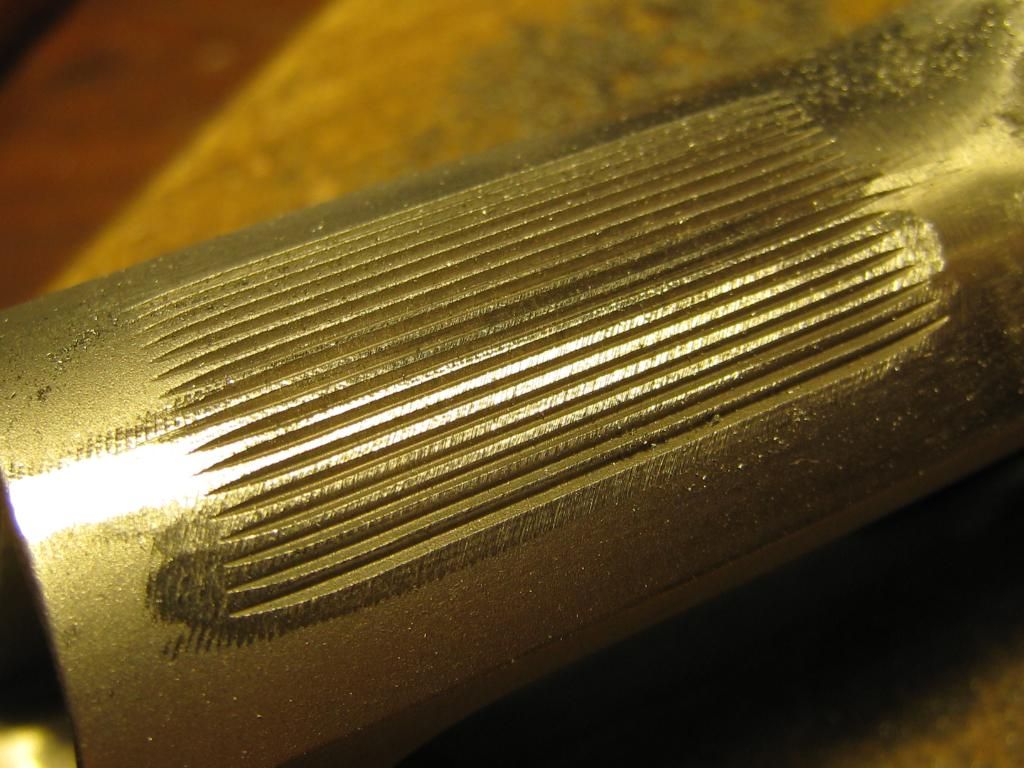
The existing vertical aren't of much use. Spacing is something a little finer than 30 LPI like 32.5 LPI or some such. In any event my 30 file wont lie evenly in those grooves so, they'll need to go. I did some measuring and those verticals are .015 - .017 deep and the front strap is .108 thick on the center line. The front strap is also kinda lumpy and will need truing up. So, what I think I'll do is true up the front removing the absolute minimum amount of metal along with the existing verticals then layout and re-cut it it at 20 LPI.
Cheers
Bill
|
|
The Following 2 Users Like Post:
|
|
07-01-2012, 11:31 AM
|
 |
US Veteran
|


|
|
Join Date: Jan 2012
Location: Desert South West
Posts: 5,539
Likes: 7,356
Liked 8,688 Times in 2,312 Posts
|
|
You guys are real craftsmen. Wow!
__________________
John 1:17
NRA Life Benefactor
|
07-01-2012, 12:06 PM
|
|
Member
|

|
|
Join Date: Dec 2011
Location: Eastern US
Posts: 374
Likes: 1
Liked 315 Times in 123 Posts
|
|
Isn't STEEL wonderful ??!! You can't do custom work like that on PLASTIC !
|
|
The Following 4 Users Like Post:
|
|
07-01-2012, 04:55 PM
|
 |
Member
|
|
|
Join Date: Sep 2008
Location: Shenandoah Valley, VA
Posts: 126
Likes: 37
Liked 26 Times in 17 Posts
|
|
I'm really enjoying seeing this project develop -- great work, and thanks for sharing it with us!!
|
|
The Following 3 Users Like Post:
|
|
07-01-2012, 05:25 PM
|
|
Member
|
|
|
Join Date: Apr 2010
Location: Atlanta, GA
Posts: 465
Likes: 48
Liked 31 Times in 21 Posts
|
|
OP - good on you!
I'm in the camp that a handgun is a tool - not a work or art. Do to it whatever works for you!
Really enjoying this thread! Thanks!
|
|
The Following User Likes This Post:
|
|
07-01-2012, 07:26 PM
|
|
Member
|
|
|
Join Date: Feb 2002
Location: Victoria, Texas
Posts: 3,323
Likes: 380
Liked 1,016 Times in 358 Posts
|
|
while I think you have made your decision on the front strap but by chance you are on the fence.
I had a Colt done over sometime back. it belonged to my dad and he gave it to me and we had always wanted a stippled front strap.
We never went through with it and when he passed some years ago, I decided to shell out cash to have this gun redone.
I informed the gunsmith I did not want an ugly stipple but showed a picture of a shark skin type done by Yost.
I was happy with the results. not trying to persuade....just throwing another idea out there. take care


|
|
The Following 10 Users Like Post:
|
|
07-01-2012, 08:04 PM
|
 |
Member
|


|
|
Join Date: Nov 2009
Location: Republic of Texas
Posts: 11,364
Likes: 9,381
Liked 17,297 Times in 6,648 Posts
|
|
Quote:
Originally Posted by chp
OP - good on you!
I'm in the camp that a handgun is a tool - not a work or art. Do to it whatever works for you!
Really enjoying this thread! Thanks!
|
I've always thought that handguns were tools that could also be works of art.
|
|
The Following 4 Users Like Post:
|
|
07-01-2012, 09:40 PM
|
|
US Veteran
|
|
|
Join Date: Jun 2012
Location: SW Mississippi
Posts: 1,350
Likes: 2,227
Liked 6,219 Times in 1,043 Posts
|
|
Quote:
Originally Posted by SW CQB 45
while I think you have made your decision on the front strap but by chance you are on the fence.
I had a Colt done over sometime back. it belonged to my dad and he gave it to me and we had always wanted a stippled front strap.
We never went through with it and when he passed some years ago, I decided to shell out cash to have this gun redone.
I informed the gunsmith I did not want an ugly stipple but showed a picture of a shark skin type done by Yost.
I was happy with the results. not trying to persuade....just throwing another idea out there. take care
|
I appreciate the input. I'm still entertaining different ways to do the front strap. BTW great looking Colt.
Cheers
|
07-01-2012, 10:54 PM
|
|
US Veteran
|
|
|
Join Date: Jun 2012
Location: SW Mississippi
Posts: 1,350
Likes: 2,227
Liked 6,219 Times in 1,043 Posts
|
|

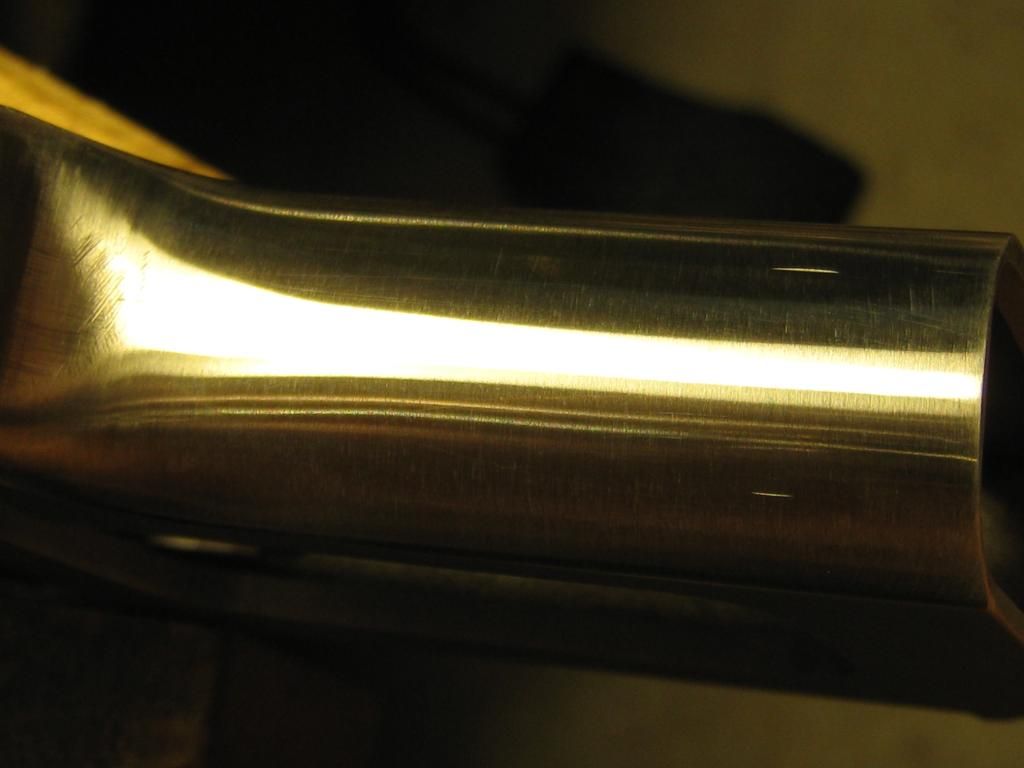
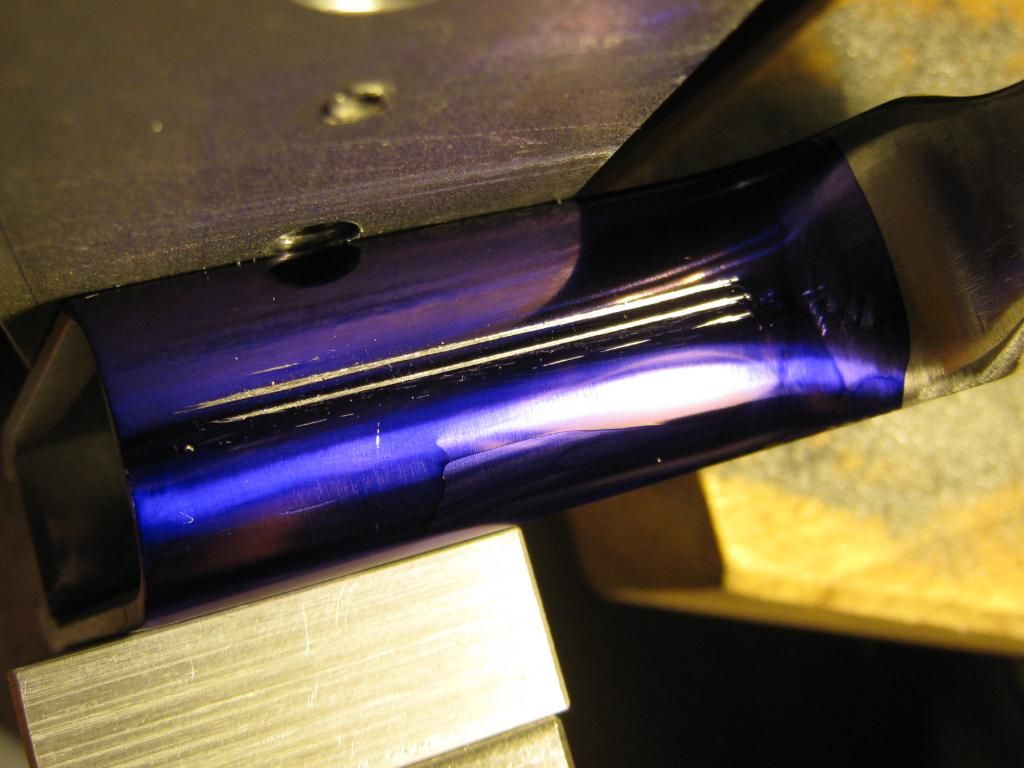
Started working on truing up the front strap last night and finished up today. For the most part it's ready for whatever treatment I decide to apply. At this point I'm leaning towards 20 LPI checkering though.
Last night's work:
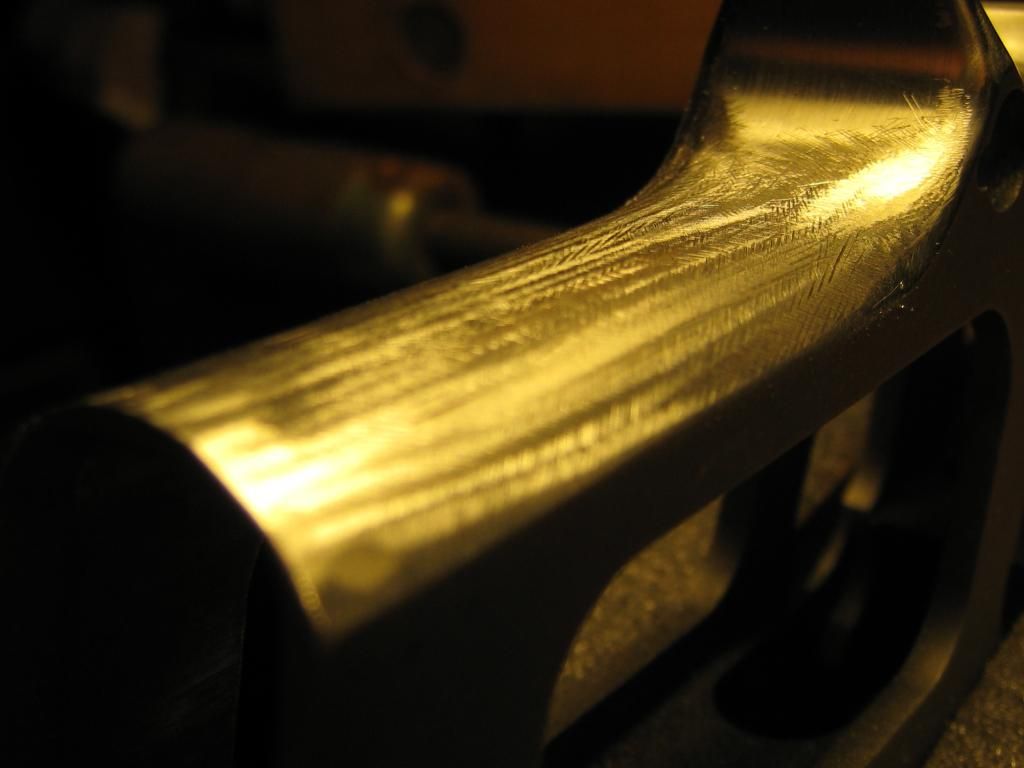
And today's:
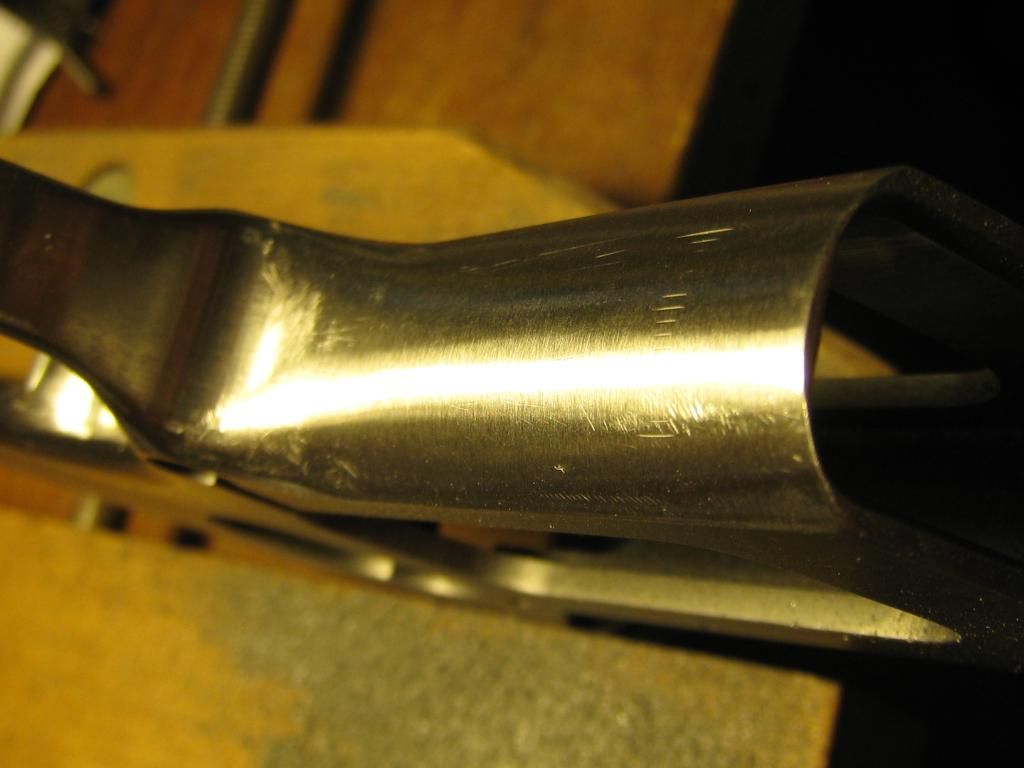
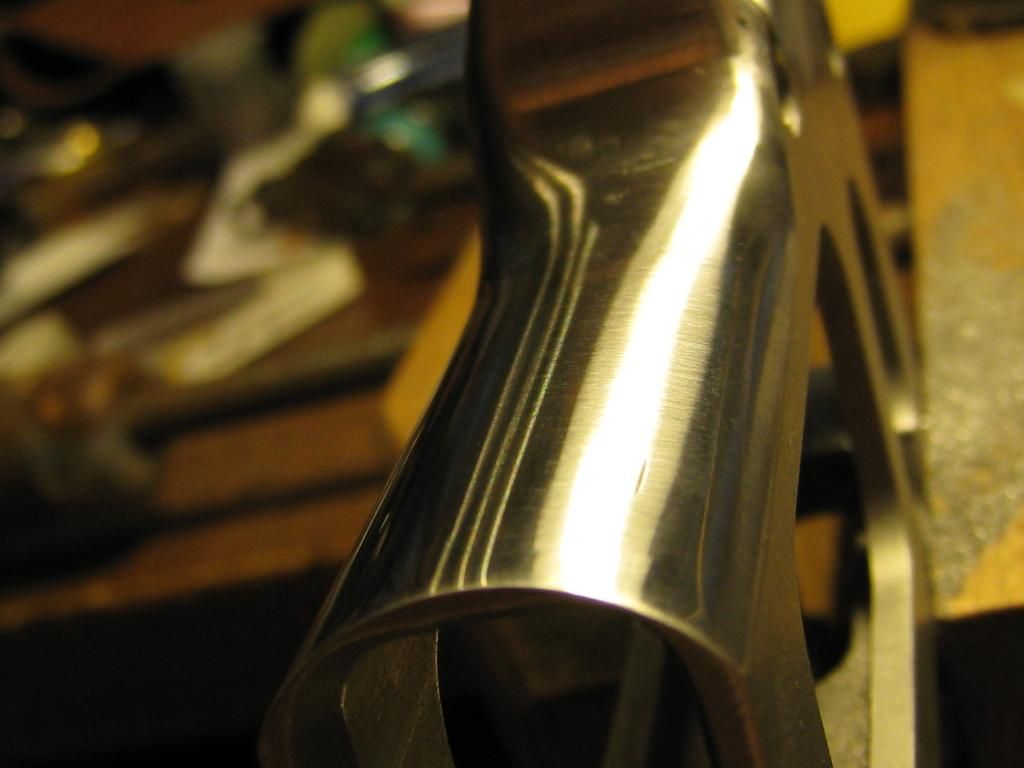
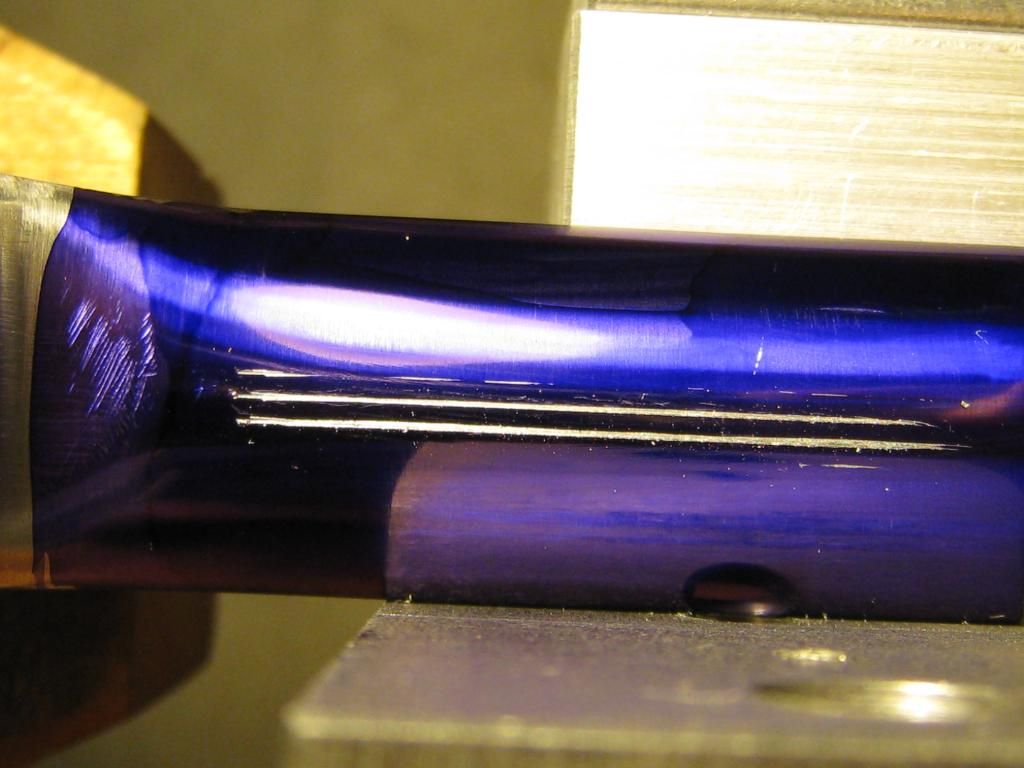
Plenty of meat left.
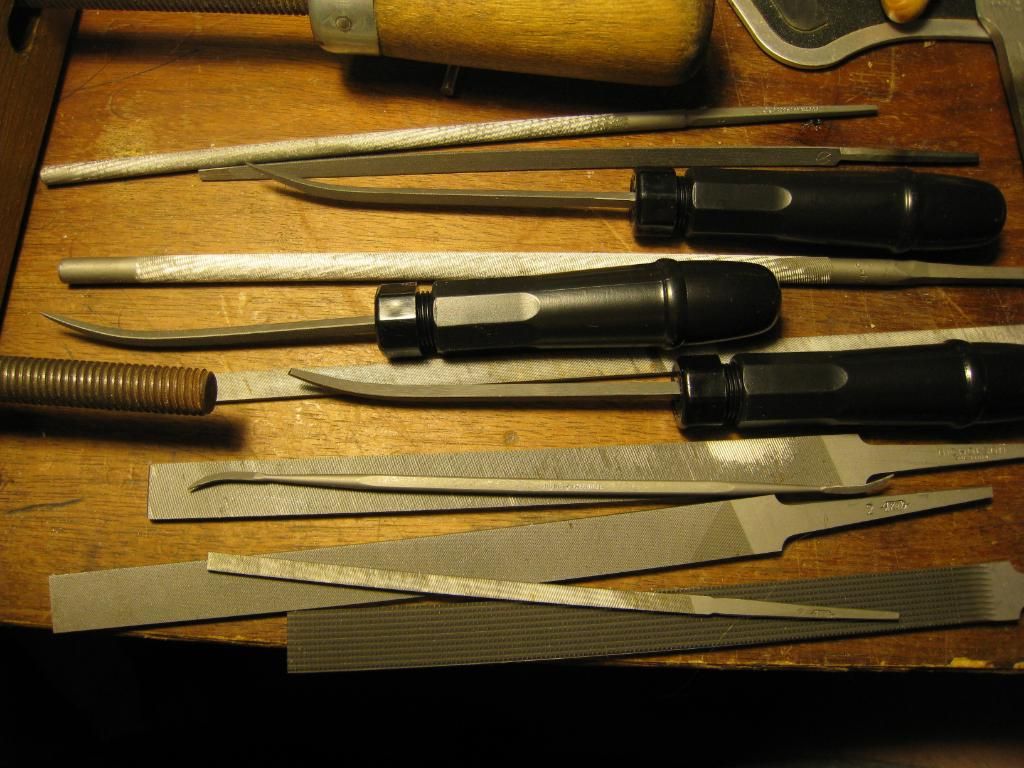
The pile o' files.
Next step is to settle on the layout. I originally wanted to have checkering extend all the way to the bottom of the mag well but, S&W did a lovely job of beveling the mag well opening which left the metal a bit too thin right at the edge to cut checkering. It was indeed too thin before I started filing so truing up the front really made no difference.
So I'm down to doing something sort of like this, stop line top & bottom and checker in between:
Or this without the stop lines:
Problem is though I wont be able to cut the verticals with a standard checkering file. I can do the horizontals that way but the verticals I'll have to cut one at a time with a bent three square needle file. So. unless someone has a better idea, I'll apply some Dykem then start the layout scribing the verticals every .050 then get to filing. Whew, this is gonna take forever.
Cheers
Bill

|
|
The Following 6 Users Like Post:
|
|
07-01-2012, 11:57 PM
|
|
Member
|
|
|
Join Date: Feb 2002
Location: Victoria, Texas
Posts: 3,323
Likes: 380
Liked 1,016 Times in 358 Posts
|
|
Damn brother....you got talent.
you are way beyond the dremel!!!!!
and I is still in left field, with my dremel spinning!!!!!!
|
|
The Following 3 Users Like Post:
|
|
07-02-2012, 01:14 AM
|
|
Member
|
|
|
Join Date: May 2010
Posts: 146
Likes: 13
Liked 69 Times in 35 Posts
|
|
Quote:
Originally Posted by SW CQB 45
Damn brother....you got talent.
you are way beyond the dremel!!!!!
and I is still in left field, with my dremel spinning!!!!!!
|
I second my fellow Texan. You sir are quite skilled, I tip my hat to you. Please carry on.
|
|
The Following 3 Users Like Post:
|
|
07-02-2012, 01:57 PM
|
 |
Member
|
|
|
Join Date: Dec 2011
Location: Tampa Bay Area
Posts: 593
Likes: 235
Liked 224 Times in 131 Posts
|
|
Boats I gotta tell ya I was thinkin WTH, as you progress through this it's lookin pretty good. Motor On
|
07-02-2012, 04:07 PM
|
|
Member
|
|
|
Join Date: Feb 2012
Location: Louisiana
Posts: 554
Likes: 4,534
Liked 135 Times in 98 Posts
|
|
BMCM,
Awesome work.
Buffalo Trace is fantastic. I have met the owner and master distiller. I have a signed bottle at home. Great bourbon. Nothing wrong with cleaning or working on an unloaded gun with a drink or two.
Last edited by 627 city hunter; 07-03-2012 at 12:50 AM.
|
|
The Following User Likes This Post:
|
|
07-02-2012, 10:37 PM
|
|
US Veteran
|
|
|
Join Date: Jun 2012
Location: SW Mississippi
Posts: 1,350
Likes: 2,227
Liked 6,219 Times in 1,043 Posts
|
|
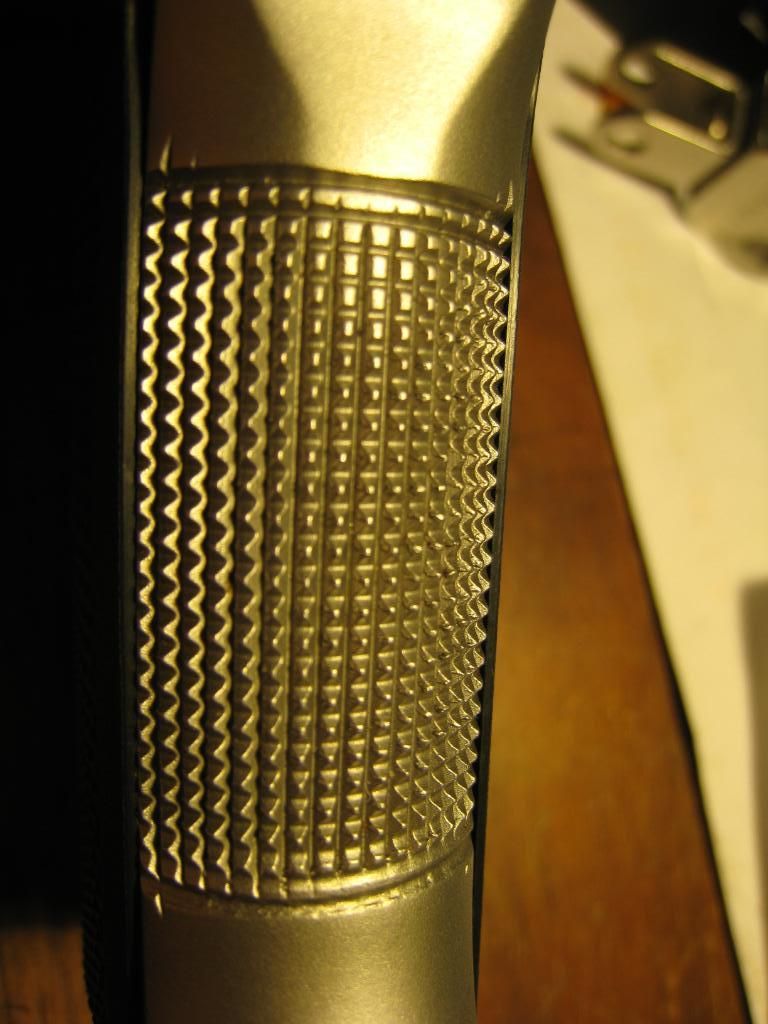
Ok Guys...Starting in on the front strap. I'm going to use the same pattern my Shorty is checkered with which is the last picture post 61.
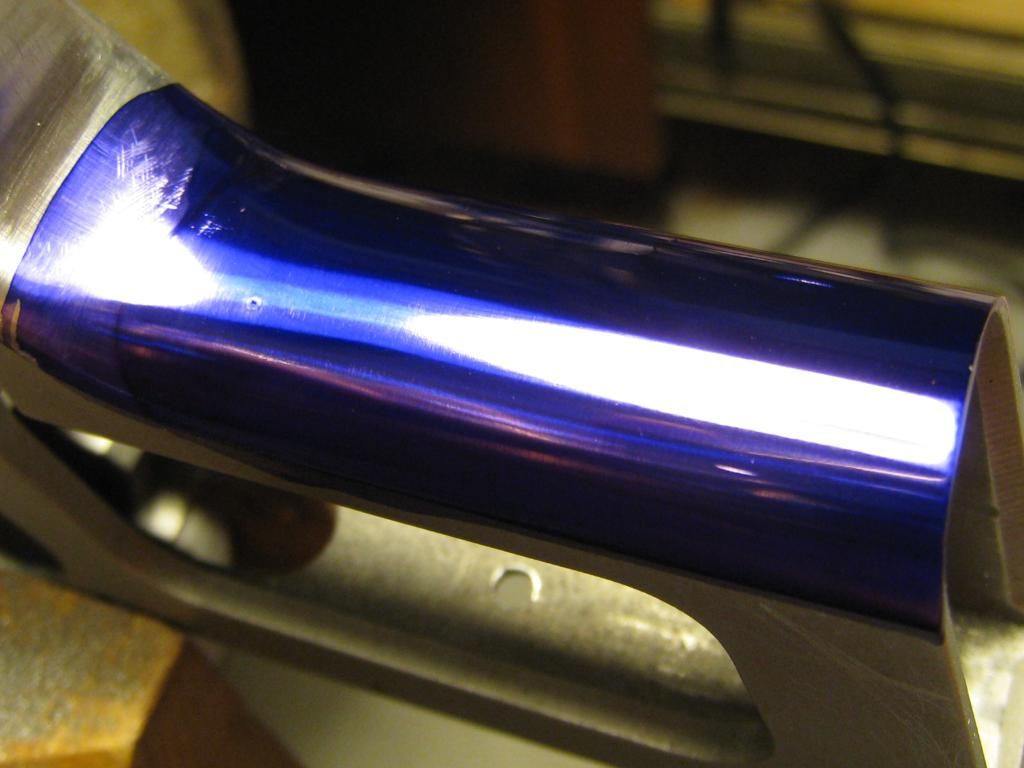
First a little "shoe shine" action:
A little 400 grit.
Then maybe some 600 grit.
Ah what the hell...some 1000 grit too.
Splash on some layout juice.
This thing in case you don't recognize it is a sight pusher tool. Forum member epj makes these and it works great on tough sticky sights.
Well, turns out if you take it apart, re-arrange the bits, and bolt it to the grip-frame, it also makes a jim dandy checkering jig 
And off we go.
I'm using a Grobet 00 checkering file (20 LPI). I'm holding the tang elevated a few degrees so as to not scribe any lines any closer than an eighth inch or so from the bottom of the frame. For perspective, those lines are .050 apart. Once I get all my verticals laid out and deepened a little I can set up and scribe the horizontals. When all the lines are laid out I finish up with a three square needle file. This is going to take some time. Like I said before, one slip of the file and the job is ruined. So, I only work on this stuff maybe and hour or two at the most. Ya don't want to be doing this stuff when you're tired or cranky or otherwise not giving your full attention to the work. Stay tuned.
Cheers
Bill
Last edited by BMCM; 07-03-2012 at 12:57 AM.
|
|
The Following 6 Users Like Post:
|
|
07-02-2012, 11:59 PM
|
 |
Member
|
|
|
Join Date: Mar 2009
Location: United States
Posts: 150
Likes: 39
Liked 52 Times in 31 Posts
|
|
WAY to much time on your hands. I would use the, "time for a new gun honey" quote rather than spend the hours and hours on modifing my gun. Doesnt Kimber make the "Melt down" carry guns? Anyways very intersting and cant wait to see the finished product.
|
07-03-2012, 12:49 AM
|
|
Member
|
|
|
Join Date: Feb 2012
Location: Louisiana
Posts: 554
Likes: 4,534
Liked 135 Times in 98 Posts
|
|
I think its kind of like Buffalo Trace -- good things take some time and effort.
Awesome work BMCM.
It would be amazing to see photos of this time lapsed.
|
|
The Following User Likes This Post:
|
|
07-03-2012, 12:50 AM
|
|
US Veteran
|
|
|
Join Date: Jun 2012
Location: SW Mississippi
Posts: 1,350
Likes: 2,227
Liked 6,219 Times in 1,043 Posts
|
|
Quote:
Originally Posted by Jim Kalsem
WAY to much time on your hands. I would use the, "time for a new gun honey" quote rather than spend the hours and hours on modifing my gun. Doesnt Kimber make the "Melt down" carry guns? Anyways very intersting and cant wait to see the finished product.
|
Methinks you may be missing the point Good Sir.
Topping the list of why I've tackled this project is the simple satisfaction of having done it myself. I acquire new skills and learn new things as I work out how to proceed at each step.
I enjoy this kind of work a great deal. And, if by sharing my experiences here, just one person following this thread learns something new or is encouraged to acquire some smithing skills, I'd consider my time very well spent on top of having a very cool & unique carry piece.
Besides, I'm having way way! more fun than opening a box and finding a Kimber inside  Swartz safety system is a non-starter for me.
Cheers
Bill
|
|
The Following 14 Users Like Post:
|
-db-, .41 cal, 18DAI, bgrone, DMcBB, gasaman, LOBO, M14sRock, olwogo, Shorty 45 MK2, spidrbob, Steve912, superfluities, TheHobbyist |
07-03-2012, 12:55 AM
|
|
US Veteran
|
|
|
Join Date: Jun 2012
Location: SW Mississippi
Posts: 1,350
Likes: 2,227
Liked 6,219 Times in 1,043 Posts
|
|
Quote:
Originally Posted by 627 city hunter
I think its kind of like Buffalo Trace -- good things take some time and effort.
Awesome work BMCM.
It would be amazing to see photos of this time lapsed.
|
Big fan of the Buffalo Trace however topping my list of vastly underrated whiskeys would be Elijah Craig 12 year old. Then again there are times when I feel the need to break out the Balvenie Doublewood Thanks for the compliment.
Cheers
Bill
|
|
The Following User Likes This Post:
|
|
07-03-2012, 05:26 AM
|
|
Member
|
|
|
Join Date: Mar 2010
Posts: 106
Likes: 1
Liked 17 Times in 10 Posts
|
|
There's nothing like working for negative wages.
|
07-03-2012, 07:27 AM
|
 |
Member
|
|
|
Join Date: Dec 2009
Location: Texas
Posts: 673
Likes: 1,109
Liked 865 Times in 286 Posts
|
|
This here is craftsmanship work. The eye and hand coordination and precision measurement obviously comes from years of experience and mistakes. I believe this is not a mechanic here, but, a skilled machinist at play. I spent nearly 20 years in a machine shop, the bulk as a misc. machinist and we, other firearm lovers, routinely would tinker with our Smiths, Rugers, Colts, etc. We had the benefits of millers & grinders & lathes. This is done by hand. Keep a detailed notebook. Others will follow. Bravo. Well done.
|
|
The Following User Likes This Post:
|
|
07-03-2012, 08:34 AM
|
 |
Member
|
|
|
Join Date: Sep 2009
Location: I Can See The Alamo
Posts: 556
Likes: 303
Liked 372 Times in 188 Posts
|
|
It is always a pleasure to watch a true craftsman at work. They make the difficult look easy. More than a little humbling, too.
|
|
The Following 2 Users Like Post:
|
|
07-03-2012, 10:03 PM
|
|
US Veteran
|
|
|
Join Date: Jun 2012
Location: SW Mississippi
Posts: 1,350
Likes: 2,227
Liked 6,219 Times in 1,043 Posts
|
|
Did a little work on the verticals tonight.
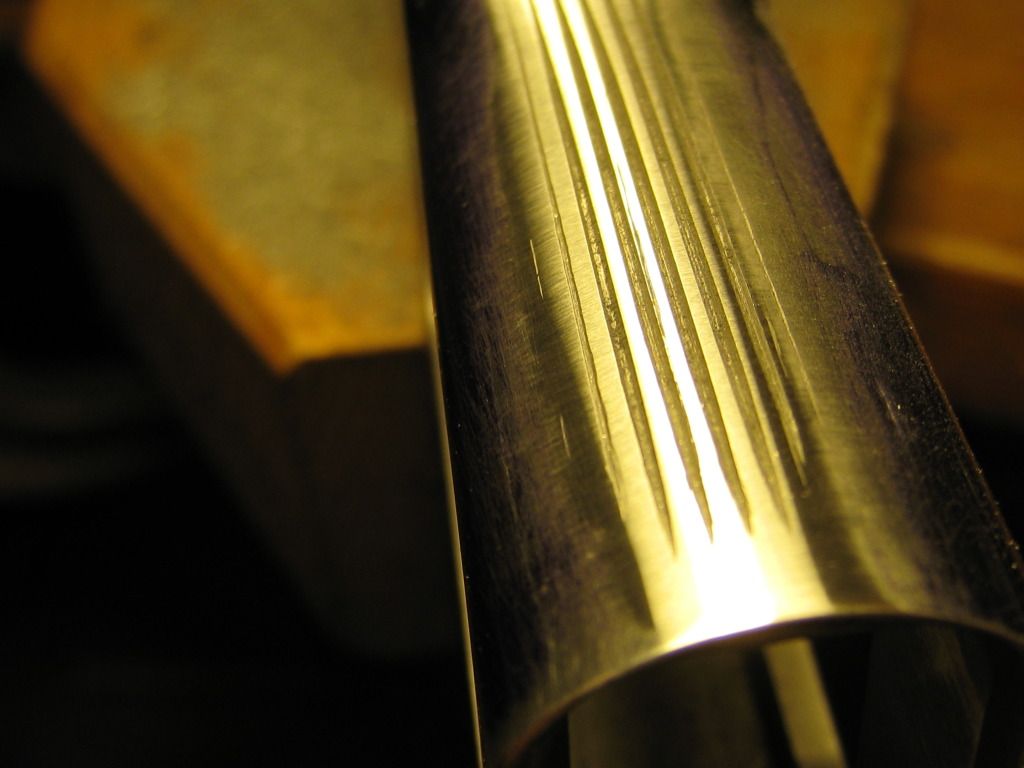
I think you'll get the general idea. Once all the verticals are cut to this depth (about halfway) I'll start carving the horizontals. Slow & careful going since mistakes here are pretty unforgiving. Have a happy Independence DAY!
Cheers
Bill
|
|
The Following 4 Users Like Post:
|
|
07-04-2012, 11:23 PM
|
|
Member
|
|
|
Join Date: Sep 2008
Location: Shenandoah Valley, VA
Posts: 126
Likes: 37
Liked 26 Times in 17 Posts
|
|
This is amazing -- I can't wait for the next update!
|
07-05-2012, 12:24 AM
|
|
Member
|
|
|
Join Date: May 2012
Location: Valley of the Sun, AZ.
Posts: 33
Likes: 2
Liked 1 Time in 1 Post
|
|
Great work. I wish I had the nerve/ability to try it on one of mine.
__________________
S&W M&P Shield 9mm. (2)
|
07-05-2012, 09:38 AM
|
 |
Member
|
|
|
Join Date: May 2012
Location: SC
Posts: 89
Likes: 36
Liked 7 Times in 6 Posts
|
|
Very nice so far!
__________________
"Shut up and take my money!"
|
07-06-2012, 12:39 AM
|
 |
Member
|

|
|
Join Date: May 2012
Location: Where Its Hot & Muggy
Posts: 1,057
Likes: 1,333
Liked 1,577 Times in 400 Posts
|
|
Hot Damn, Master Chief, you got a great story going here. Lethal weapons, good liquor, lots of tools. I can't wait to see the finished product.
__________________
"We deal in lead, friend."
|
|
The Following 4 Users Like Post:
|
|
07-06-2012, 10:37 AM
|
|
Banned
|
|
|
Join Date: Sep 2011
Posts: 138
Likes: 0
Liked 29 Times in 20 Posts
|
|
I wish I had your talent and the "balls" I can`t imagine me starting to do the stuff you have accomplished and I have "cabinet making" as a hobby...Your gun looks great and the final finishing I`m sure from the looks so far will be great...
Frankly some feel resale would be hurt.. I don`t think so there are many that would consider a good melt job to be of greater value...I for one would...Looking forward to the final finish...Jim
|
|
The Following 2 Users Like Post:
|
|
07-06-2012, 11:27 AM
|
 |
Member
|
|
|
Join Date: Jun 2012
Location: Splittsville
Posts: 58
Likes: 57
Liked 30 Times in 12 Posts
|
|
Quote:
Originally Posted by Jim Kalsem
WAY to much time on your hands. I would use the, "time for a new gun honey" quote rather than spend the hours and hours on modifing my gun. Doesnt Kimber make the "Melt down" carry guns? Anyways very intersting and cant wait to see the finished product.
|
I'm pretty sure you're missing the point in it's freaking entirety, Jim.
And, besides "honey" doesn't need to know when I buy a gun...but that's just mho.
Bill, you cannot stop updating this thread. You're talented, mate.
Last edited by Ervin; 07-06-2012 at 11:31 AM.
|
|
The Following 2 Users Like Post:
|
|
07-06-2012, 02:09 PM
|
|
Member
|
|
|
Join Date: Jul 2005
Location: Cary, NC
Posts: 128
Likes: 8
Liked 14 Times in 9 Posts
|
|
Very nice work. What you are doing is so far beyond what I would ever attempt to do.
|
07-06-2012, 09:14 PM
|
|
US Veteran
|
|
|
Join Date: Jun 2012
Location: SW Mississippi
Posts: 1,350
Likes: 2,227
Liked 6,219 Times in 1,043 Posts
|
|
Well, I got all the verticals roughed in finally. Near as I can discern with these ****** eyeballs of mine, the lines are all parallel, straight & evenly spaced. Still some work left on evening the depth and the length of the cuts and I'll see to that after the horizontals are cut in.
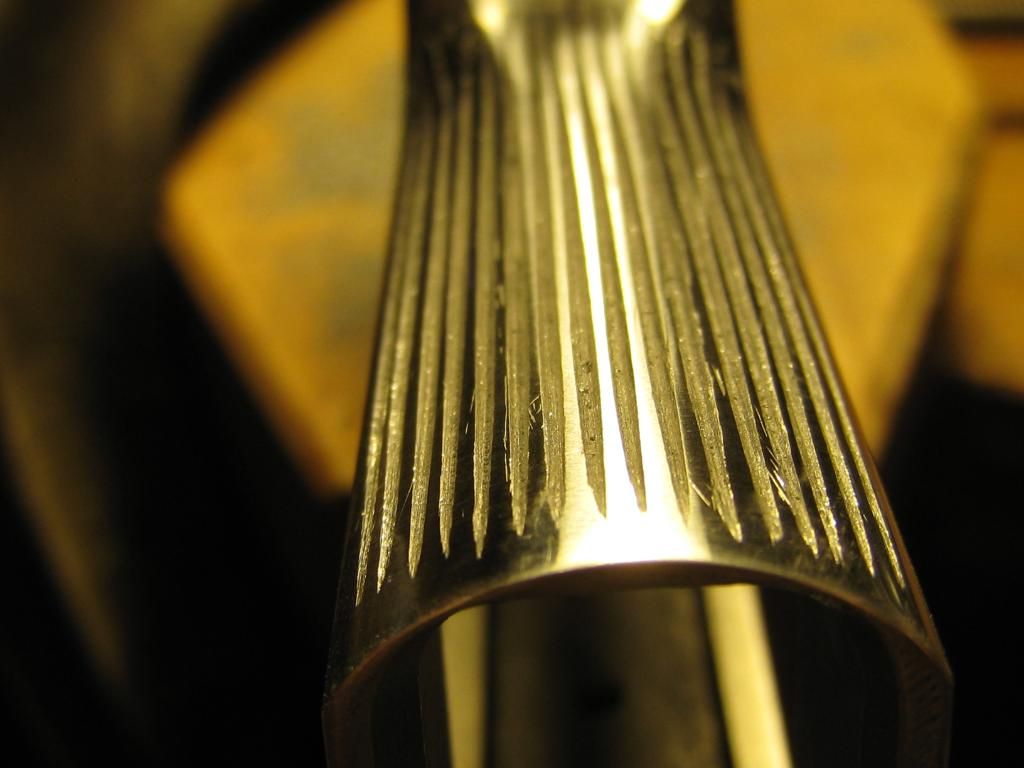
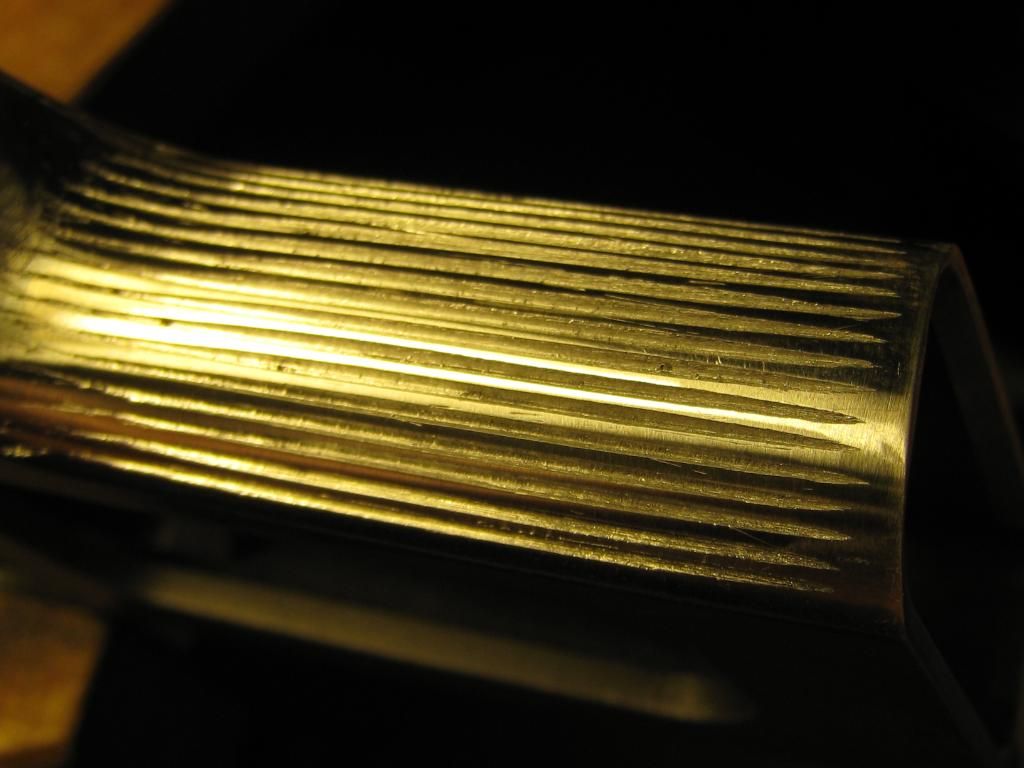
I'm taking a break from checkering for a bit while I nurse my sore fingers. I haven't done this **** for a while and I do believe I've ground off several callouses messing with these needle files.
Anyway I'm rather pleased with the outcome thus far and so I shall relax and partake of an adult beverage.
Not as smooth as the Buffalo Trace but packs a bit more muscle.

Got some other bits needing attention. Need to lightly break some sharp edges around the ejection port, finish shaping & smoothing the trigger guard below the other checkered area and, finish up melting the front & rear of the slide/frame.
I'll get back to the checkering next week perhaps.
Cheers
Bill
|
|
The Following 5 Users Like Post:
|
|
07-06-2012, 09:39 PM
|
|
Member
|
|
|
Join Date: Feb 2002
Location: Victoria, Texas
Posts: 3,323
Likes: 380
Liked 1,016 Times in 358 Posts
|
|
Quote:
Originally Posted by BMCM
Well, I got all the verticals roughed in finally. Near as I can discern with these ****** eyeballs of mine, the lines are all parallel, straight & evenly spaced. Still some work left on evening the depth and the length of the cuts and I'll see to that after the horizontals are cut in.
I'm taking a break from checkering for a bit while I nurse my sore fingers. I haven't done this **** for a while and I do believe I've ground off several callouses messing with these needle files.
Anyway I'm rather pleased with the outcome thus far and so I shall relax and partake of an adult beverage.
Not as smooth as the Buffalo Trace but packs a bit more muscle.
Got some other bits needing attention. Need to lightly break some sharp edges around the ejection port, finish shaping & smoothing the trigger guard below the other checkered area and, finish up melting the front & rear of the slide/frame.
I'll get back to the checkering next week perhaps.
Cheers
Bill |
Ok, me see a beavertail fit in progress on a 1911. How many projects you got going on?
|
07-06-2012, 11:00 PM
|
|
US Veteran
|
|
|
Join Date: Jun 2012
Location: SW Mississippi
Posts: 1,350
Likes: 2,227
Liked 6,219 Times in 1,043 Posts
|
|
Quote:
Originally Posted by jimjc
I wish I had your talent and the "balls" I can`t imagine me starting to do the stuff you have accomplished and I have "cabinet making" as a hobby...Your gun looks great and the final finishing I`m sure from the looks so far will be great...
Frankly some feel resale would be hurt.. I don`t think so there are many that would consider a good melt job to be of greater value...I for one would...Looking forward to the final finish...Jim
|
Well Jim... I cant help with the "balls" but... I imagine there was a time when you didn't know ****e about cabinetry and have acquired that skill for whatever reason/s over time. Take metal checkering for example. There was a time when I had no idea how to do that. I just decided to learn how. Here's a shortcut: get some mild steel round bar scrap from your local welding shop. 3/4' or 1" will do, then get a checkering file and a couple 3 square needle files in med & fine cut or 00 & 2. then just play around on the steel until you get the hang of it. use the checkering file to make the lines first vertical then horizontal then cut to depth & point up the pyramids with the needle files.
As far as re-sale value goes... Don't take this the wrong way as there's been a few comments about re sale blah blah blah. I'm just stating my position. I couldn't give two ****'s about re-sale value. I don't acquire weapons or anythings else for that matter with any eye toward how much $ I might be able squeeze out somebody a few years later or whatever. What I consider in purchasing a weapon is first maximum durability, extreme reliability and preferably combat proven. For these reasons and others I'm very fond of inch Pattern FALs, Garands, 1911's, US military bolt guns Krag, 1903s and recently I've come to appreciate steel 3rd gen smiths a great deal. You may note that plastic does not have a prominent place on my list. Alloy bits are permitted only in a truly cool & unique piece like my Shorty 45 mk2. This 4516 I'm working on is an instance where "here's a weapon I'm keeping period" Now I will make some modifications to suit it perfectly to my needs & physiology. Resale value is NOT a consideration. There may come a day when this pistol is no longer in my possession but when that time comes I will have moved on and won't care.
Quote:
Originally Posted by SW CQB 45
Ok, me see a beavertail fit in progress on a 1911. How many projects you got going on?
|
That good Sir is a Springfield all steel compact I bought for my Mom about 20 years ago which is now undergoing a bit of remodeling to wit: Wilson BP beavertail and round butt MS housing, C&S lockwork, EGW Carry Bevel bushing & long plug, Wilson guide rod, ISMI flatwire spring. I've also stoned out a few irregularities in the factory machine work and will be sending this one out for Isonite finish too.
I'm also tinkering with a series 70 goverment model I picked up very cheap which had a "hack" job of fitting a Ed Brown beaver tail to it which I'm currently trying to un-f**k and fix up in a similar fashion to Mom's Springer'.
The recently completed projects are a complete rebuild on one of my SecNav trophy rifles and the completion of a 25year project for an all Australian build L1A1. Just took that long to scrounge up the NOS Aussie replacement parts as bits became available the same time I had $ to spend. Chrome lined Lithgow barrels are rare as hens teeth.
Cheers
Bill
Last edited by BMCM; 07-07-2012 at 12:20 AM.
|
|
The Following 3 Users Like Post:
|
|
07-09-2012, 11:56 PM
|
|
US Veteran
|
|
|
Join Date: Jun 2012
Location: SW Mississippi
Posts: 1,350
Likes: 2,227
Liked 6,219 Times in 1,043 Posts
|
|
Things are coming along just fine.
Cheers
Bill
|
|
The Following 9 Users Like Post:
|
|
07-10-2012, 12:59 AM
|
|
Member
|
|
|
Join Date: May 2012
Location: SC
Posts: 89
Likes: 36
Liked 7 Times in 6 Posts
|
|
Very nice!
__________________
"Shut up and take my money!"
|
07-10-2012, 02:46 AM
|
|
Member
|
|
|
Join Date: Mar 2005
Location: Seattle, WA
Posts: 645
Likes: 7
Liked 52 Times in 39 Posts
|
|
Wow, that looks great! Thank you for documenting it with all the pics. I especially like the Bourbon on top of the Brownells catalog. 
__________________
NRA Certified Instructor
|
07-11-2012, 11:22 AM
|
|
Member
|
|
|
Join Date: Jan 2012
Location: central Texas
Posts: 90
Likes: 105
Liked 15 Times in 11 Posts
|
|
Bill! I can't wait to see the finished product! As to the guy who talked about a 'limited market", There is ALWAYS a market for quality! And this weapon will be just that. Having said that, I was always taught to BUY guns, not sell. Great project and story! Thank you much!
|
|
The Following 3 Users Like Post:
|
|
07-11-2012, 05:08 PM
|
 |
Member
|
|
|
Join Date: Mar 2006
Location: Sainte Genevieve MO
Posts: 1,263
Likes: 991
Liked 565 Times in 234 Posts
|
|
Cool
Howdy,
I have followed this from the start and my first impression was "This is not going to end well".
Boy was I wrong.
Nice job BMCM!
Thanks for sharing the build.
Mike
|
|
The Following User Likes This Post:
|
|
07-11-2012, 06:29 PM
|
|
Member
|
|
|
Join Date: Nov 2008
Location: Catskill Mountains, Ulste
Posts: 94
Likes: 185
Liked 47 Times in 32 Posts
|
|
Just MY opinion, but I really like the looks of the straight, sharp, geometric factory-produced angles. They look nice & clean, function well, and show the level of quality instilled by their maker. I also appreciate the smooth, gracefully rounded edges offered on some of the mass & custom produced carry pieces.
I carry my firearms daily, and sit & look at them rarely. For me, the real beauty is in the utilitarian usefulness and function. I often carry an Officer's ACP which has been gently melted, and reworked for dead-reliable operation. I paid to have that work done, over 26 years ago, because I then lacked the "brass" to do what you are now doing.
You, Sir, are to be commended for your patience, fortitude, and foresight. It's coming along beautifully, and may be the incentive I need, to take my file set to an old Series 70 I've been neglecting. Shoots quite well, I just don't care for all those sharp edges when I carry it!
__________________
Virtute et armis
|
|
The Following User Likes This Post:
|
|
07-11-2012, 07:39 PM
|
|
US Veteran
|
|
|
Join Date: Jun 2012
Location: SW Mississippi
Posts: 1,350
Likes: 2,227
Liked 6,219 Times in 1,043 Posts
|
|
Ok gents,
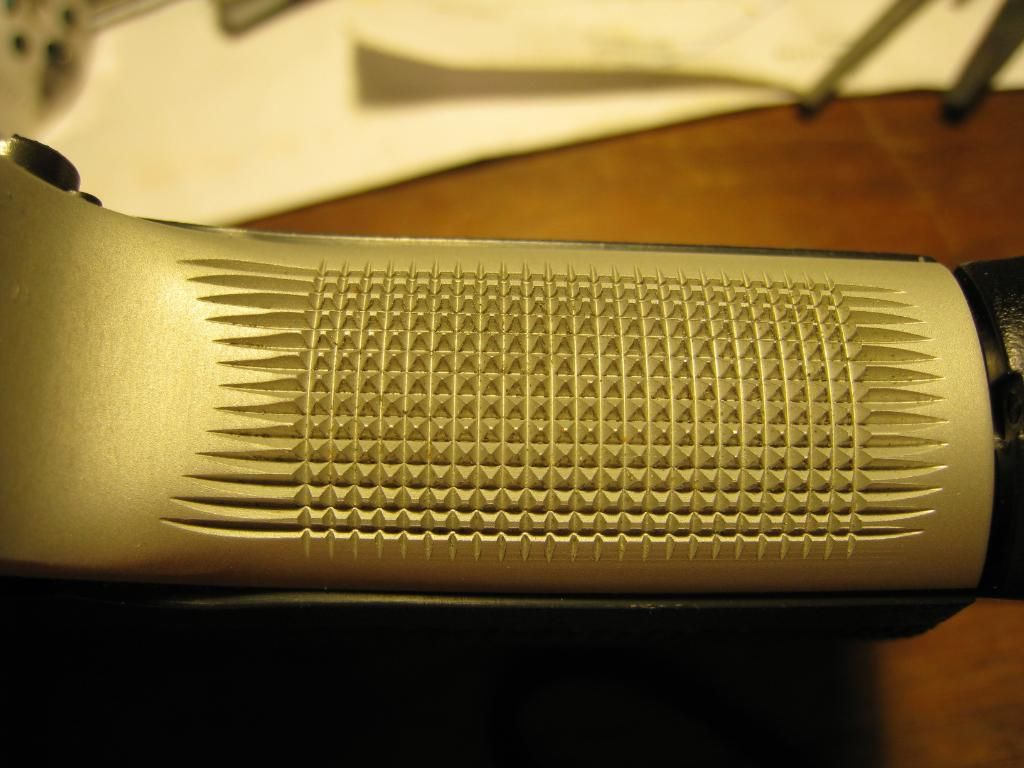
Been working some more on the checkering and I'm about to call it done. Just a little more sculpting to do above and below the checkered area and some minor touch-up here and there that I didn't see until looking at the pics in high resolution.
I did work on it some last night and this is where we picked up the project this morning.
After messing with it most of today it now looks like this.
Installed a grip and stuck a mag in and I have to say it feels great in the hand. Very solid & stable feel to it now.
Looks pretty good too if I do say so myself.
At this rate I foresee loading these bits in the blast cabinet next week.
Cheers
Bill
|
|
The Following 5 Users Like Post:
|
|
07-11-2012, 07:49 PM
|
|
Banned
|

|
|
Join Date: Jun 2009
Location: SC/TX
Posts: 618
Likes: 339
Liked 82 Times in 55 Posts
|
|
This project is coming right along, I look fwd to the outcome. Excellent work, I love the feeling of a finished project.
|
07-11-2012, 07:49 PM
|
 |
Member
|
|
|
Join Date: Jan 2012
Posts: 433
Likes: 37
Liked 210 Times in 88 Posts
|
|
Fantastic!
Andrew
|
07-11-2012, 08:01 PM
|
|
US Veteran
|
|
|
Join Date: Jan 2010
Location: east central fla.
Posts: 1,194
Likes: 319
Liked 373 Times in 200 Posts
|
|
pretty overwelming job,it takes a confident man do take on your task,i can hardly follow your lingo,nevermind doing it.....so much for me thinking changing my grips around is a big deal....small steps,small steps
|
07-11-2012, 08:27 PM
|
 |
Member
|
|
|
Join Date: Sep 2011
Location: Texas Panhandle
Posts: 7,215
Likes: 5,644
Liked 3,462 Times in 1,729 Posts
|
|
I think you are doing a heck of a job. To heck with all the naysayers. I like it. Thanks for all the updates and pictures. I have never cared for the melted look even though I have a few guns that have the melt treatment and there is no doubt about the difference in ease of carry.
__________
James
|
07-11-2012, 09:48 PM
|
|
Member
|
|
|
Join Date: Sep 2011
Posts: 90
Likes: 2
Liked 9 Times in 7 Posts
|
|
Unreal craftsmanship. I'm fully entertained and can't wait for the next set of pics. Thanks for taking the time to take the pictures and explaining what you're doing and why.
|
07-11-2012, 11:49 PM
|
|
Member
|
|
|
Join Date: Feb 2002
Location: Victoria, Texas
Posts: 3,323
Likes: 380
Liked 1,016 Times in 358 Posts
|
|
very nice. I was lost in the checkering and began to wonder when you were going to take a stab at the MSH....then the black plastic grip made me realize this was a smith.
Me like!
|
07-12-2012, 09:43 AM
|
|
Member
|
|
|
Join Date: Sep 2008
Location: Shenandoah Valley, VA
Posts: 126
Likes: 37
Liked 26 Times in 17 Posts
|
|
Bravo!! It's looking terrific!
|
07-12-2012, 09:55 PM
|
|
US Veteran
|
|
|
Join Date: Jun 2012
Location: SW Mississippi
Posts: 1,350
Likes: 2,227
Liked 6,219 Times in 1,043 Posts
|
|
Well, it's been raining non-stop all day here. So much so that some of my heirloom tomatoes are splitting open on the vine. Anyway, once I got the 'maters seen to I clamped up the frame, broke out to files and got to work.
First thing I did was go over the the checkering very carefully checking frequently with a loupe. I saw some flaws in a few areas when looking at last night's pictures that needed some more attention.
Points are looking better now.
Once I was satisfied with the checkering I set about smoothing and contouring the transitions. First the area from the bottom of the mag well to the bottom of the checkering. Then I worked on the area from the top of the checkering blending the shape up to the bottom of the trigger guard.
Transition areas above & below checkering blended.
This spot (outlined in red) has been bugging me for a while. I hadn't decided exactly what I wanted to do here just that I had to do something. It looks, well, unfinished to me. Right above this spot inside the frame is the recess where the drawbar plunger & spring lives so I new there was a limit to how much metal work I could do here.

Well, I took some measurements with a depth instrument. Once I was satisfied there would be sufficient material to work with I set about reshaping this spot.
Here is the result.
The big picture of today's work.
I think I'm about done with the frame. Next up I'll install the top end on the frame and finish work on the rear of the slide.
Thank you for all your kind words of encouragement. Ya'll are keeping me focused. Otherwise my attention might wander and I'd be liable to start wrenchin' on something else that Momma may not approve of like her car or the fridge.
That's all for now.
Cheers
Bill
Last edited by BMCM; 07-12-2012 at 11:14 PM.
Reason: spelling fix
|
|
The Following 7 Users Like Post:
|
|
07-12-2012, 10:17 PM
|
 |
Member
|
|
|
Join Date: May 2012
Posts: 31
Likes: 3
Liked 2 Times in 2 Posts
|
|
I think it looks great, I cant wait to see the finished project. Great pictures too. keep up the good work.
|
|
|
 Posting Rules
|
|
|
|
|


 Linear Mode

