Bubba defeated - the barrel pin from hell is OUT

-BTM-

Member
Joined
Jan 14, 2025
Messages
201
Reaction score
253
Location
Yuba county
What an adventure. My previous thread on the topic was about how every traditional method failed. Bent too many punches, Time to make some stuff. Yes I bought a lathe.

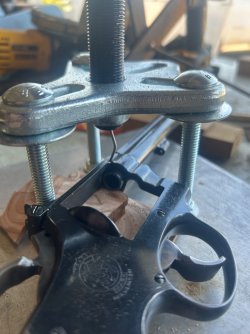
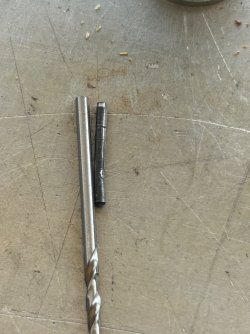
Ended up adapting a puller set to work like an arbor press. Still bent the shaft. Made a little pin holder and cut some short-medium-long pins to keep the stick out/unsupported section short and changed them as it went through.

The press required very little force, worked great. The pin was a nightmare from both ends to the middle. My theory is the barrel was swapped out and pin pounded in w/o redoing the groove in the barrel. The frame holes vary from frame to frame.
 

Attachments

  • IMG_3575.jpeg
    IMG_3575.jpeg
    1.3 MB · Views: 2
  • IMG_3590.jpeg
    IMG_3590.jpeg
    1.3 MB · Views: 2
  • IMG_3589.jpeg
    IMG_3589.jpeg
    1.2 MB · Views: 2
Last edited:
Register to hide this ad
HINT: When trying to remove really stubborn pins, don't over use a punch. If it does not move with reasonable /normal force and before bending the punch, use a short piece of drill rod instead. Drill rod can be gotten in any size from places like McMaster-Carr. Cut into a 1" section, polish so you do not scratch the pin's face and start it moving. Once it moves a 1/8" or so them go back to a punch. A short piece is much less likely to bend!

I find a plethora of uses for Drill Rod - and it makes great replacement pins. I have at least 30 different sizes that I keep in stock.

HINT #2: Make sure you use a hard bench block. If you try and remove a stubborn pin on a soft piece of wood or movable object it will absorb the energy instead of transferring it to the pin. You can place a piece of paper or masking tape over the steel bench block so you don't scratch the gun's finish.
 
Last edited:
HINT: When trying to remove really stubborn pins, don't over use a punch. If it does not move with reasonable /normal force and before bending the punch, use a short piece of drill rod instead. Drill rod can be gotten in any size from places like McMaster-Carr. Cut into a 1" section, polish so you do not scratch the pin's face and start it moving. Once it moves a 1/8" or so them go back to a punch. A short piece is much less likely to bend!

I find a plethora of uses for Drill Rod - and it makes great replacement pins. I have at least 30 different sizes that I keep in stock.

HINT #2: Make sure you use a hard bench block. If you try and remove a stubborn pin on a soft piece of wood or movable object it will absorb the energy instead of transferring it to the pin. You can place a piece of paper or masking tape over the steel bench block so you don't scratch the gun's finish.
I ordered several sizes of A2 and used the largest that would fit. It’s a bit over .06 and having a bandsaw is highly recommended to cut it!

You are absolutely correct about using short pieces, I don’t think one punch can start and finish the job. The final solution required 3 pins.

The bench block I mounted the press on is .75” aluminum about 12x18. Zero flex. I wanted the press idea to work as I knew a lot of force would be needed and could imagine a good hammer blow punching through and driving the punch body into the frame. No such worries with a screw for leverage.
 
I do use drill stock all the time. I even made a punch body that holds a piece of 1.2mm drill (.0472) of what ever length stick out I want. I even soaked the frame in Ed's red for a couple days. No go. I cut drill shanks with a Dremel cut off wheel and polish the ends with a 600 grit slack belt on one of my 2x72 belt grinders. I have 2 cup punches from Brownells but they are really spendy to bend or break on tough pins.
 
Making the cupped tip is not easy, and it hurts when they bend. I’m going to make a new one and put it in a non marring punch body with minimal stick out just for starting the pin.
 
One can never have enough hardened punches on the bench.

When a parallel pin punch bends, don't throw it away; cut it short, heat harden and temper it, a short starter punch you now have. I fabricated a whole set in this manner, each one with a story and reminder not to proceed like that again.

When it is apparent early on that a solid pin is difficult to move, beside all the usual set up methods, using a tapered "starter" punch to get it moving a few millimeters, named for a reason; tapered tip is strong with some mass behind it. The object with the pin has to be rigidly held, best in heavy vise with protective jaws.

The cup profiled pin ends can be problematic; the punches available for Beretta's etc, are too delicate and long to begin the task. However there are several ways to fabricate a short hard pin punch.
Use an old drill bit, cut to size; Brownells has short small diameter starter punches (essentially ejector pins); both can have a cupped surface imparted with a dremel tool. Ejector pins can also be employed as fine hard punch.

A clever set of small diameter punches is the Rennsteig set. The sliding outer sleeve supports the punch proper, so only the least amount of pin length is exposed to start the pin, and it continues to
"lengthen" as the pin moves, avoiding the need to change punch lengths thru the task.

Non-marring brass are useful in some situations, not the hard to move ones.

DSC00248 copy 3.JPGCIMG1426 copy 2.JPGGunsmith Punches Cup Tipped Beretta S&W Set C 09,04.23 ANNOTATED copy 2.jpgIMG_8588 copy.jpgIMG_8596 copy.jpgIMG_8598 copy.jpgIMG_8606 copy.jpgIMG_8621 copy.jpgEJECTOR PINS AS PUNCH TIPS 3.pngDSCN1187a copy 2Gunsmith Cup Tip Punch Brass Fabrications New England Parnder Project copy.jpg

CIMG4638 copy 2.JPG
IMG_7922 copyGunsmith Rensteig Parallel Pin Punch Guide Sleeves Set copy.jpgIMG_7923 copyGunsmith Rensteig Parallel Pin Punch Guide Sleeves Set copy.jpg
 
Last edited:
Back
Top