|
 |

04-11-2020, 07:13 PM
|
 |
Member
|
|
|
Join Date: Jan 2015
Location: Black Hills South Dakota
Posts: 1,944
Likes: 10,265
Liked 3,329 Times in 1,244 Posts
|
|
UPDATE Ruger SR1911 Disassembly vs Owner's Manual
I want to run this pass the 1911 45ACP experts here. I have a question on Disassembly
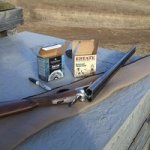
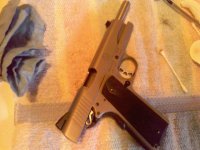
of my 2011 Ruger SR1911 Standard Full Size 45ACP Pistol.
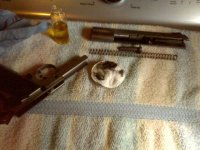
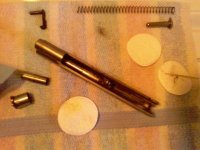
"Why can't you just align and push out the Slide Stop Pin and remove the Slide off the Frame?
Bushings, Spring, Internal Recoil Spring Guide, are all self contained on the Slide. I can not
understand why this can't be done this way? I there something dangerous I don't understand?
The Spring is a 16 pound replacement".
This will be the second time I've Disassembled this Pistol and cleaned it. Just Oil and Shoot. There is
approximately 300 plus rounds through it. The SR1911 just keeps shooting trouble free.
I wanted to see how just trouble free it is, I'm bored now. I don't shoot SR1911 very much. I like this
Pistol that's why I bought, just like my Revolvers better. That's why such a long time between cleanings.
I am a S&W Revolver guy. This SR1911 is the only 1911 I have. I am very Mechanically Inclined, so
that's why I'm asking this question.
Now....I have been studying the SR1911 Owner's Manual.
Please give me insight as to why do it by the Manual. Thank you in advance for your help.
Last edited by The Norseman; 04-12-2020 at 03:56 PM.
Reason: date, update
|

04-11-2020, 07:26 PM
|
Member
|
|
|
Join Date: May 2013
Location: Denver area
Posts: 6,325
Likes: 20,437
Liked 13,273 Times in 4,232 Posts
|
|
I’ve never disassembled an SR1911 nor have I read the manual.
The one thing most guys resist doing is reading instructions. We tend to think we just ‘know’ how to do it or should be able to figure it out on our own.
When all else fails, read the instructions and follow them.
So, you should:
1. Read the instructions
2. Follow them.
|
The Following User Likes This Post:
|
|

04-11-2020, 07:32 PM
|
 |
Member
|
|
|
Join Date: Aug 2012
Location: Battle Born
Posts: 364
Likes: 300
Liked 474 Times in 222 Posts
|
|
A standard 1911 can be disassembled 2 ways., as per the usual manual instructions or by the manner you describe above. Choose your preferred method. I have no experience with full length guide rods in 1911's so I don't know if your S&W has that or how it would affect disassembly. All mine are Colts or S.A. standard Gov. models with the 2 piece guide rod.
I will add you may have a higher probably of a flying guide rod (recoil) spring & bushing removal issues (if it's tight) using the method you describe. I think it's probably easier to reassemble using the method in your manual.
Last edited by Chino74; 04-11-2020 at 07:36 PM.
|
The Following User Likes This Post:
|
|

04-11-2020, 07:32 PM
|
Member
|
|
|
Join Date: Nov 2006
Location: Montana
Posts: 5,248
Likes: 3,527
Liked 6,430 Times in 2,112 Posts
|
|
For "ME" I like to remove the spring tension of the recoil spring first which makes further disassembly that much easier.
You do as you see fit....there is NO one and only one way to disassemble a 1911.
Randy
|
The Following 2 Users Like Post:
|
|

04-11-2020, 07:36 PM
|
 |
Member
|
|
|
Join Date: Feb 2005
Location: Lost Wages, NV
Posts: 22,362
Likes: 29,204
Liked 33,780 Times in 12,480 Posts
|
|
I'm cleaning a Gen2 R51 in 9mm today. It's marginally less frustrating than a CZ 52, but quite a bit safer. 1911s are a piece of cake by comparison.
__________________
Release the Kraken
|

04-11-2020, 07:38 PM
|
 |
Member
|
|
|
Join Date: Aug 2012
Location: Battle Born
Posts: 364
Likes: 300
Liked 474 Times in 222 Posts
|
|
You think that's bad try disassembling / reassembling an old Astra 400 or 600.
|
The Following 4 Users Like Post:
|
|

04-11-2020, 07:52 PM
|
Member
|
|
|
Join Date: May 2012
Location: North Georgia
Posts: 4,829
Likes: 3,291
Liked 9,729 Times in 3,430 Posts
|
|
The Norseman,
Why not do it the way the manual proposes?
You might end up liking it better, both in
disassembly and reassembly.
I've seen many 1911s pulled apart by removing
the entire slide assembly first and always thought
it awkward. But that's just me.
Now obviously with more modern designed autos,
i.e. the Beretta or SIG, taking the entire slide assembly
off intact is the correct way. But I've always disliked
putting the spring back in by pushing it forward to the
muzzle. I've found it problematic at times seating the
spring assembly. But that's just me.
Now, back to our revolvers!!!!! 
__________________
Ubi Est Mea
Last edited by UncleEd; 04-11-2020 at 07:54 PM.
|
The Following User Likes This Post:
|
|

04-11-2020, 09:36 PM
|
 |
Member
|
|
|
Join Date: Jan 2011
Posts: 638
Likes: 16
Liked 2,198 Times in 499 Posts
|
|
Quote:
Originally Posted by The Norseman
I have a question on Disassembly
of my Circa 2008 Ruger SR1911 Standard Full Size 45ACP Pistol.
|
You have a very rare pistol, being a 2008 and all. Seein's how that model wasn't intro'ed until 2011........
|
The Following User Likes This Post:
|
|

04-11-2020, 10:48 PM
|
Member
|
|
|
Join Date: May 2012
Location: North Georgia
Posts: 4,829
Likes: 3,291
Liked 9,729 Times in 3,430 Posts
|
|
Quote:
Originally Posted by huntsman22
You have a very rare pistol, being a 2008 and all. Seein's how that model wasn't intro'ed until 2011........
|
"Circa" is a very big word.
__________________
Ubi Est Mea
|

04-11-2020, 10:51 PM
|
 |
Member
|
|
|
Join Date: Jan 2011
Posts: 638
Likes: 16
Liked 2,198 Times in 499 Posts
|
|
And using it makes a guy sound intelligent. Instead of correct......
|

04-11-2020, 11:28 PM
|
 |
Member
|
|
|
Join Date: Jan 2015
Location: Black Hills South Dakota
Posts: 1,944
Likes: 10,265
Liked 3,329 Times in 1,244 Posts
|
|
2011 Ruger SR1911 45ACP
Ooops, My SR1911 = Dec 2011. So Circa 2011. Just
re-found the Receipt, had to go look.
Got Date mixed up with my Super Rare Ruger Gold Label
Side x Side 12ga. English Stock Lever Action Shotgun.
Still, can the 2011 Ruger SR1911 be taken apart safely
the way I asked?
|

04-11-2020, 11:56 PM
|
Member
|
|
|
Join Date: Nov 2005
Location: Upstate SC
Posts: 3,639
Likes: 62
Liked 5,913 Times in 1,914 Posts
|
|
Quote:
Originally Posted by The Norseman
Ooops, My SR1911 = Dec 2011. So Circa 2011.
|
"Circa" means "approximately". Your gun is precisely from 2011.
Disassembly by the method you describe is certainly possible, but it requires alignment of the slide and slide stop against the pressure of the recoil spring. Both disassembly and reassembly are much more more difficult doing it this way.
__________________
Pisgah
|
The Following 2 Users Like Post:
|
|

04-12-2020, 12:29 AM
|
 |
Member
|
|
|
Join Date: Jan 2015
Location: Black Hills South Dakota
Posts: 1,944
Likes: 10,265
Liked 3,329 Times in 1,244 Posts
|
|
Out Take
Sounds like a challenge. I'll have to try that Disassembly and
Assembly of my Ruger SR1911 45ACP with the Slide and all
intact.
I will make sure to grasp the whole assembly as I move the
Slide off the Frame.
|

04-12-2020, 05:39 AM
|
Member
|
|
|
Join Date: Mar 2016
Location: PA
Posts: 235
Likes: 22
Liked 290 Times in 139 Posts
|
|
The method the OP describes is used with 1911s that have bull barrels and no bushings. Takedown is a pain compared to normal 1911s with a barrel bushing as the recoil spring is kept in compression. The normal takedown is much easier in regular 1911s as the Ruger is. And yes the SR1911 was brought out in 2011 the 100th anniversary year.
|
The Following 7 Users Like Post:
|
|

04-12-2020, 07:21 AM
|
Member
|
|
|
Join Date: May 2012
Location: North Georgia
Posts: 4,829
Likes: 3,291
Liked 9,729 Times in 3,430 Posts
|
|
Well Norseman,
Seems like you're determined to NOT take
it down per the manual. So, go for it!
__________________
Ubi Est Mea
|

04-12-2020, 07:35 AM
|
Member
|
|
|
Join Date: Apr 2007
Location: Virginia
Posts: 10,356
Likes: 26,125
Liked 14,611 Times in 6,517 Posts
|
|
You can do it by aligning the cut in the slide and pushing out the slide stop pin, but I find that to be royal pain with traditional 1911's. I prefer Government and Commander size 1911's to have the standard (short) recoil spring guide and standard plug. The best plugs are the old ones that had a small piece of the metal punched into the plug. You sort of screwed the open end of the recoil spring into the plug, so that the plug would not be launched into the mud, grass, swamp, whatever if you fumbled the field strip/reassembly.
__________________
VCDL, GOA, NRA
|
The Following 7 Users Like Post:
|
|

04-12-2020, 07:44 AM
|
Member
|
|
|
Join Date: Jan 2009
Location: Metro Detroit, Michigan
Posts: 6,956
Likes: 180
Liked 4,374 Times in 2,140 Posts
|
|
Quote:
Originally Posted by Chino74
You think that's bad try disassembling / reassembling an old Astra 400 or 600.
|
I have an Astra 300 my Dad brought back from WWII and completely understand your comment.
Concerning the SR1911, I have 4 of them, 3 in 45 ACP and 1 in 9mm. All are basically designed and made to the original design of the 1911. As in short solid guide rod with a spring that is retained at the rear by the guide rod and the front with the plug.
They can be taken down by positioning, and holding the slide at the disassembly notch and pushing out the slide lock. You can also re-assemble by reversing this procedure. However on re-assembly you will be fighting with that recoil spring and guide rod all the way. Do it this way once or twice and you'll probably decide that removing the spring plug to remove the tension from the recoil spring is much easier.
To sum it up, the easiest way to take down a 1911 is to do it by the manual.
|
The Following 2 Users Like Post:
|
|

04-12-2020, 12:46 PM
|
 |
US Veteran
|
|
|
Join Date: Mar 2001
Location: illinois
Posts: 6,240
Likes: 1,983
Liked 7,140 Times in 2,224 Posts
|
|
I figure the Army has a lot (100 years) exp with the 1911 and they teach, or did, to remove the bushing and spring prior to the takedown. It does make things a lot easier.
|
The Following User Likes This Post:
|
|

04-12-2020, 04:19 PM
|
 |
Member
|
|
|
Join Date: Jan 2015
Location: Black Hills South Dakota
Posts: 1,944
Likes: 10,265
Liked 3,329 Times in 1,244 Posts
|
|
Update 2011 Ruger SR1911 Smack Down
Update.
Well I got the 100th Anniversary 2011 Ruger SR1911 45ACP
Full Size Pistol all cleaned up.
I Disassembled taking the Slide off with all on it (Bushing,
Barrel, Spring Cap, Spring, Spring Guide).
Wow! That was easy, and quick way to seperate Slide
and Frame. Then just took the Slide apart.
I could see controlling the Spring and no catch Spring Guide
would be a problem.
I decided to put the Slide back on per the Owner's Manual;
not as one Unit. I believe It is just easier that way.
In closing; I learned Disassembly taking the whole Slide off or
doing it by the Book works. When putting it back together
though, I will do it by the Book.
Thanks for reading about my conundrum.
1. A filthy Prescott AZ Ruger 1911 amazingly
trouble free for 9 years.
2. Barrel and Slide filth.
3. Cleaned, Oiled, Greased; ready for Assembly.
4. Together again, Idiot free.
Last edited by The Norseman; 04-12-2020 at 04:21 PM.
|

04-12-2020, 04:39 PM
|
 |
Member
|
|
|
Join Date: Feb 2008
Location: Florida
Posts: 22,426
Likes: 11,207
Liked 16,068 Times in 7,017 Posts
|
|
It is just a "regular" 1911 yes it can be done taking the whole slide off but the more betterer way is they way it should be. 
If you like fighting the spring and risk getting one to fly off in your eye, go for it
__________________
Still Running Against the Wind
|
The Following User Likes This Post:
|
|

04-12-2020, 06:03 PM
|
Member
|
|
|
Join Date: Jan 2017
Location: Pittsburgh, PA
Posts: 6,191
Likes: 9,297
Liked 10,098 Times in 3,874 Posts
|
|
Rule3, you are correct! Somewhere on my basement floor are two bushings that just missed my face! First one taking it apart, 2nd putting it back together. After the 2nd, I ordered 2 bushings...still have the spare. One of those cheap bushing tools should be in the box with my 1911! Read the directions! Heed the warnings! I can keep a frozen food warehouse, etc., humming along. I can use tools. I know my limitations: guns and cars!
|
The Following User Likes This Post:
|
|

04-12-2020, 06:24 PM
|
 |
Member
|
|
|
Join Date: Feb 2005
Location: Lost Wages, NV
Posts: 22,362
Likes: 29,204
Liked 33,780 Times in 12,480 Posts
|
|
All this is a good reminder of why the 380EZ is named the way it is.
I'm getting disassembly of the R51 down to an art. The handle end of an old toothbrush makes a useful tool, especially if it has a relatively thick handle.
__________________
Release the Kraken
|

04-12-2020, 07:10 PM
|
Member
|
|
|
Join Date: Jan 2008
Location: Harlem, Ohio
Posts: 15,457
Likes: 26,372
Liked 28,799 Times in 9,948 Posts
|
|
Doughboys and G.I.'s didn't have a conundrum with their 1911's and 1911A1's! The were given simple instructions that their training sergeants expected them to follow!
You on the other hand, are convinced you know better!
By the way your Gold Label is not a "Double Barrel Lever Action Shotgun" I guess you never read the owners manual on that gun either!
Ivan
|
The Following User Likes This Post:
|
|

04-13-2020, 11:26 AM
|
 |
Member
|
|
|
Join Date: Feb 2008
Location: Florida
Posts: 22,426
Likes: 11,207
Liked 16,068 Times in 7,017 Posts
|
|
__________________
Still Running Against the Wind
|
The Following 3 Users Like Post:
|
|

04-13-2020, 11:39 AM
|
 |
Member
|
|
|
Join Date: Jan 2014
Posts: 3,375
Likes: 4,722
Liked 6,542 Times in 2,119 Posts
|
|
To correctly disassemble/reassemble a 1911 to avoid the "idiot" scratch:
1) Always take the tension off the recoil spring first before disassembling a 1911.
2) Always put the tension back on last when reassembling a 1911.
3) Any other order makes you an idiot.
__________________
Dave Ramsey Cultist
|
The Following 2 Users Like Post:
|
|

04-15-2020, 01:14 AM
|
US Veteran Absent Comrade
|
|
|
Join Date: Jan 2010
Location: San Diego, PRK
Posts: 9,233
Likes: 11,531
Liked 11,251 Times in 3,918 Posts
|
|
I was taught in the 'bees to go plug, spring, bushing.
Never even knew there was another way til somebody showed it.
Supposedly, the slide stop first method reduces wear on tightly fitted bushings. Indeed, on my Dan Wessons I need to use the bushing wrench.
One thing I would say for sure. The slide stop last method of assembly would greatly increase the possibility of installing the dreaded idiot scratch unless the stop had that chamfer thingy...
|
The Following User Likes This Post:
|
|

04-15-2020, 10:01 AM
|
 |
Member
|
|
|
Join Date: Feb 2005
Location: On da Bayou Teche
Posts: 19,049
Likes: 20,286
Liked 62,778 Times in 10,211 Posts
|
|
Well I am at a loss as to why one would want to take it down for cleaning in the first place.
1. It's stainless
2. You are not shooting corrosive ammo
3. You have't dunked it in salt water
4. It still works
We ain't talking blue steel and walnut gripped Registered Magnums here
The floor is now open for discussion
__________________
Forum consigliere
Last edited by CAJUNLAWYER; 04-15-2020 at 10:02 AM.
|

04-15-2020, 06:14 PM
|
Member
|
|
|
Join Date: Jan 2009
Location: Metro Detroit, Michigan
Posts: 6,956
Likes: 180
Liked 4,374 Times in 2,140 Posts
|
|
Quote:
Originally Posted by Rule3
|
I've done that, held onto the key long enough to burn an impression of the key head into my palm. Thing is my older brother also stuck a key in a socket but he was weak and let go. Yeah my Mom did try to make sure I couldn't get a key after my brothers episode but I was an explorer and 2 year olds can vanish real quick when they want to.
|

04-15-2020, 07:46 PM
|
 |
Member
|
|
|
Join Date: Dec 2017
Location: Texas Hill Country
Posts: 452
Likes: 1,430
Liked 995 Times in 311 Posts
|
|
I thought that you could take stainless pistols out in the yard and squirt em off with the hose.
But I can see where taking them apart first could get confusing.
|

04-16-2020, 08:06 AM
|
Member
|
|
|
Join Date: Apr 2007
Location: Virginia
Posts: 10,356
Likes: 26,125
Liked 14,611 Times in 6,517 Posts
|
|
Quote:
Originally Posted by CAJUNLAWYER
Well I am at a loss as to why one would want to take it down for cleaning in the first place.
1. It's stainless
2. You are not shooting corrosive ammo
3. You have't dunked it in salt water
4. It still works
We ain't talking blue steel and walnut gripped Registered Magnums here
The floor is now open for discussion
|
Quote:
Originally Posted by Ingramite
I thought that you could take stainless pistols out in the yard and squirt em off with the hose.
But I can see where taking them apart first could get confusing.
|
Y'all are thinking about Glock's, which if they need cleaning, you just run them through a cycle in the dishwasher.
__________________
VCDL, GOA, NRA
|

04-16-2020, 10:13 AM
|
 |
Member
|
|
|
Join Date: Jan 2014
Posts: 3,375
Likes: 4,722
Liked 6,542 Times in 2,119 Posts
|
|
Quote:
Originally Posted by stansdds
Y'all are thinking about Glock's, which if they need cleaning, you just run them through a cycle in the dishwasher. 
|
...and they can be fixed with model airplane glue.
__________________
Dave Ramsey Cultist
|
The Following User Likes This Post:
|
|

04-17-2020, 09:17 AM
|
Member
|
|
|
Join Date: Apr 2007
Location: Virginia
Posts: 10,356
Likes: 26,125
Liked 14,611 Times in 6,517 Posts
|
|
Quote:
Originally Posted by 03hemi
...and they can be fixed with model airplane glue.
|
LOL!!!!!!!!!
__________________
VCDL, GOA, NRA
|

04-17-2020, 09:42 PM
|
 |
US Veteran
|
|
|
Join Date: Feb 2016
Location: western NC
Posts: 3,538
Likes: 2,974
Liked 7,965 Times in 2,518 Posts
|
|
Quote:
Originally Posted by sheppard
The method the OP describes is used with 1911s that have bull barrels and no bushings. Takedown is a pain compared to normal 1911s with a barrel bushing as the recoil spring is kept in compression. The normal takedown is much easier in regular 1911s as the Ruger is. And yes the SR1911 was brought out in 2011 the 100th anniversary year.
|
While I field strip my 1911 with a bushing by removing the bushing and spring first, I've found that field stripping my 1911's that don't have a bushing to be easier and faster. All you need is a paper clip; you keep the spring in tension on the control rod and take it out in one piece after removing the slide. It's as fast as taking down a Glock. Ruger builds them both ways. The .45 Full size and Commanders are bushing pistols, but the Officers , and the full size 10mm (which I have) are bushingless.
I've field stripped my bushing version both ways (removing slide under spring tension, vs removing bushing and spring first), and the short control rod makes it much more difficult to reassemble by inserting the spring and replacing the slide under tension. Of course, you can disassemble it one way, and reassemble it the other.
Last edited by Hair Trigger; 04-17-2020 at 09:47 PM.
|

04-17-2020, 10:58 PM
|
Member
|
|
|
Join Date: Jun 2011
Posts: 38
Likes: 1
Liked 45 Times in 10 Posts
|
|
Quote:
Originally Posted by scooter123
I've done that, held onto the key long enough to burn an impression of the key head into my palm. Thing is my older brother also stuck a key in a socket but he was weak and let go. Yeah my Mom did try to make sure I couldn't get a key after my brothers episode but I was an explorer and 2 year olds can vanish real quick when they want to.
|
I've always been enamored of mechanical/electrical stuff. When I was about 9-10 walking home from school (also did that in 2 feet of snow, around 1949) I spotted a thing in the grass with coils of copper wire, contacts, and other bits mounted on a black metal plate,. I picked it up and when I got home immediately retrieved my little bag of tools and set about trying to take it apart. Got a couple of wires loose and held them to a 6v lantern battery.
Nothing.
Noticed the wall socket.
Can you see this coming?
Stuck those 2 wires into the socket while holding the "thing"
in my other hand not really comprehending what was about to happen.
At once:
Wires went red.
Really loud buzzing.
Ice picks being stabbed into hand.
Lights started flickering.
Hand seemed to be burning.
"Thing" ejects from my hand simultaneously with lightning bolt shooting through my arm.
Flashbulb fired off behind my eye - don't know which one.
Not knowing any appropriate cuss words the best I could come up with was the loudest ouch I have ever uttered.
Mom runs into the room and I am unable to form the words to explain what happened...all of this transpired at the speed of light - I know because I literally saw the light.
I apologize for this non-S&W post but the key thing resurrected a memory that doesn't surface all that often and when it does I realize that I'm lucky not to have been killed...
I later came to realize that the "thing" was a voltage regulator that controlled the voltage output of the generator all cars had in those days.
__________________
SmthWsn the rgnl pntnclk nrfac
|

04-17-2020, 11:11 PM
|
 |
Member
|
|
|
Join Date: Aug 2012
Location: Battle Born
Posts: 364
Likes: 300
Liked 474 Times in 222 Posts
|
|
An old electrician friend of mine back in the day showed me how to check 120 volt on open wire leads to an outlet, you just lick your middle & ring finger & flick them across the wires quickly, you'll know if that circuit is hot or not...NOTE this does NOT apply to 220 volt, that would not be advised.
|
 |
Posting Rules
|
|
|
|
|