Gunhohulk
Member
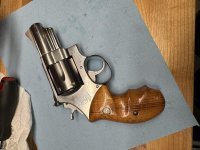
I have a 657 no dash with a 3” barrel that I picked up a not too long ago that I finally opened up for a proper cleaning. When I got the side plate open my suspicions that bubba had been there before me grew. I looked like someone had just slapped a handful of red grease in the frame then squeezed the excess out with the side plate.
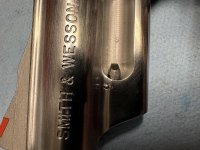
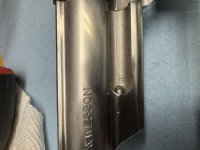
The primary issue I’m having is with releasing the cylinder. When I push the thumb piece forward it takes way too much pressure to get the cylinder to open, especially compared to my other N Frames. This has been a problem since I picked it up and was hoping that the cylinder just wasn’t tightened down all the way. But once everything has been cleaned and put back together it persisted. I then took a slight amount of material off of the thumb piece to make sure the bolt could go fully forward in the frame. This seemed to help slightly but there is still considerable resistance to overcome when opening the cylinder. I then compared the locking bolt on the front of the ejector shroud to my other N-Frame’s and there is a big difference to the profile of the part of the locking bolt that connects with the end of the ejector rod.
Does this sound familiar to anything anyone else has experienced or is there something here I’m overlooking? My initial thought would be that the locking bolt might need to be re-profiled but admittedly this problem is over my head.
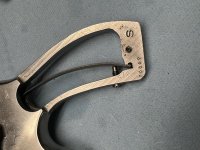
The other issue I have it when I went to tighten down the strain screw it “bottomed out” and was still protruding from the front of the frame way more than any strain screw on any of my other revolvers. After checking it seems like this strain screw was never fitted to this gun and it putting too much pressure on the mainspring. I backed it out and the trigger seems like it feels about right but the screw head is out to the point where it barely clears the grips when I install them. Is there a standard length for the strain screw on n frames or at least a ballpark value that I could grind it down to or is it a piece by piece kind of thing?
If anyone has any tips or resources for me to reference that would be great of if the best advice is to stay in my own lane and get an actual gunsmith to correct things please let me know. I’d appreciate any input. Also I’ll put up a couple pictures of what I’m talking about so hopefully it is something someone has the answer to.
The primary issue I’m having is with releasing the cylinder. When I push the thumb piece forward it takes way too much pressure to get the cylinder to open, especially compared to my other N Frames. This has been a problem since I picked it up and was hoping that the cylinder just wasn’t tightened down all the way. But once everything has been cleaned and put back together it persisted. I then took a slight amount of material off of the thumb piece to make sure the bolt could go fully forward in the frame. This seemed to help slightly but there is still considerable resistance to overcome when opening the cylinder. I then compared the locking bolt on the front of the ejector shroud to my other N-Frame’s and there is a big difference to the profile of the part of the locking bolt that connects with the end of the ejector rod.
Does this sound familiar to anything anyone else has experienced or is there something here I’m overlooking? My initial thought would be that the locking bolt might need to be re-profiled but admittedly this problem is over my head.
The other issue I have it when I went to tighten down the strain screw it “bottomed out” and was still protruding from the front of the frame way more than any strain screw on any of my other revolvers. After checking it seems like this strain screw was never fitted to this gun and it putting too much pressure on the mainspring. I backed it out and the trigger seems like it feels about right but the screw head is out to the point where it barely clears the grips when I install them. Is there a standard length for the strain screw on n frames or at least a ballpark value that I could grind it down to or is it a piece by piece kind of thing?
If anyone has any tips or resources for me to reference that would be great of if the best advice is to stay in my own lane and get an actual gunsmith to correct things please let me know. I’d appreciate any input. Also I’ll put up a couple pictures of what I’m talking about so hopefully it is something someone has the answer to.