No 3 44 Russian

Big River

Member
Joined
Sep 22, 2024
Messages
9
Reaction score
5
Location
Victoria BC
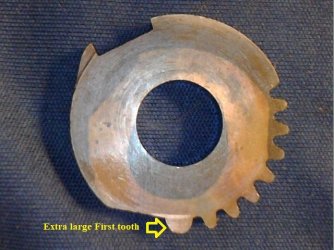
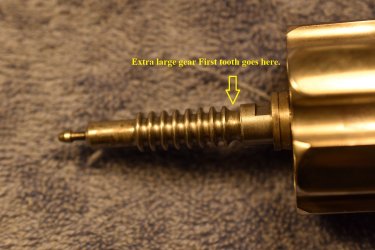
I found a disassembled a SW No 3 44 Russian that I bought. The cylinder is separated from the ejector rod as well as the stop cylinder plate and screww, barrel block platebarrel block screw, barrel block plunger. Everything looks to be in good shape for reassembly, but I cannot find a manual or any instructions for reassembly. I used a Uberti Russian schematic for the part names, which looks the same; it's the reassembly that I'm not sure of. Any assistance would be greatly appreciated.
 
Register to hide this ad
Hi There,

Welcome to the Forum!

Could you post some pics of your revolver? It would save a lot
of time in identification of the specific model you have. There
are three "Russian" models and the New Model # 3 came in .44
Russian too.

Cheers!
Webb
 
Hi There,

Welcome to the Forum!

Could you post some pics of your revolver? It would save a lot
of time in identification of the specific model you have. There
are three "Russian" models and the New Model # 3 came in .44
Russian too.

Cheers!
Webb
 
Thanks for the reply. I hate to admit I don't have the camera skills to take or post photos. I'll see if I can find a youngster to help.
 
As you can see its in good shape and everything looks to be there except grips. not sure how my 80 yr old fingers will handle those small parts but never know till you try, right/
 
Looks like you have a 3rd Model Russian.

The little spring and cam next to it are what closes the barrel catch. The screw for the catch or latch needs to be removed, spring inserted 'between the ears' of the barrel. The cam is next, round end towards the spring. The ramped face of the cam should face up toward the top strap. The hard part is compressing the cam against the spring with the barrel latch and inserting the screw at the same time.

Once that is accomplished, the cylinder can be assembled back on the pivot post / quill. The fluted extractor rod must engage the sprocket-like extractor cam in the barrel hinge. This may need to be attempted several times to get the timing correct.

Once the cylinder is seated correctly, the flat 'L' piece is slid into a dovetail under the top strap (short leg holds the cylinder) and the knurled screw replaced in the notch on the barrel rib.
 
It's a wonder what a good night's sleep does. I'm guessing, but I think the prior owner had trouble setting the cylinder to time correctly. It's a challenge to get the extractor placed correctly so it releases and retracts when the barrel is all the way open and allow the barrel/cylinder assembly to close/latch fully.

Please keep us informed of the progress.
 
Welcome. I think this page from David Chicoine's book will help you out. Shows all parts for this gun. You will notice that the top latch is rotated in the diagram, but of course it is flat with the top strap when installed. Download the page to your computer and you should be able to blow it up to see all details.

IMG_20250619_0001.jpg
 
Last edited:
Thanks, with all the foregoing help, I have a better idea of what I need to do now. Mike your right thats exactly the problem I'm running into. It seems the extractor will not engage the pin fully.
It's a wonder what a good night's sleep does. I'm guessing, but I think the prior owner had trouble setting the cylinder to time correctly. It's a challenge to get the extractor placed correctly so it releases and retracts when the barrel is all the way open and allow the barrel/cylinder assembly to close/latch fully.

Please keep us informed of the progress.
 
Take a look at the parts diagram and you will see the position of the ratchet. The notch in it should line up with the ratchet pawl in the frame. After you replace the cylinder, try to insert the ratchet in the slot in that position.
 
Hi There,

I will post the following about the extractor gear and extractor
rack. If you will notice, there is one tooth that is bigger than the
others (the first gear tooth). This extra large (double wide) gear
tooth goes in the first notch of the rack. See pics.

Cheers!
Webb
 

Attachments

  • 3rd model -1.jpg
    3rd model -1.jpg
    70.3 KB · Views: 1
  • 3rd Model - 3.jpg
    3rd Model - 3.jpg
    162.5 KB · Views: 1
Hi There,

I will post the following about the extractor gear and extractor
rack. If you will notice, there is one tooth that is bigger than the
others (the first gear tooth). This extra large (double wide) gear
tooth goes in the first notch of the rack. See pics.

Cheers!
Webb
Mike, that did it! Thanks for your continued support, I now have a functioning SW no 3 in 44 Russian. My sincere thanks to everyone in this forum who took the time to assist me, you are appreciated. I think a set of ivory grips should complement this revolver quite nicely.
 
Between Gary, Webb and myself, you didn't stand a chance of NOT getting it back together. I'm glad it worked out. Going to shoot it?
 
Back
Top