|
|
 |

02-28-2017, 04:18 PM
|
|
Member
|


|
|
Join Date: Feb 2011
Location: Fond du Lac WI
Posts: 893
Likes: 21
Liked 1,348 Times in 283 Posts
|
|
 .44 Hand Ejector 2nd Model Project - FINISHED!
Well, here we go.
My 1921 .44 2nd model project gun.
I always wanted a short barrel pre-war N-frame and I knew the only way to have one is to make one. So I acquired the custom short barrel from Hondo44 (3-1/2") and bought this gun from a friend.
It's been reblued already (including hammer & trigger) and the barrel chopped a bit once before - so I'm not wrecking a nice gun here.
I have an NOS hammer and post war.400 target trigger, though I would rather have an original pre-war trigger with "great case coloring". (Anyone have one cheap?)
Timing is good but needs a new cylinder stop which I have.
I'll post pictures as I make progress
Last edited by rgm36; 03-06-2017 at 07:35 PM.
|
|
The Following 12 Users Like Post:
|
bruce5781, codenamedave, damienph, Frank46, GunarSailors, Kinman, MCorps0311, mojave30cal, Ngtdog, olskool, RILEY31, snowman.45 |
02-28-2017, 05:57 PM
|
 |
Member
|

|
|
Join Date: Dec 2009
Location: South Texas & San Antonio
Posts: 33,711
Likes: 245
Liked 29,234 Times in 14,143 Posts
|
|
Also you need blocks to clamp the barrel in a sturdy vise while you turn off the frame. Maybe someone would loan you what you need. One time I made up a K-frame wrench out of angle iron which worked OK, but that was long ago, and it's long gone. Don't use a hammer handle through the window, as some who should know better recommend.
|
|
The Following 3 Users Like Post:
|
|
03-01-2017, 02:26 PM
|
|
Member
|
|
|
Join Date: Feb 2011
Location: Fond du Lac WI
Posts: 893
Likes: 21
Liked 1,348 Times in 283 Posts
|
|
 .44 Hand Ejector 2nd Model project Gun
I DID IT!!!!!!
I successfully removed the barrel without frame blocks! (Don't try this at home)
I was very carefull.
I pre-soaked the threads for 24 hours, then used a "very little" amount of heat so as not to take the hardening out of the frame - and off she came without stressing the frame at all.
I was lucky! 
Looks just the way I hoped it would with the short barrel 
Now the real work begins. Polishing and re-bluing, and reassembly to make it all work well.
Last edited by rgm36; 03-06-2017 at 08:24 PM.
|
|
The Following 17 Users Like Post:
|
BillyMagg, Breakaway500, bruce5781, codenamedave, delta-419, Frank46, JH1951, ki5mc, Kinman, LeBur, Lee's Landing Billy, mojave30cal, Ngtdog, RKmesa, snowman.45, Tinker Pearce, Watchdog |
03-01-2017, 02:58 PM
|
|
SWCA Member
|


|
|
Join Date: Jun 2011
Location: Northeast FL
Posts: 5,825
Likes: 7,482
Liked 15,286 Times in 3,648 Posts
|
|
I will watch your progress carefully. I'm planning to do the same metamorphosis to a 32 hand ejector that I have. I bought the gun to get some parts off of it for a 32 Target, and now that that's complete I've got a short-barrel I'm going to install on a hand ejector.
__________________
Robert
SWCA #2906, SWHF #760
|
03-01-2017, 08:32 PM
|
|
SWCA Member
|

|
|
Join Date: Oct 2007
Location: California
Posts: 19,256
Likes: 11,946
Liked 20,609 Times in 8,587 Posts
|
|
Bravo!!
Yep. I agree. 3 1/2" is a good length for that frame size.
__________________
Jim
S&WCA #819
|
|
The Following User Likes This Post:
|
|
03-02-2017, 12:50 AM
|
 |
Member
|

|
|
Join Date: Jul 2010
Location: Spokantucky
Posts: 4,140
Likes: 10,426
Liked 6,952 Times in 2,359 Posts
|
|
Yeah! I like it and thats the way a project can go with a little luck and perseverance. I'm looking for something very similar, I've done a little work with a Brazilian 1917 that had already had a decent reblue, I cut it down to 4" and am very happy with it but its not a .44 and dog-gone-it, who don't like .44's. So I'm on the hunt and hope...Probably one of the major reasons you can't find a cheap model 28 anymore...
|
03-03-2017, 08:33 AM
|
|
Member
|
|
|
Join Date: Jul 2010
Location: Central VA
Posts: 8,675
Likes: 1,578
Liked 9,446 Times in 4,237 Posts
|
|
Great project there, rgm36. As with all great projects you thought it out and gathered up the key parts to start with. I can sense the sweet smell of success from here.
That Hondo44 is quite the enabler, isn't he?  He's helped me out with parts and advice more than once and seems to "know where all the bodies are buried" not to mention the good gun parts! I wonder how many projects on this or other related gun boards he's had a hand in?
Keep up the good work and be sure to post more pictures of your progress. We ❤️ pictures!
Regards,
Froggie
|
03-03-2017, 08:39 AM
|
 |
Member
|
|
|
Join Date: Jan 2011
Location: the woods of S.C.
Posts: 538
Likes: 2,462
Liked 1,278 Times in 255 Posts
|
|
I bet in the end the gun will shoot high, you will most likely need a higher front sight.
|
03-03-2017, 10:42 AM
|
|
SWCA Member
|

|
|
Join Date: Dec 2006
Location: NW Florida
Posts: 2,244
Likes: 6,391
Liked 3,415 Times in 583 Posts
|
|
Project 44
Be Very Careful!! Project guns can become a passion beyond simple collecting to the point of a holy grail obsession for parts, special tools, diagrams, and books. I just finished my first Triple Lock project with help from Hondo44. It shipped off to Fords yesterday for plating. This is one of my 44 projects using a MKII .455 frame that had a cut barrel. Its now a 44 Spl. with a 5" barrel and jigged bone grips. You can't stop with one.
|
|
The Following 19 Users Like Post:
|
bruce5781, Combat, DGT, Frank46, Hondo44, JH1951, ki5mc, Kinman, Lee Barner, Lee's Landing Billy, MCorps0311, mojave30cal, Muley Gil, Ngtdog, olskool, Pig Hunter, Plain Old Dave, shouldazagged, snowman.45 |
03-03-2017, 10:19 PM
|
|
Member
|
|
|
Join Date: Feb 2011
Location: Fond du Lac WI
Posts: 893
Likes: 21
Liked 1,348 Times in 283 Posts
|
|
I've got the barrel on now with a bit of trouble. It hand tightened at 3:00 so I had to machine the barrel flange so it would hand tighten at 11:45.
Then I lock tighted it and bench tightened it to 12:00 and installed the pin.
I will have to shorten the extractor rod (which Jim is sending me) the same amount cause now it is too long to fit into the barrel lug since the lug moved forward when the flange was machined. Everything to do with the cylinder release and extractor will have to be custom fit to the lug locking bolt.
I've wet sanded the frame with 600 grit - then 1000 grit. It didn't need much so no stamping was affected. Its ready for bluing but am working on installing the innards and fitting everything to work first.
I want to get everything working first - then disassemble and blue.
The cylinder stop was a hassle! I needed to replace it with a wider one to hold the cylinder tighter when locked into position. The cylinder rocked quite a bit with the old one. The new one is wider than the slot in the frame so I had to file that slot to accept the new wider cylinder stop. Then I had to hand fit it's depth into the cylinder lock slot. Now its nice and tight. It was worth the 2 hours it took to get it right.
The NOS hammer replacement was LOTS of work. It did NOT just drop in. I had to file the frame about .010" at the hammer stop so it would pull far enough back to lock into the trigger. It had easy push off because it was not fully locking into the trigger. Then I had to sharpen the edge of the trigger where it locks into the hammer when cocked. It was worn and not sharp edged any more. NOW its perfect. You can't push it off now no matter how you try - nice and safe and proper. Single and double action and cylinder lock up and timing are finally perfect!
I have reused the trigger by de-bluing it and case coloring it with a torch.
I do not recommend doing this type of project unless you have all the tools, parts, patience and knowhow. It is frustrating figuring out everything that is not right and coming up with the solution. These things are VERY complicated and everything works together. If just one thing is wrong - it will affect everything else. I had MANY things wrong with this old gun - so it was WORK!
I'm only an ASE certified auto tech. but have the ability to trouble shoot mechanical problems. I have had to custom fit everything once I figured out what the problems were.
I don't know if I'll do another one soon.
Pictures coming when I get it blued.
Last edited by rgm36; 03-05-2017 at 10:21 PM.
|
|
The Following 4 Users Like Post:
|
|
03-03-2017, 10:23 PM
|
|
US Veteran
|
|
|
Join Date: Apr 2004
Location: Oak Ridge TN
Posts: 417
Likes: 77
Liked 363 Times in 130 Posts
|
|
Stoked with Keith handloads, this will probably be the perfect fighting gun.
Sent from my SM-J700T using Tapatalk
|
03-06-2017, 08:13 PM
|
|
Member
|
|
|
Join Date: Feb 2011
Location: Fond du Lac WI
Posts: 893
Likes: 21
Liked 1,348 Times in 283 Posts
|
|
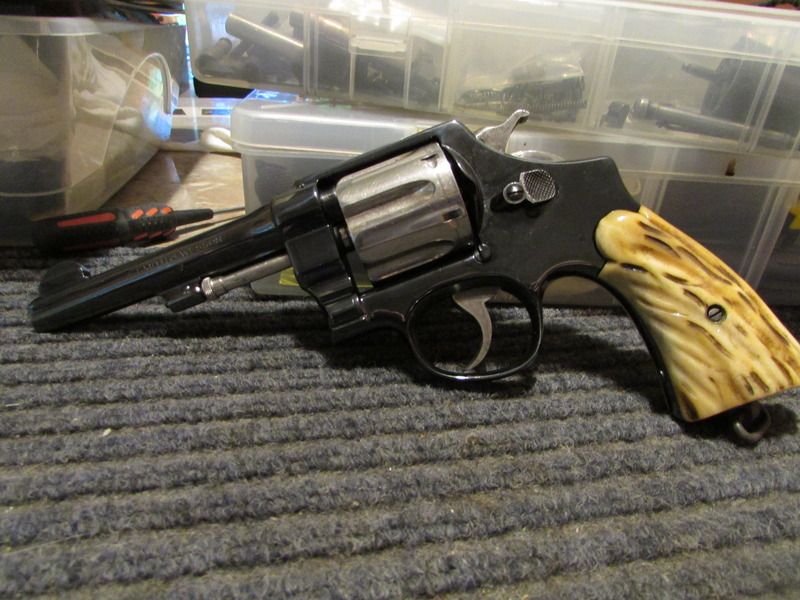
IT'S DONE!!!!!
I received the last part needed to finish my gun, thanks to Hondo44. It was an extractor rod that I had to machine shorter to fit.
The machining of the barrel flange made the distance from the barrel lug to frame shorter. Therefore, extractor rod had to be shortened to fit.
This was accomplished by machining the seating flange of the rod that seats down in. Nothing had to be done with the threads. When threaded in it just threaded deeper giving me the clearance that I needed to have proper engagement of the locking bolt in the lug.
The bluing is not great as all I did was rub some Walmart bluing agent on the whole thing for a couple hours. NOT the right way to blue a gun - but it's better than it was. I may yet have it professionally blued - but it aint too bad this way.
I had complete confidence in my work as it did time and lock up perfectly - so off the shooting range I went.
It works great! I shot a full box of hot load 180 grain jacketed hollow point .44 specials.
I thought I was shooting a .44 Mag with that short barrel and those hot loads!
FLAMES shot out the end of the short barrel as I went through load after load. I quickly shot all 50 rounds to heat the gun up as much as possible to be sure no clearances were too tight. I've had some guns where the cylinder would bind once the gun got hot - but this one worked flawlessly to the end.
The frame is a military inspected frame and the cylinder is factory heat treated so I was not worried to shoot the hotter loads. Go big or go home!
I need to put a gold dot bead on that skinny front sight blade because I could hardly see the sight blade while fixing my vision on the target. I kept guessing where the blade level was while firing and seemed to shoot 2" high at 30 feet. Right to left is perfect.
The frame and cylinder are the original matched pair with matching numbers. The new custom short barrel has no numbers.
Enjoy the pictures of the finished gun. rgm36
Last edited by rgm36; 03-11-2017 at 12:26 AM.
|
|
The Following 46 Users Like Post:
|
2152hq, 992B, BigCityChief, Breakaway500, bruce5781, BUFF, codenamedave, Combat, culito, D1911, ddixie884, delta-419, DevilDog72, DGT, Doug627, Engineer1911, Frank46, g8rb8, Glashaus, H Richard, Iggy, Joe Kent, ki5mc, Kinman, LeBur, Lee Barner, Lee's Landing Billy, LoadedRound, Model25Man, mojave30cal, Ngtdog, Old_Cop, quinn, raljr1, RKmesa, SAFireman, series guy, shouldazagged, sigp220.45, snowman.45, The Gila Bender, Tinker Pearce, Todd K., tops, vonn, Watchdog |
03-06-2017, 09:48 PM
|
|
Member
|
|
|
Join Date: Feb 2009
Location: CA
Posts: 1,530
Likes: 797
Liked 679 Times in 437 Posts
|
|
Fun project, turned out nice.
thanks for showing us.
|
03-06-2017, 10:46 PM
|
 |
US Veteran
|
|
|
Join Date: Jun 2013
Location: STL
Posts: 887
Likes: 1,103
Liked 4,189 Times in 547 Posts
|
|
Looks great!
Question, why not just cut the original barrel down a little more? Wouldn't that have saved some of the fitting work?
I've got your gun's (former self) twin and I'm looking to do the same eventually but I don't have the machining abilities.
|
|
The Following User Likes This Post:
|
|
03-06-2017, 11:04 PM
|
|
Member
|
|
|
Join Date: Feb 2011
Location: Fond du Lac WI
Posts: 893
Likes: 21
Liked 1,348 Times in 283 Posts
|
|
Quote:
Originally Posted by LLOYD17

Looks great!
Question, why not just cut the original barrel down a little more? Wouldn't that have saved some of the fitting work?
I've got your gun's (former self) twin and I'm looking to do the same eventually but I don't have the machining abilities.
|
That's a valid question. The answer is that the original barrel had already been cut down and it was done very poorly. All the stamping was polished off as well. It was not worth reusing.
|
03-06-2017, 11:05 PM
|
 |
Member
|
|
|
Join Date: Nov 2013
Location: Spokane, WA
Posts: 13,534
Likes: 1,186
Liked 18,481 Times in 7,315 Posts
|
|
That looks GREAT!
Tell me more about this "Walmart" cold blue you used.
Is it actually Birchwood Casey brand?
I know my local Wally's carries some of their products....
|
03-06-2017, 11:17 PM
|
 |
Member
|
|
|
Join Date: Apr 2013
Location: Southern Utah
Posts: 1,790
Likes: 4,237
Liked 2,796 Times in 898 Posts
|
|
That looks sexy. My take: Hondo44=Santa Claus.
|
03-06-2017, 11:30 PM
|
|
Member
|
|
|
Join Date: Jul 2010
Location: Spokantucky
Posts: 4,140
Likes: 10,426
Liked 6,952 Times in 2,359 Posts
|
|
Great project, Hats Off to both of you...
|
03-07-2017, 01:47 AM
|
|
Absent Comrade
|
|
|
Join Date: Feb 2013
Location: Louisville, KY, USA
Posts: 19,336
Likes: 53,737
Liked 38,387 Times in 11,802 Posts
|
|
That's a beauty--nice work.
__________________
Oh well, what the hell.
|
03-07-2017, 04:22 AM
|
|
SWCA Member
|
|
|
Join Date: Oct 2007
Location: California
Posts: 19,256
Likes: 11,946
Liked 20,609 Times in 8,587 Posts
|
|
Bravo,
That's great work, what a difference!
Is the trigger already torched for some simulated CCH? It should look mottled with blue and grey areas, by holding a small point heat source at different points on the trigger for different lengths of time to get different colors.
__________________
Jim
S&WCA #819
|
03-07-2017, 08:18 AM
|
 |
US Veteran
|

|
|
Join Date: Oct 2013
Location: Central Montana
Posts: 13,735
Likes: 12,900
Liked 39,595 Times in 10,066 Posts
|
|
Looks good to me.. Nice job. Hot blue chemicals are avalible and you do not need a big setup to do handguns. A big enameled turkey roaster on top of a propane burner. Hard part for me is storage of chemical when done. I have a few I need to do. Just like to do them all at once and with me it seems another is always in the process.
|
03-07-2017, 09:15 AM
|
|
SWCA Member
|

|
|
Join Date: Aug 2009
Location: Virginia
Posts: 1,179
Likes: 1,053
Liked 2,547 Times in 462 Posts
|
|
Very nice job. My only problem is that the front sight looks too much like a C#%@ New Service.
Bob
|
03-07-2017, 02:15 PM
|
 |
Member
|
|
|
Join Date: Sep 2001
Location: Grinder's Switch, TN
Posts: 1,680
Likes: 1,440
Liked 1,444 Times in 664 Posts
|
|
I'll take it!
__________________
S&W Forum Member #721
|
03-07-2017, 03:07 PM
|
 |
Member
|
|
|
Join Date: Oct 2003
Location: Wyoming
Posts: 10,422
Likes: 10,440
Liked 28,249 Times in 5,276 Posts
|
|
That's finer than frog's hair.
Very well done.

I have a similar one in 45 that I carry a lot of the time.
__________________
Eccentric old coot
Last edited by Iggy; 03-07-2017 at 04:25 PM.
|
|
The Following 5 Users Like Post:
|
|
03-10-2017, 10:04 PM
|
|
US Veteran
|

|
|
Join Date: Feb 2005
Location: The SW Va Blue Ridge
Posts: 17,567
Likes: 90,092
Liked 24,984 Times in 8,557 Posts
|
|
"I need to put a gold dot bead on that skinny front sight blade because I could hardly see the sight blade while fixing my vision on the target."
Hate to tell you this, but you are sighting incorrectly. Your eyes cannot focus on all three planes-rear sight, front sight, target- at the same time. When we are young, it SEEMS that we can, but the brain is changing focus rapidly. As we age, this ability goes away.
The front sight should be sharp, and the rear sight and the target should be blurred. If you have practiced enough, your sight alignment should be automatic.
Repeat after me-front sight, trigger squeeze; front sight, trigger squeeze; front sight, trigger squeeze.
__________________
John 3:16
WAR EAGLE!
|
|
The Following User Likes This Post:
|
|
03-10-2017, 10:11 PM
|
|
Member
|
|
|
Join Date: Feb 2011
Location: Fond du Lac WI
Posts: 893
Likes: 21
Liked 1,348 Times in 283 Posts
|
|
Who says I can see the target!? 
You should see me drive.
Last edited by rgm36; 03-10-2017 at 10:13 PM.
|
|
The Following 2 Users Like Post:
|
|
03-10-2017, 10:19 PM
|
|
Banned
|

|
|
Join Date: Apr 2013
Posts: 12,572
Likes: 21,054
Liked 32,463 Times in 7,773 Posts
|
|
Quote:
Originally Posted by rgm36
IT'S DONE!!!!!
Enjoy the pictures of the finished gun. rgm36
 |
I think it looks really good...an excellent rescue of a fine ol' revolver.
I'd leave the bluing as it is. If you have it blued "for real", the whole thing will have to be taken apart and polished again, which might take away some of the crispness of the rollmarks.
That gun would look good with a nice vintage holster and belt.
Congratulations on a job well done.
|
|
The Following 3 Users Like Post:
|
|
03-10-2017, 10:45 PM
|
 |
Member
|
|
|
Join Date: Apr 2011
Location: Mansfield, Texas
Posts: 1,528
Likes: 11,499
Liked 2,888 Times in 947 Posts
|
|
all I can say is w o w...... w o w..... what a great job, I would love to have one just like it.
|
03-11-2017, 02:26 AM
|
|
Member
|
|
|
Join Date: Nov 2013
Location: Spokane, WA
Posts: 13,534
Likes: 1,186
Liked 18,481 Times in 7,315 Posts
|
|
I still want to hear more about how you got the cold blue to look so good. My results haven't been nearly that good, and I'd like to know the secret.
|
03-11-2017, 04:57 AM
|
|
Member
|
|
|
Join Date: Dec 2011
Location: Seattle, WA.
Posts: 124
Likes: 236
Liked 306 Times in 47 Posts
|
|
Great job! Very satisfying to take an old gun and make it new again.
|
03-11-2017, 05:09 AM
|
 |
Member
|
|
|
Join Date: Nov 2016
Location: East of Jefferson
Posts: 634
Likes: 667
Liked 1,159 Times in 387 Posts
|
|
Wow, indeed. That's some serious skills on display there. I suspect you'd have a waiting list of customers if you went into 'smithing full time.
+1 on the amazement at the look of that bottle blue. Prithee spill the beans!
__________________
TEAM DNF
|
03-11-2017, 09:02 AM
|
|
Member
|
|
|
Join Date: Feb 2011
Location: Fond du Lac WI
Posts: 893
Likes: 21
Liked 1,348 Times in 283 Posts
|
|
The bluing was a LOT of work.
After prepping the surfaces I "started" with Super Blue by Birchwood Casey from Wal-Mart and a "hot gun" from the oven at 215 degrees.
The heat really made it instantly penetrate deep BUT left it blotchy. I could not get even coverage no matter how many times I re-did it.
Plus, my wife discovered I had accidently left the oven on all night long and shook her head at me just like my father always did when I was a kid. 
Not a good start.
I switched bluing agents and ended up using "VANS INSTANT GUN BLUE" by C.S. Van Gorden & Son from Bloomer Wisconsin on a "cold gun". No more oven and disappointed looks from the wife.
This did not penetrate as well but applied much more consistently. I just had to apply it 100 times.
I mostly applied with un-lotioned tissue paper since tissue removed the bluing agent as fast as it applied. Why is this important? Because if you leave it on too long, some areas will over blue giving you an inconsistent coverage again.
At times I needed to apply the bluing with 0000 steel wool VERY lightly to remove (blend in) the over blued areas to achieve uniform coverage.
I have more time than money, so I had at it and it's good enough for me - but I spent days working at it.
Thanks for the compliments.
Last edited by rgm36; 03-11-2017 at 07:34 PM.
|
|
The Following User Likes This Post:
|
|
03-11-2017, 03:25 PM
|
 |
Member
|
|
|
Join Date: Jun 2005
Location: Northern Illinois
Posts: 883
Likes: 958
Liked 431 Times in 185 Posts
|
|
The recovery
Super well done,,,a great story, thanks for sharing.
__________________
NOT SO FAST,, NOT-- SO-- FAST
|
03-11-2017, 04:47 PM
|
|
SWCA Member
|
|
|
Join Date: Dec 2006
Location: NW Florida
Posts: 2,244
Likes: 6,391
Liked 3,415 Times in 583 Posts
|
|
Vans
I have a bottle of Vans that I use for "touch ups". A gunsmith friend told me its what old timers used "back in the day" to hide scratches. Never thought of doing a whole gun with it. Your work looks super, I may have to try it. I've got an old brown shooter that might be a candidate for a facelift! Good job!!!
|
03-11-2017, 04:59 PM
|
|
Banned
|
|
|
Join Date: Mar 2014
Location: Battery Oaks Range, S.C.
Posts: 1,847
Likes: 5,663
Liked 3,574 Times in 1,163 Posts
|
|
I know you are proud of the finished product...I would be!
|
|
 Posting Rules
|
|
|
|
|


 Linear Mode

