|
|
 |

02-15-2019, 12:25 AM
|
 |
US Veteran
|


|
|
Join Date: Jun 2012
Location: SW Mississippi
Posts: 1,351
Likes: 2,236
Liked 6,228 Times in 1,044 Posts
|
|
 625-6 In for spa treatment
Ahoy there Gents,
I'm typically found over in the Semi-Auto forum but I have some revolver work on the bench of late and this particular one has an interesting back story.
So, this gun was stolen some 7+ years ago and recently recovered a couple states away on an unrelated LE action. The owner, who's a member here, got it back early last month after clearing a few legal hurdles.
And now it's here on the healing bench for a checkup.
Gentlemen, Attend...
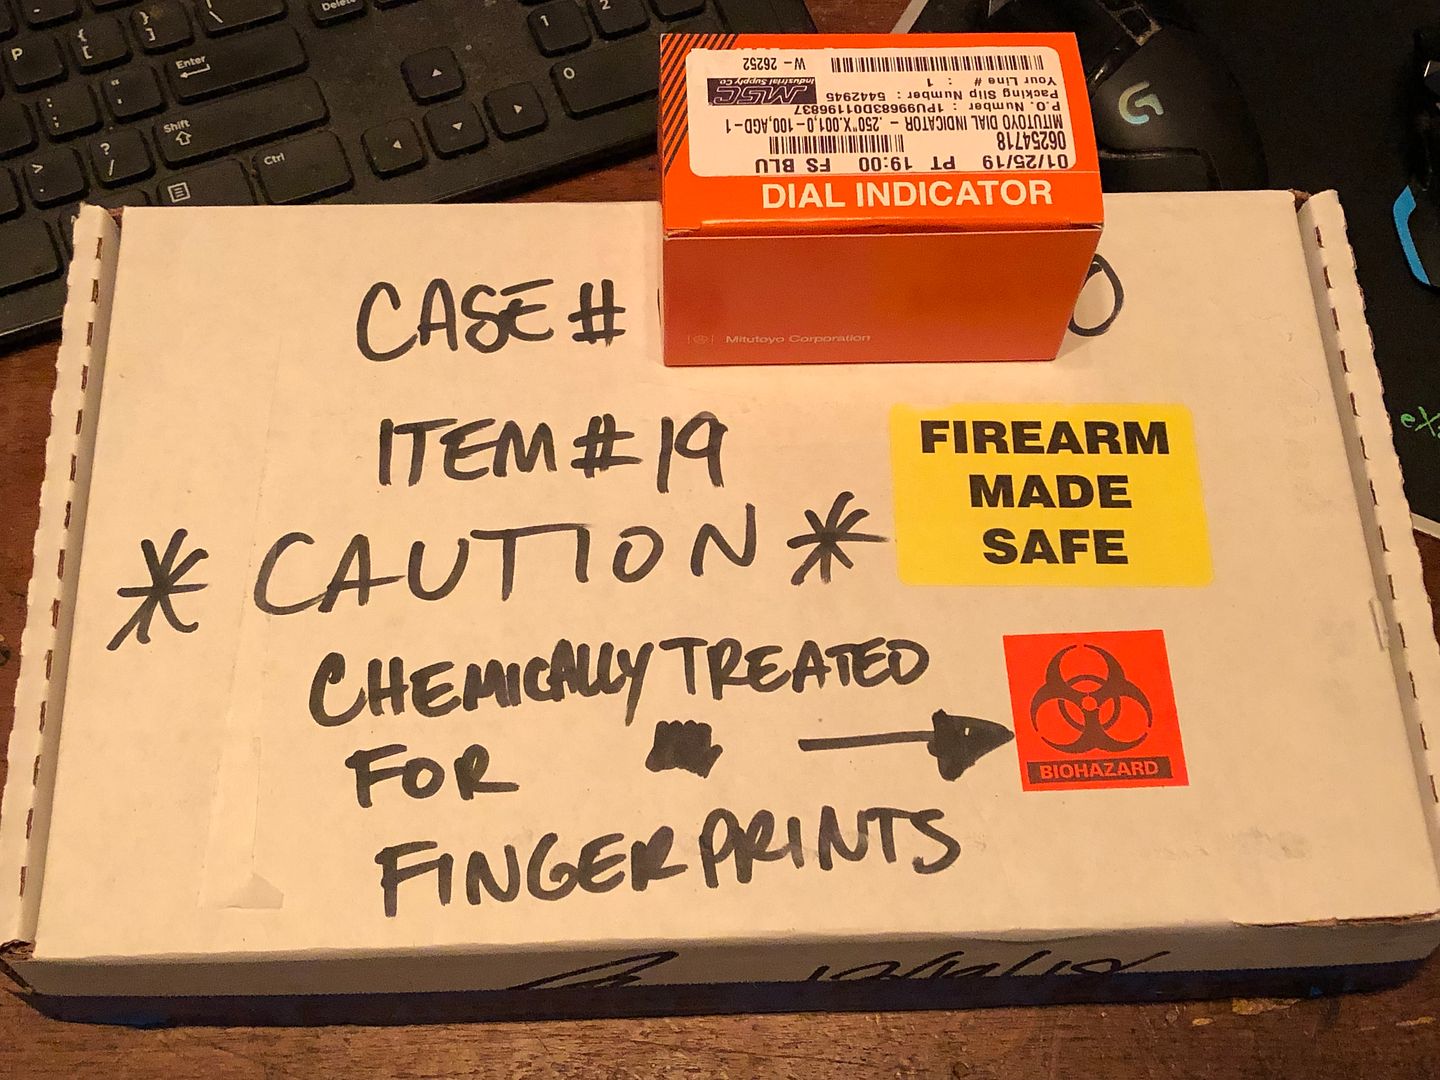
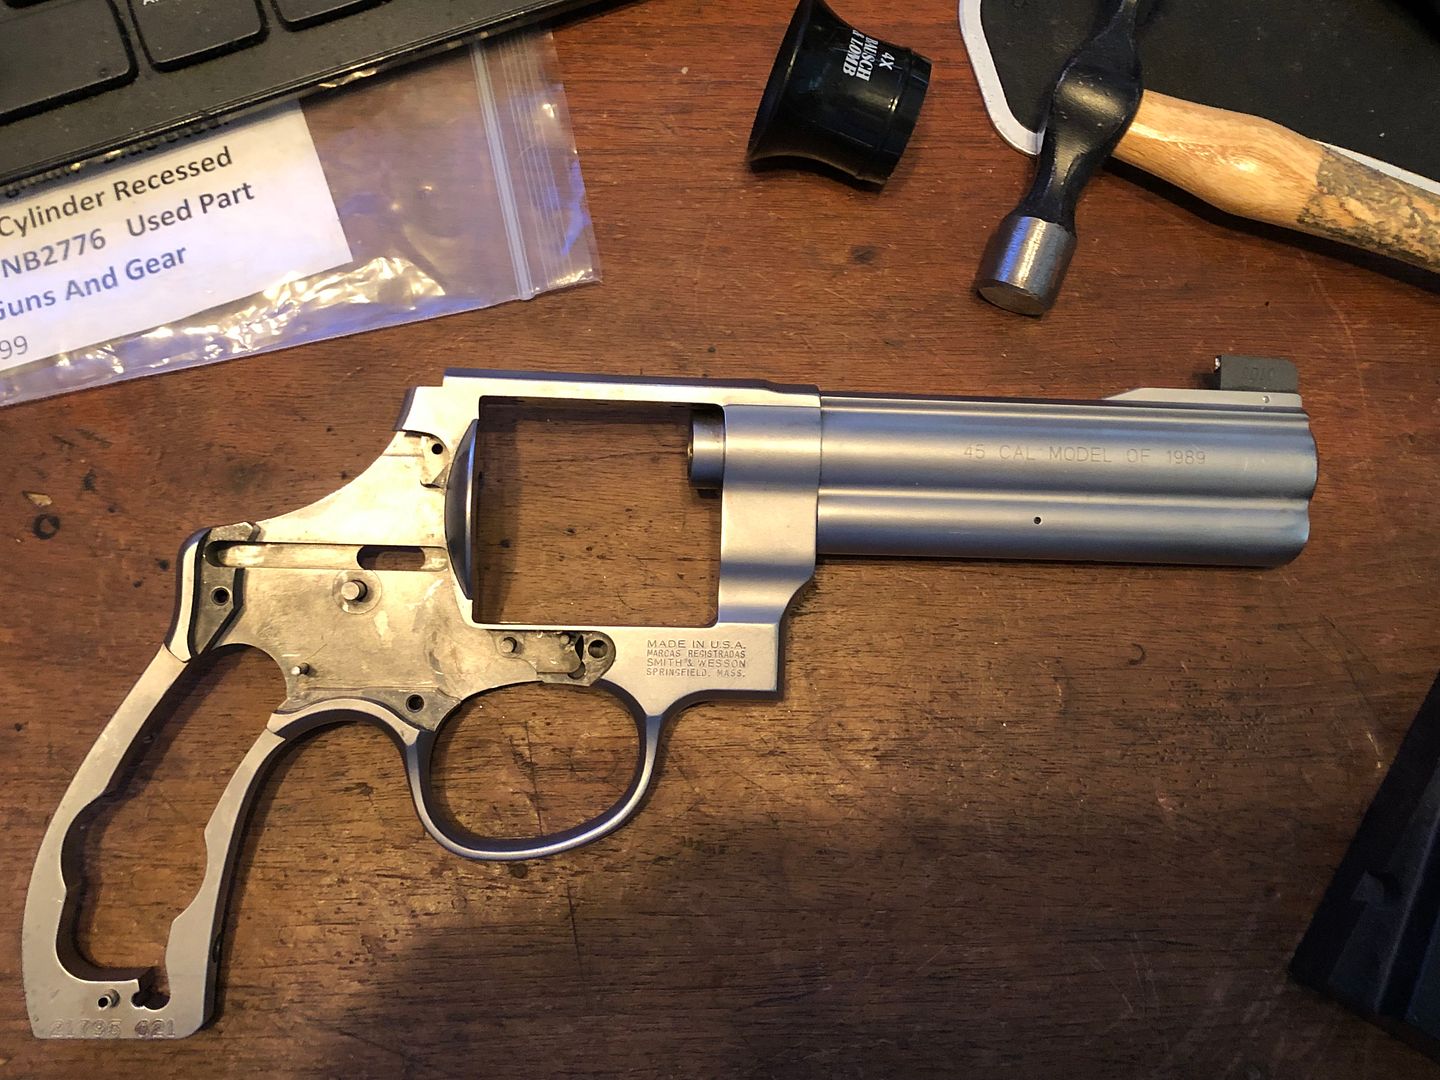
Kinda gives one pause when a gun shows up in a box labeled thus,
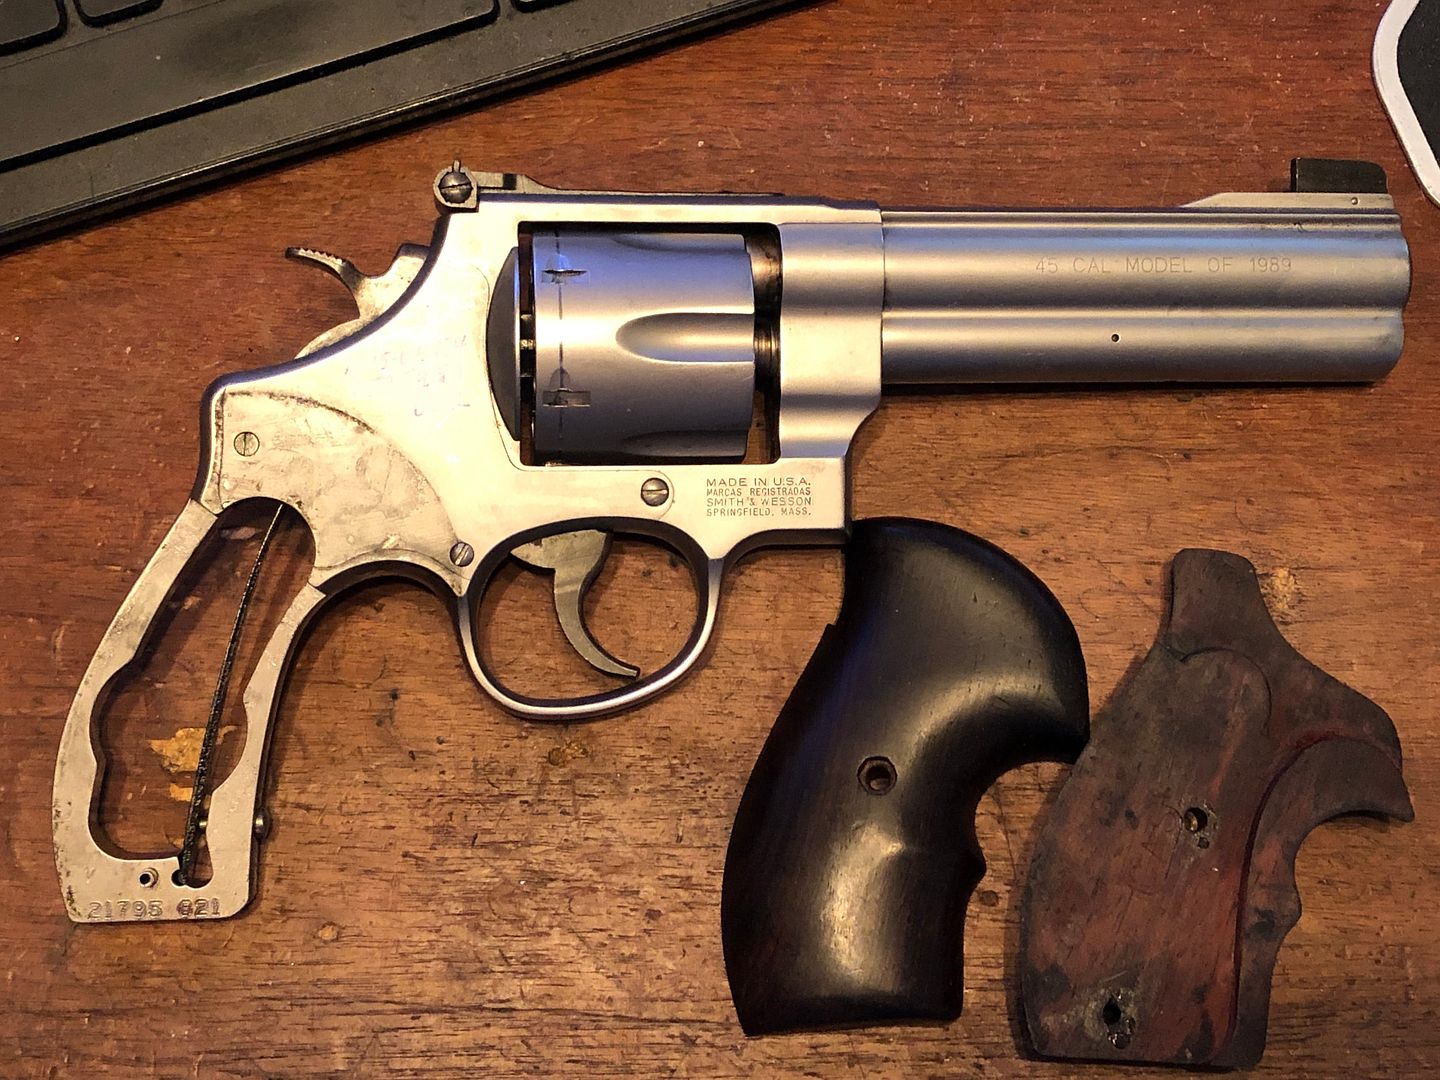
Pretty crusty overall, grips are Craig Spegel's boots and just soaked with crud and oily goop. Mainspring screw backed waaay out 
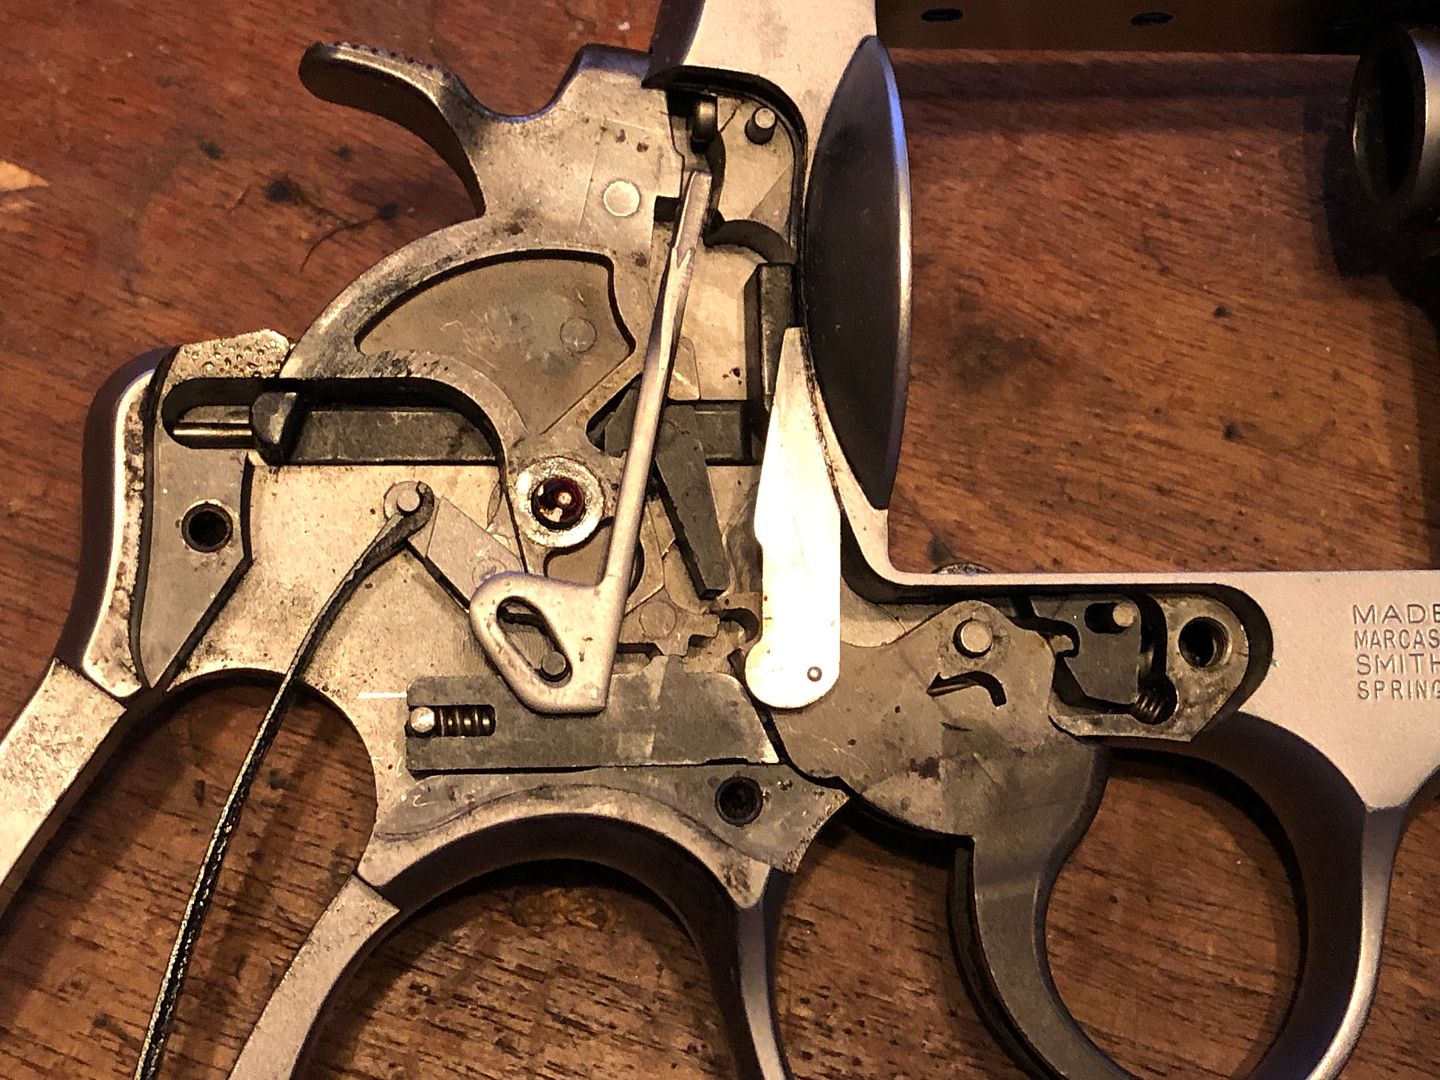
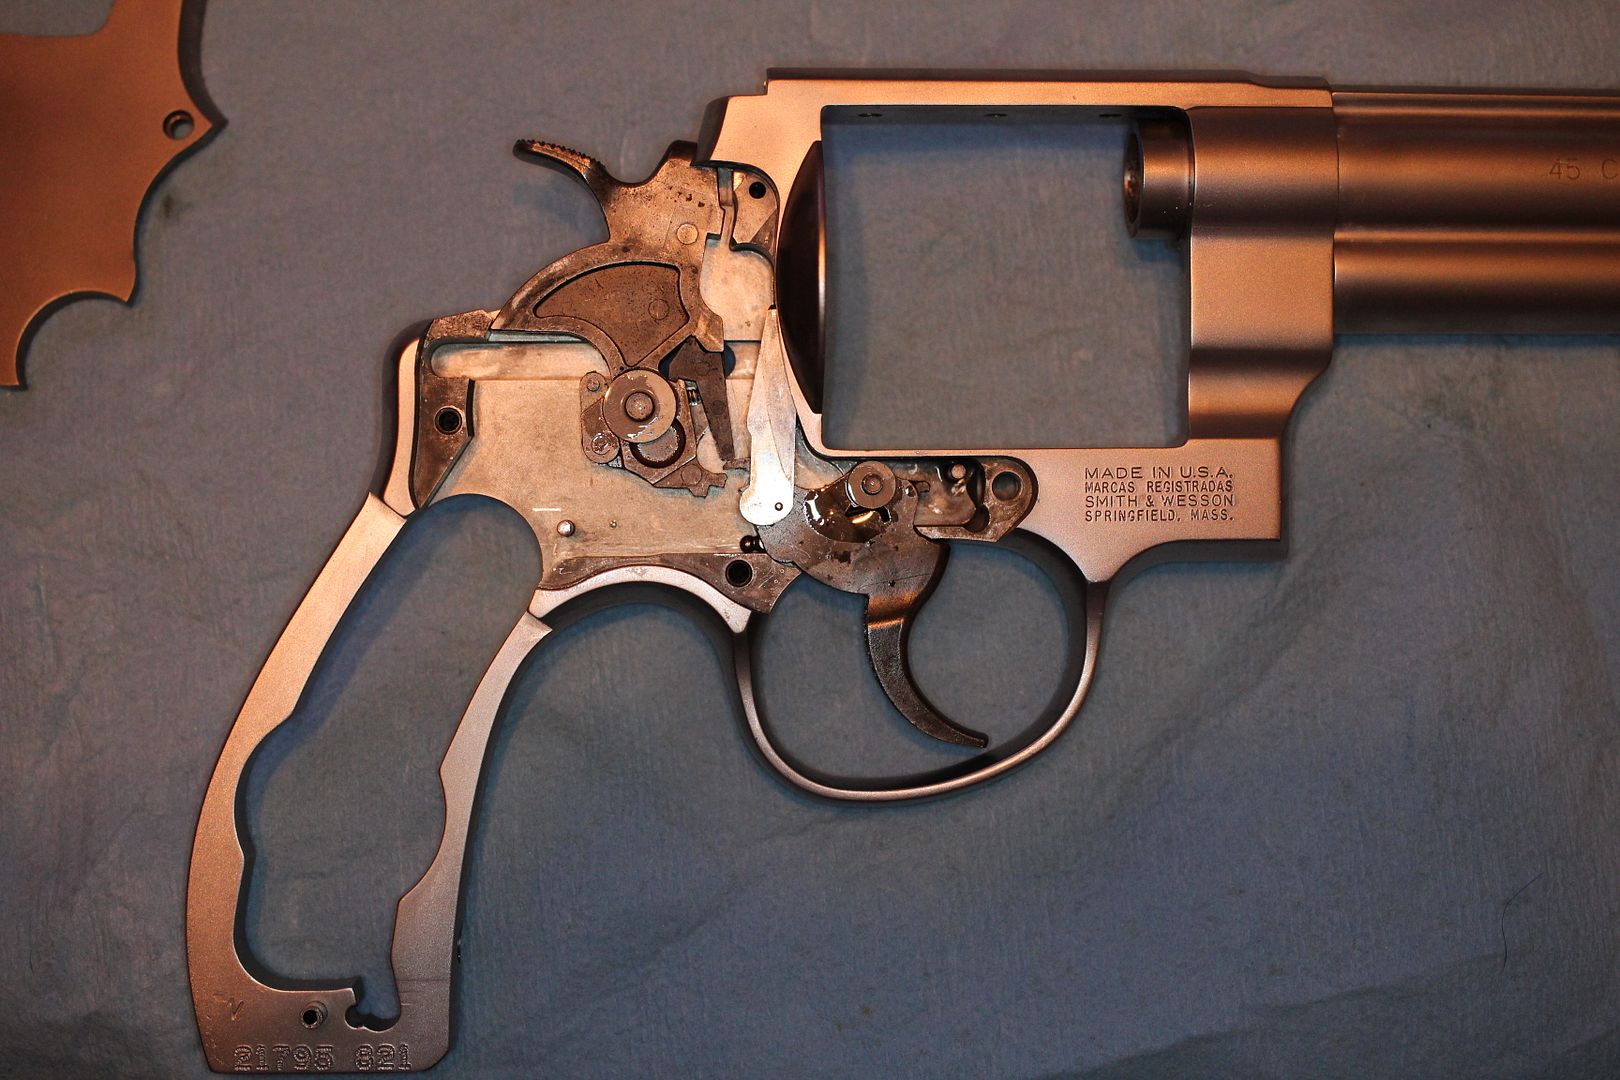
Under the hood, dirty & crusty but, at first glance, everything seems sound mechanically.
A bit banged up on the backstrap,
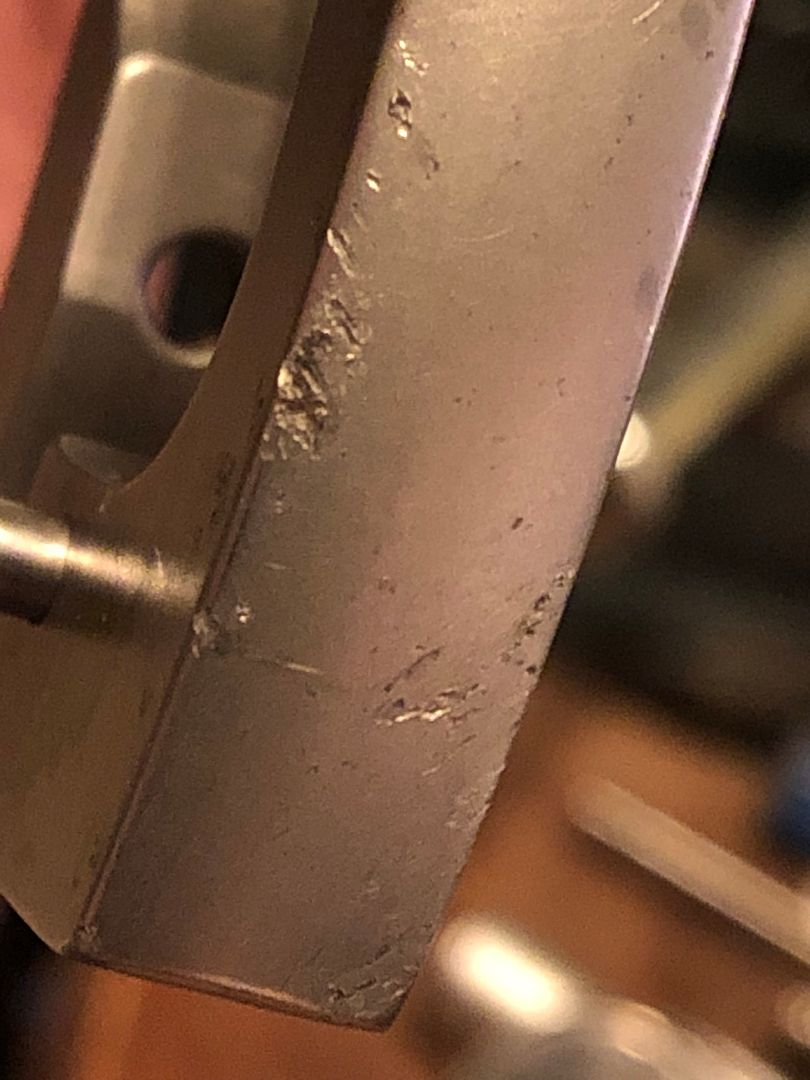
Some dings here right forward of the frame lug,
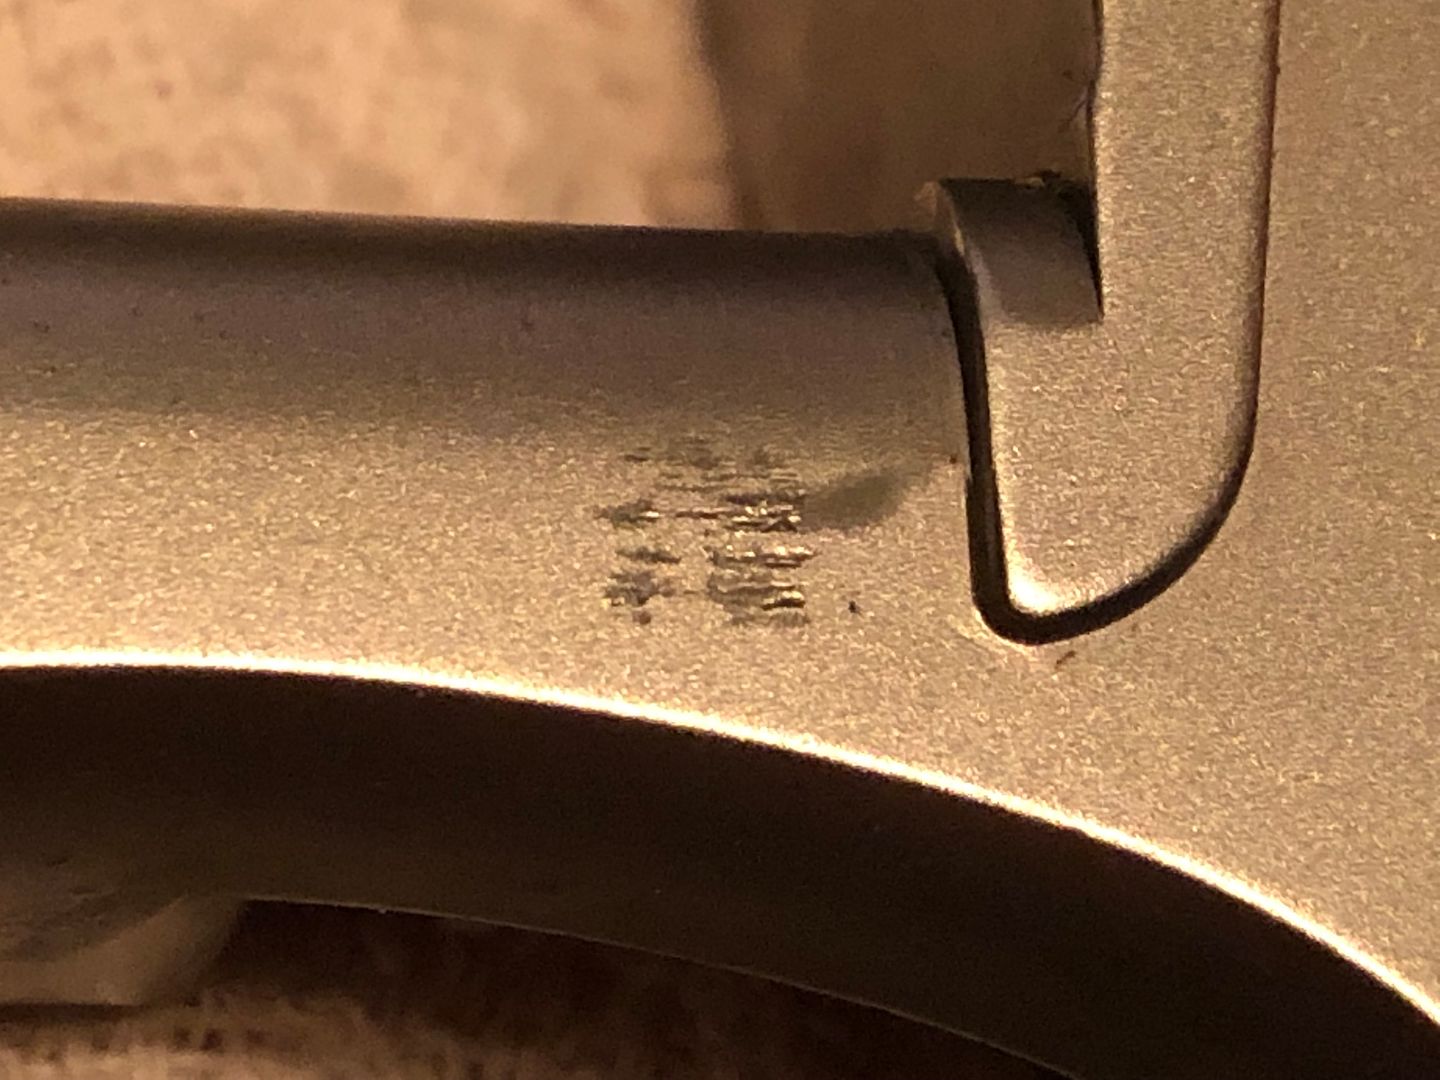
Front sight blade beat up,
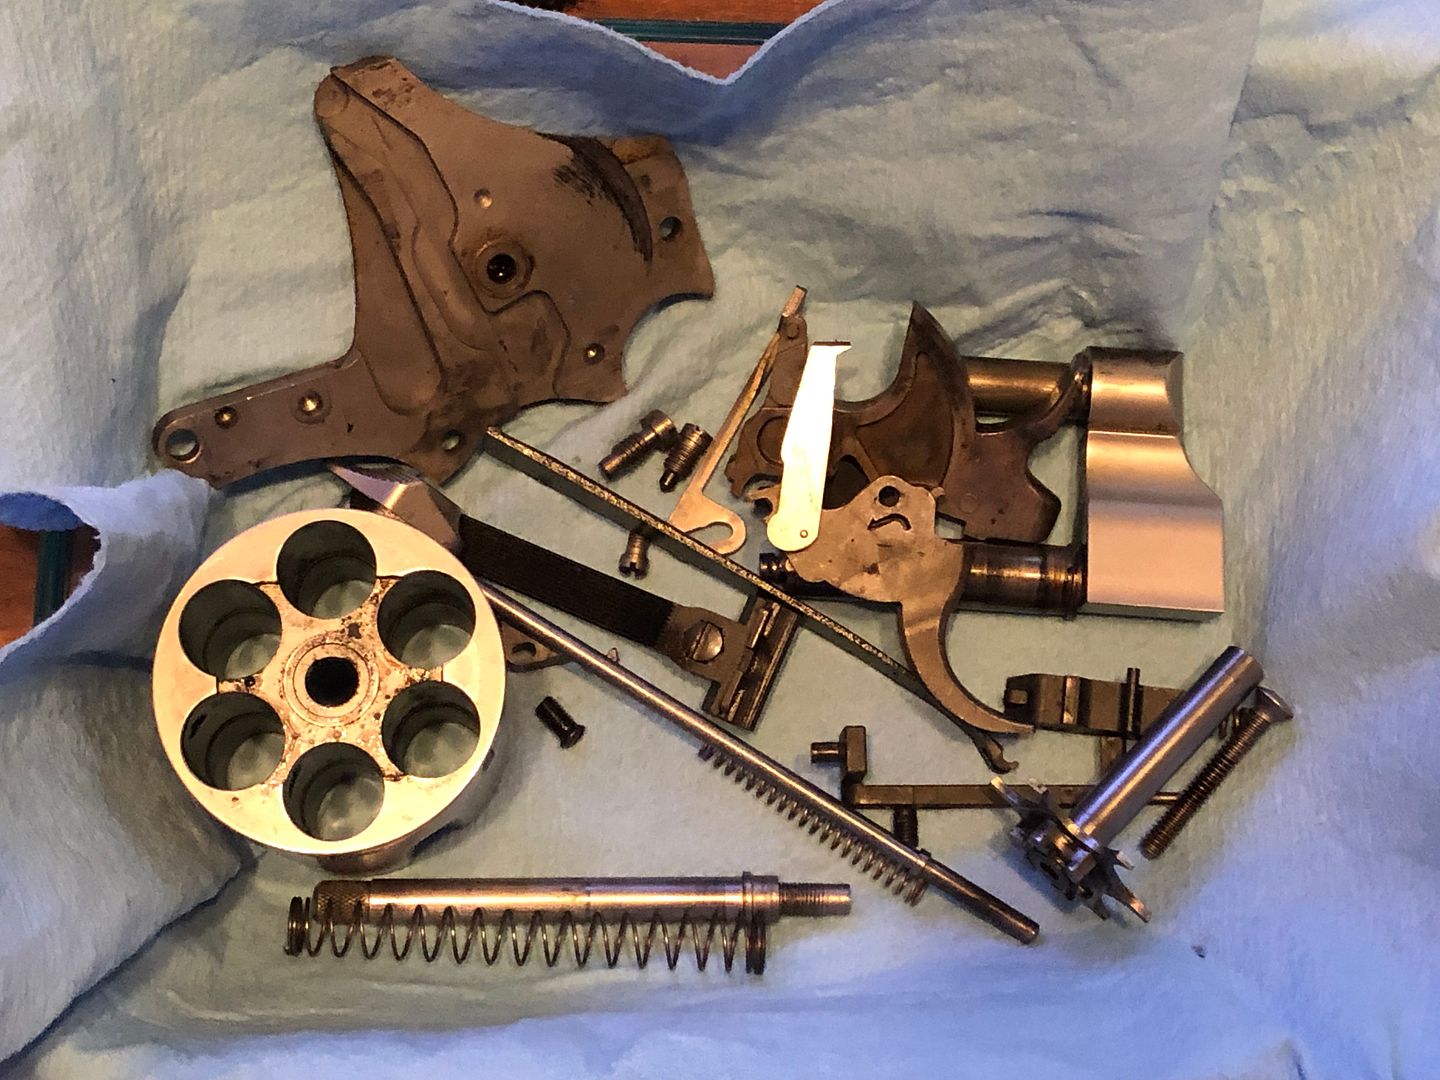
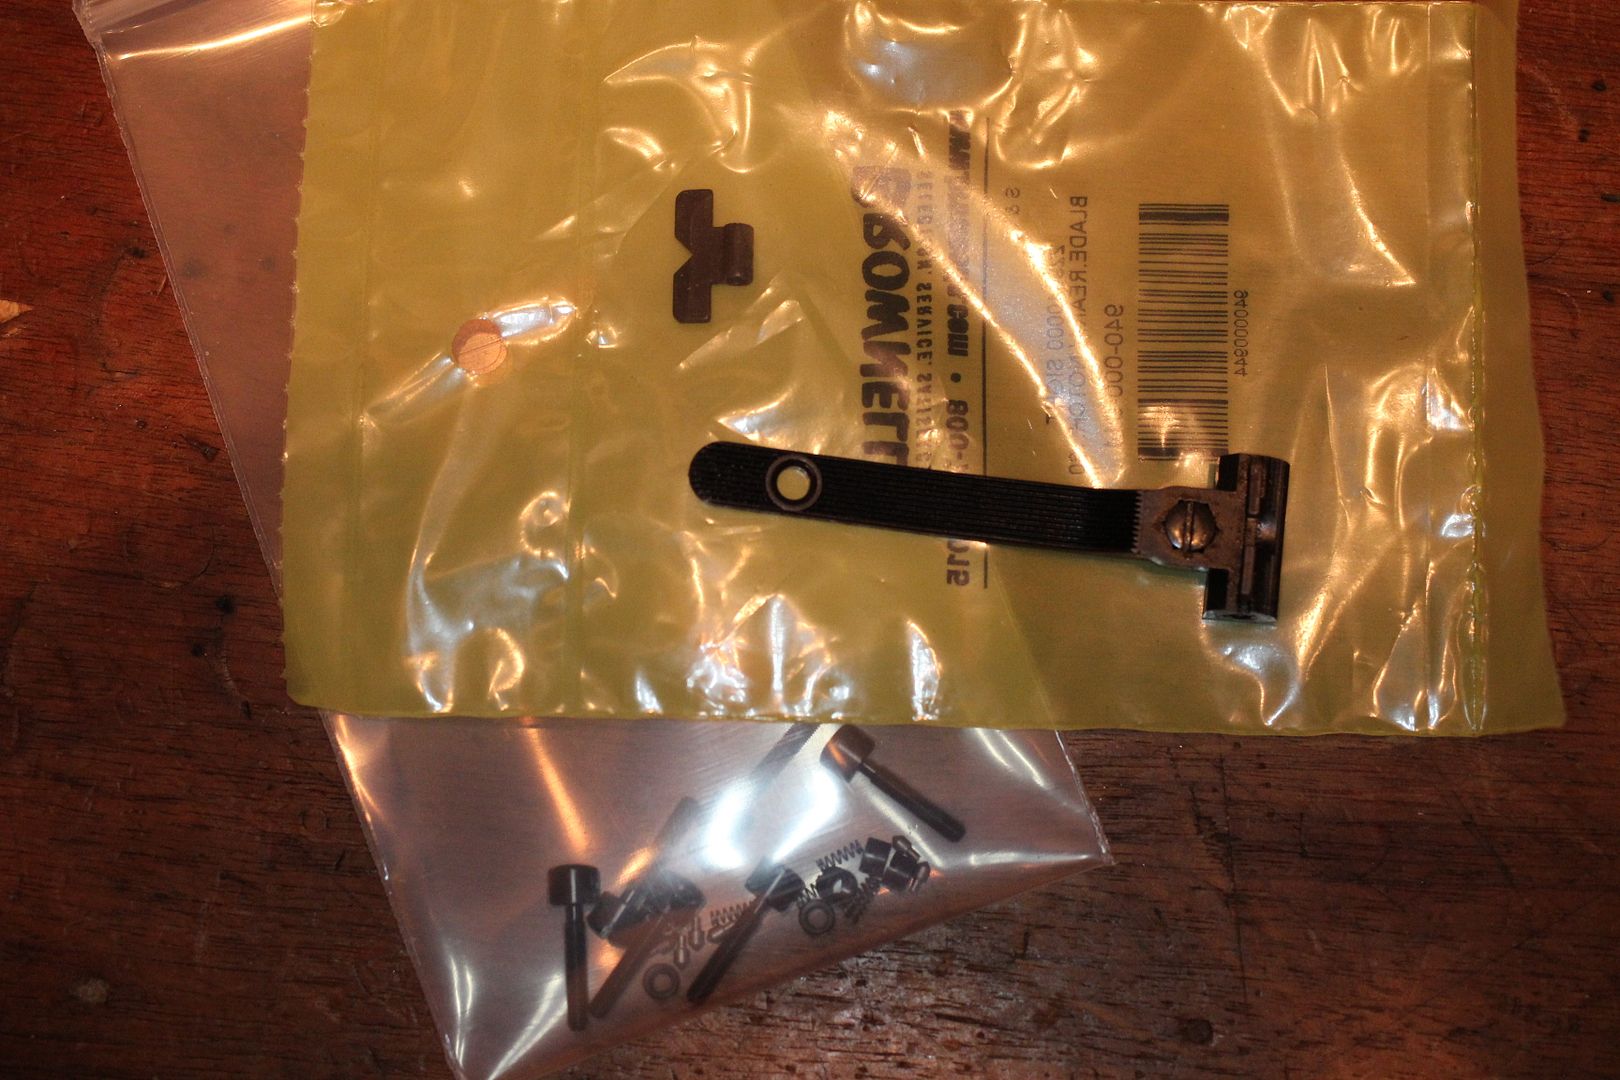
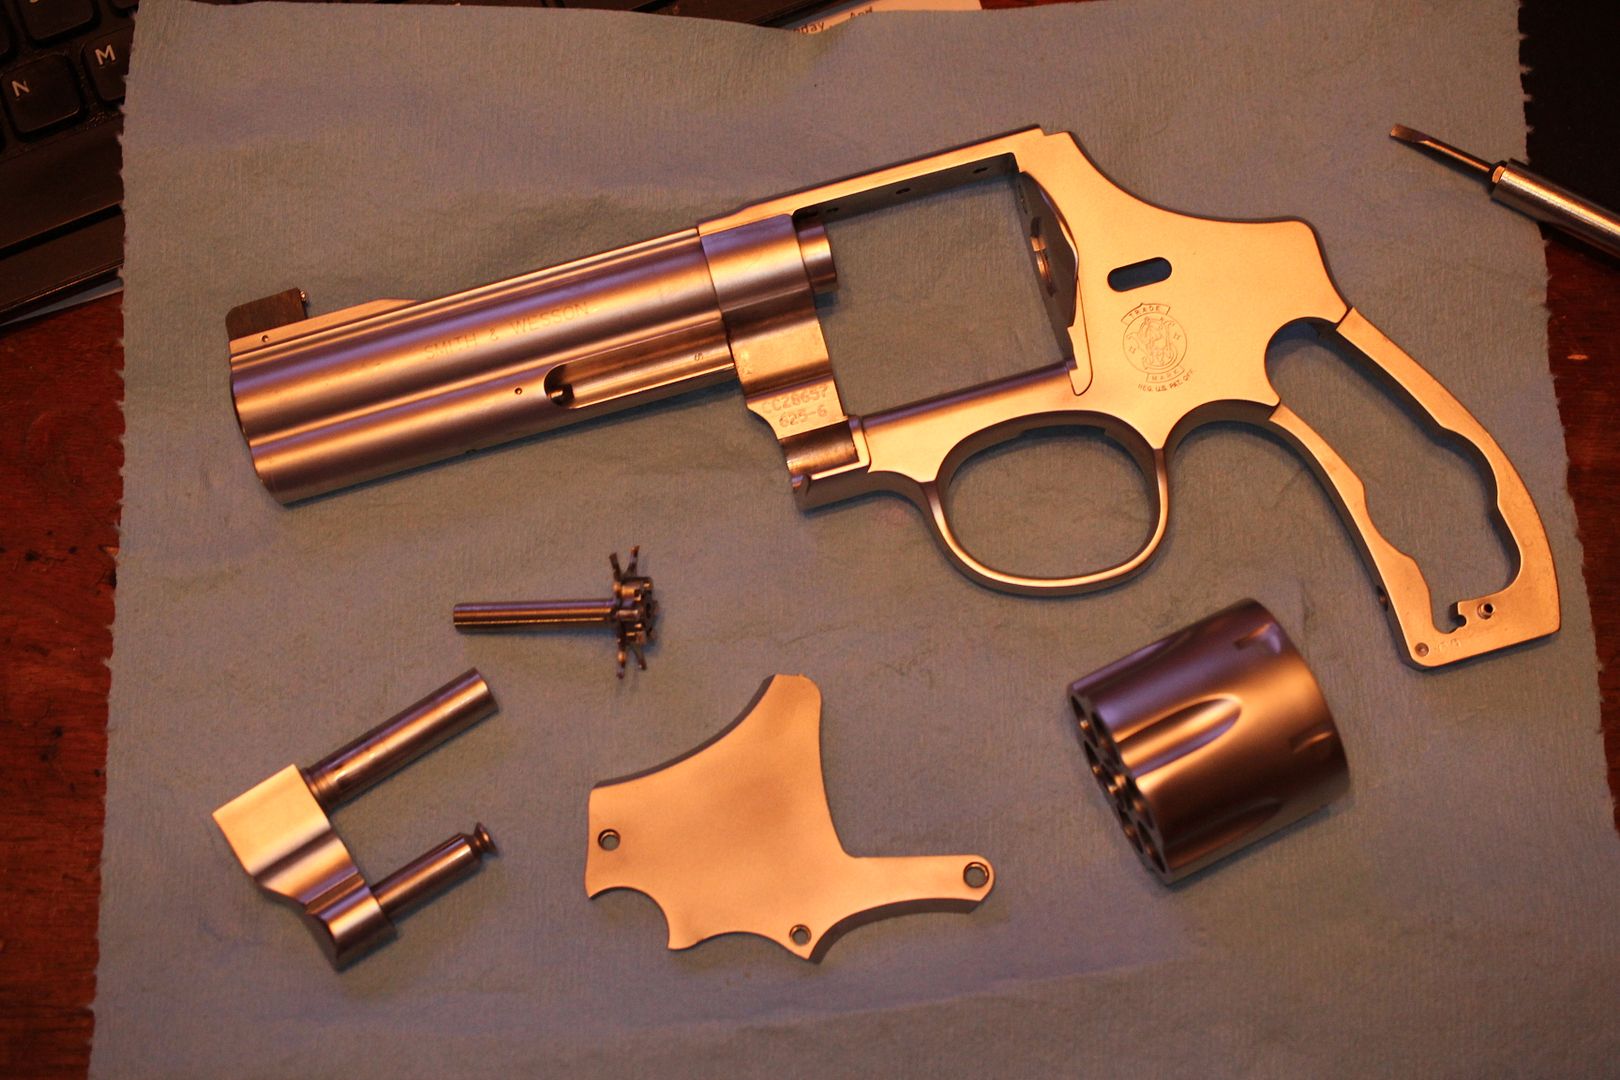
Detail stripped the gun and got this stuff in a dish sprayed down with some Kroil. I'll attend to these bits later on.
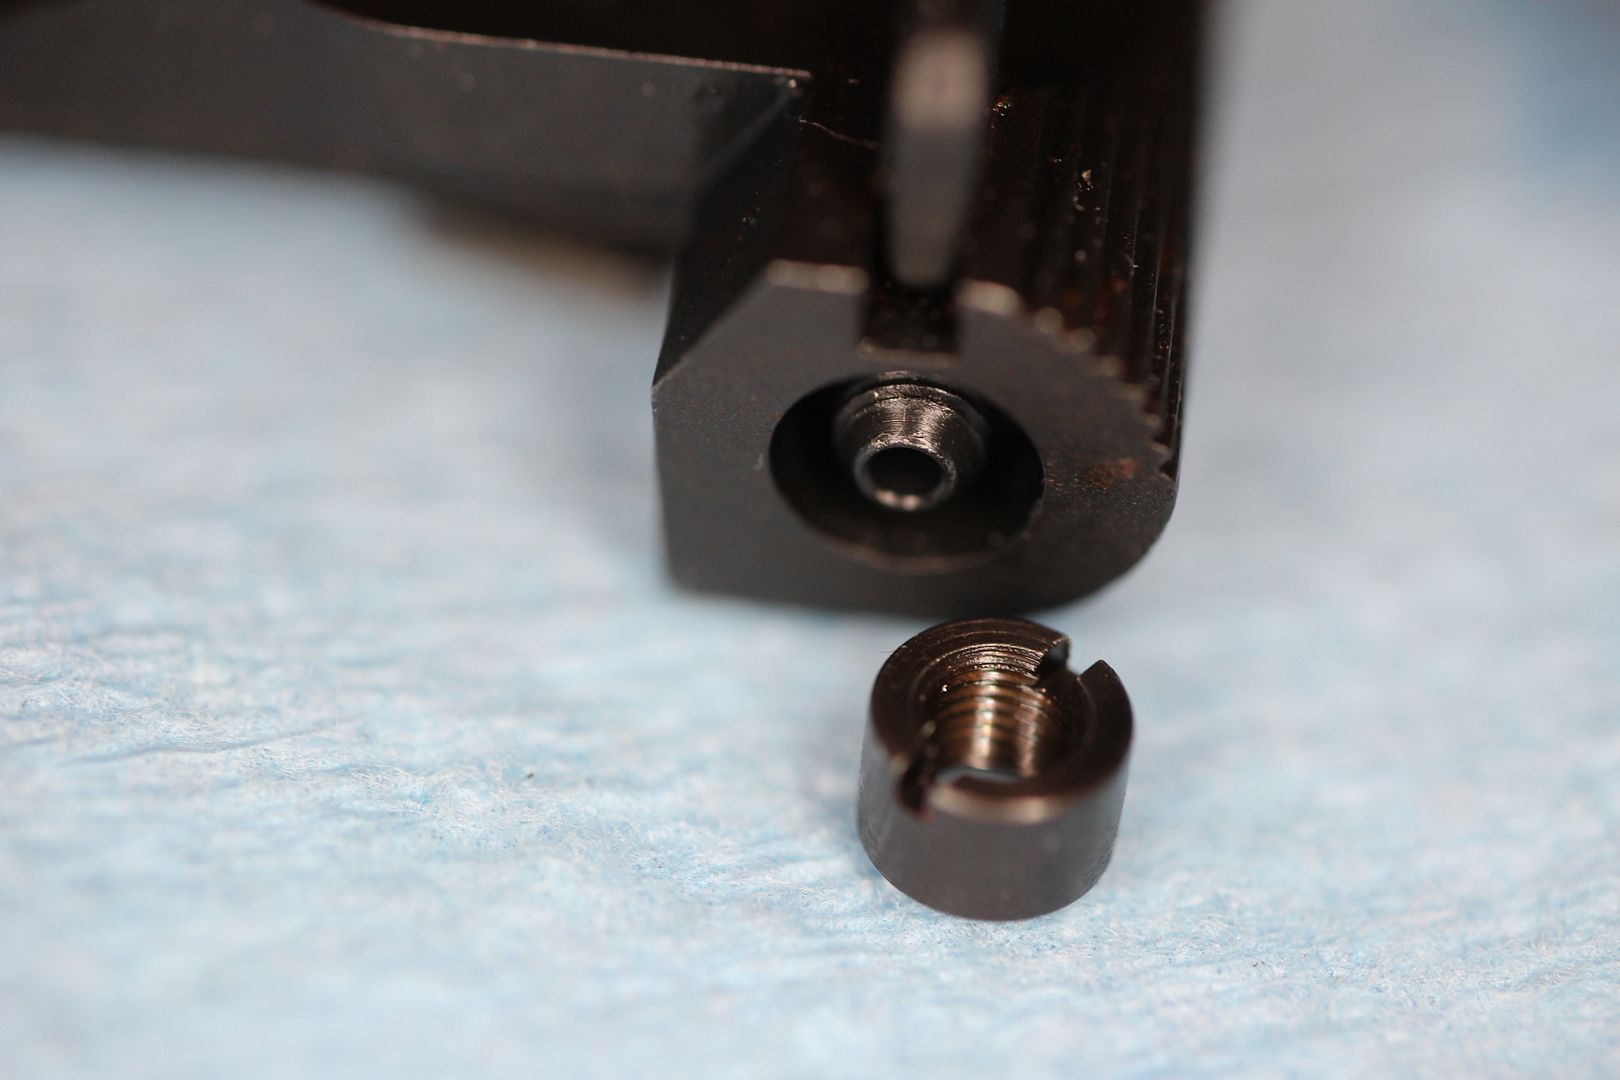
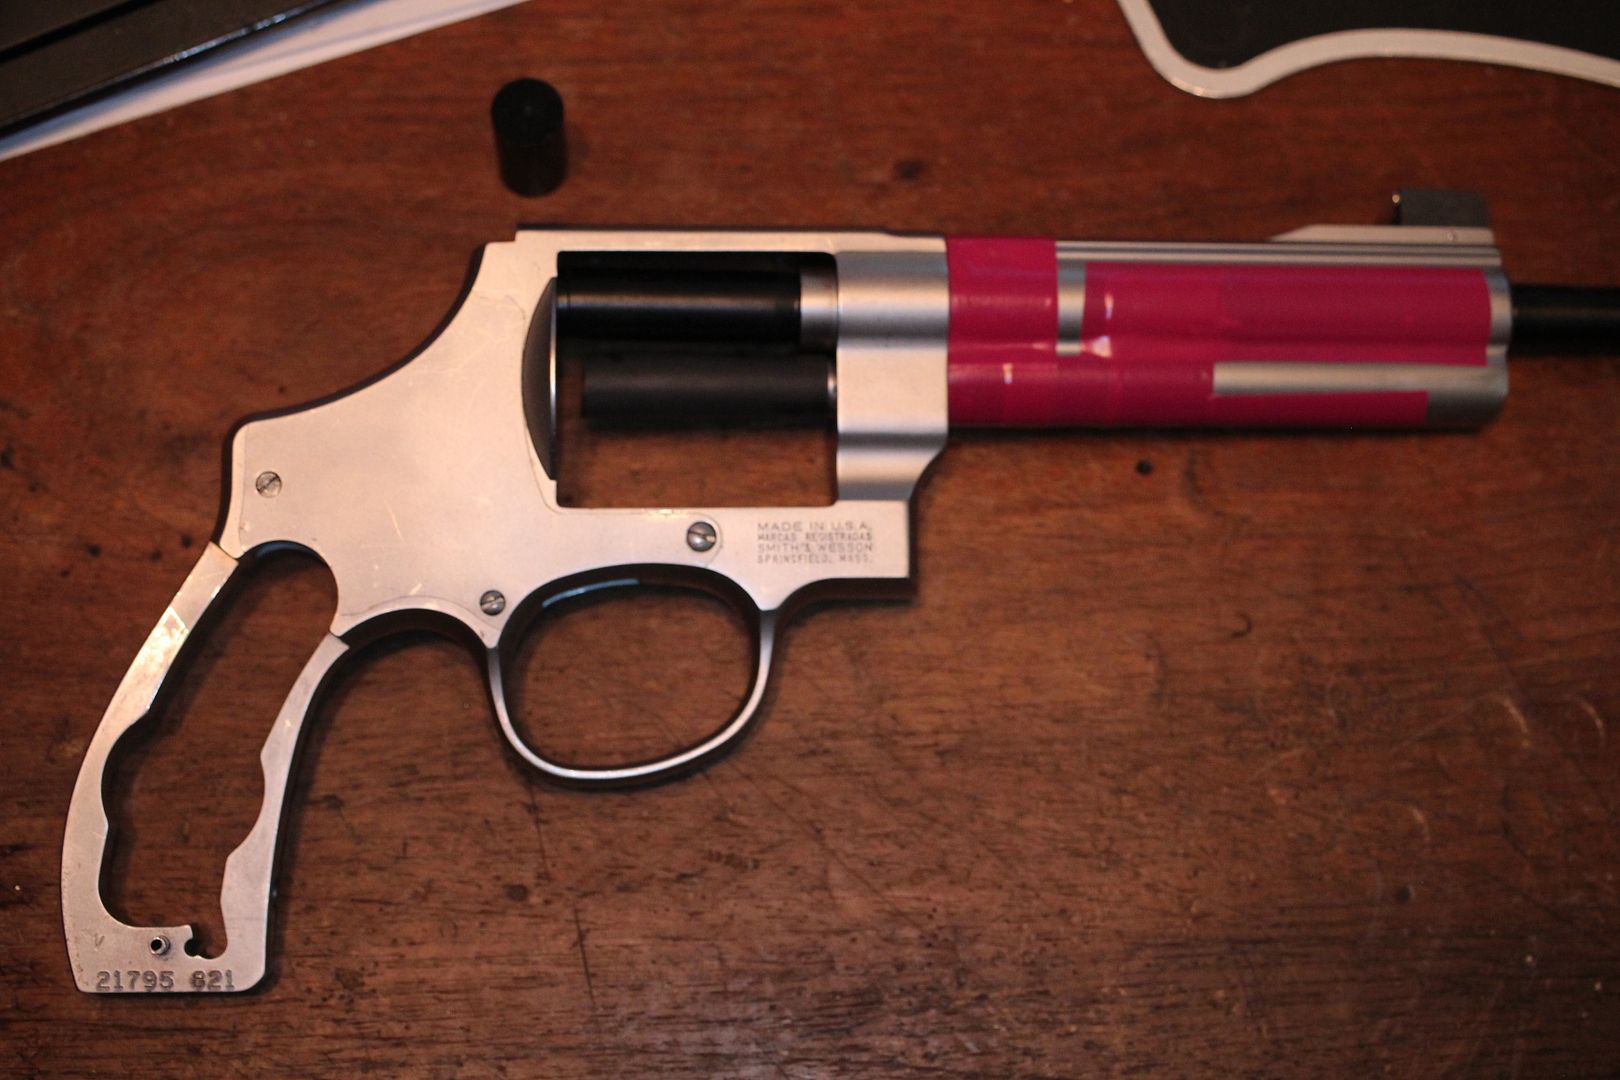
Got the frame/barrel all degreased and cleaned up so I figure I'll start with the front sight. Were gonna bump that damaged blade off of there and replace it with a SDM Gold Bead front.
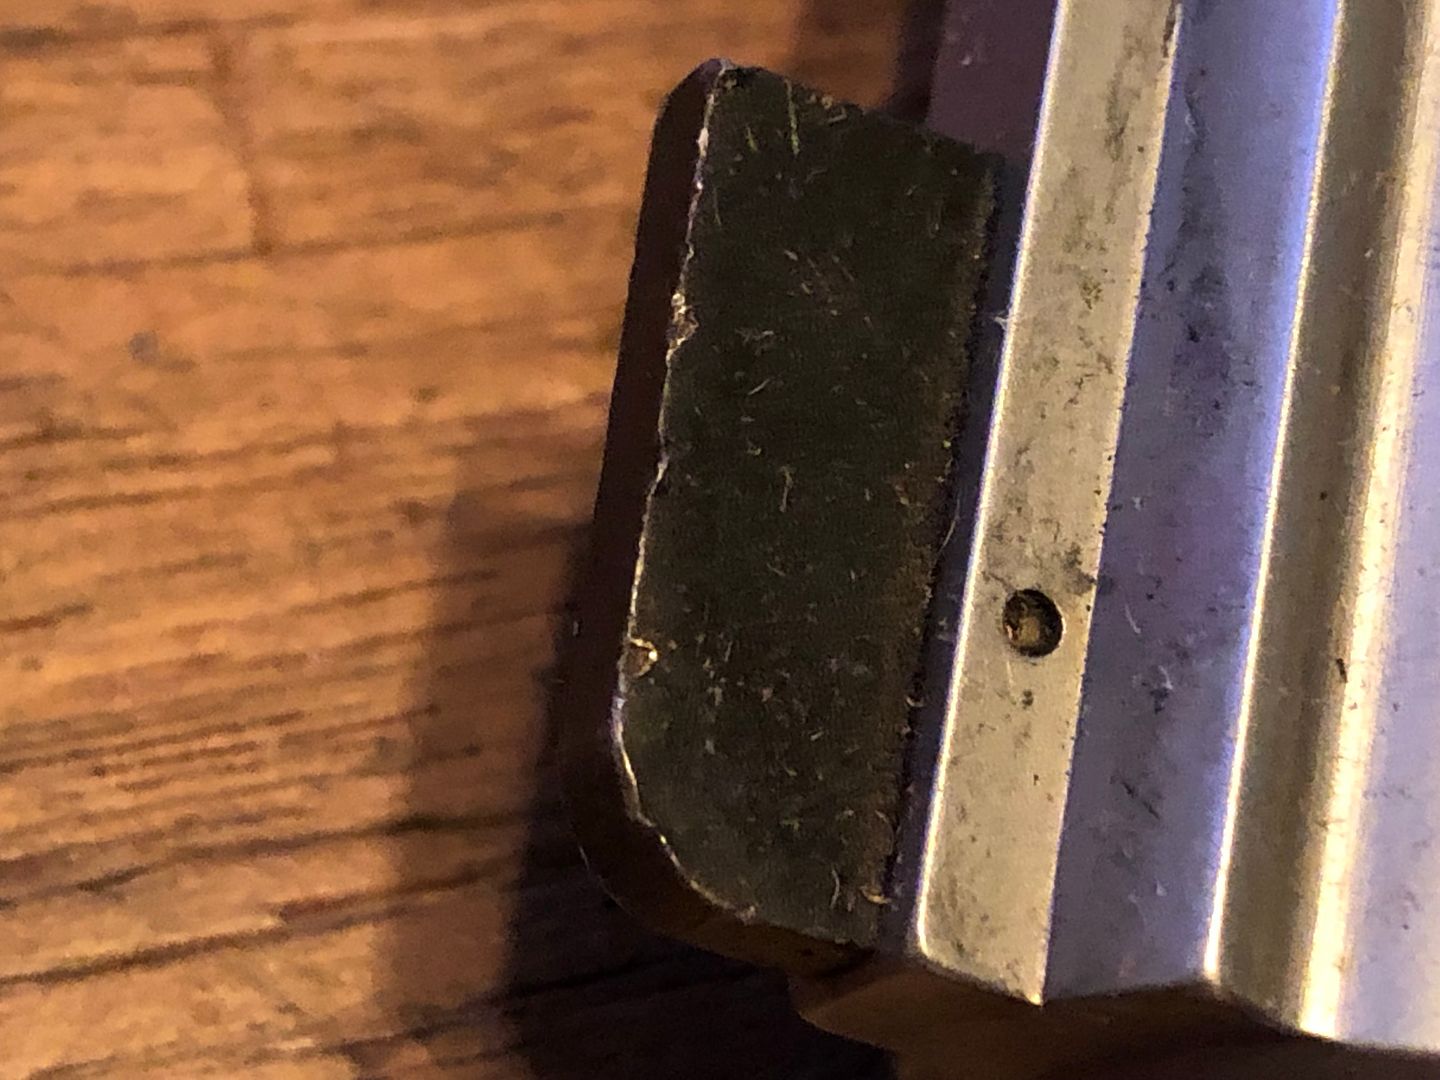
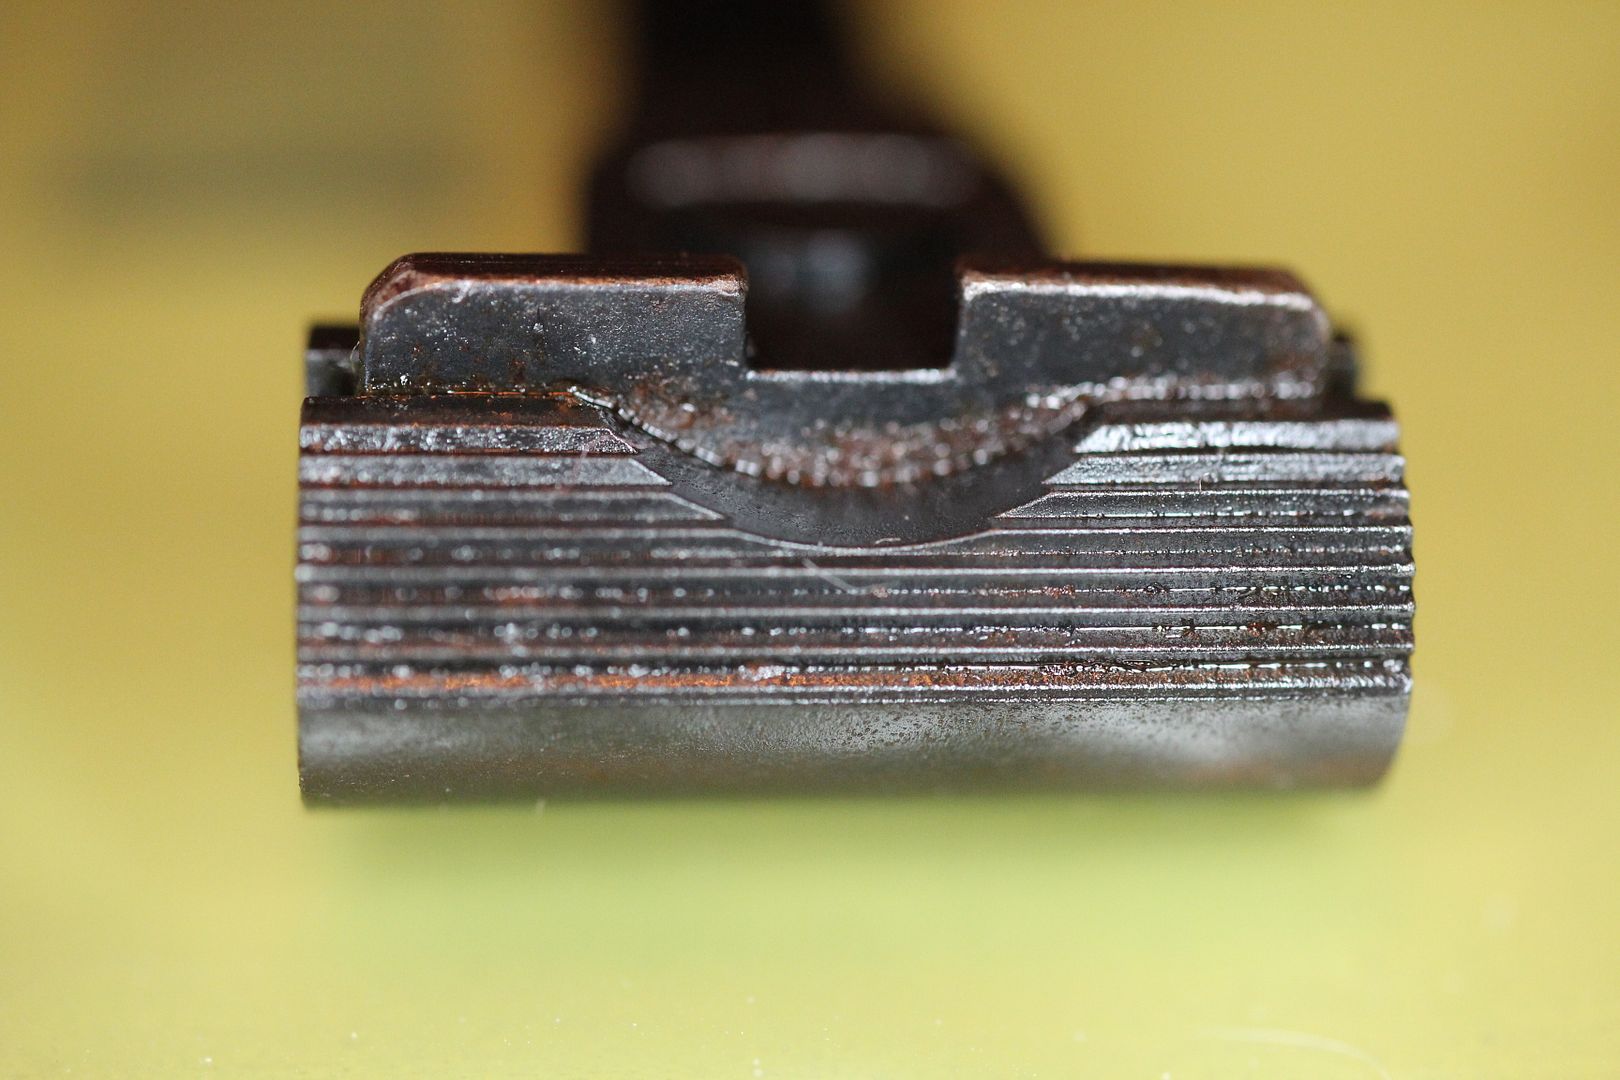
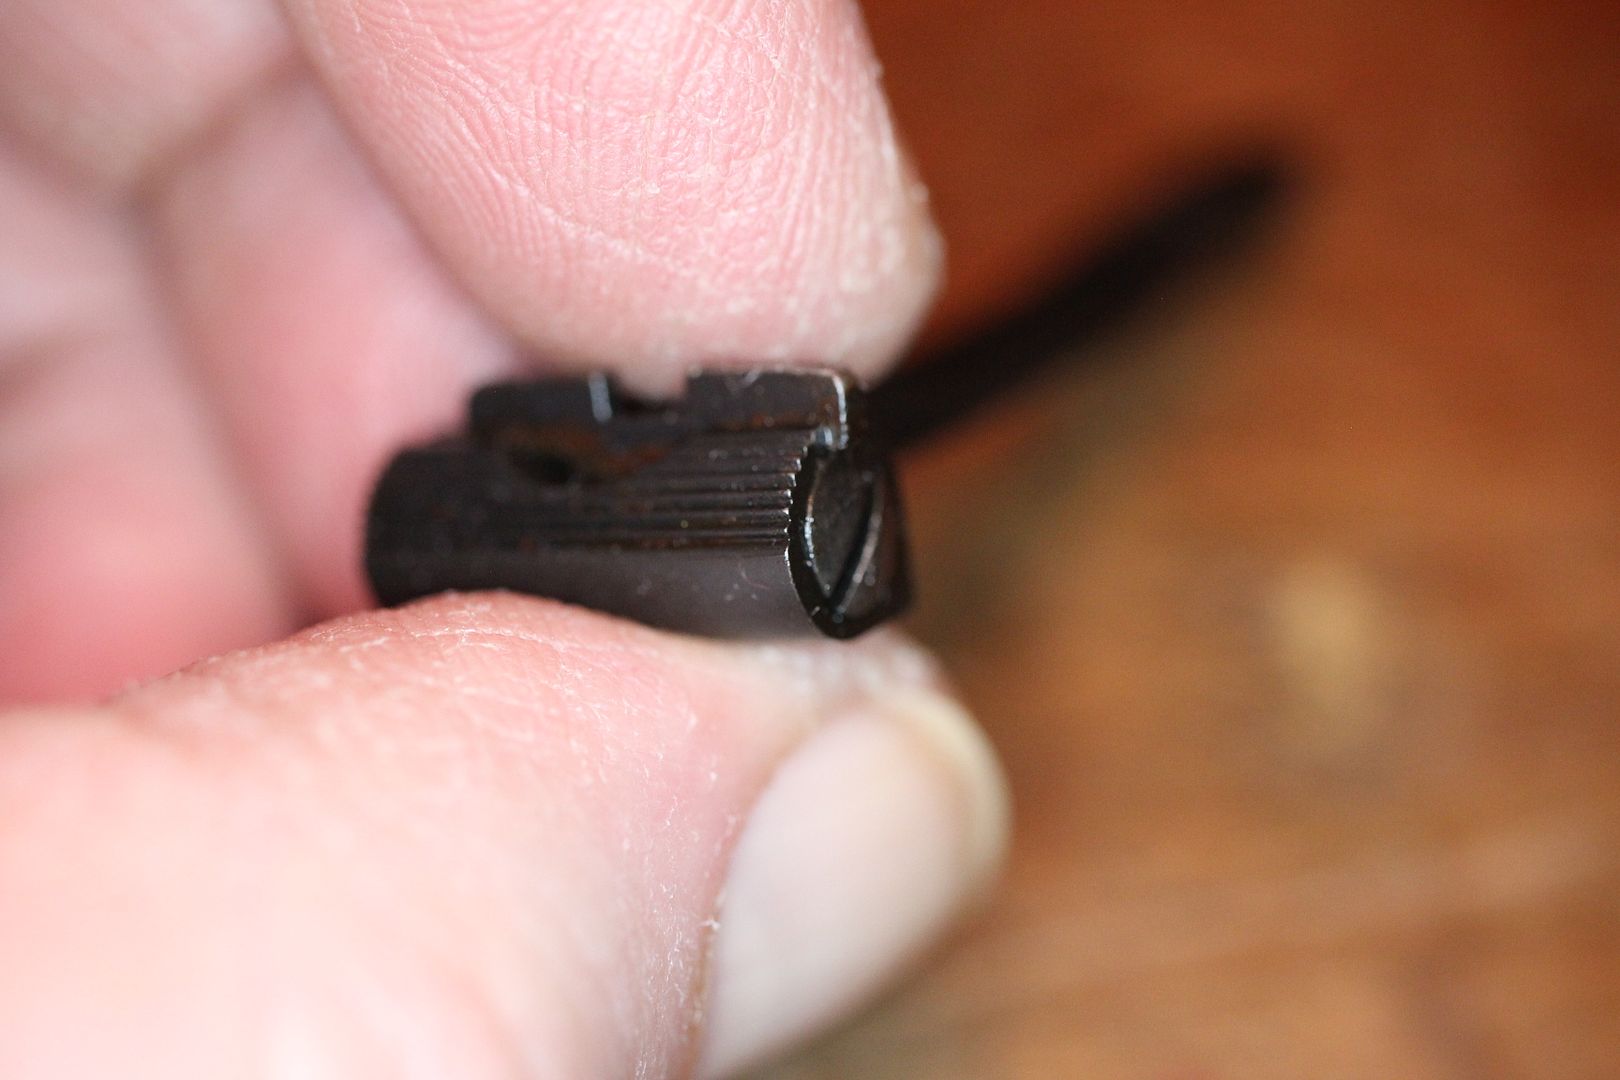
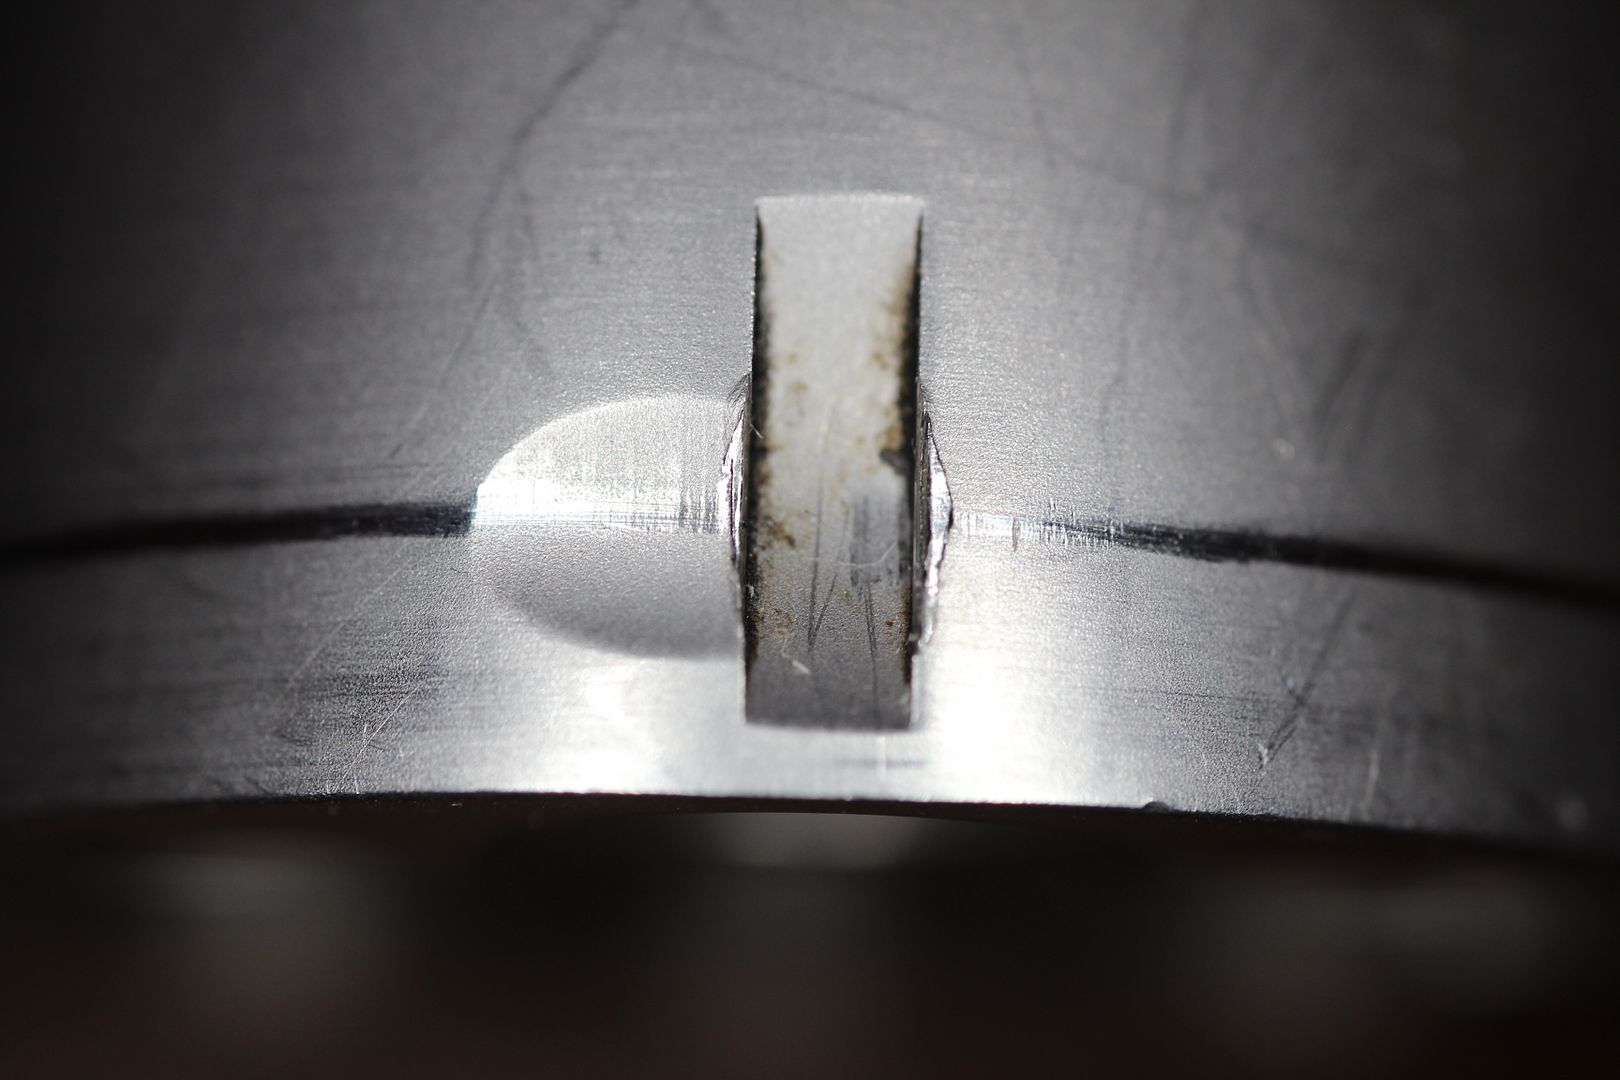
Have a look at the old take off here... Note the tiny bevel on the bottom of the tenon. That's to help get it started into the mortise on the barrel.
New sights aren't beveled like that nor do they have a hole drilled.
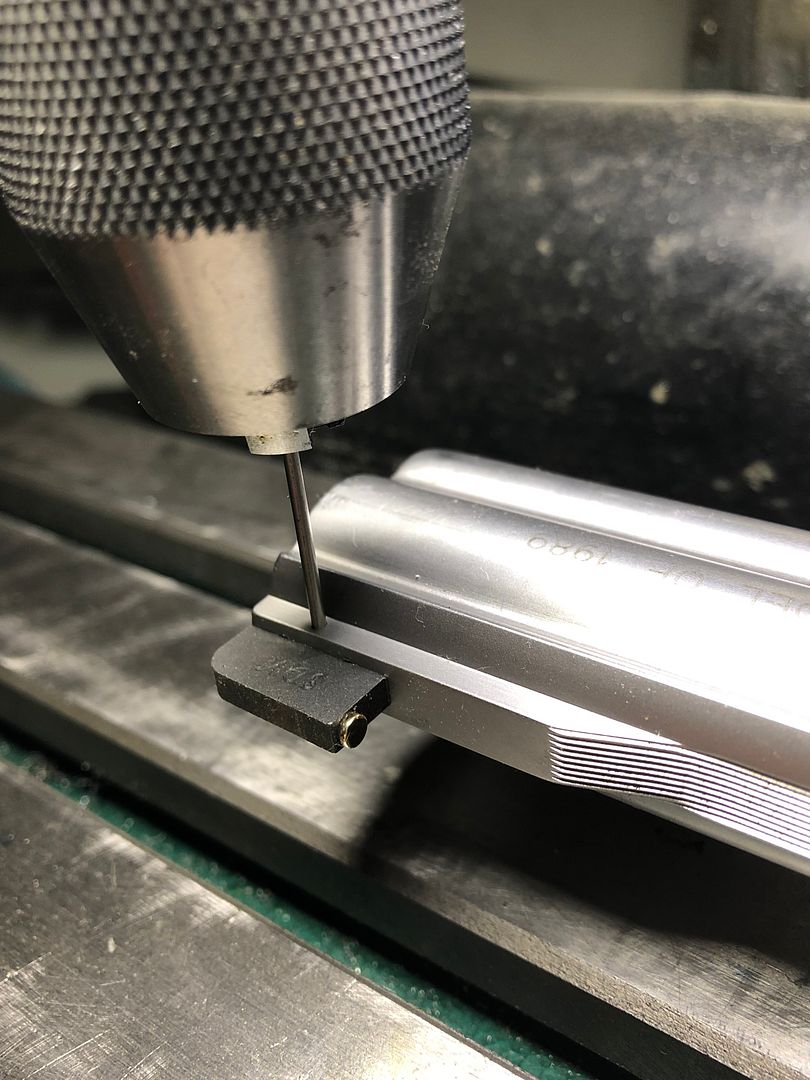
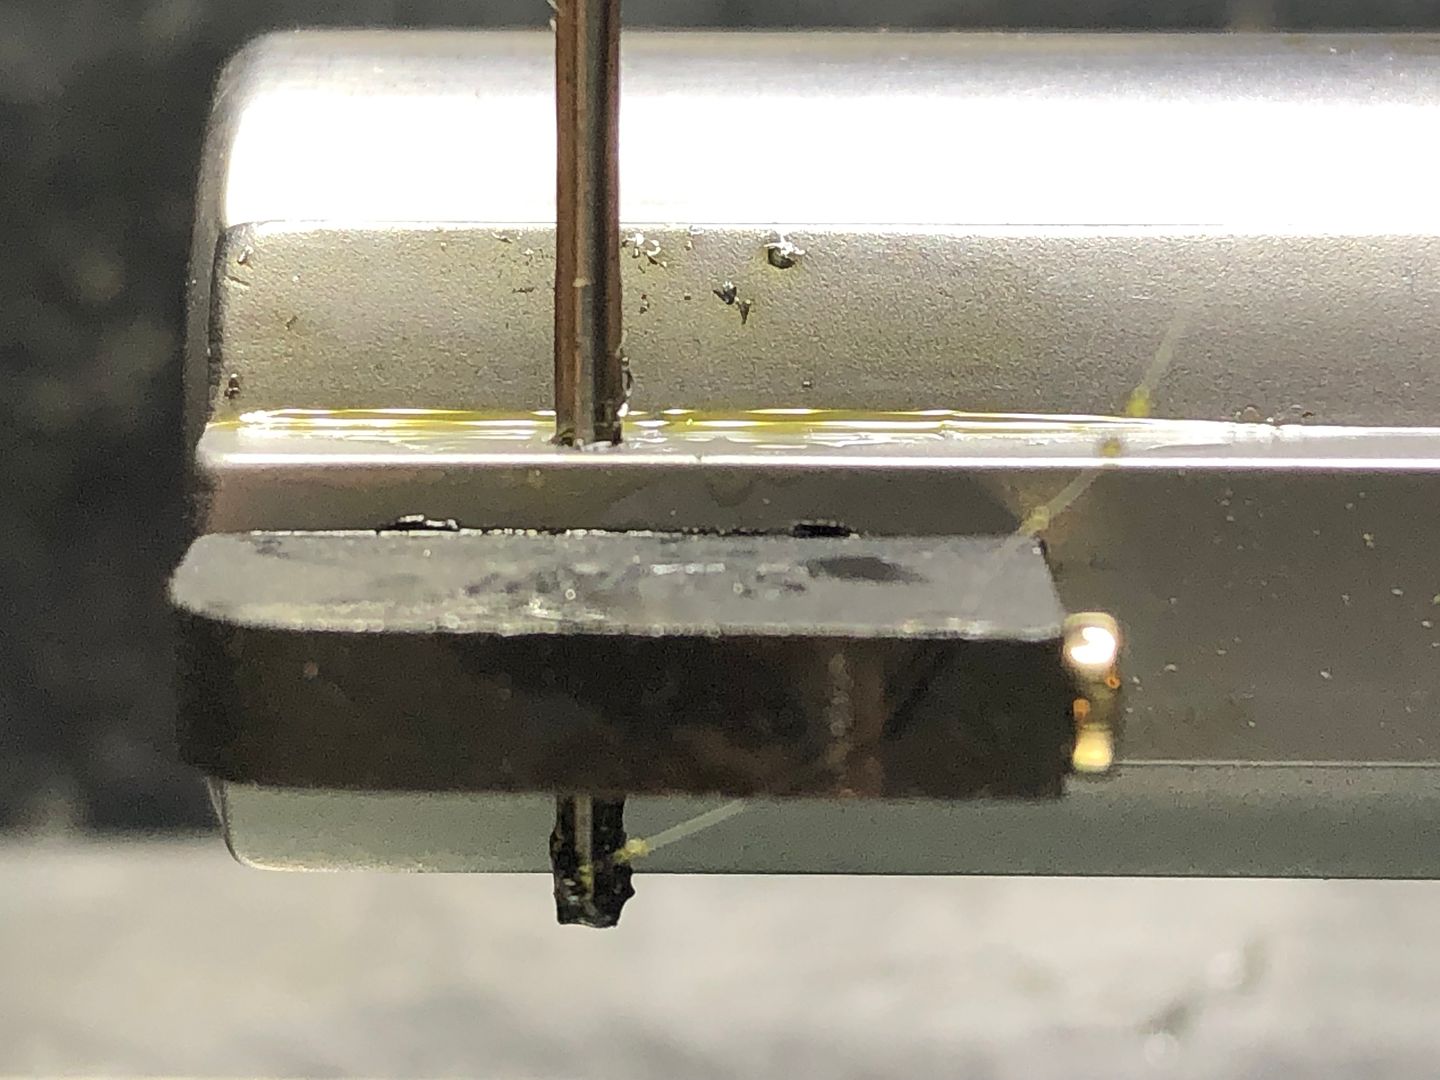
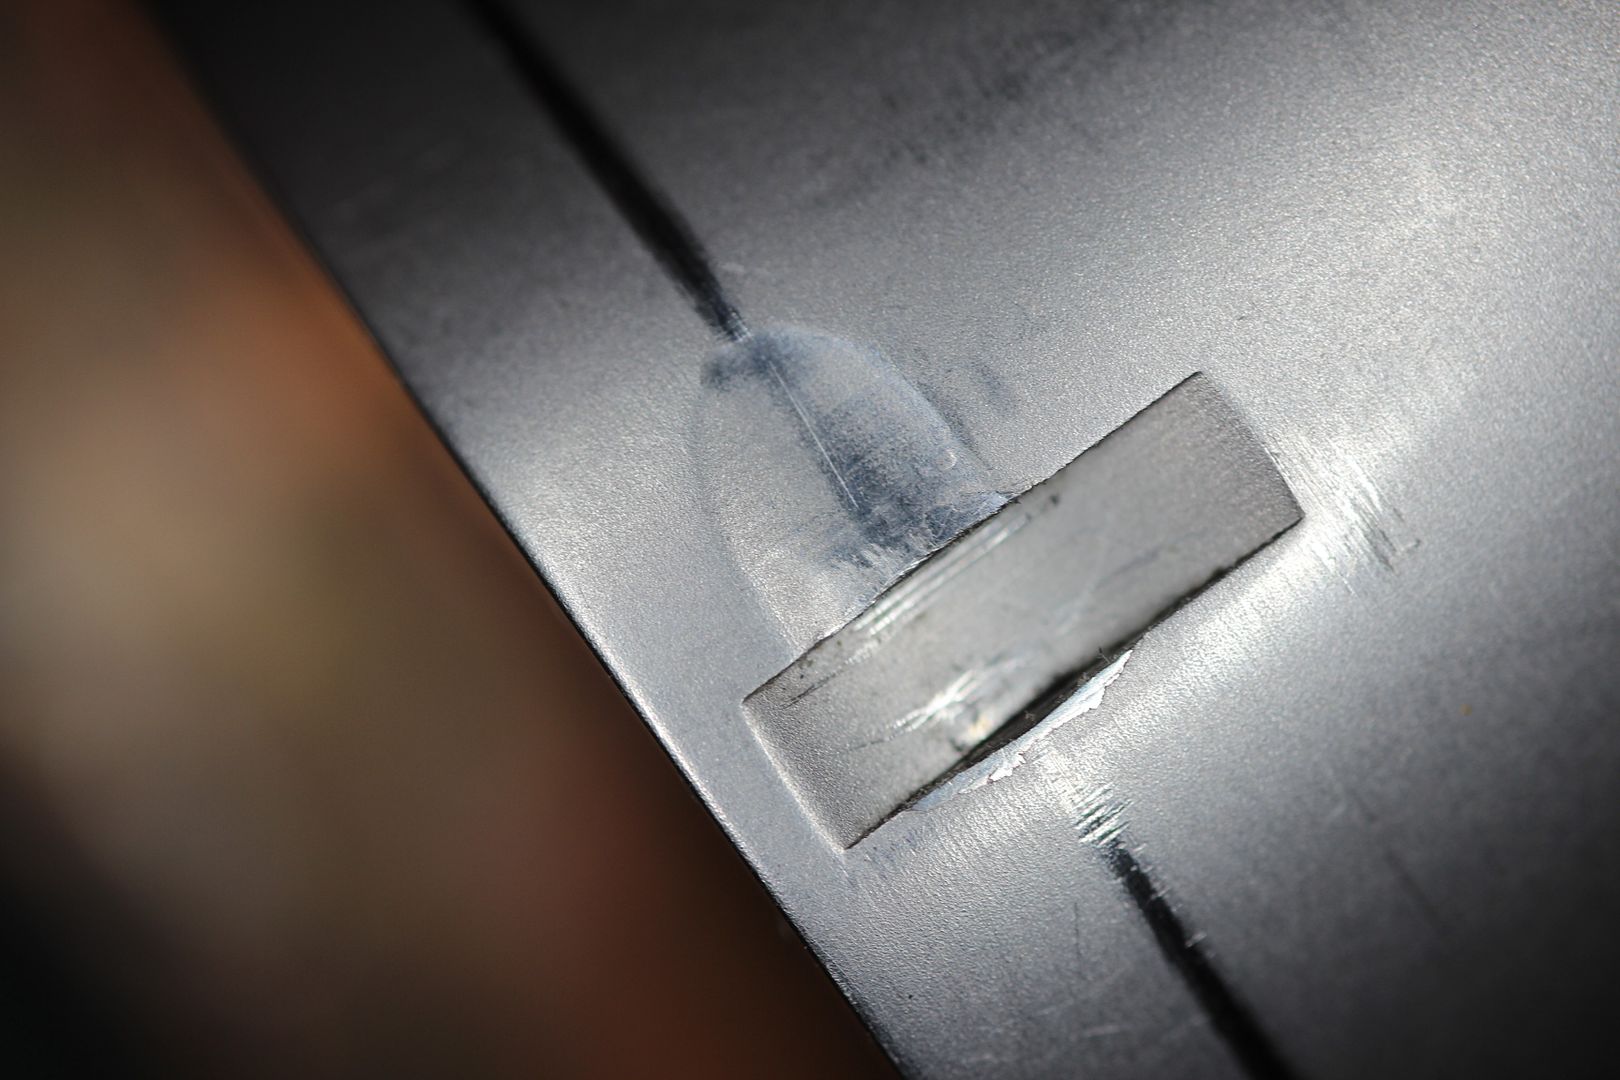
So, what I've done is file a tiny bevel on the tenon of the new blade then mashed it into the mortise. Now the whole thing in fixtured on the mill table since we have to drill the hole in the tenon through the existing holes in the mortise.
Now to make sure we get a perfectly round hole and don't enlarge the existing holes any we're going to poke that hole undersize then finish it with a reamer.
The existing holes in the mortise are #54 or .055" in diameter so what we do here is take a #54 drill bit upside down in the chuck and use the shank to align the hole dead under the spindle then lock the table down.
Now that everything is lined up we take a #55 drill bit which is .052" diameter and drill into the tenon about .070" or a little past halfway through.
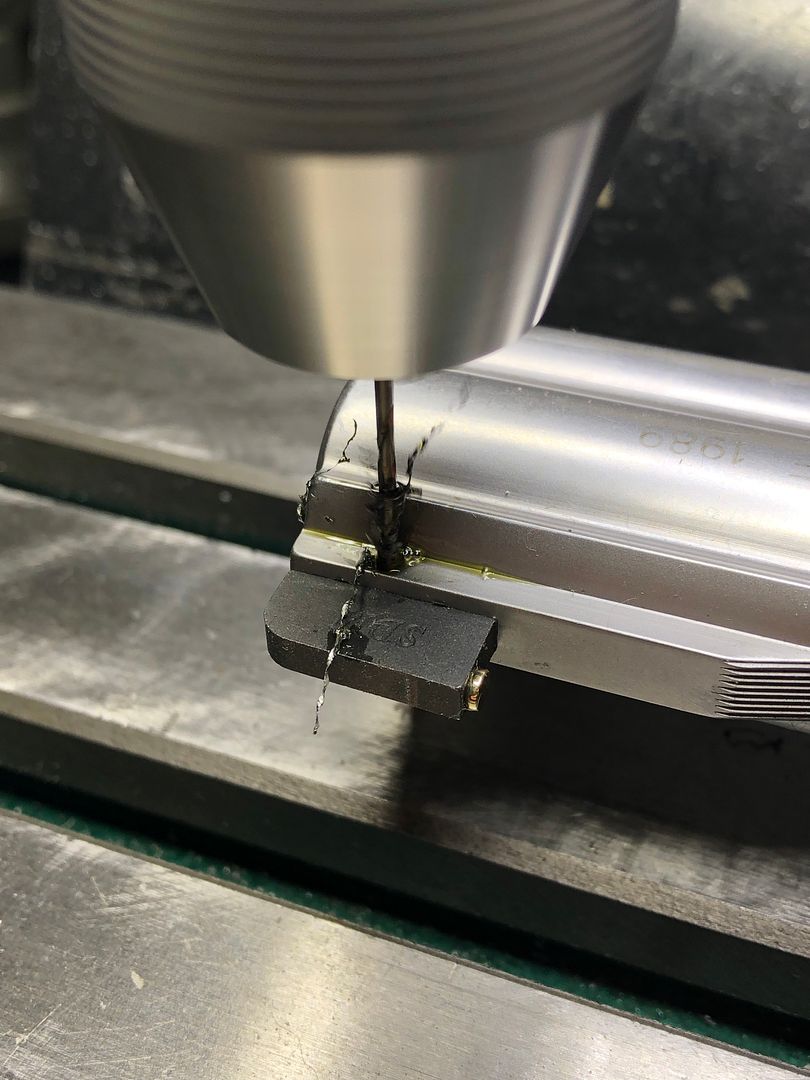
Flip the thing over, repeat the alignment and finish drilling the undersize hole from the other side.
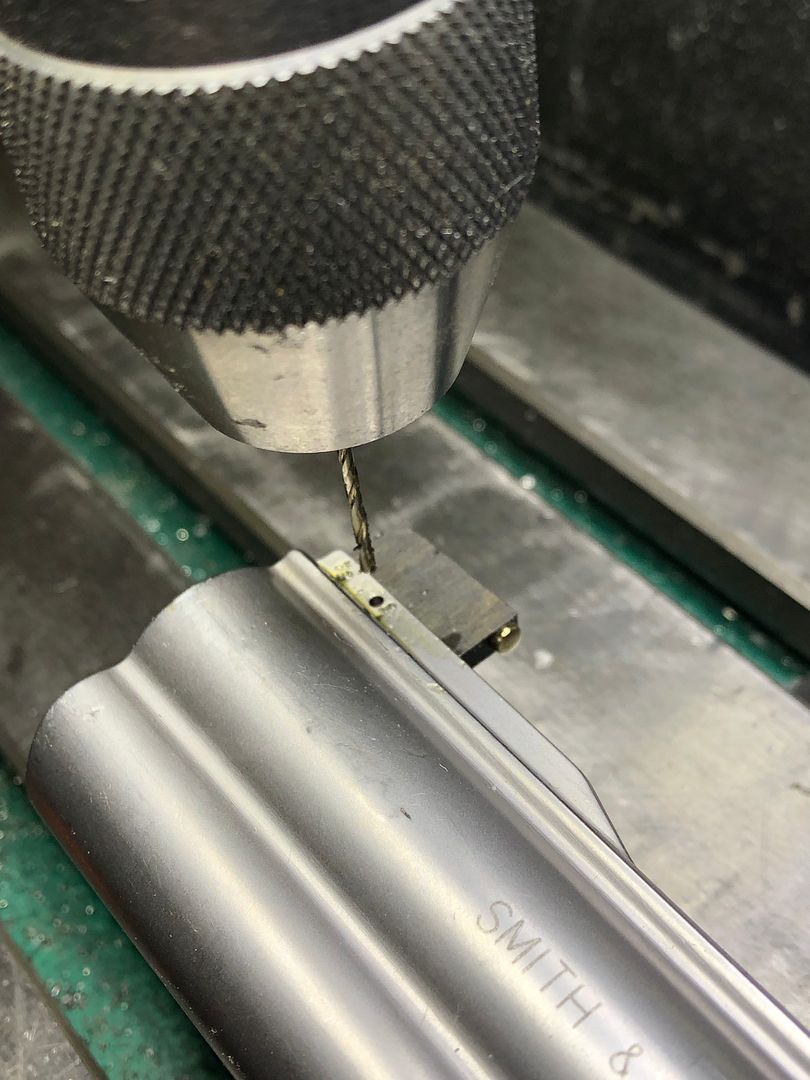
Now to finish that hole to correct size we use this #54 chucking reamer.
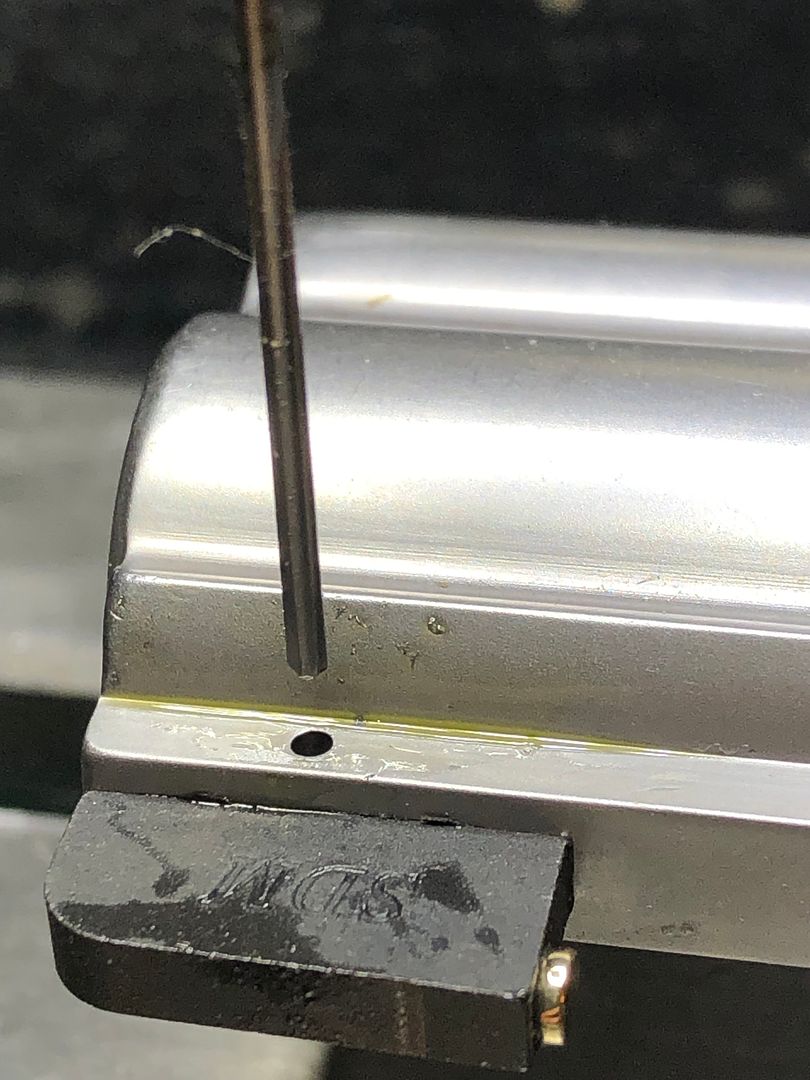
A little splash of cutting oil with the tool turning about 200rpm and we have a perfectly round hole exactly to size.
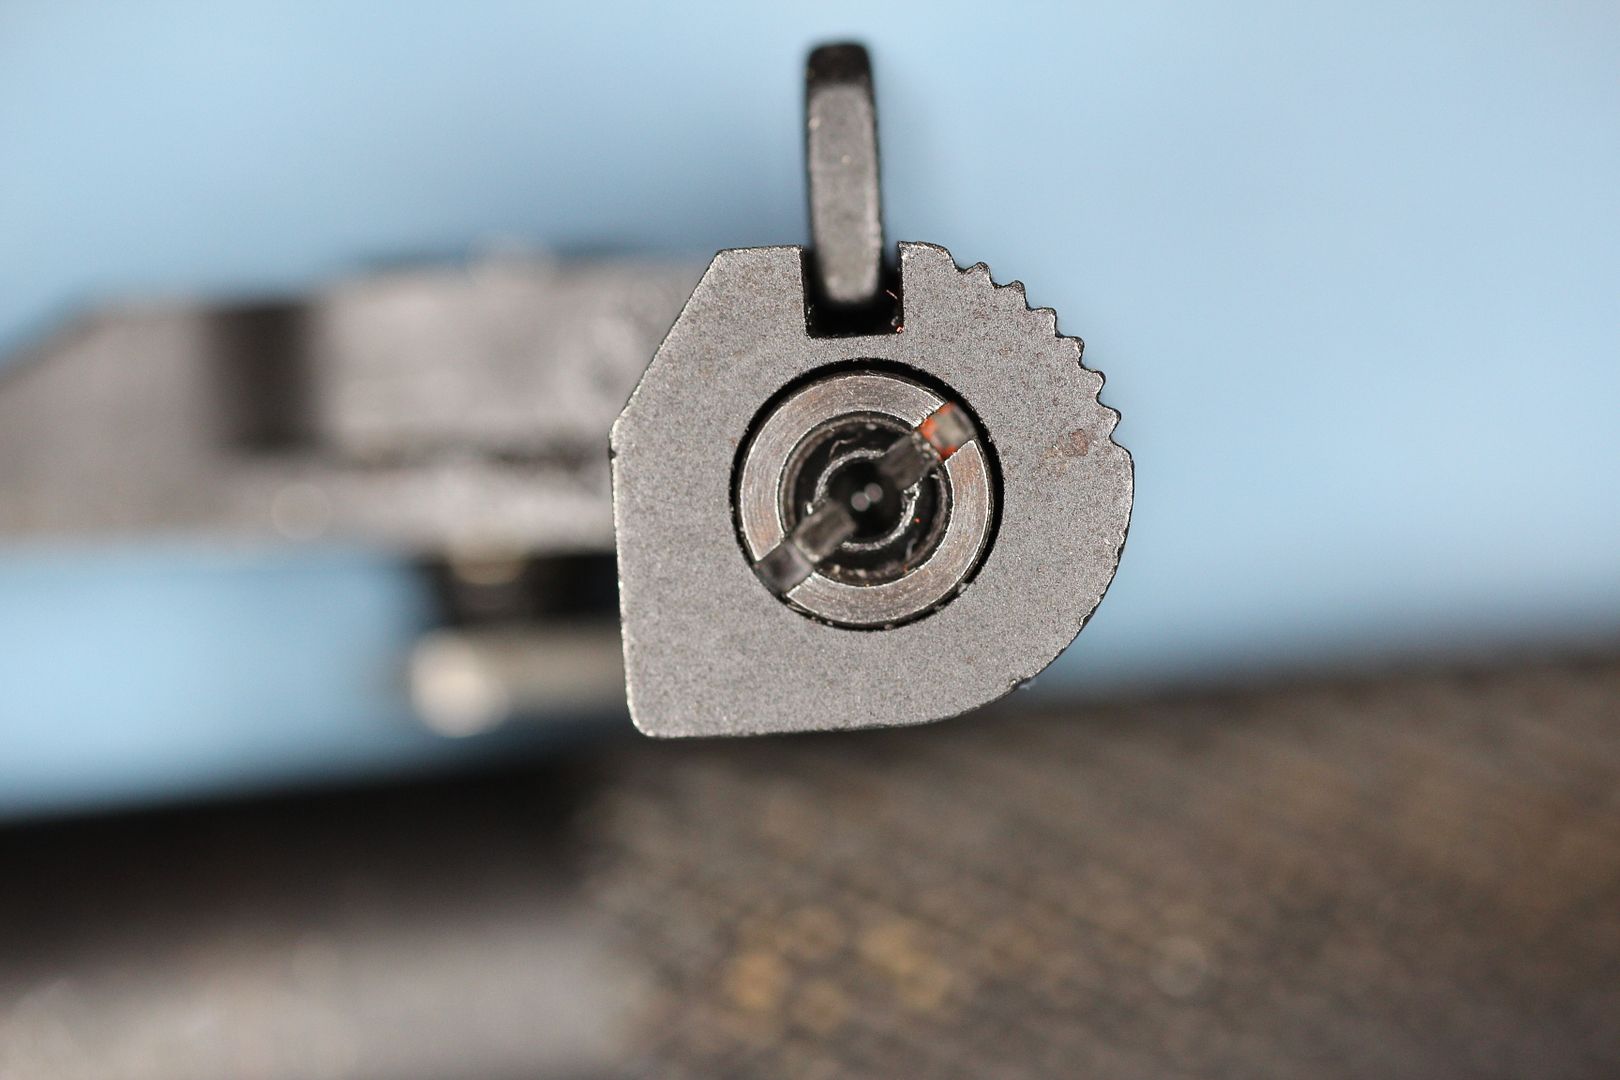
All that was the easy part. Now we're back at the bench. Hole is clean & de-greased. Using a #2 cup tip punch & hammer, have to get that tiny pin in there without having it shoot across the room nor leaving any peckertracks on the gun.
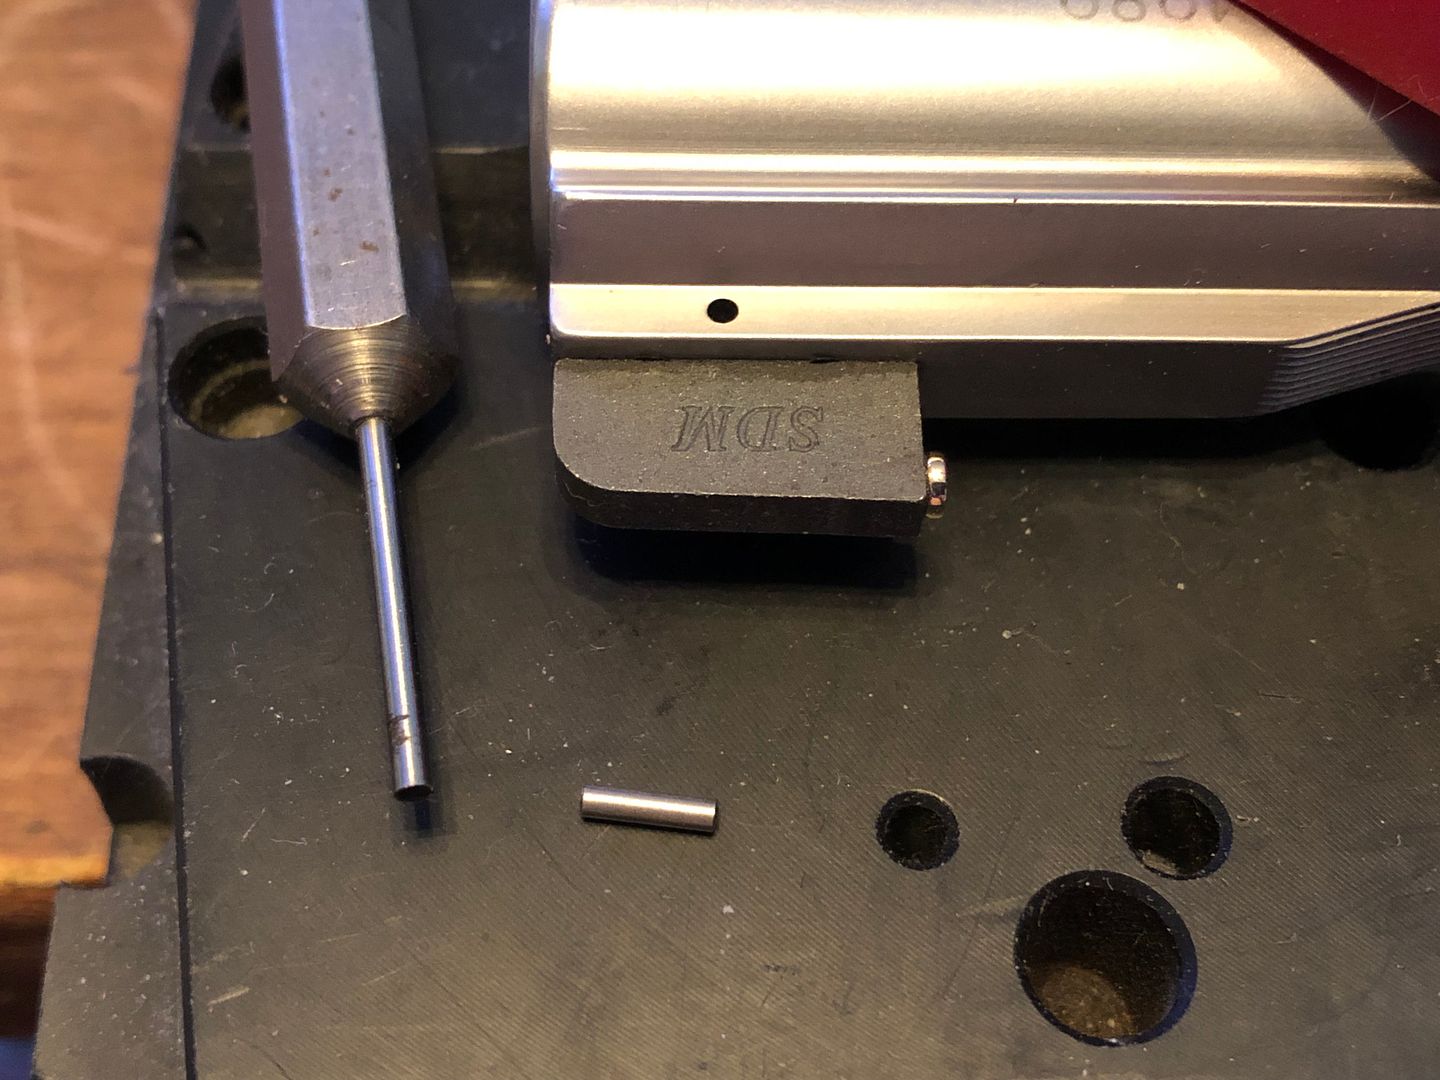
Got the pin started without launching it anywhere, so far so good ")
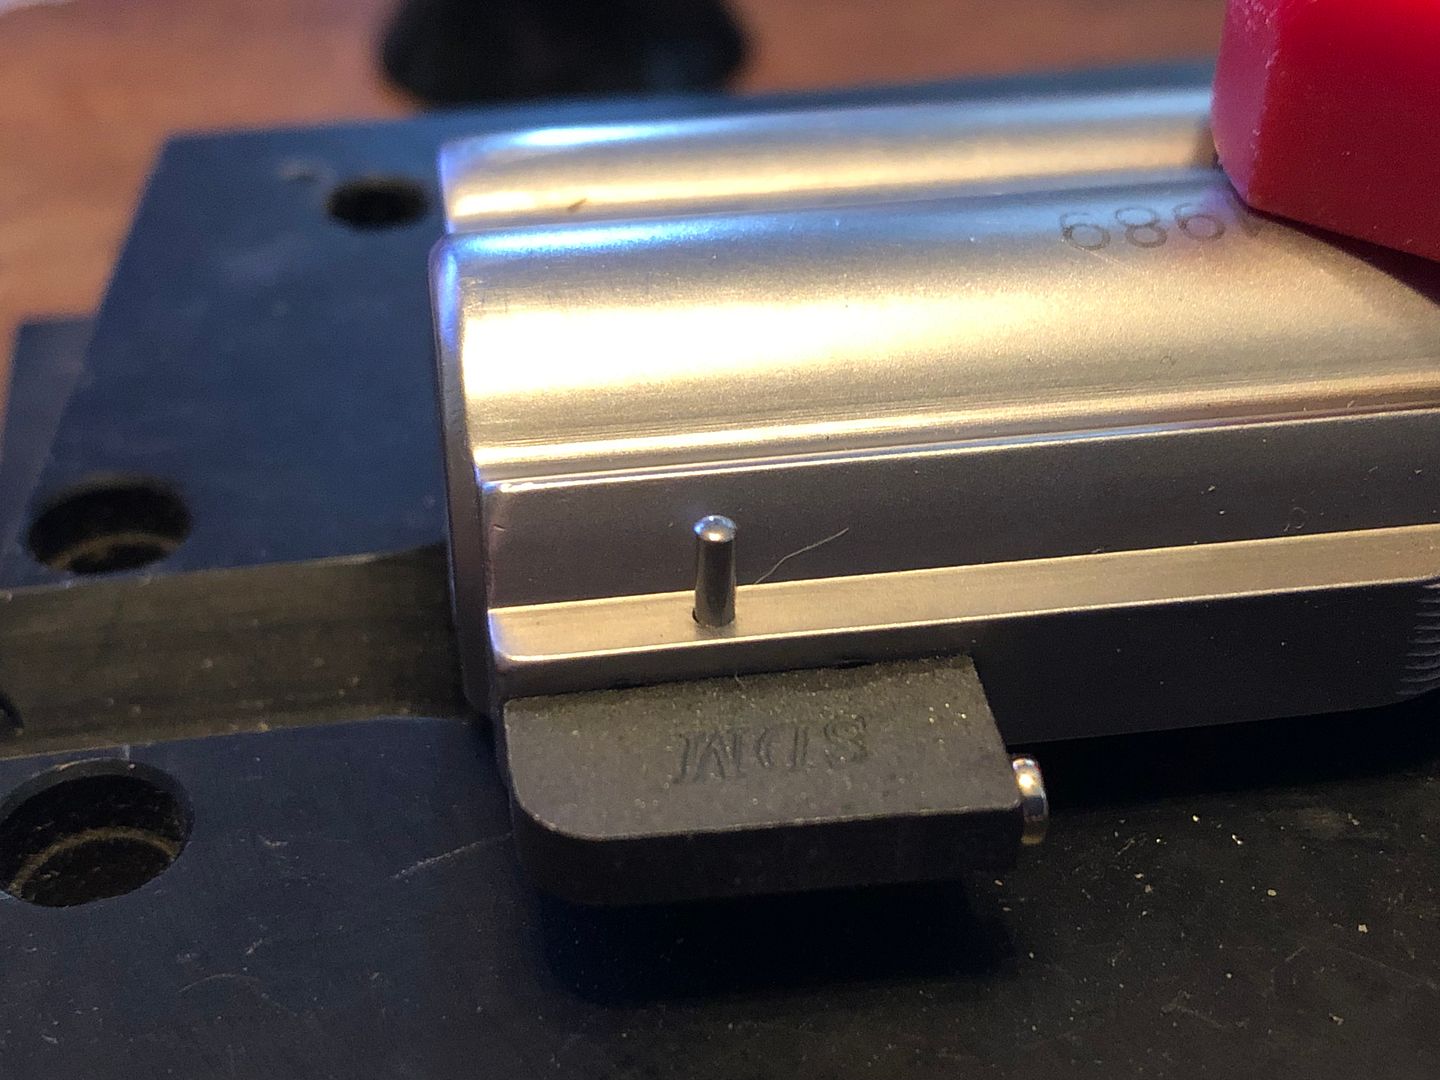
And... it's in. Whew 
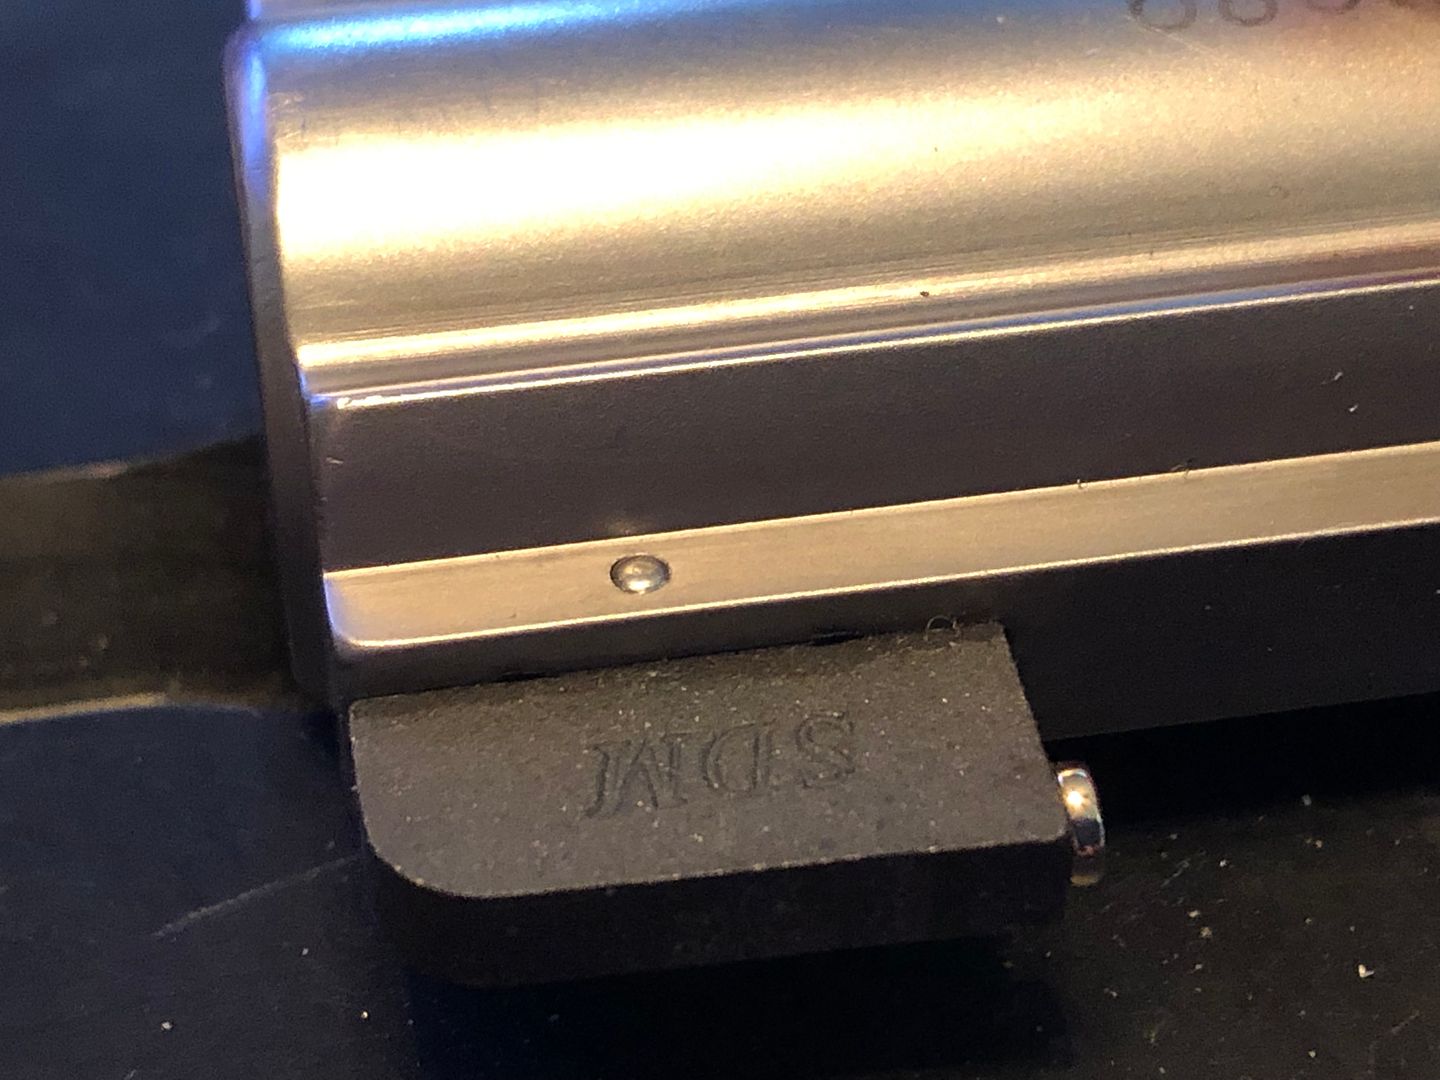
So far so good...
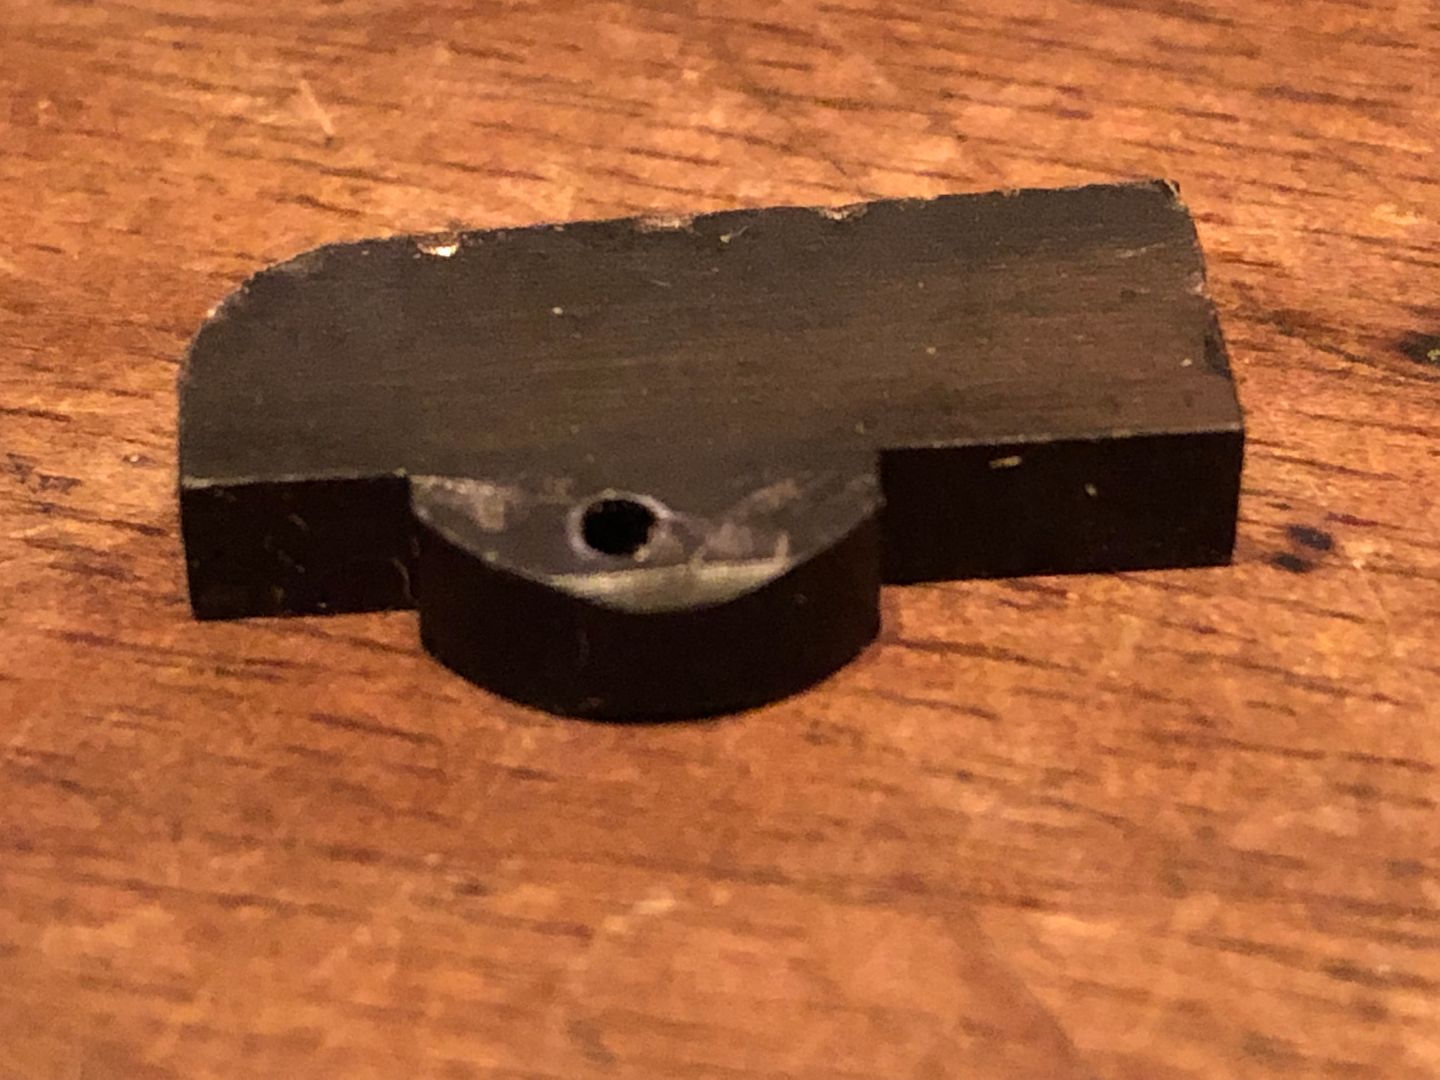
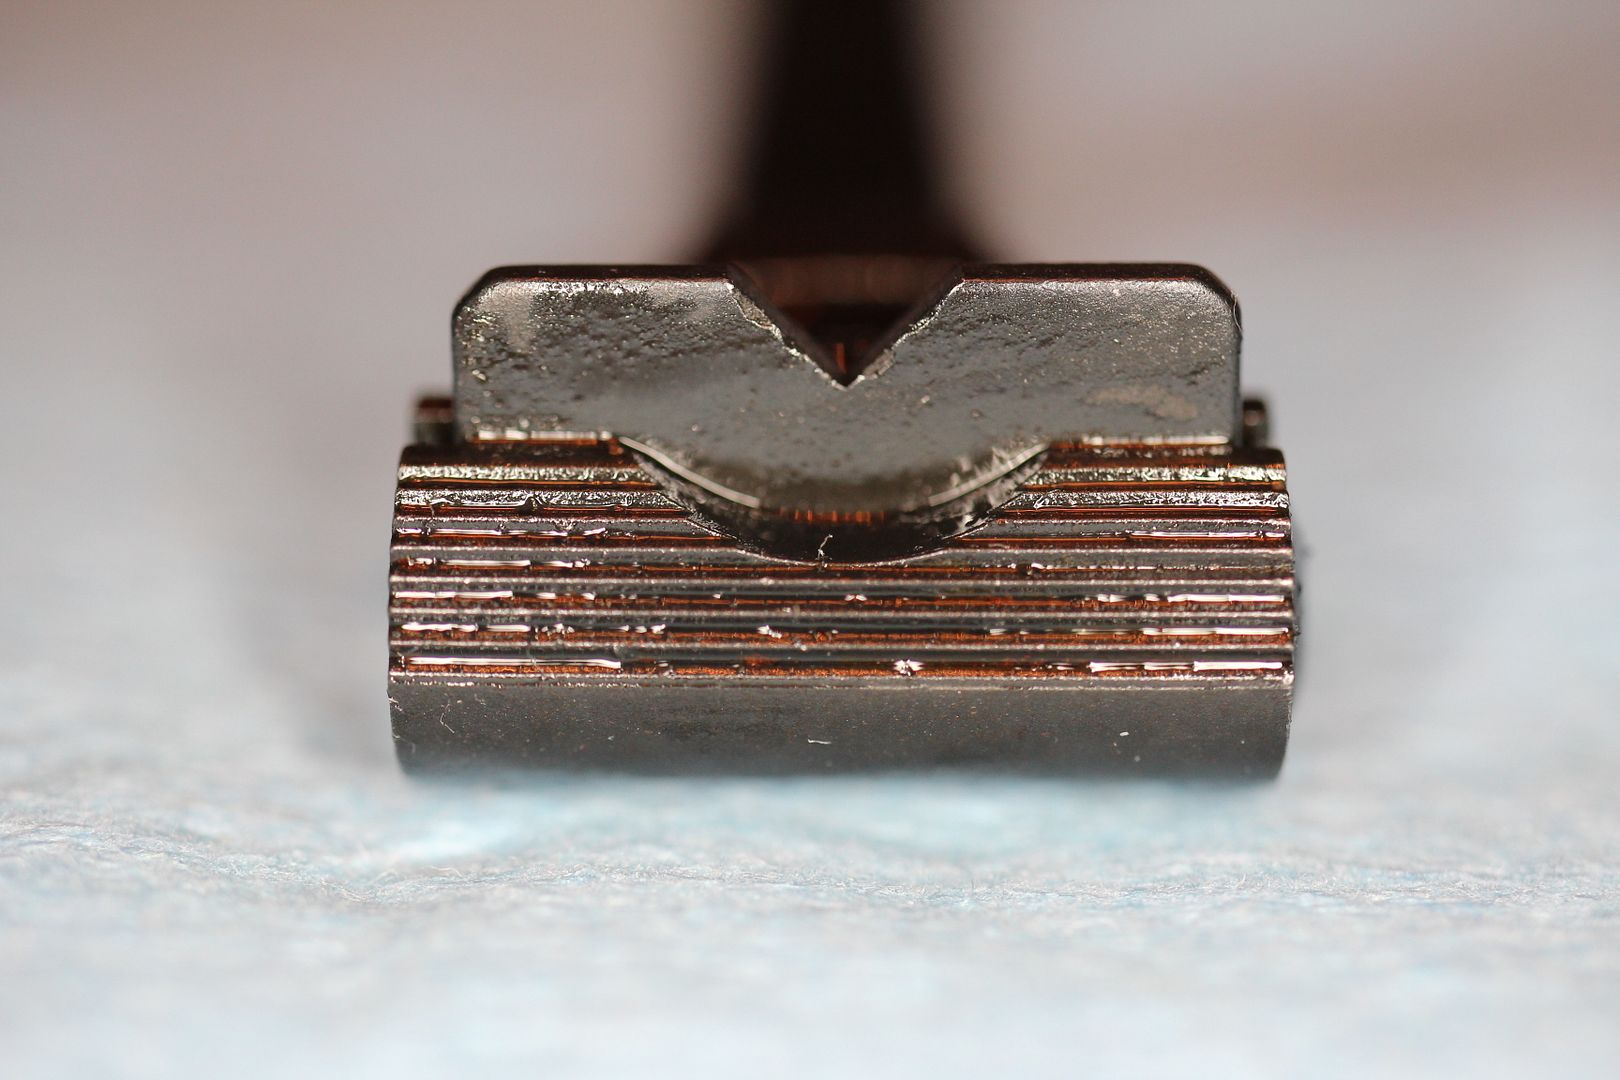
The slider on the backsight was a bit mashed so that's getting replaced too. We're going with a .160 V-notch slider which ought to be here tomorrow.
I apologize for the wonky alignment on some of the pics. I tried using my phone for these shots and for some reason my workstation and photobucket both see the orientation differently. Gonna have to charge up the camera.
More to follow...
Cheers
Bill
__________________
Because they don't make a .46
Last edited by BMCM; 02-16-2019 at 01:18 PM.
|
|
The Following 45 Users Like Post:
|
22hipower, 292, 75Vette, amazingflapjack, andy52, armenius, BillyMagg, Bob L, Coastie762, colt_saa, Doug M., drgbike, Erocksmash, GerSan69, jack the toad, jculloden, Jebus35745, johnbeaver, ladder13, MetalMan, Moo Moo, muddocktor, Muley Gil, Narragansett, NMPinNYC, norsemanhp, ontargetagain, Outrider, pj151, Protocall_Design, quinn, rbmac52, Redford, rm06, RonPagan, S&WIowegan, series guy, sinister, snowman.45, steelslaver, TAROMAN, The Gila Bender, tug700, Usmc5811, Wee Hooker |
02-15-2019, 07:54 AM
|
 |
US Veteran
|


|
|
Join Date: Oct 2013
Location: Central Montana
Posts: 13,812
Likes: 13,009
Liked 39,870 Times in 10,126 Posts
|
|
Like the trrick of using the upside down drill for an alignment tool.
|
|
The Following 4 Users Like Post:
|
|
02-15-2019, 08:03 AM
|
 |
US Veteran
|


|
|
Join Date: Apr 2007
Location: Back in Northern NJ
Posts: 886
Likes: 904
Liked 865 Times in 352 Posts
|
|
I just LOVE a pictorial essay like this. Thank you!
__________________
NICK-SWCA-NRA BENEFACTOR LIFE
|
|
The Following 5 Users Like Post:
|
|
02-15-2019, 09:50 AM
|
 |
Member
|

|
|
Join Date: Jul 2013
Location: South of Atl
Posts: 4,071
Likes: 38,810
Liked 14,520 Times in 3,117 Posts
|
|
Great thread. I'll be looking forward to the following "spa" treatment.
__________________
Don't You Ever Wash That Thing
|
|
The Following 3 Users Like Post:
|
|
02-15-2019, 09:59 AM
|
|
Member
|
|
|
Join Date: Dec 2011
Location: above ground, under water
Posts: 768
Likes: 753
Liked 622 Times in 269 Posts
|
|
Good stuff, great pictures, keep em coming.
|
|
The Following 2 Users Like Post:
|
|
02-16-2019, 12:19 AM
|
|
Member
|
|
|
Join Date: Aug 2017
Posts: 34
Likes: 23
Liked 27 Times in 11 Posts
|
|
I'm interested in seeing how this turns out.
|
|
The Following User Likes This Post:
|
|
02-16-2019, 12:39 AM
|
|
US Veteran
|
|
|
Join Date: Jun 2012
Location: SW Mississippi
Posts: 1,351
Likes: 2,236
Liked 6,228 Times in 1,044 Posts
|
|
Fixin' up the backsight
Evening gents,
Now I'll see to changing out the damaged slider on the backsight.
Got the new slider and a sack full of spare bits so lets have at it.
Yeah that slider has seen better days, a little dinged up here and there plus slightly smushed over on the right side. In any even this one would be too short to pair with the gold bead front.
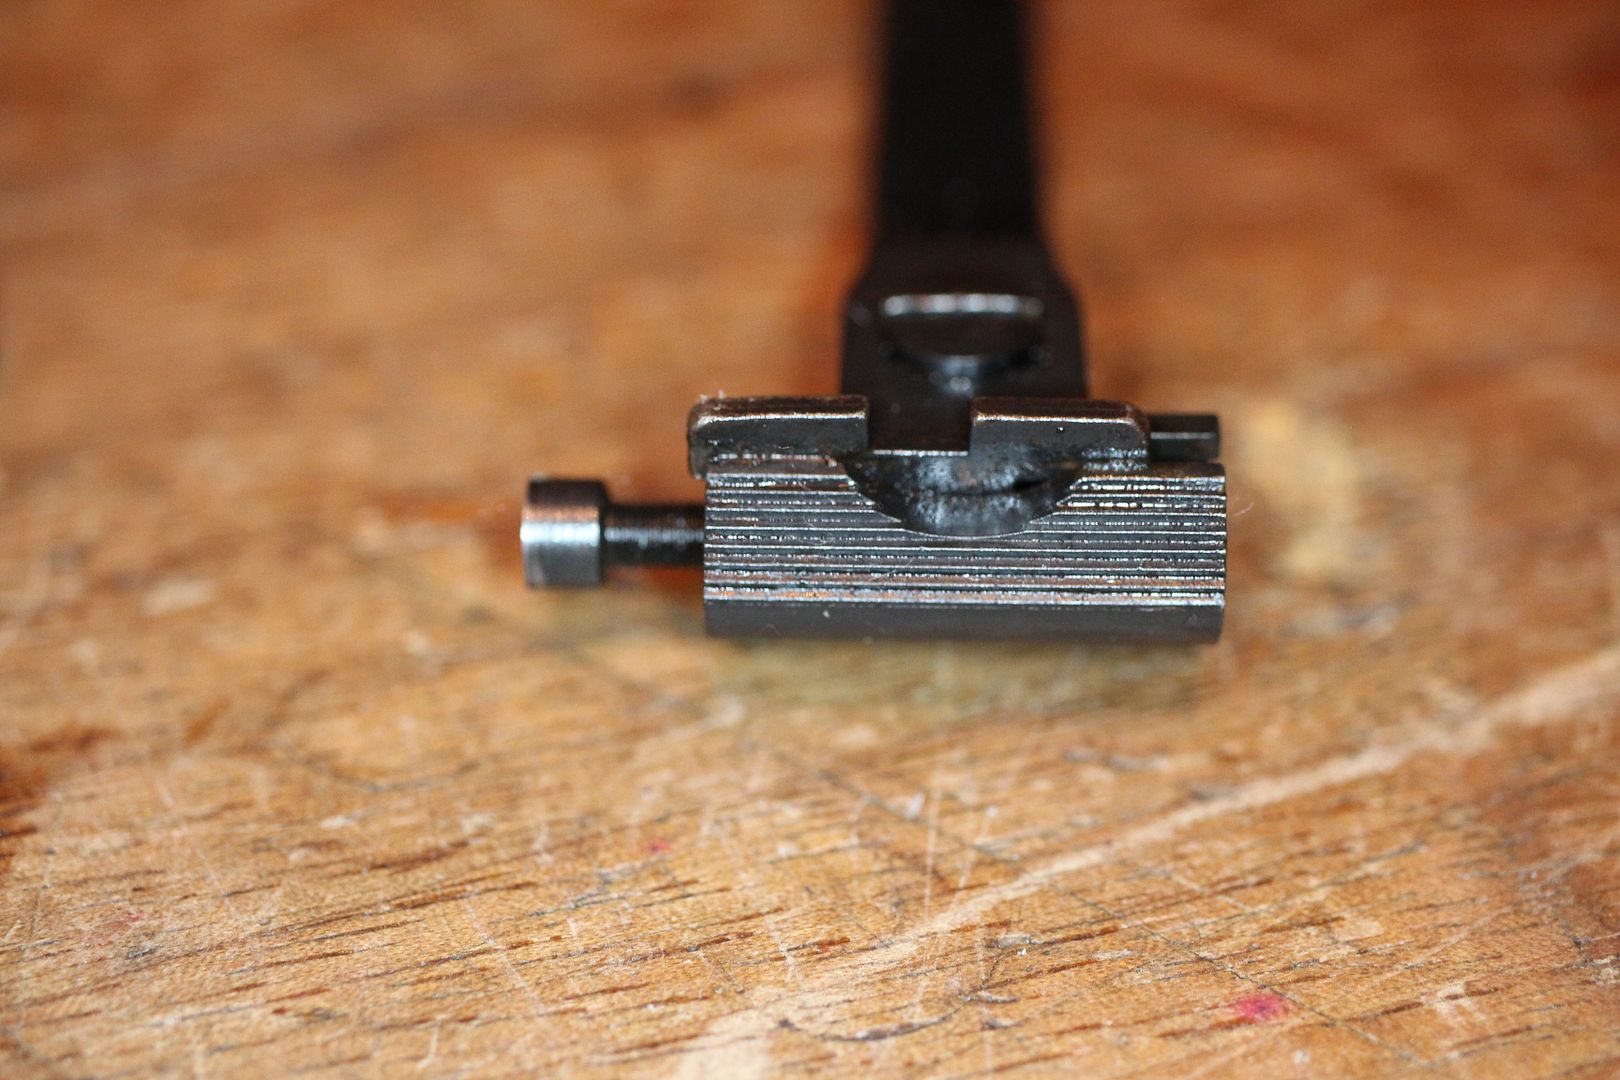
So, to get that thingy outa there we gotta crank the slider all the way over to the right by turning the windage screw clockwise until it bottoms out.
Then give it a few extra turns 'till it snaps clean off
Need to be quite careful when extracting the screw head from the sight body... There's a tiny spring & plunger in that screw that has a propensity for launching into orbit. I took one of these apart a couple weeks ago where the plunger got away from me...Hit me in the face on the way to Mars never to be seen again. I did however find the spring four days later tangled in my beard
Anyway, got the screw head out then pushed the slider to the left and unscrewed the stub from the slider. The slider comes off to the right.
Despite soaking in Kroil for a week, the plunger & spring remained stuck solidly in the old screw.
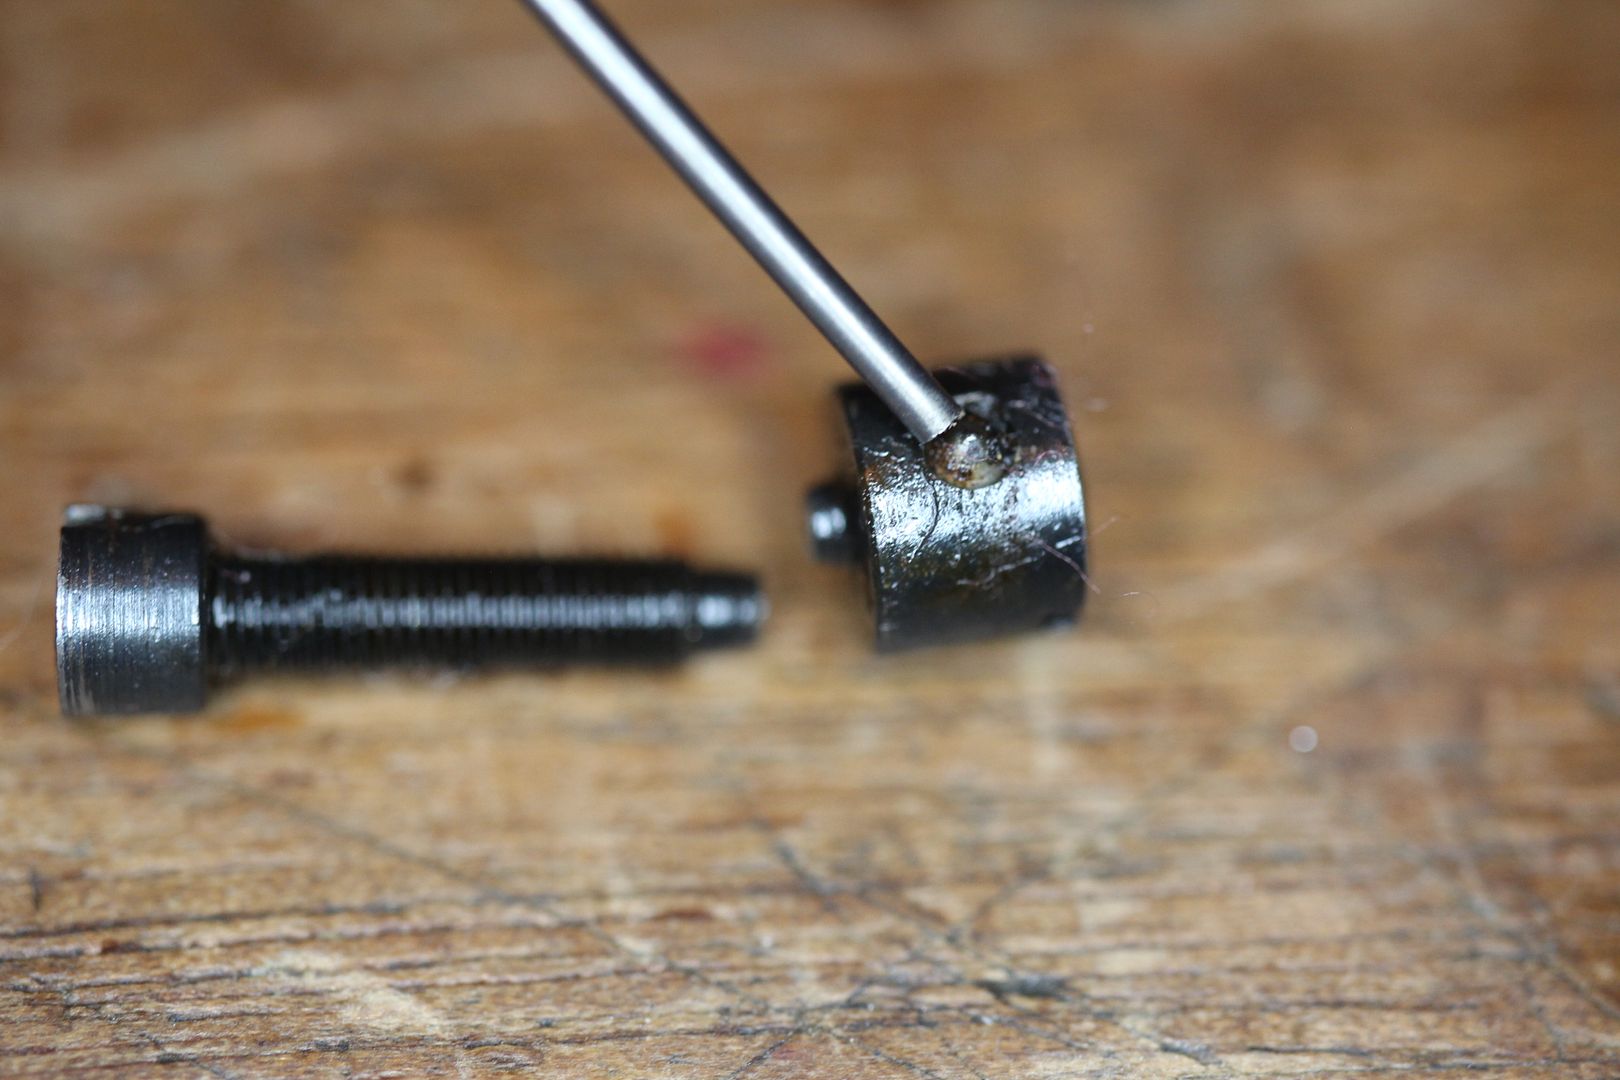
Not to worry, I have spares

There are a couple special tools you need for this too... A spanner bit to tighten the nut and a special staking punch to stake the nut securely once tightened. Brownells has both of these however, these tools need to be sharpened a bit in order to fit the slots in the nut. A small mounted stone such as used the sharpen gunsmithing screwdrivers does the job nicely. Oh and regarding the spanner bit, don't bother loading it into a handle. That tiny nut does not need much torque. Turning the bit between thumb & forefinger is quite sufficient for tightening the nut.
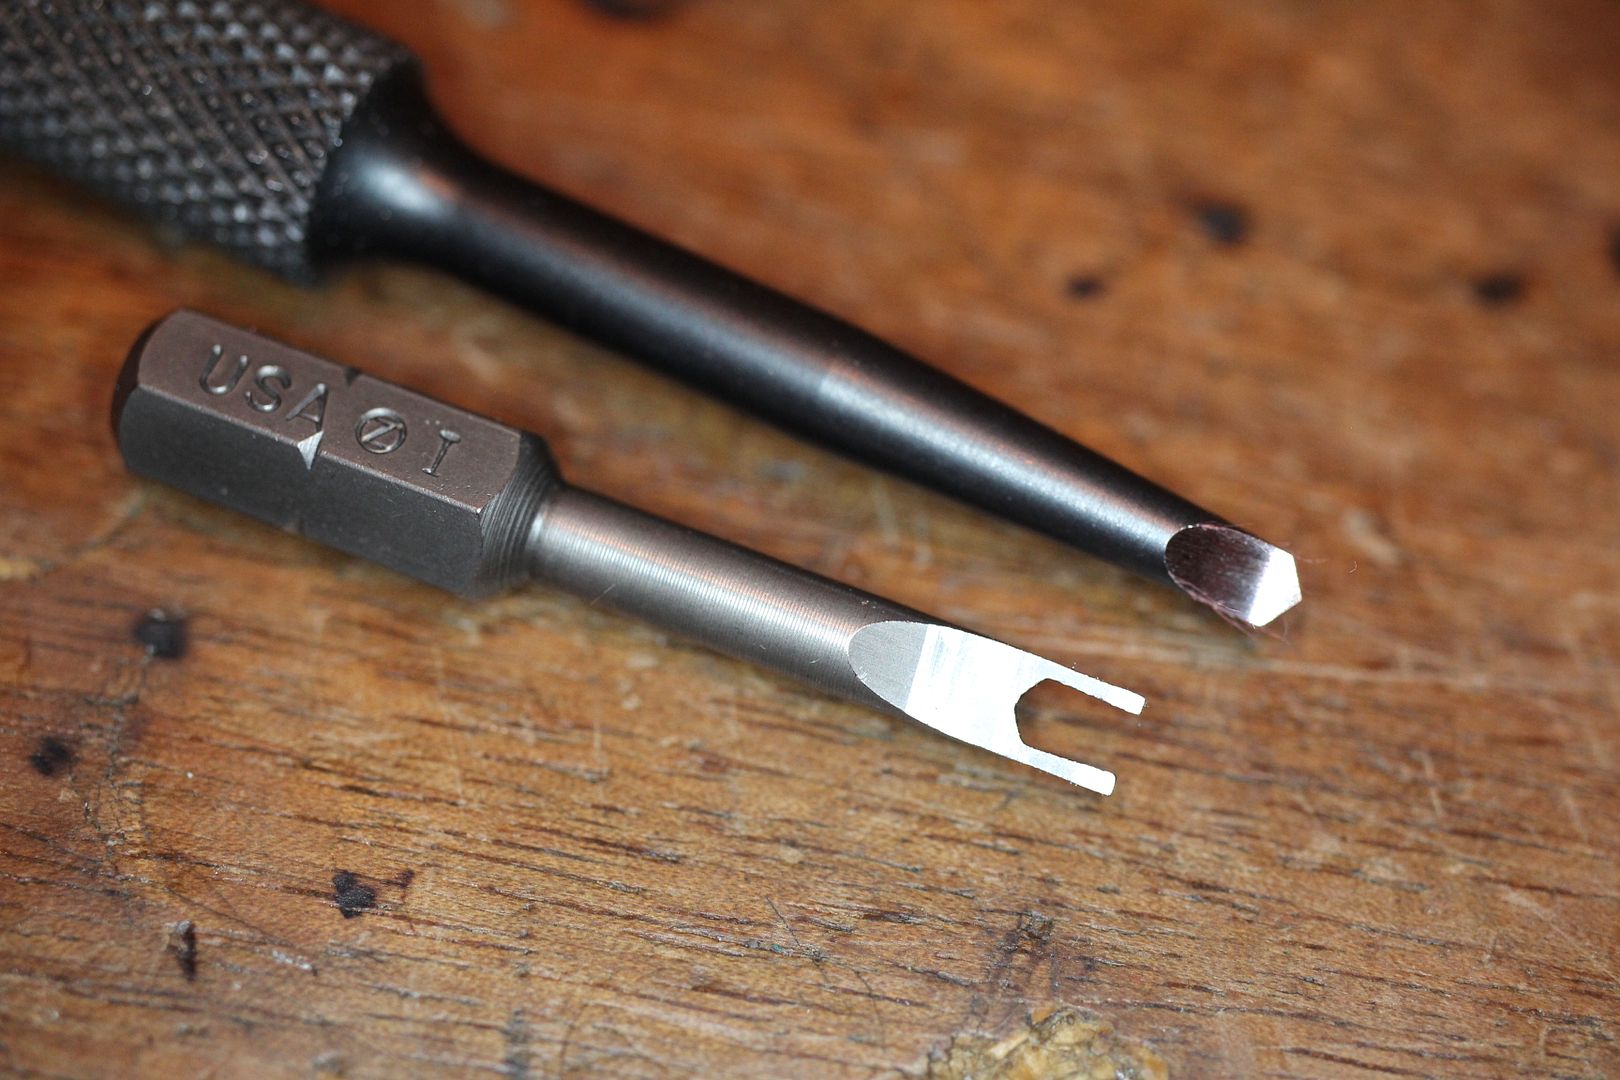
I imagine all the bad reviews that spanner bit gets are from folks loading it into a handle and cranking on like they were tightening lug nuts on a truck
Here's where we risk sending a new plunger into orbit. Got the new slider threaded onto the replacement windage screw with a new plunger & spring. The trick is to compress the plunger and slide everything to the left without letting the plunger get loose.
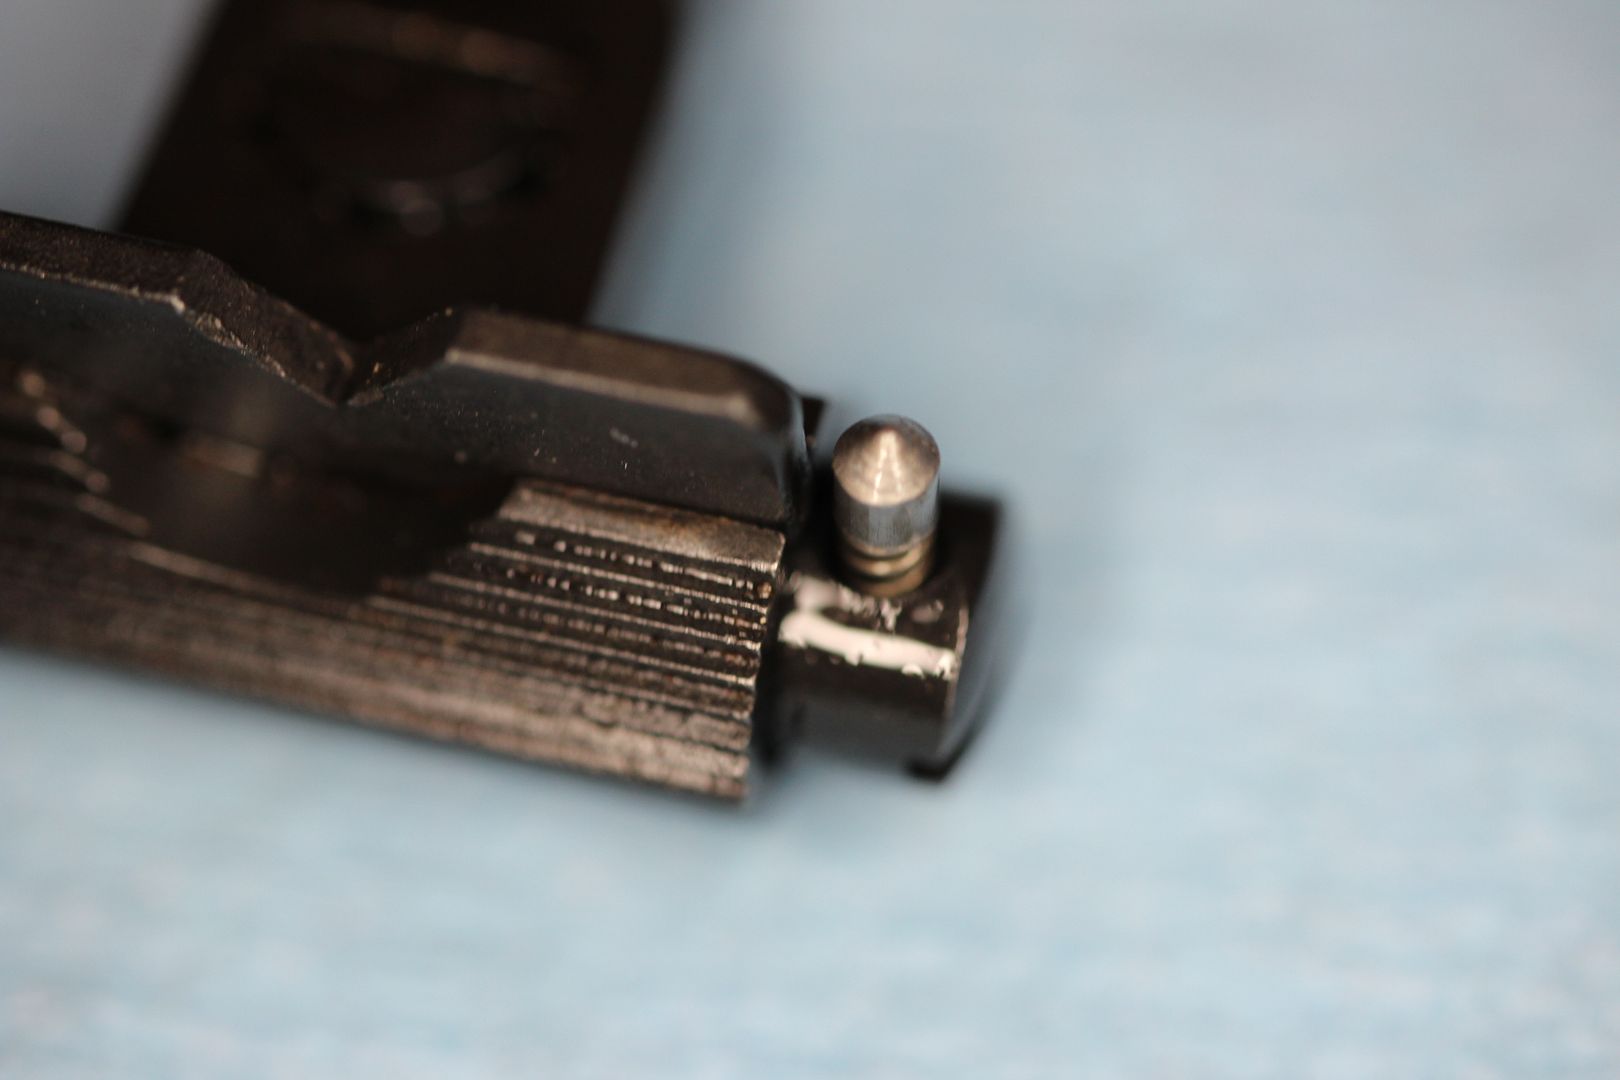
And... it's in Whew!

Now to the little spanner nut.
Tightened up snug by hand with only the bit then backed off slightly. Perhaps a touch under 1/8th turn but no more than that. Then set the thing resting on the head of the windage screw and using the staking punch, give it a few whacks until the screw is spread into the spanner slots on the nut. Job done 
It's quite oily since I gave it a good hosing with some Lubriplate FMO. This should work quite well with the gold bead, ought to be pretty fast for the eye to pickup too. Us old guys like clean simple fast sights 
That's all for now.
Cheers
Bill
__________________
Because they don't make a .46
Last edited by BMCM; 02-16-2019 at 01:18 PM.
|
|
The Following 21 Users Like Post:
|
75Vette, amazingflapjack, Bob L, Coastie762, Doug M., Jebus35745, johnbeaver, kraynky, Moo Moo, muddocktor, Muley Gil, Narragansett, NMPinNYC, Outrider, Protocall_Design, rbmac52, S&WIowegan, sinister, snowman.45, TAROMAN, Usmc5811 |
02-16-2019, 01:03 AM
|
|
Member
|

|
|
Join Date: Sep 2007
Location: Southwestern Ohio
Posts: 2,337
Likes: 209
Liked 1,195 Times in 457 Posts
|
|
Bill;
Absolutely EXCELLENT photo/tutorial! Thanks for sharing that with us.
If this particular 625-6 is half the revolver that mine is (now residing with my youngest son) you will be tickled pink! These are seriously good revolvers and a dandy both On The Range and in the Field!
Dale53
|
|
The Following 3 Users Like Post:
|
|
02-16-2019, 08:04 AM
|
|
US Veteran
|
|
|
Join Date: Oct 2013
Location: Central Montana
Posts: 13,812
Likes: 13,009
Liked 39,870 Times in 10,126 Posts
|
|
Once again nice tutorial.
I hate those little spring and plunger setups. The one on the elevation nut can be fun.
But, the worst one is the one that works a Charter Arms cylinder latch. Getting thatt all together with the spring and plunger is "entertaining"'
|
|
The Following 5 Users Like Post:
|
|
02-16-2019, 12:48 PM
|
 |
Member
|

|
|
Join Date: May 2008
Location: Washington State
Posts: 7,500
Likes: 14,669
Liked 9,362 Times in 3,739 Posts
|
|
I had Bill do the RB operation on my 4" M66 after seeing that he had opened up shop. I'd followed a couple of his strings in the semi-auto sub-forum and been impressed by his work and the manner in which he wrote it up. (I'm not even close to qualified to assess a machinist's work, but the photos were very clear and as a professional word nerd, I was confident from his writing that he was the real deal.) When he did that work, I think I was proven correct. I told him he was not charging near enough, and I meant that.
This revolver was stolen in a burglary that was one of a series in the neighborhood on a Sunday morning; we were out of town. Had we been home, Bozo (avatar) would have discouraged them. That was in mid-August 2011. A computer, my wife's bike, a the TV, this and two long guns were taken. The computer, bike and eventually this revolver were recovered here and there.
The revolver was recovered from a career criminal in San Mateo County in the fall of 2015. The case process took most of three years, in large part due to the offender's exposure. Dealing with the Californicated process of getting it back was most of three months. A pox on California. The process here was not all that glorious, either. (I'm not sure of the basis for what was done - I do LE legal as one of my duties and had never seen the basis for what the local agency, not my client, had to do.)
I'd had a feeling it would need to be examined by someone with a clue, which sure as heck was not me. I had time to consider the options, and Bill opening his shop gave me a good idea. I did not even open the box when I got it back, but shipped it off to him. Now you see why I choose him. This was easily the best built revolver I had ever seen, and I want it back that way. I should have sent him a couple of moonclips to make test firing easier.
__________________
NHI, 10-8.
|
|
The Following 3 Users Like Post:
|
|
02-26-2019, 11:07 PM
|
|
US Veteran
|
|
|
Join Date: Jun 2012
Location: SW Mississippi
Posts: 1,351
Likes: 2,236
Liked 6,228 Times in 1,044 Posts
|
|
Evening Gents,
Ok so now that were all done messing with the sights it about time I got after the rest yes?
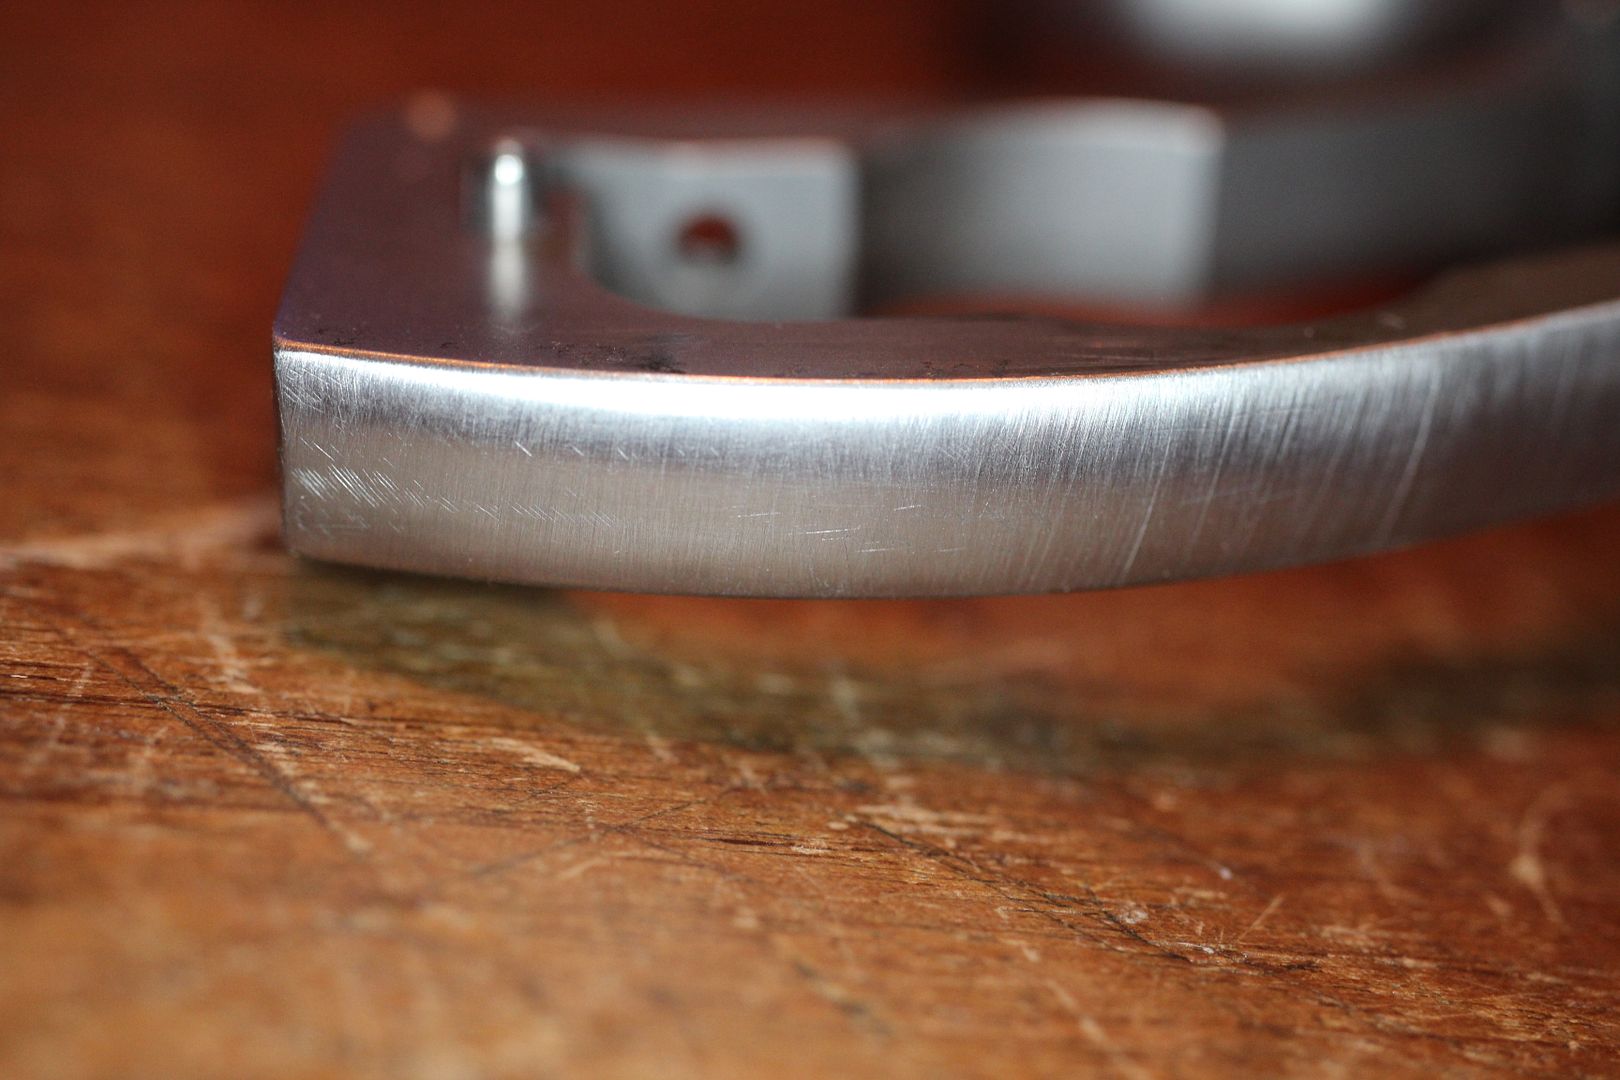
Took care of all the damage/scratches here on the backstrap with a bit of file work and some abrasive tape.
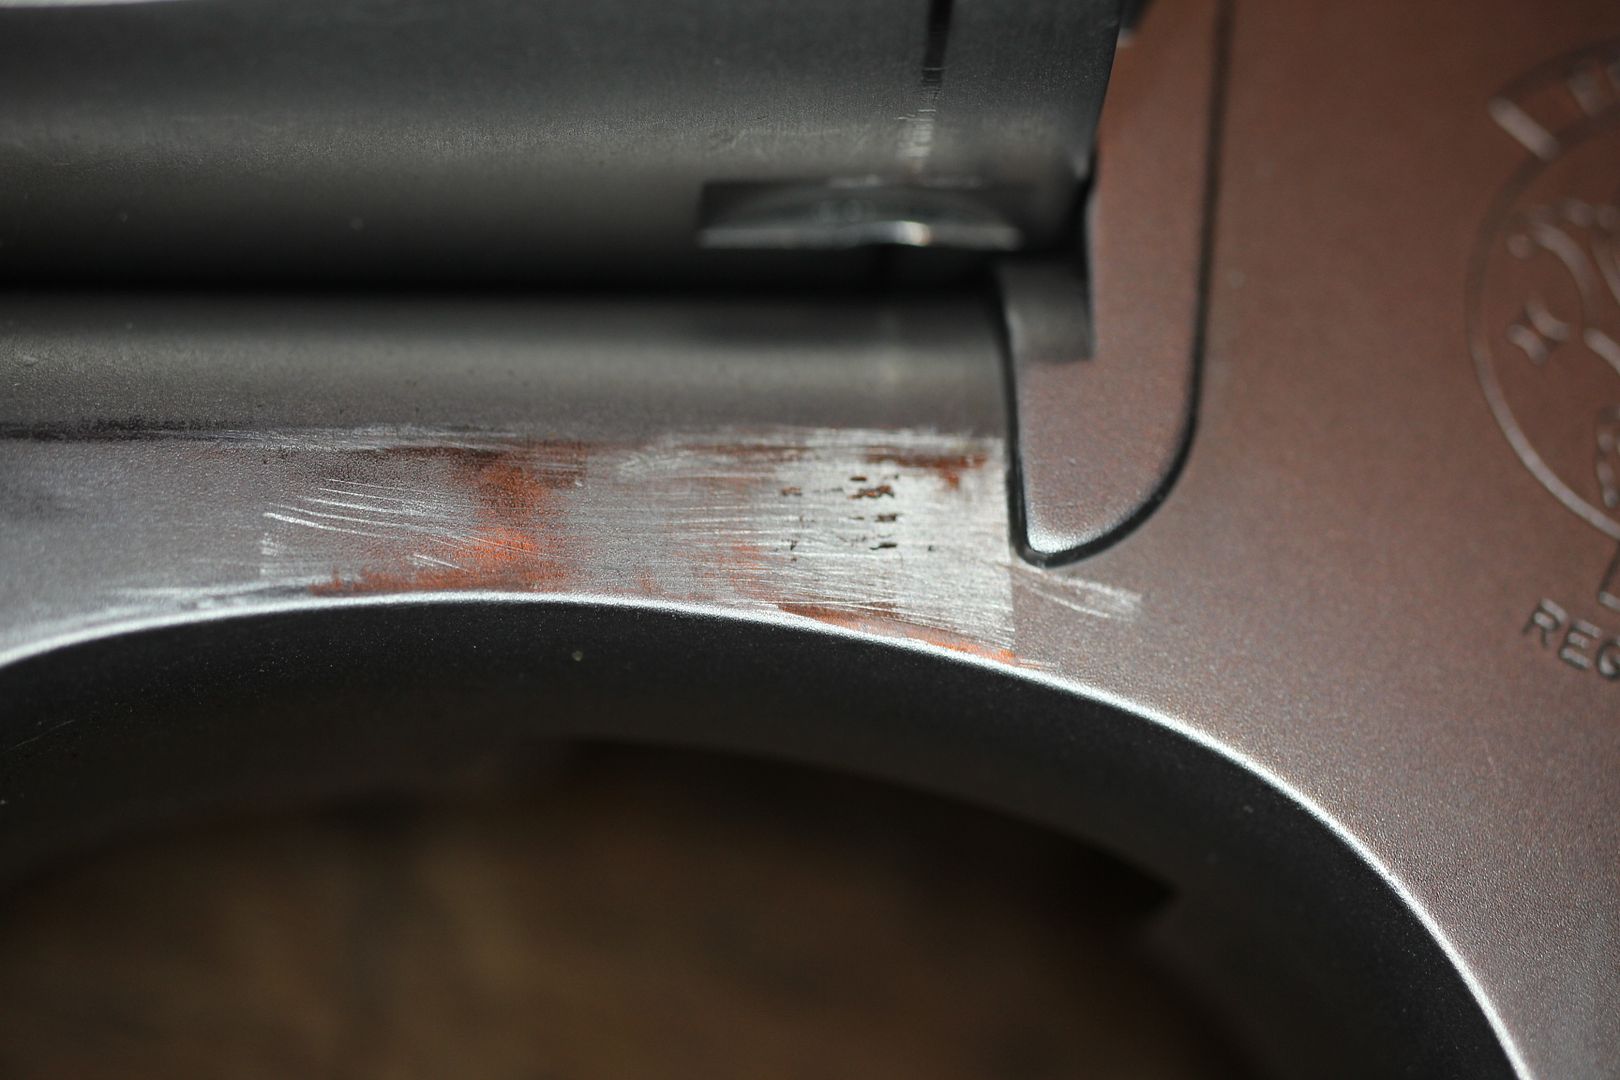
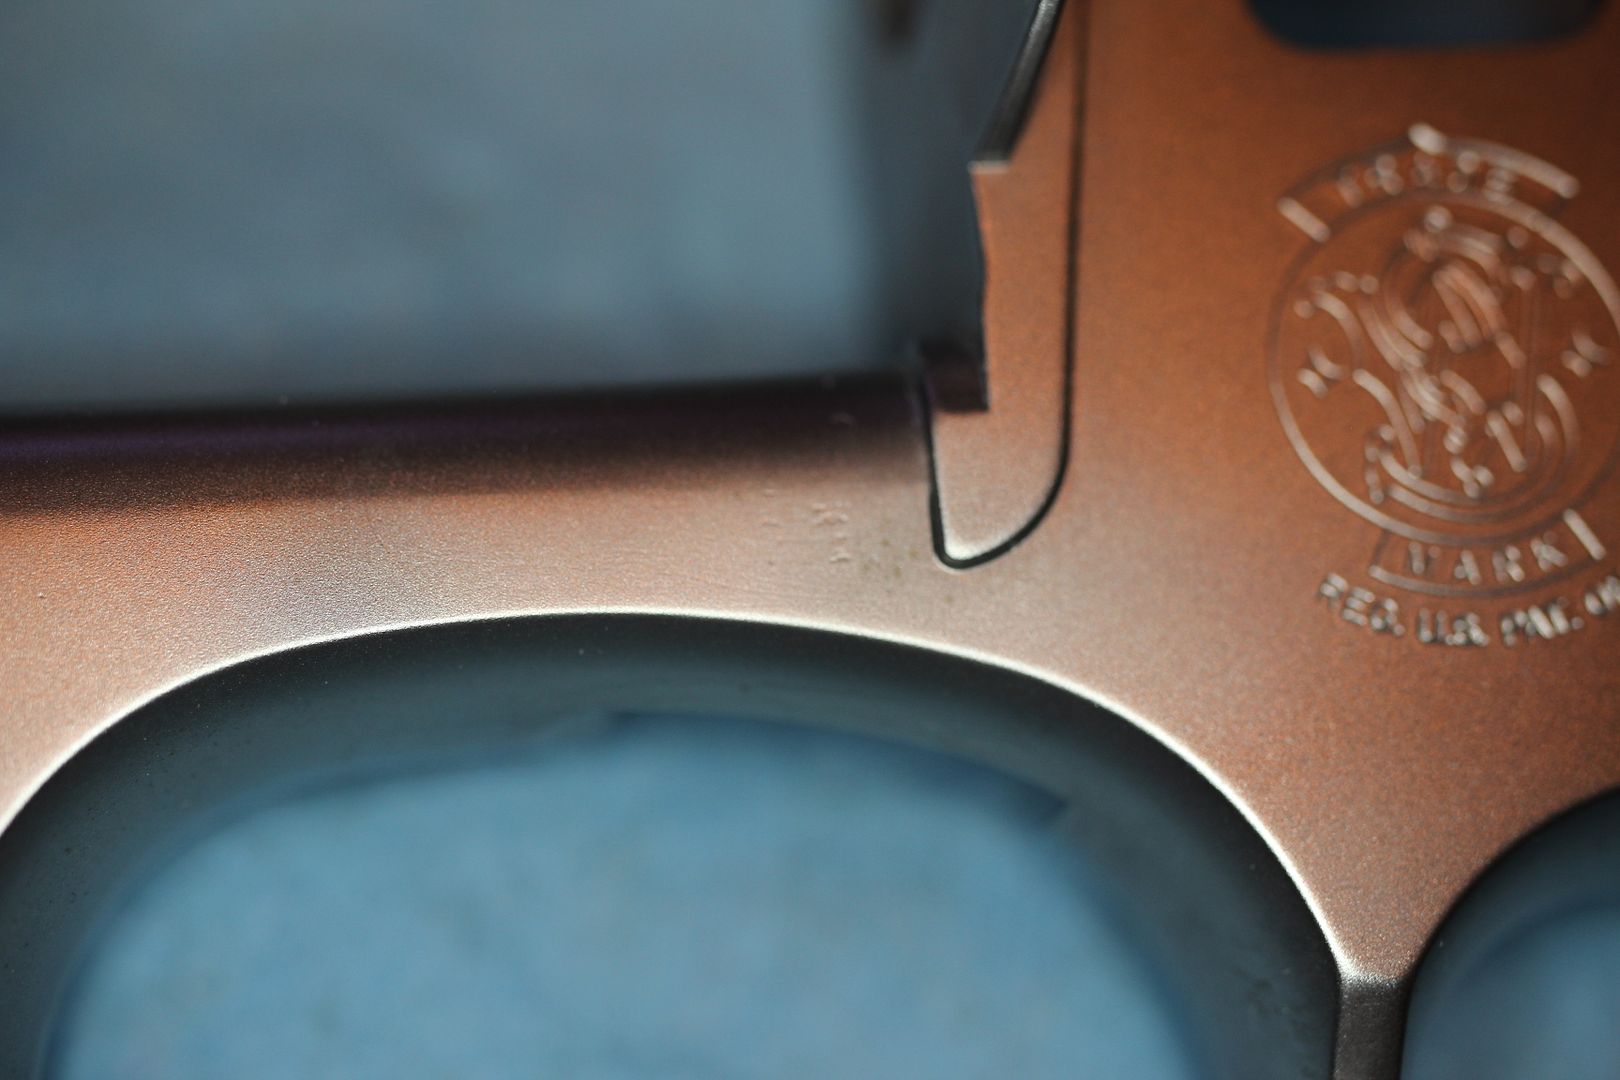
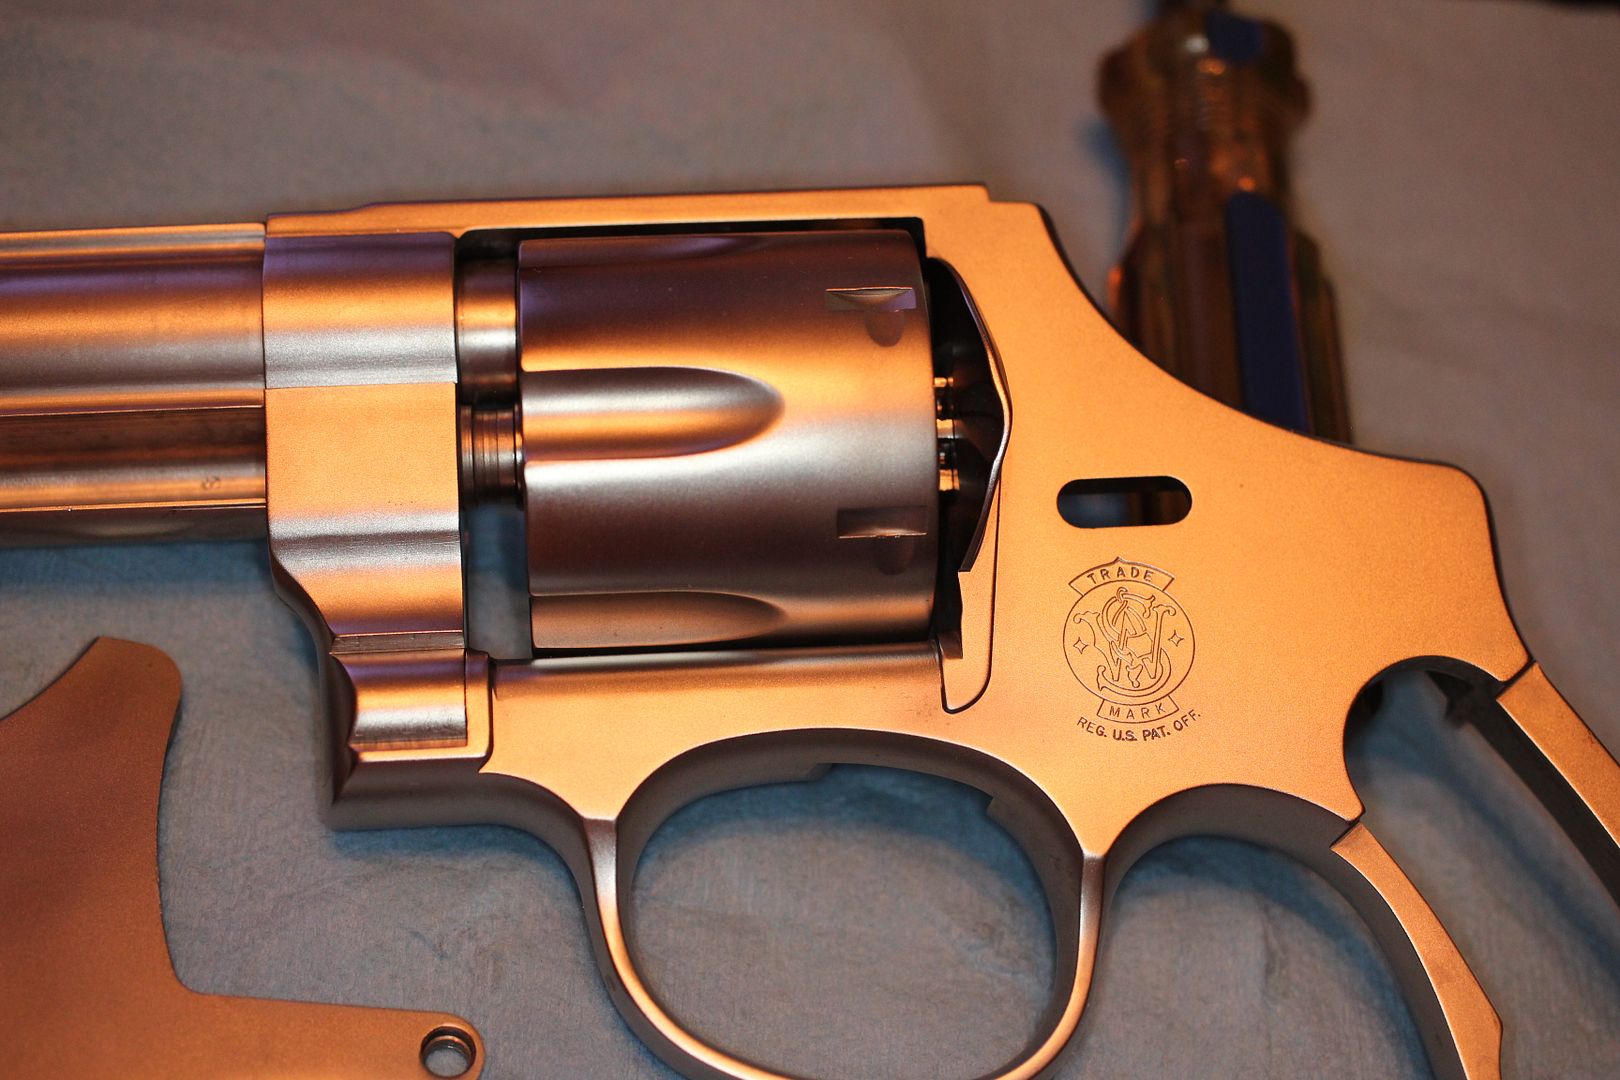
Bunch of divots here caused by burs on the cylinders stop notches. There's only about 0.010" clearance between the cylinder & frame here when it's open so I surmise the burrs had to be near 0.025 tall or so to cause this damage. Knocked down the high spots with a XF ceramic stone. Looks ugly now but that will all be cleaned up with a bit of abrasive blasting.
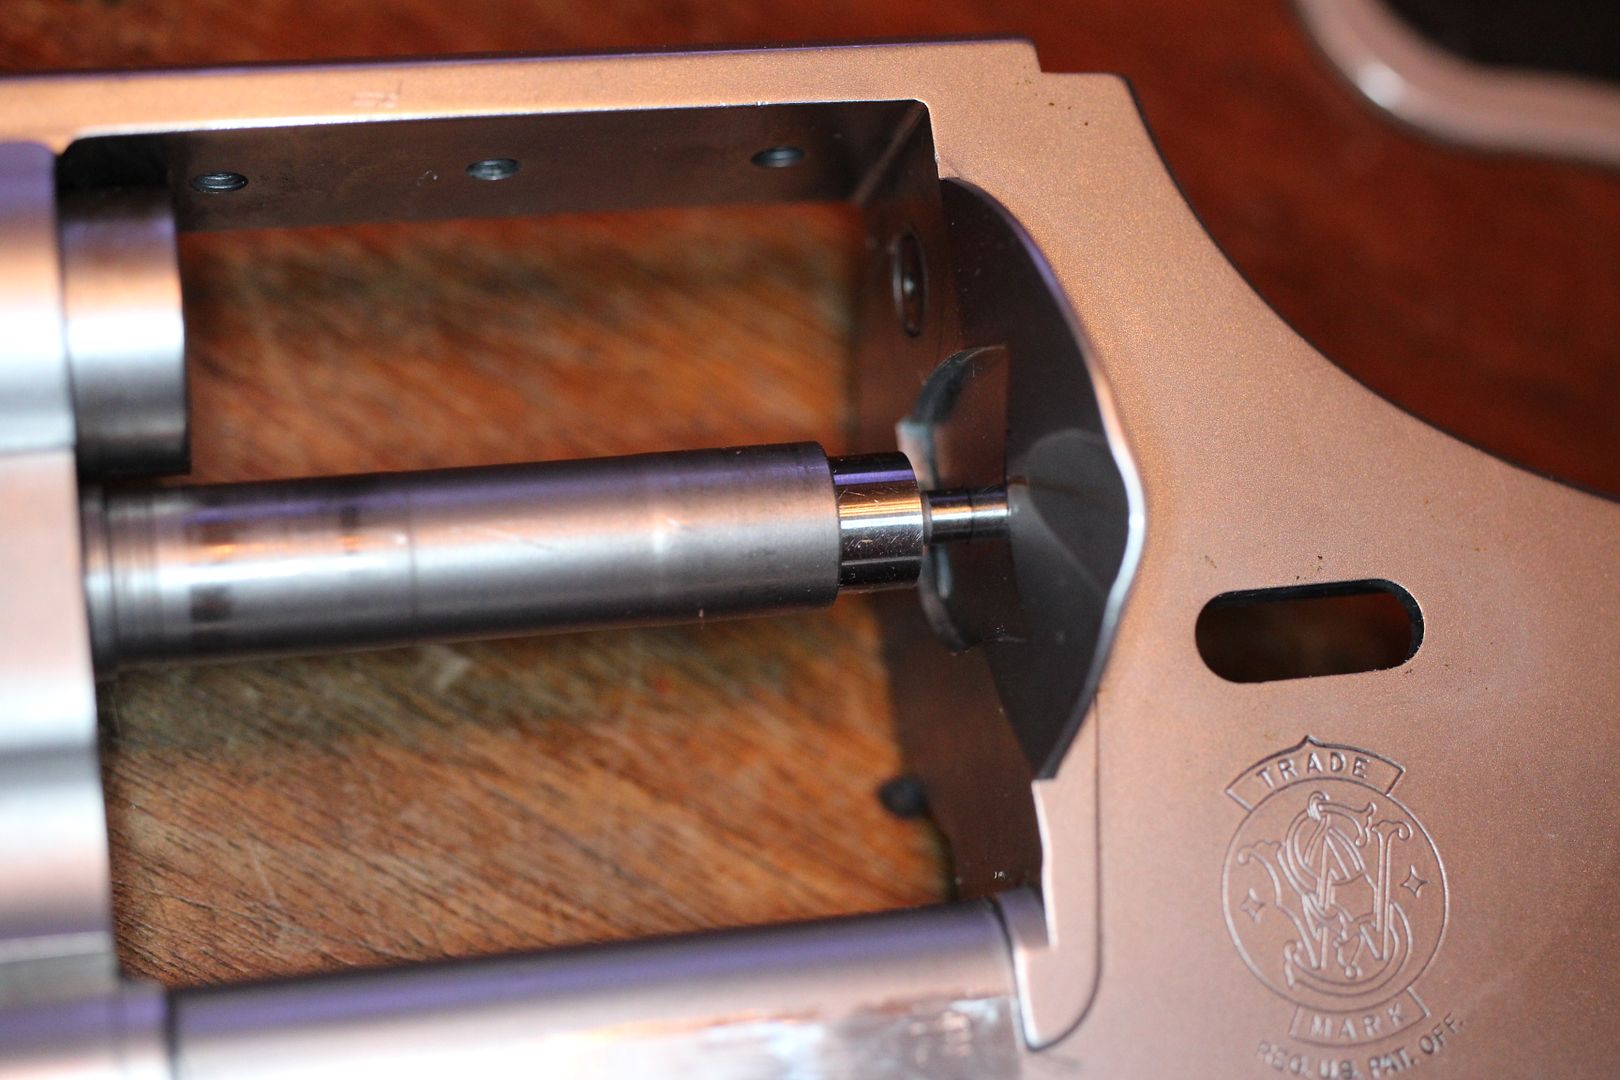
I wanted to gauge the yoke before proceeding on to the cylinder so we insert this tool into the yoke barrel.
Then holding the yoke snug in the closed position, slide the tool rearward towards the recoils shield. The precision "nub" on the end of the tool slips into the bolt hole freely, so, we're good. If the tool did not align with the hole then I would have to straighten the yoke by careful bending. Fortunately this one gauges good.
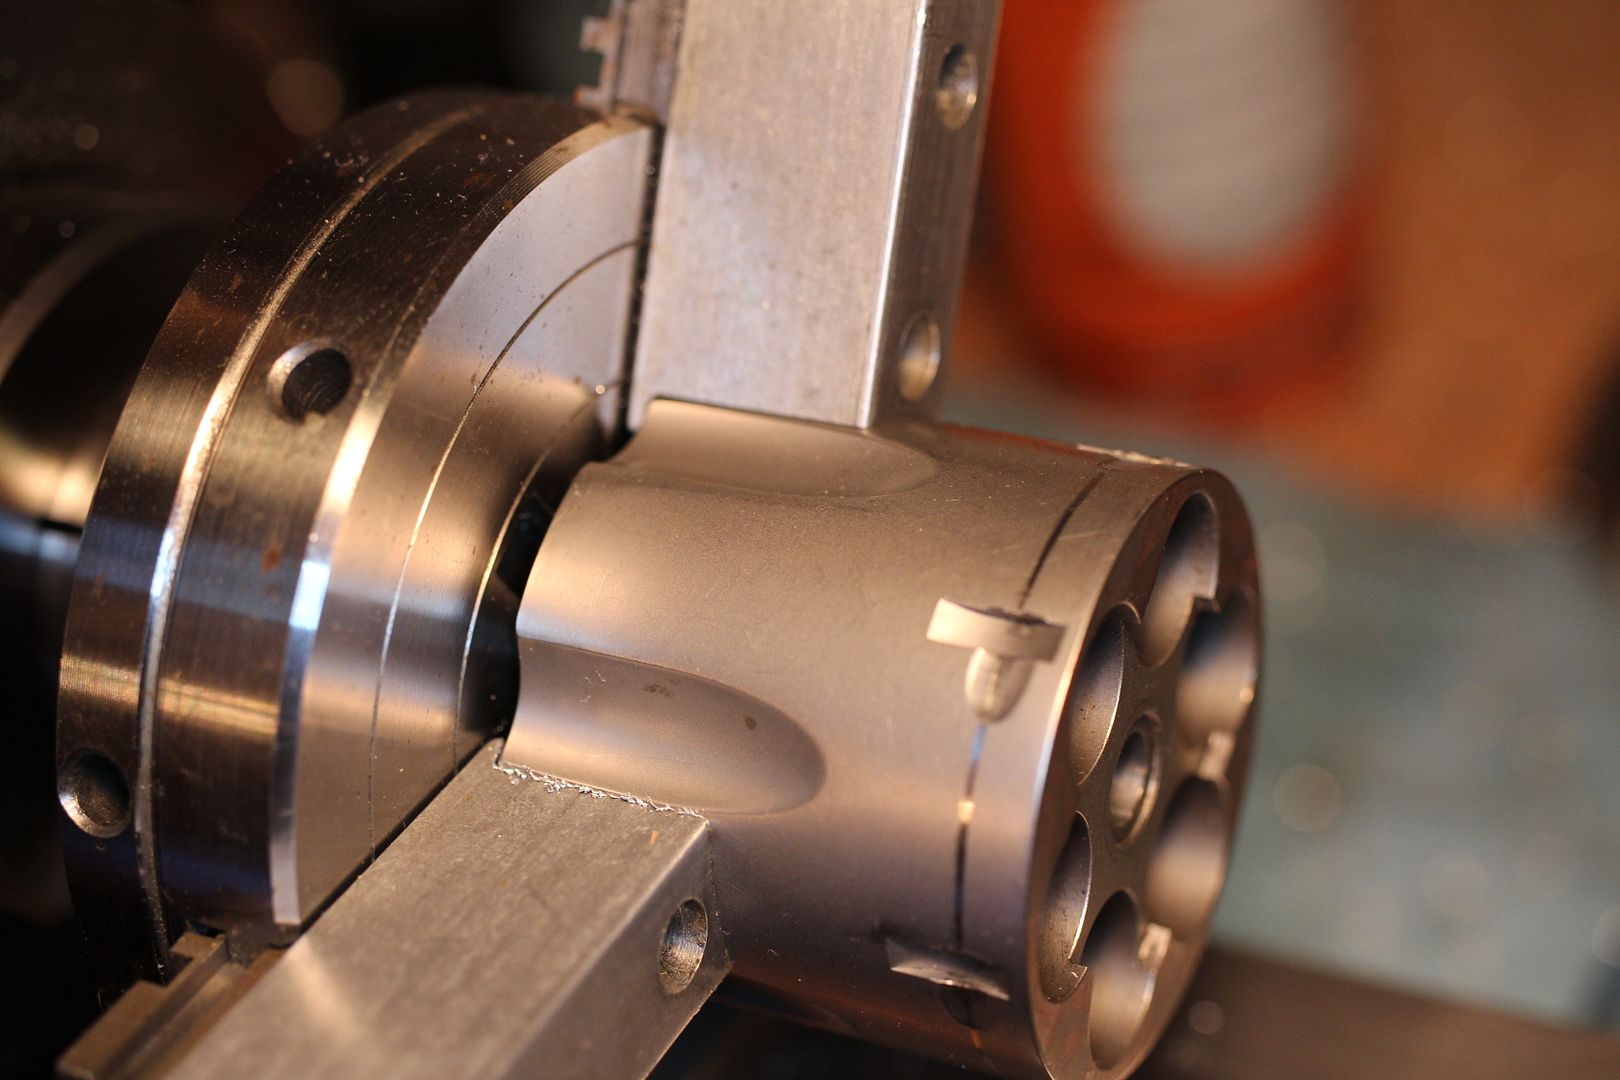
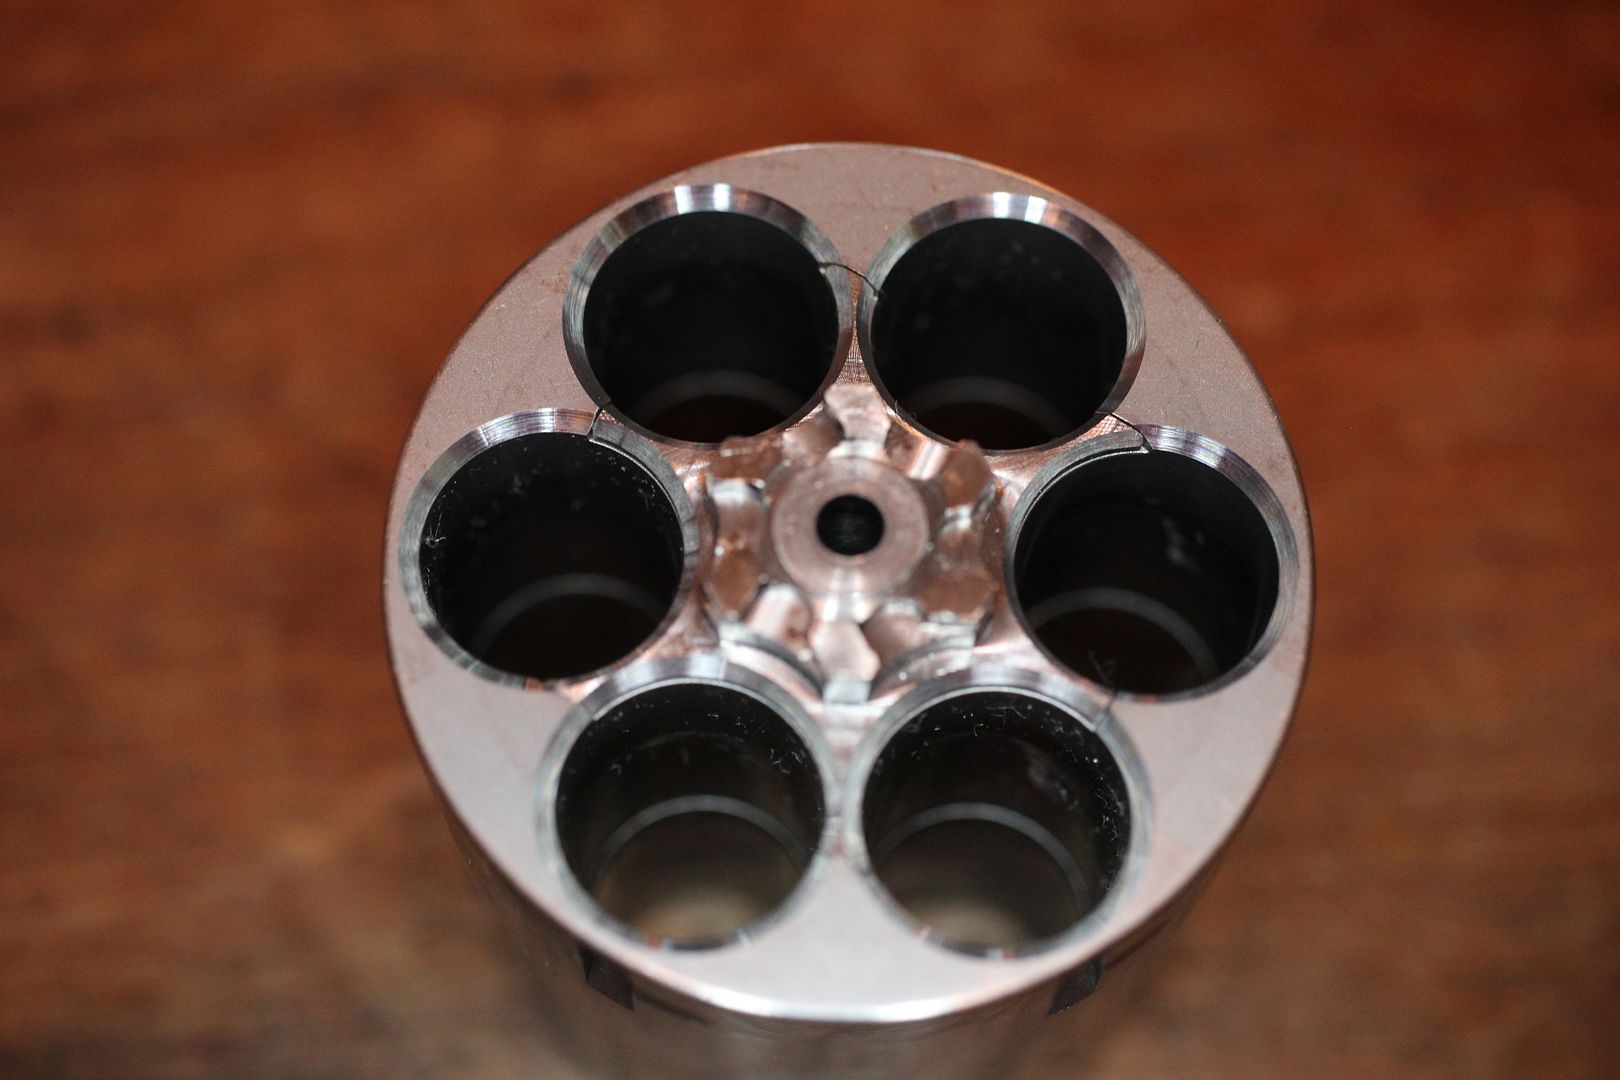
On to the cylinder. It's a little rough.
Spots bashed flat at the front of the flutes in several spots.
Peening & displaced steel at the stop notches. You can see where a bur was raise high enough that is was folded over and mashed flat when the cylinder was flipped open & struck the side of the frame. however the more problematic bur is the one raised on the lead in wherein when the cylinder stop hits that bur it can jump clean over the notch and skippin that notch entirely.
In order the correct that I'll start with putting some of that metal back. I have here a little ball pien hammer, a couple hardened dowel pins, and a 10% cobalt tool bit. I'll use the pins on the lead in and the toolbit on the opposite bur to gently bump the steel back into place.

All done with this notch. Now seeing it up close I note some divots or chatter marks just past the notch in the direction of rotation. I wonder if that was caused by the cylinder stop landing there after skipping that notch.
Finished peening the other five notches then I cut a set of soft jaws for this little scroll chuck to hold the cylinder on the lathe.
A brief spin with some 400 grit paper and it looks much better.
I have a couple more things to tend to then I'll fire up the compressor for a touch of bead blasting.
In explaining the stop notch peening, my assessment is this gun suffered lot of rapid fire DA flogging. Could have been dryfire or live fire or both, doesn't really matter. Either way it's evident to me this cylinder spent a lot of time getting flung around at a rapid pace
More to follow.
Cheers
Bill
__________________
Because they don't make a .46
Last edited by BMCM; 02-27-2019 at 12:16 AM.
|
|
The Following 15 Users Like Post:
|
16thVACav, 75Vette, Doug M., Erocksmash, johnbeaver, kraynky, muddocktor, Outrider, Protocall_Design, Redford, RonPagan, S&WIowegan, sinister, snowman.45, TAROMAN |
02-27-2019, 12:00 AM
|
|
Member
|
|
|
Join Date: Nov 2006
Location: Montana
Posts: 5,164
Likes: 3,441
Liked 6,258 Times in 2,063 Posts
|
|
Absolutely stunning in ALL regards AND you are willing to share it with us!!
Randy
|
|
The Following User Likes This Post:
|
|
02-27-2019, 03:22 PM
|
 |
Member
|
|
|
Join Date: May 2016
Location: West glacier, Mt
Posts: 190
Likes: 72
Liked 228 Times in 81 Posts
|
|
I find these pictures very soothing. it's like seeing a neglected Chevelle or firebird and bringing it back to its former glory because you hate seeing it in that state.
|
|
The Following 2 Users Like Post:
|
|
02-27-2019, 03:42 PM
|
|
Member
|
|
|
Join Date: Feb 2016
Location: Huntsville AL
Posts: 2,129
Likes: 1,183
Liked 2,673 Times in 835 Posts
|
|
Thanks for sharing , glad the firearm was taken away from a moron and returned to a responsible person.
|
|
The Following 3 Users Like Post:
|
|
02-27-2019, 03:45 PM
|
|
Member
|
|
|
Join Date: Sep 2014
Location: North Central Ohio
Posts: 921
Likes: 862
Liked 597 Times in 332 Posts
|
|
Gosh it would be great someday to shadow someone like you doing this work and learn more. I have a great appreciation for taking something that has been neglected and restoring it properly.
Thank you Bill, I find threads like this most rewarding for a guy that likes to learn.............I'm just a sponge  LOL
Karl
|
|
The Following User Likes This Post:
|
|
02-27-2019, 10:27 PM
|
|
Member
|

|
|
Join Date: Jan 2008
Location: Eastern Nebraska
Posts: 3,983
Likes: 10,563
Liked 8,516 Times in 2,945 Posts
|
|
amazing photography... much appreciated
|
|
The Following User Likes This Post:
|
|
02-28-2019, 07:54 AM
|
|
Member
|

|
|
Join Date: Apr 2007
Location: Virginia
Posts: 8,836
Likes: 19,810
Liked 11,988 Times in 5,438 Posts
|
|
This is a well documented rescue of a damaged revolver. I'm enjoying the information and the pics.
|
02-28-2019, 08:23 AM
|
 |
Member
|
|
|
Join Date: Dec 2008
Location: Pacific North-Wet
Posts: 5,662
Likes: 5,255
Liked 16,828 Times in 4,351 Posts
|
|
Wonderful photo essay, and informative for us amateur 'smiths. I like the SDM bead + v-notch rear combination. Might consider that for my 625-8.
I hope there's a special place in Hell for whoever put that gun in such terrible shape. 
|
02-28-2019, 10:33 AM
|
|
Member
|
|
|
Join Date: Oct 2014
Posts: 257
Likes: 44
Liked 170 Times in 67 Posts
|
|
just curious, would it have shot fine the way it was before you started doing all of this to it?
|
02-28-2019, 01:29 PM
|
|
Member
|
|
|
Join Date: May 2008
Location: Washington State
Posts: 7,500
Likes: 14,669
Liked 9,362 Times in 3,739 Posts
|
|
I doubt I am a good enough shot to know, but I was concerned about safety and the like, so I did not want to take the chance. This was even more true after I learned they had to use the superglue/iodine (I think it is) method of trying to raise fingerprints.
I think a reasonable reader can tell why I felt confident to send it to Bill.
__________________
NHI, 10-8.
|
02-28-2019, 02:11 PM
|
 |
Member
|
|
|
Join Date: Dec 2015
Location: Pensacola, FL
Posts: 361
Likes: 144
Liked 314 Times in 165 Posts
|
|
Very nice work indeed. I don't believe that peening and metal displacement was caused by really fast double action. It seems much more likely to me that some knucklehead spent some time spinning the cylinder (in both directions) prior to flipping the cylinder shut.
Just my thought, but it doesn't fit with the crane appearing to be straight still.
|
02-28-2019, 04:38 PM
|
|
Member
|
|
|
Join Date: Dec 2011
Location: above ground, under water
Posts: 768
Likes: 753
Liked 622 Times in 269 Posts
|
|
Nice work, great write-up. Thanks
|
02-28-2019, 05:32 PM
|
 |
Member
|
|
|
Join Date: Jun 2017
Location: Northeastern NC
Posts: 460
Likes: 1,195
Liked 629 Times in 228 Posts
|
|
Thank you so much. Great thread.
__________________
Do it outdoors
|
03-12-2019, 12:17 AM
|
|
US Veteran
|
|
|
Join Date: Jun 2012
Location: SW Mississippi
Posts: 1,351
Likes: 2,236
Liked 6,228 Times in 1,044 Posts
|
|
Evening Gents,
Progress update on Doug's M625...
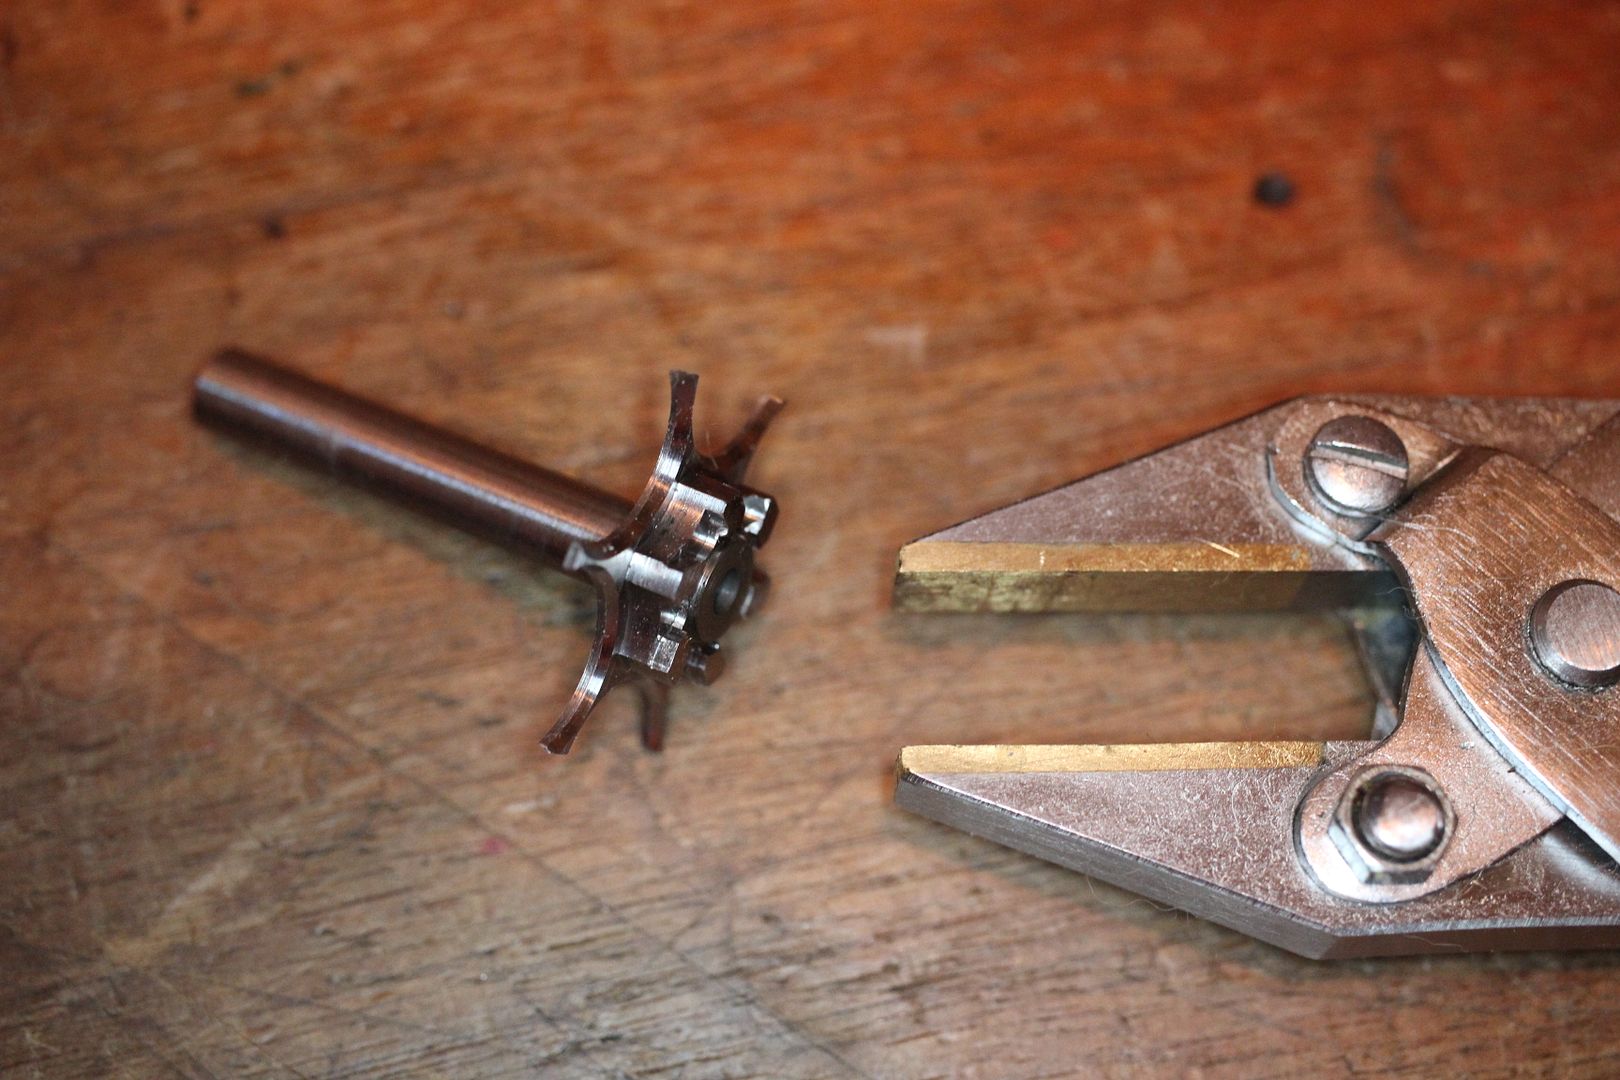
Setting up to chamfer the cylinder's chargeholes and spotted this bent leg on the extractor star. This got by me earlier, good thing I caught it now.
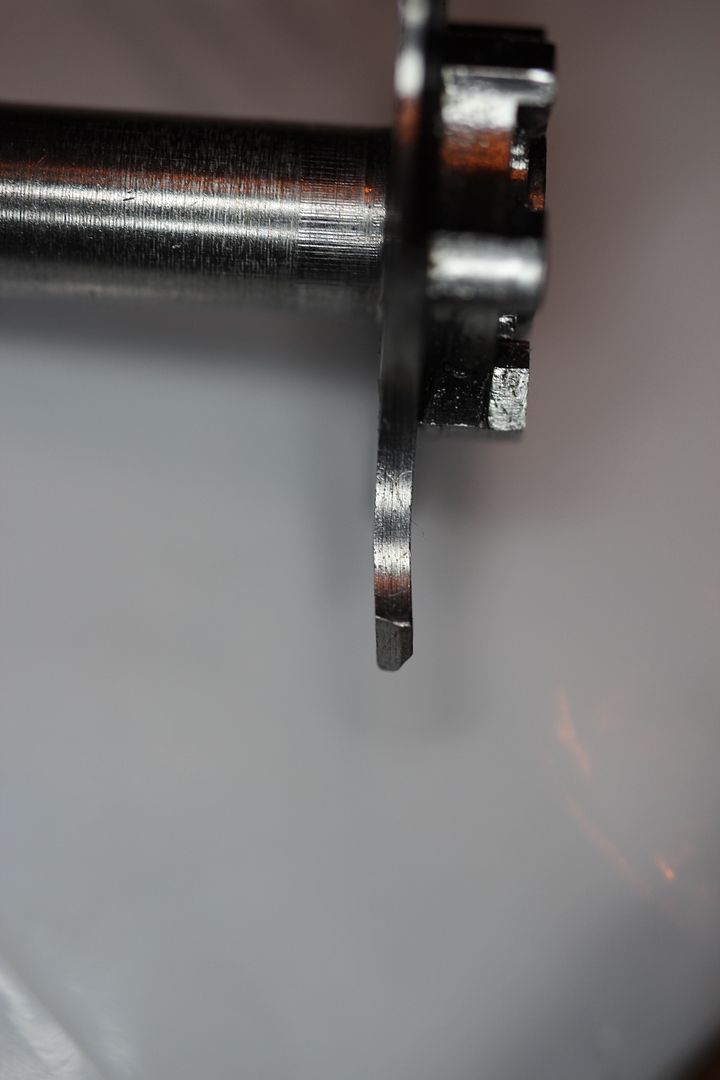
I straightened that out with this parallel jaw plier with the brass lined jaws. Good to go now.
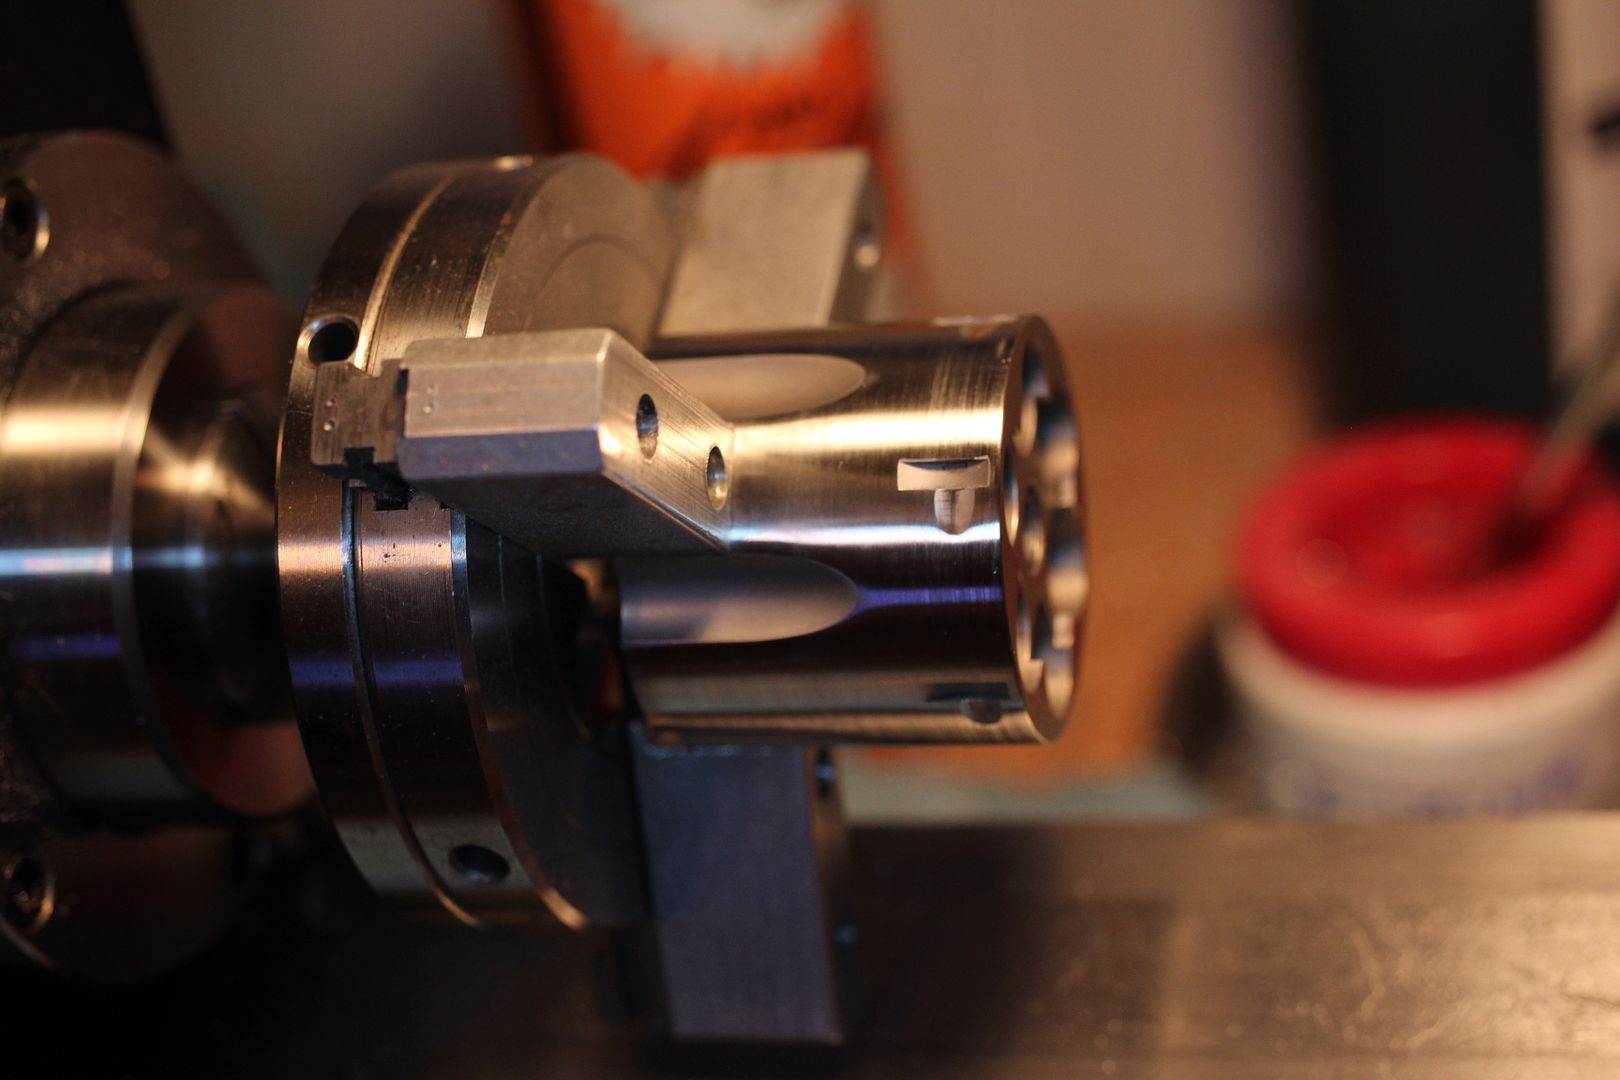
Now over to my bench lathe. Instead of turning the cutter with the little clunky "T" handle, I choose to use the lathe. I have the cutter held in a 5C collet and turn it at about 40RPM. I have a Bodine brushless motor with controller on my lathe which permits infinity variable spindle speed and loads of torque at very slow speed.
Anyway, 45° chamfer cutter with a 45ACP chamber pilot installed. I put three cases in the cylinder to support the extractor, butter up the cutter & pilot with some cutting oil then cut the chamfer on the other three chargeholes.
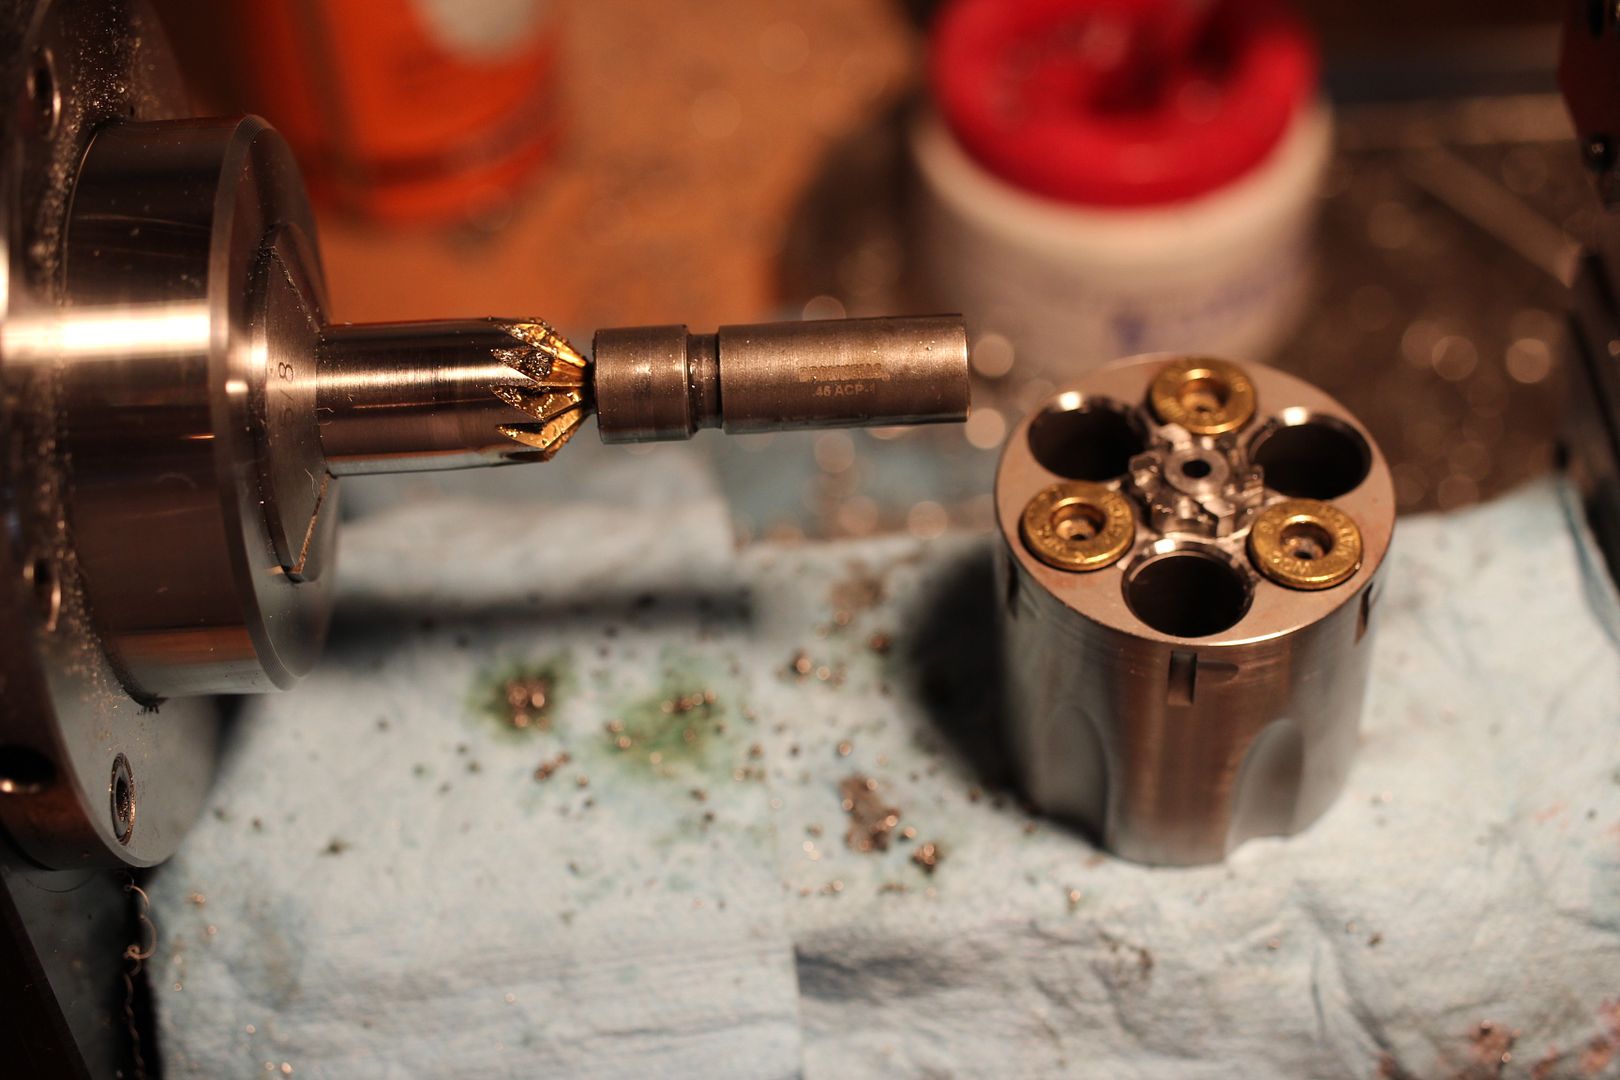
Shift the brass cases to the freshly cut holes then do the three remaining.
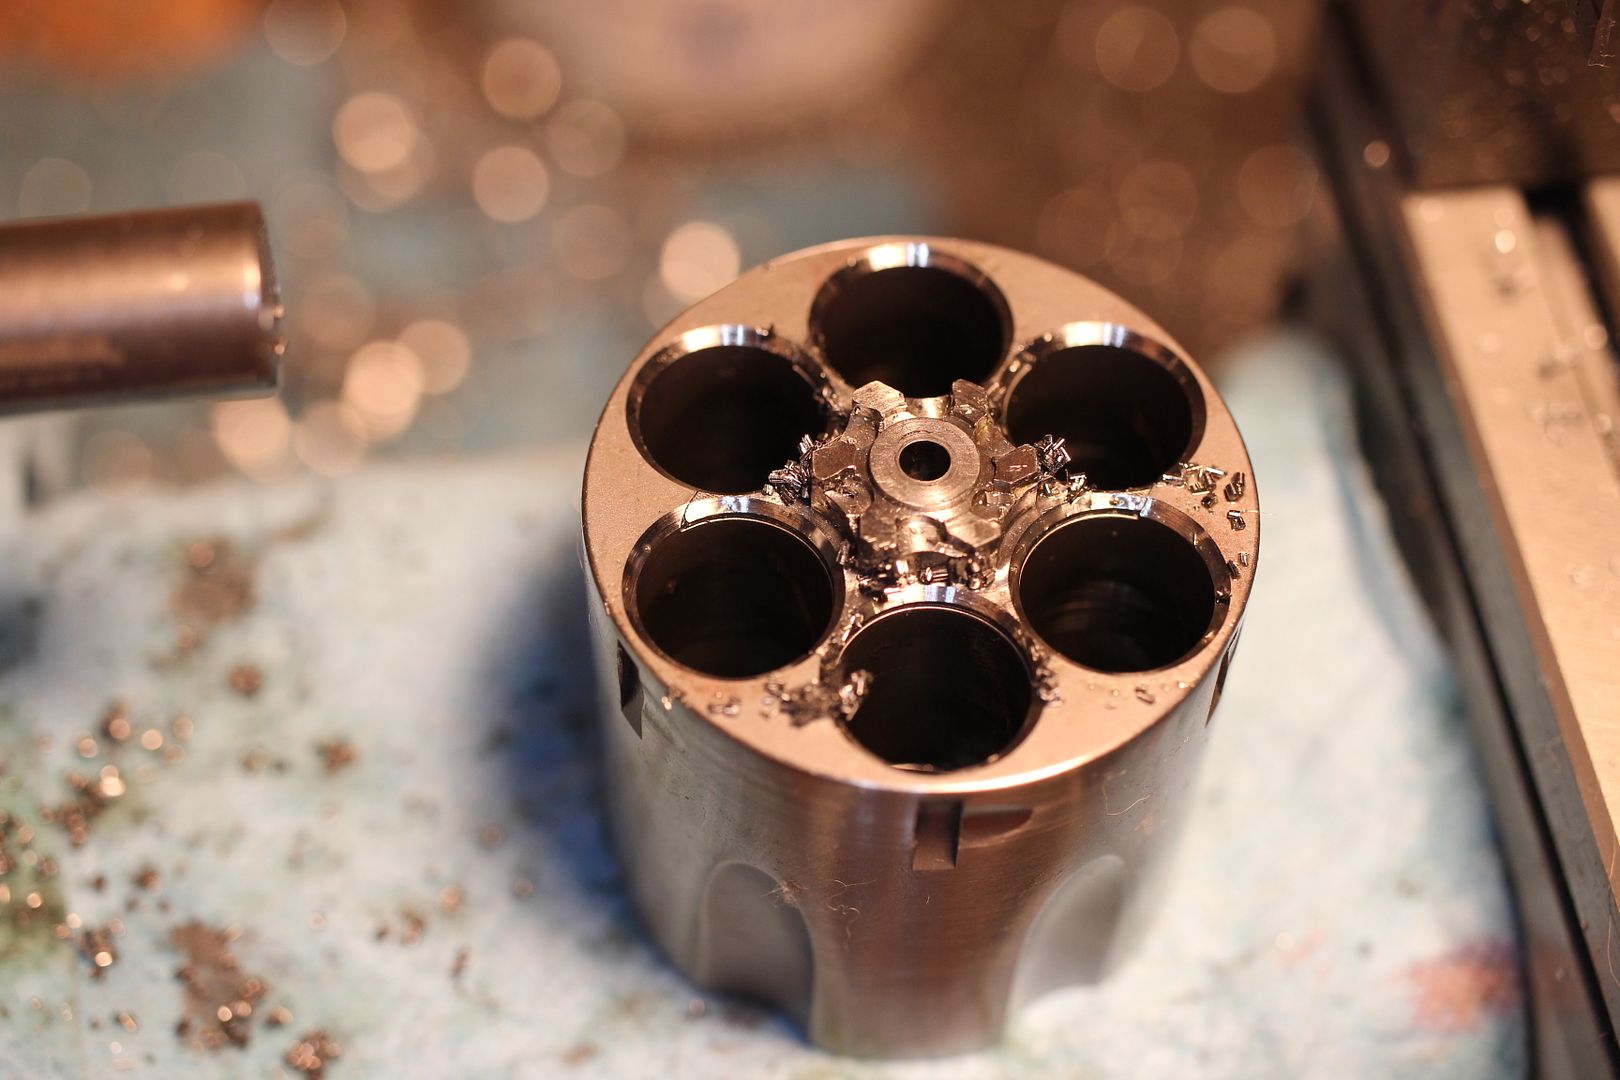
Looks much better once it's all cleaned up.
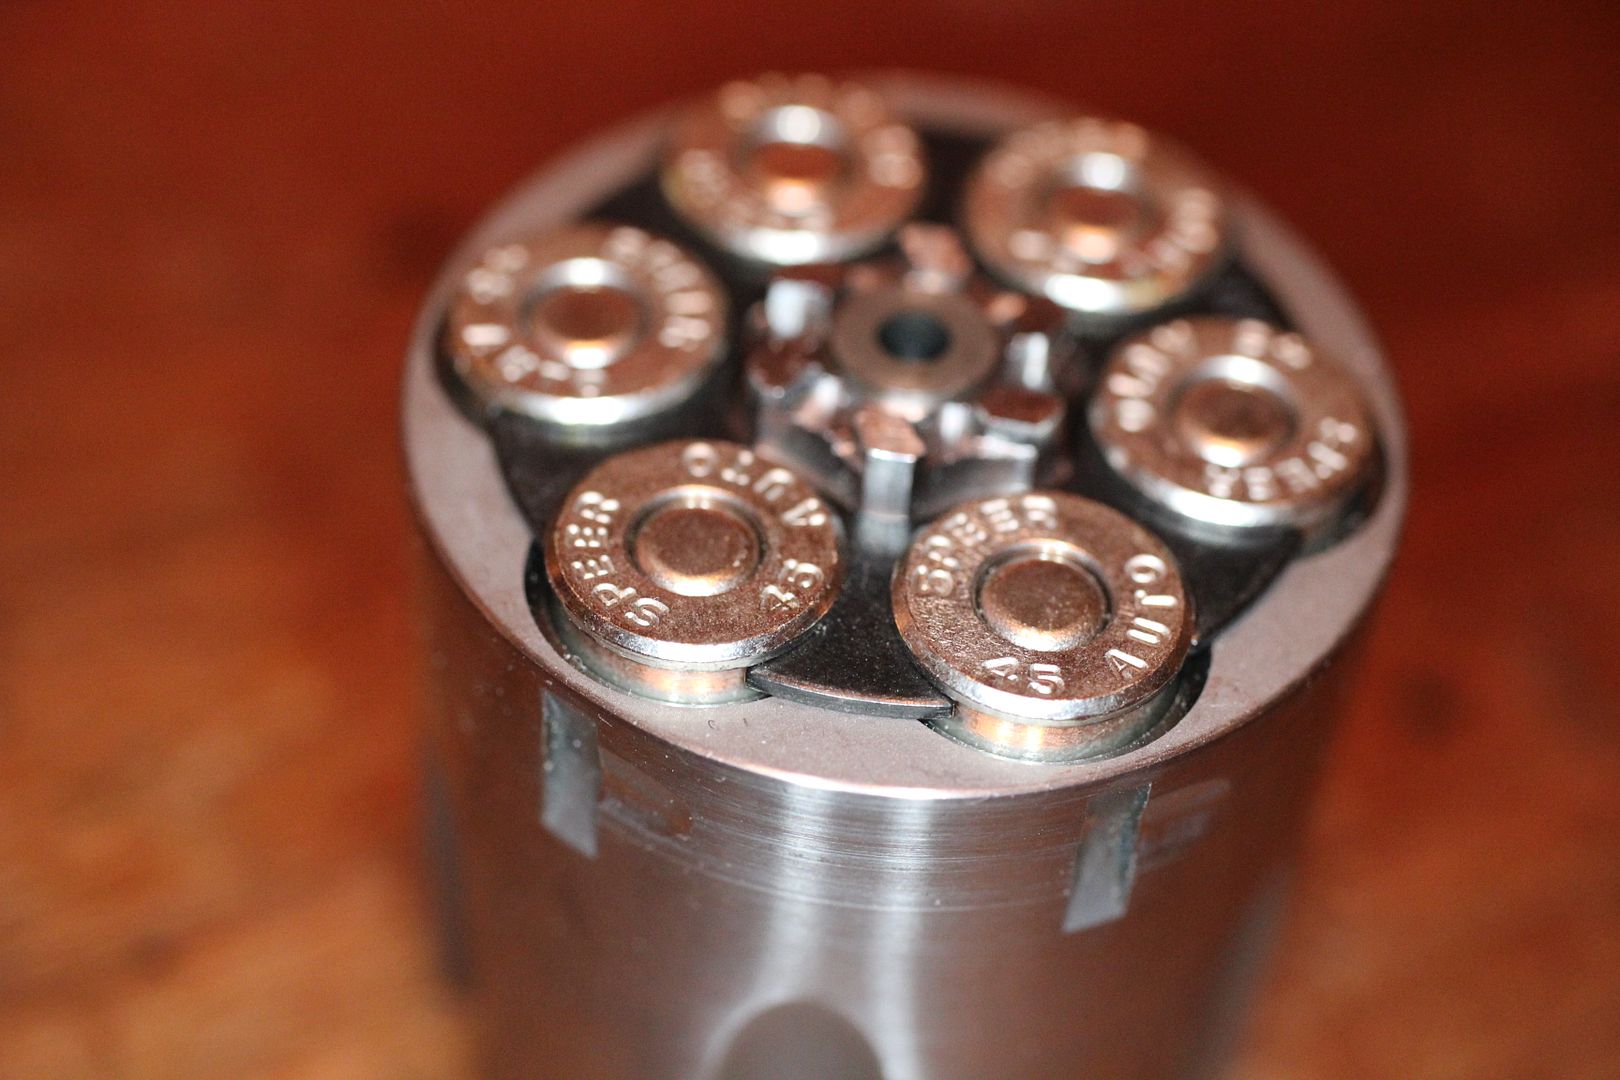
The chamfer provides a smooth lead in so the case mouth/s wont catch on the way in.
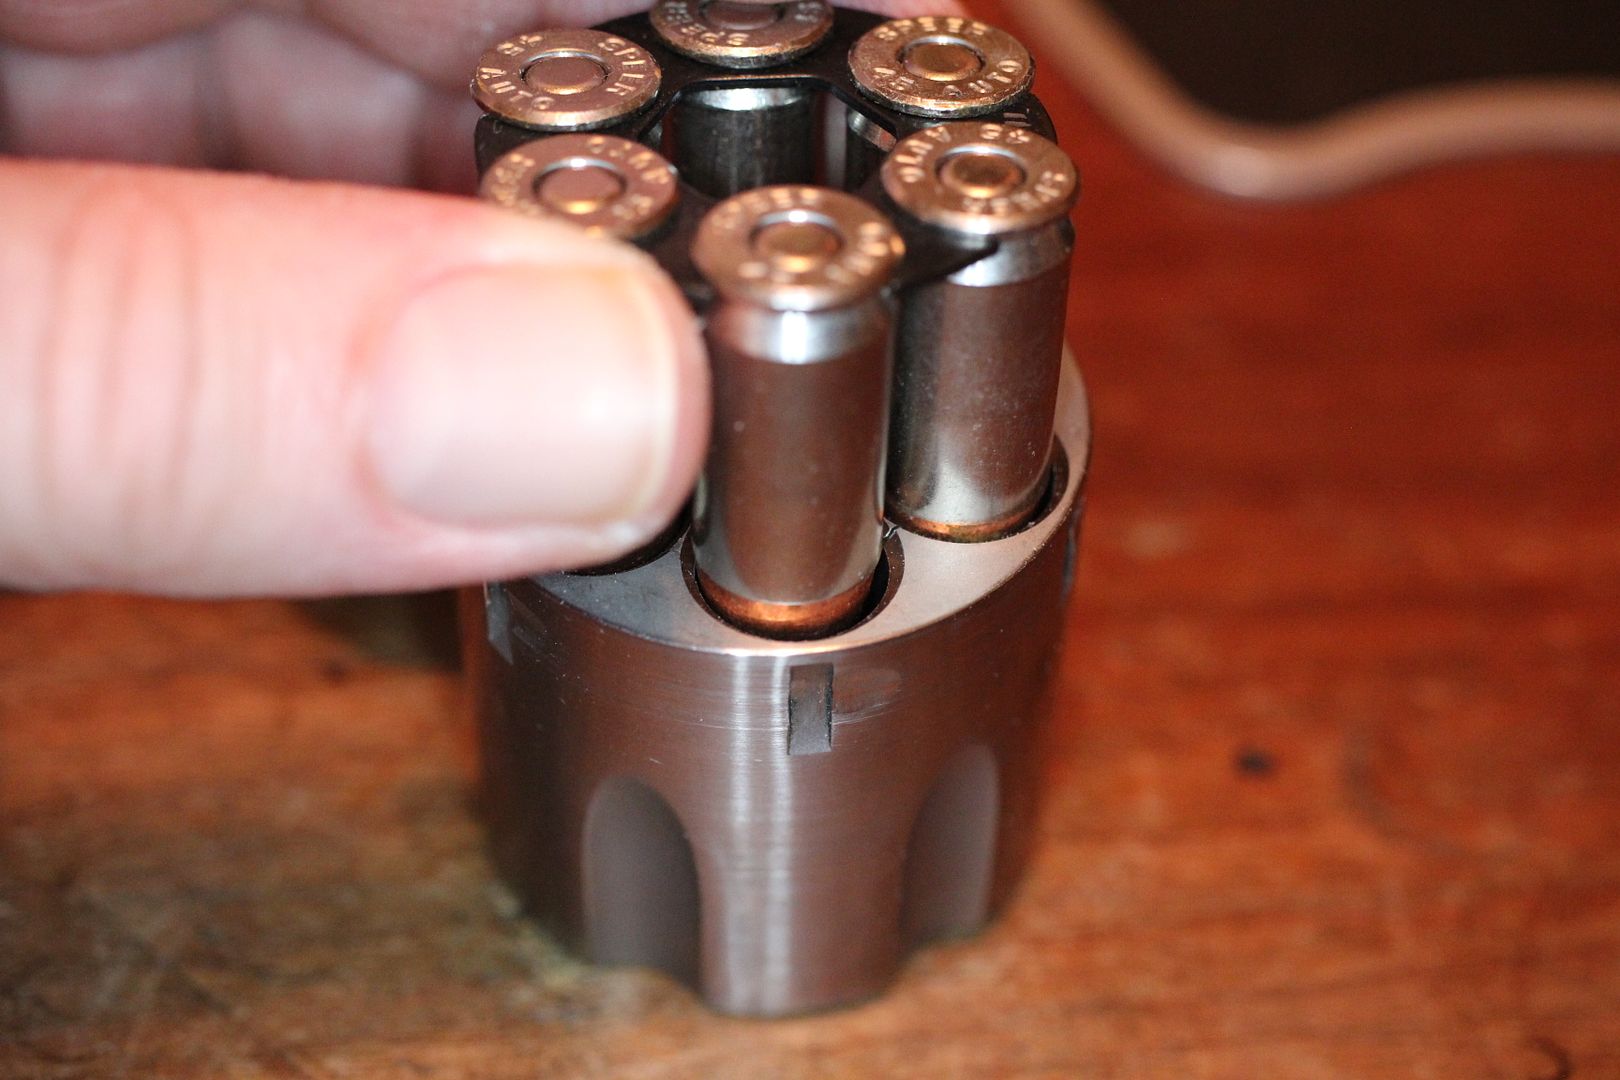
Reloads just drop right in there slicker than.... Well... slick
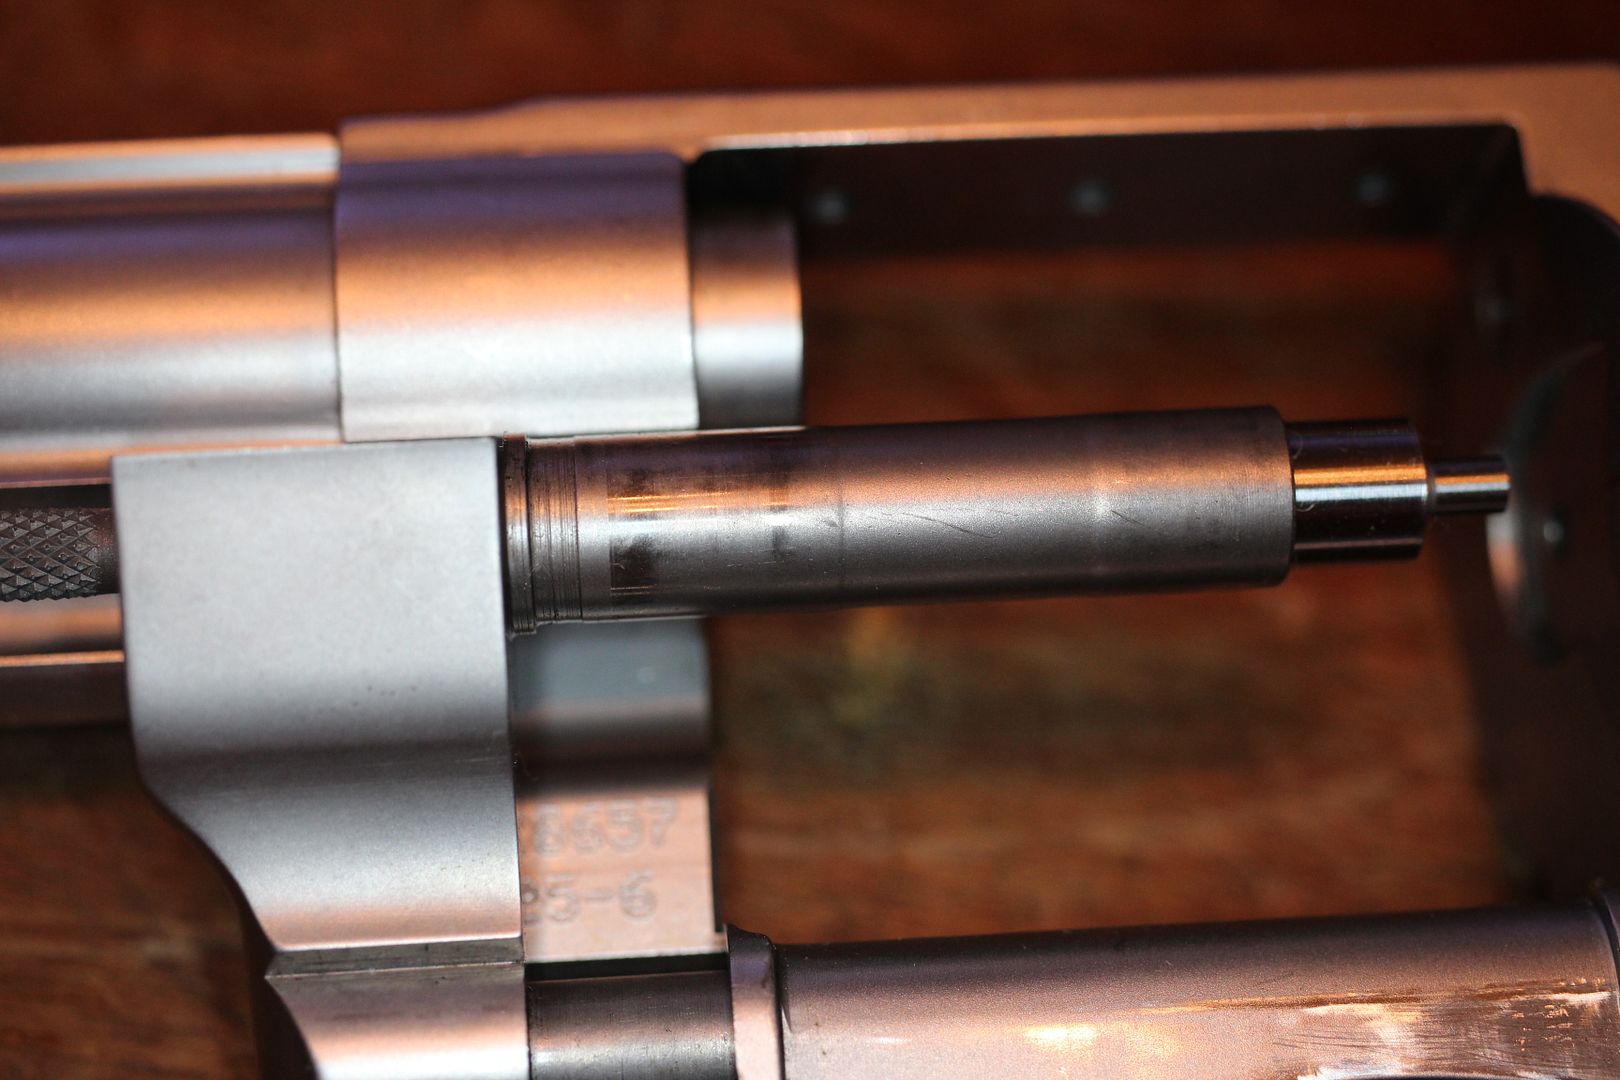
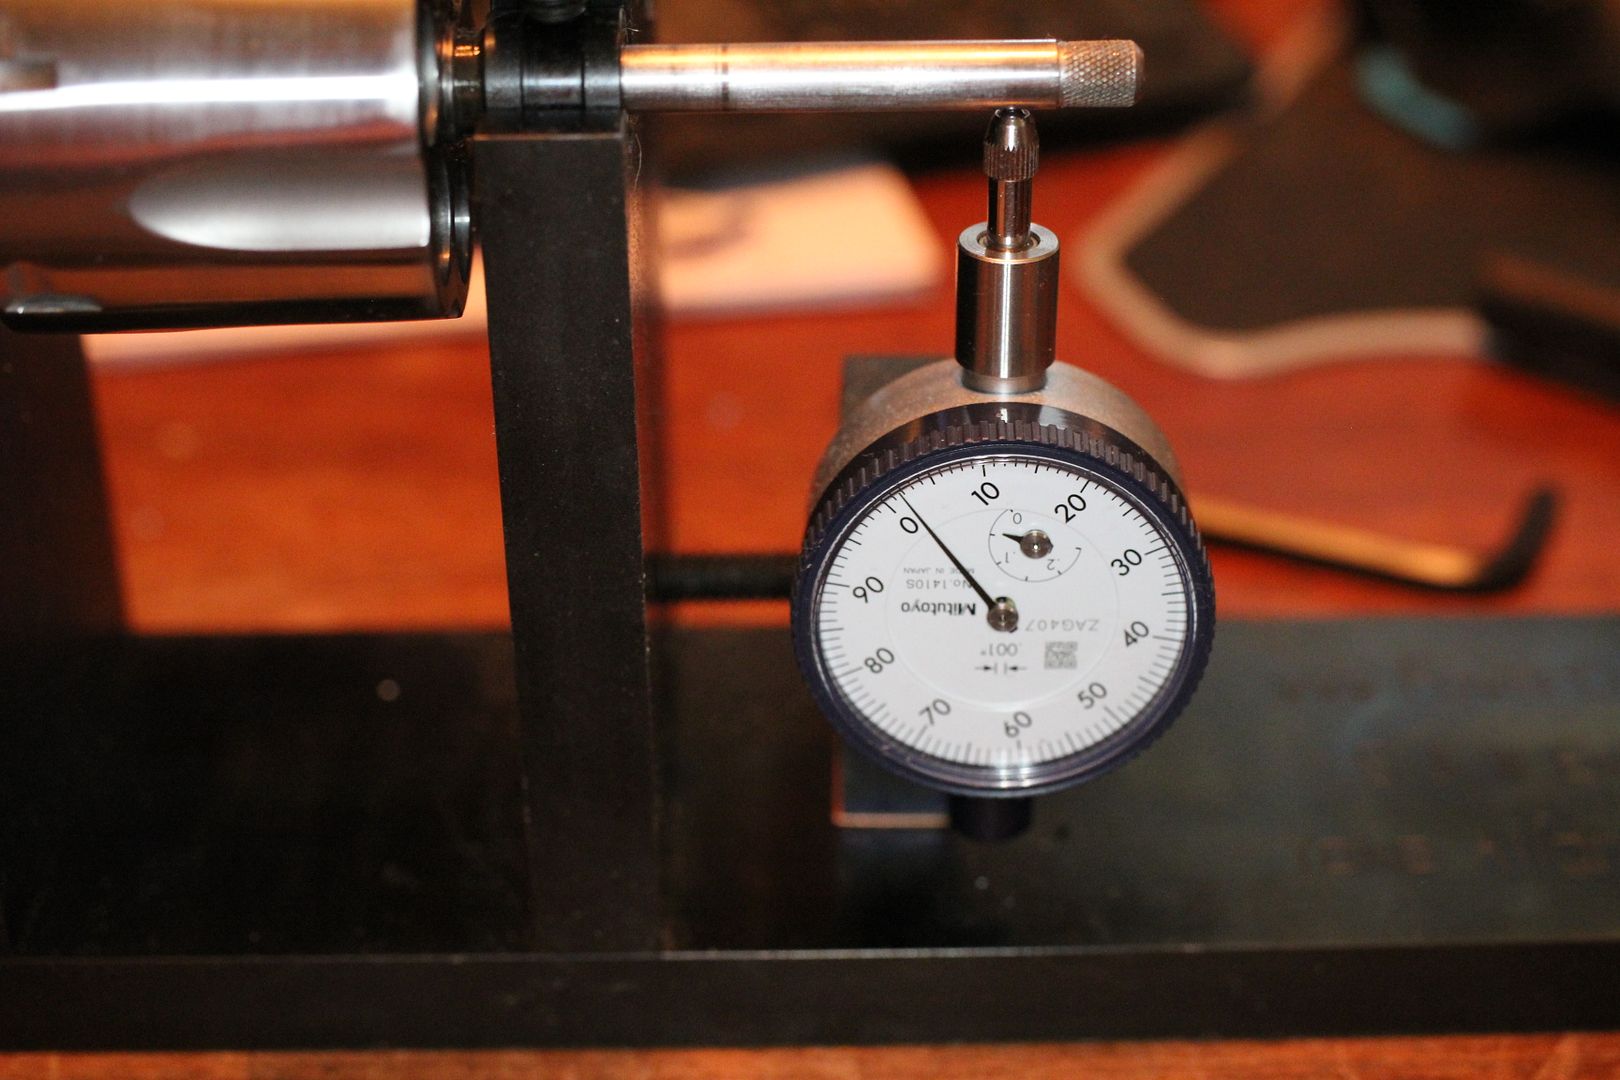
One more thing to check on the cylinder assembly. Put the thing back together and load it into the test fixture. And yep... a bit over 0.015" of runout in the extractor rod. That's no damn good at all.
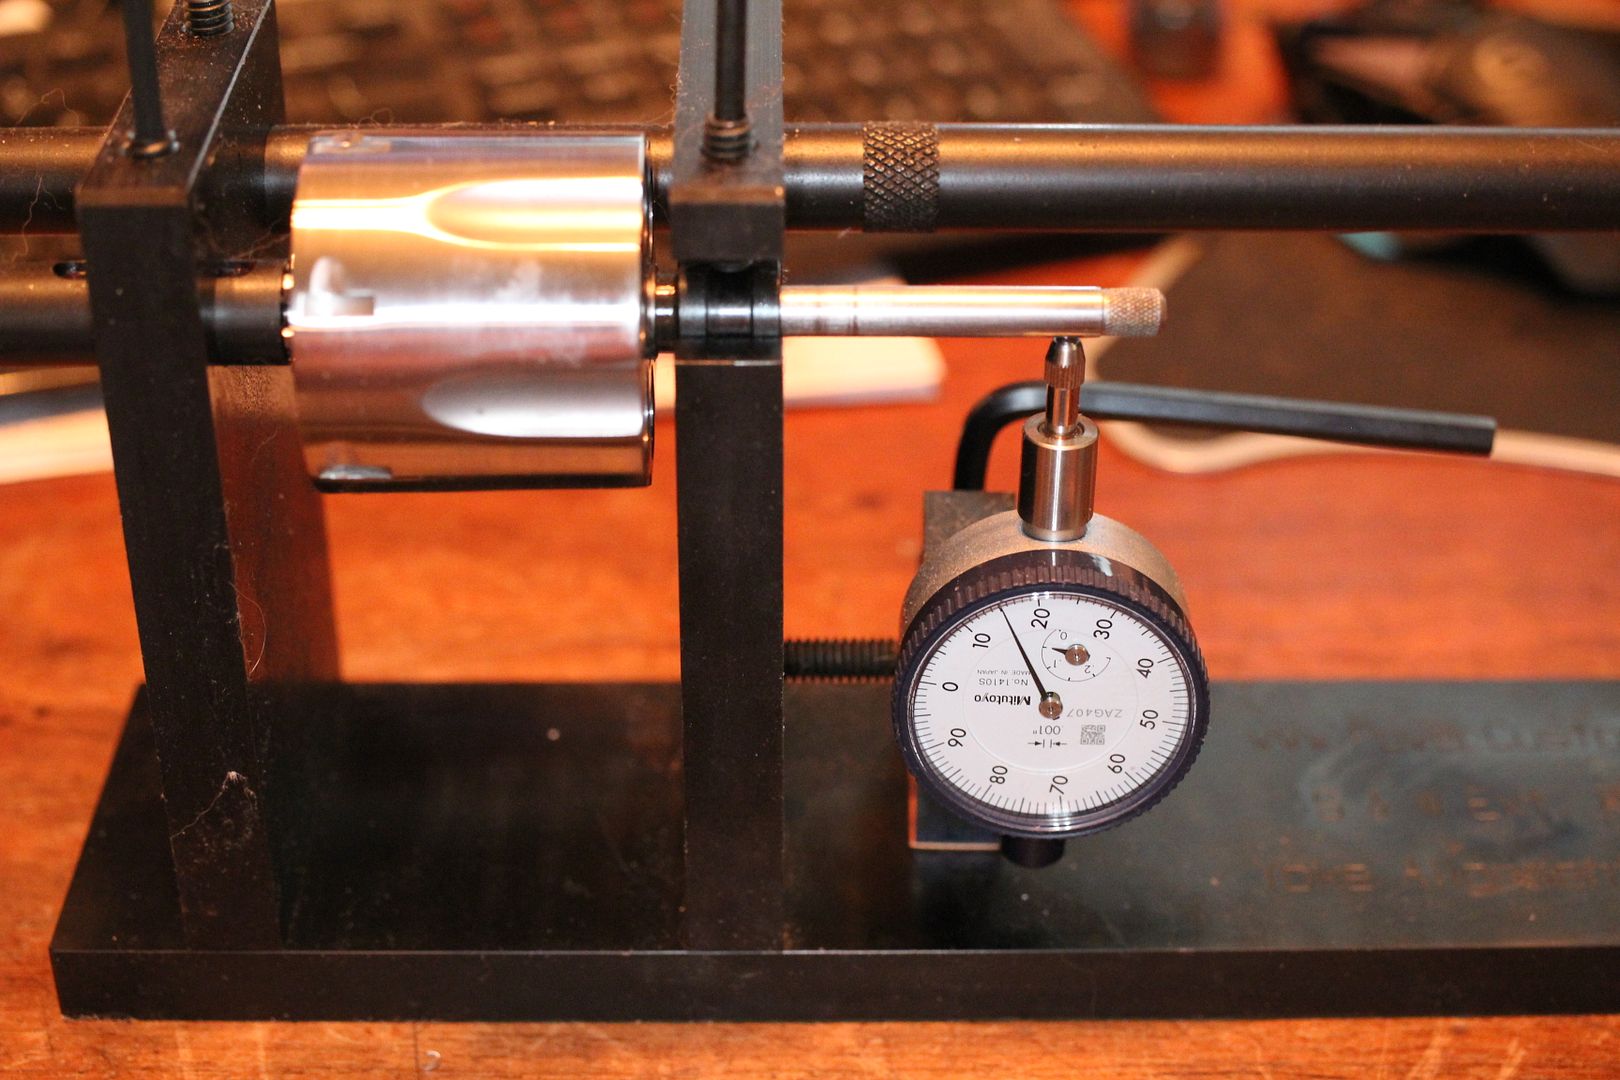
After about 20 minutes or so of careful un-bending and spinning the thing we are now under 0.002 for runout. Good to go.
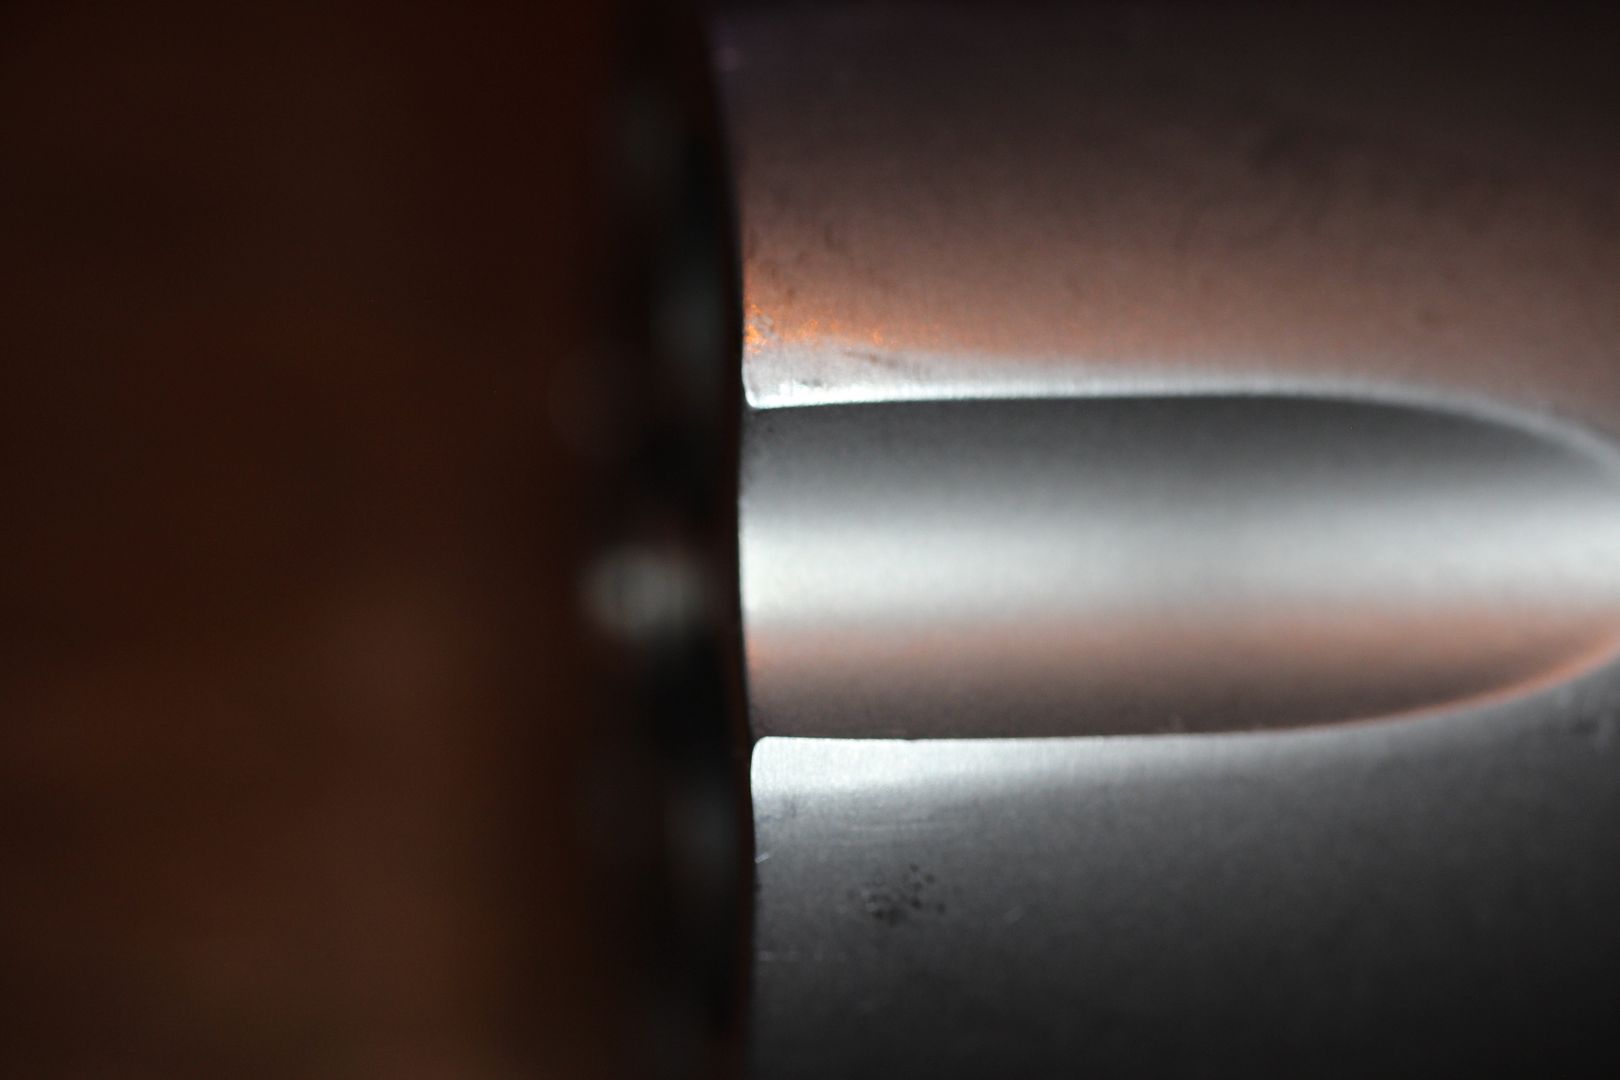
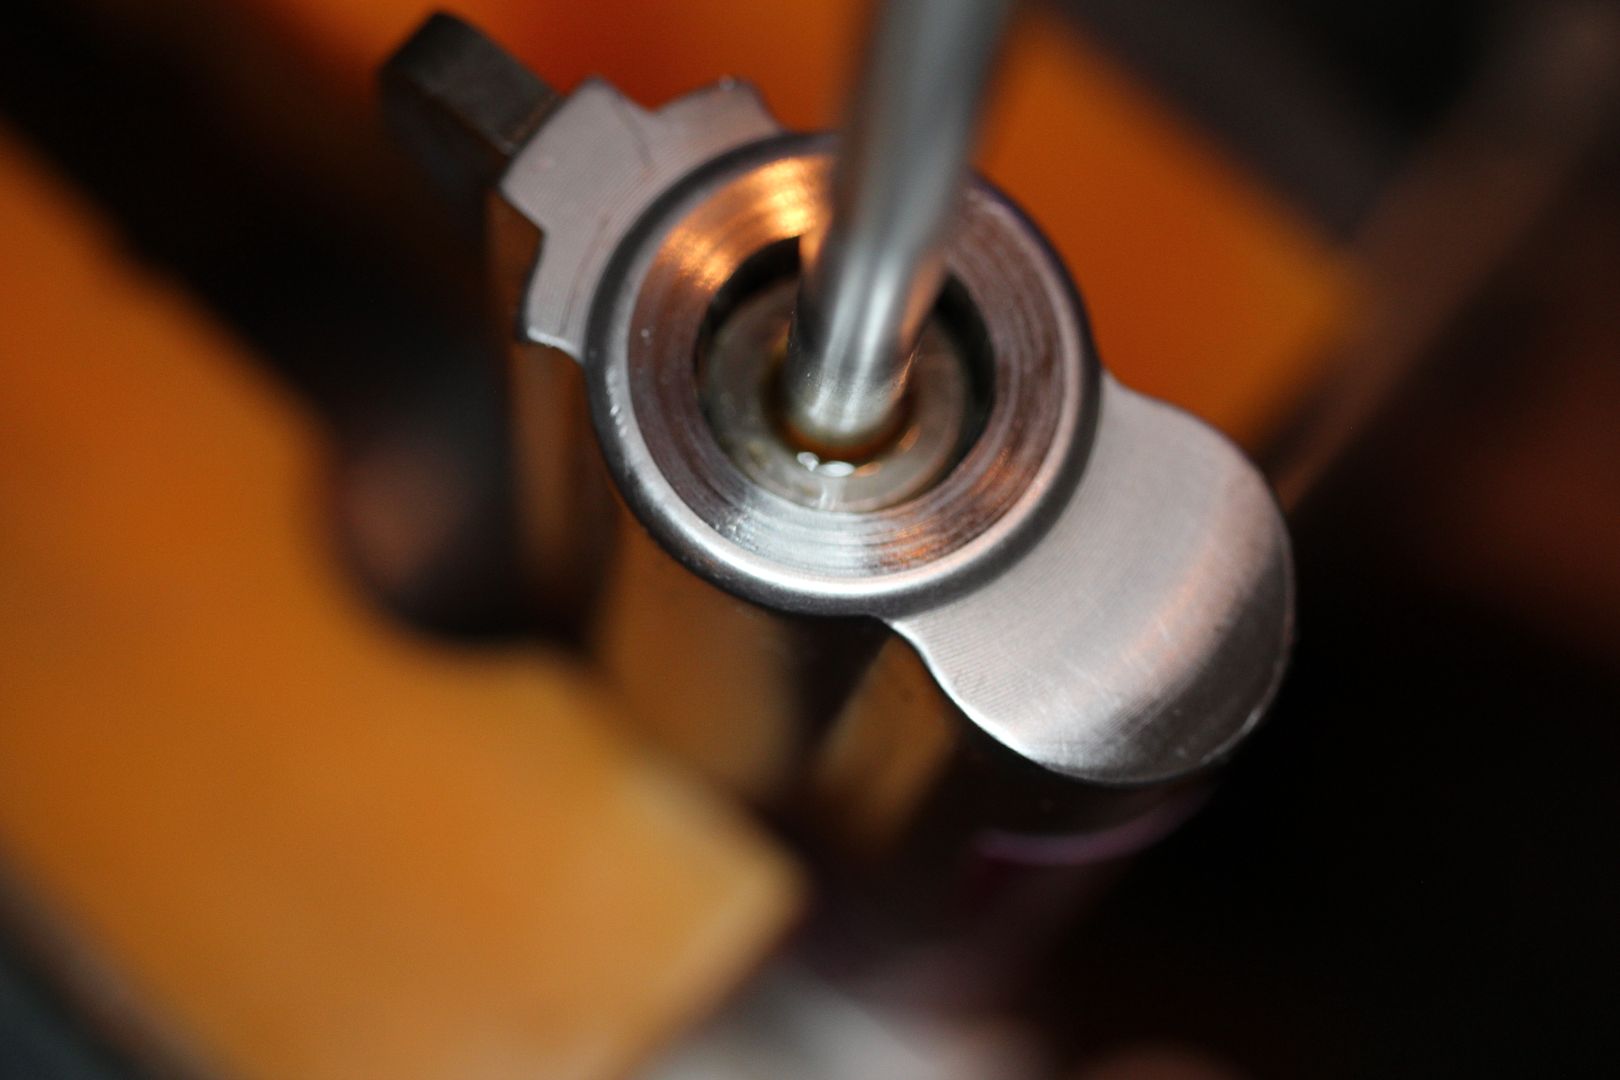
Over on the barrel, I fixed a divot on the underlug front bottom with some careful filing and a little buff with some abrasive tape. That rod you see in the bore is the pilot of an expanding mandrel to index a crowning cutter off of.
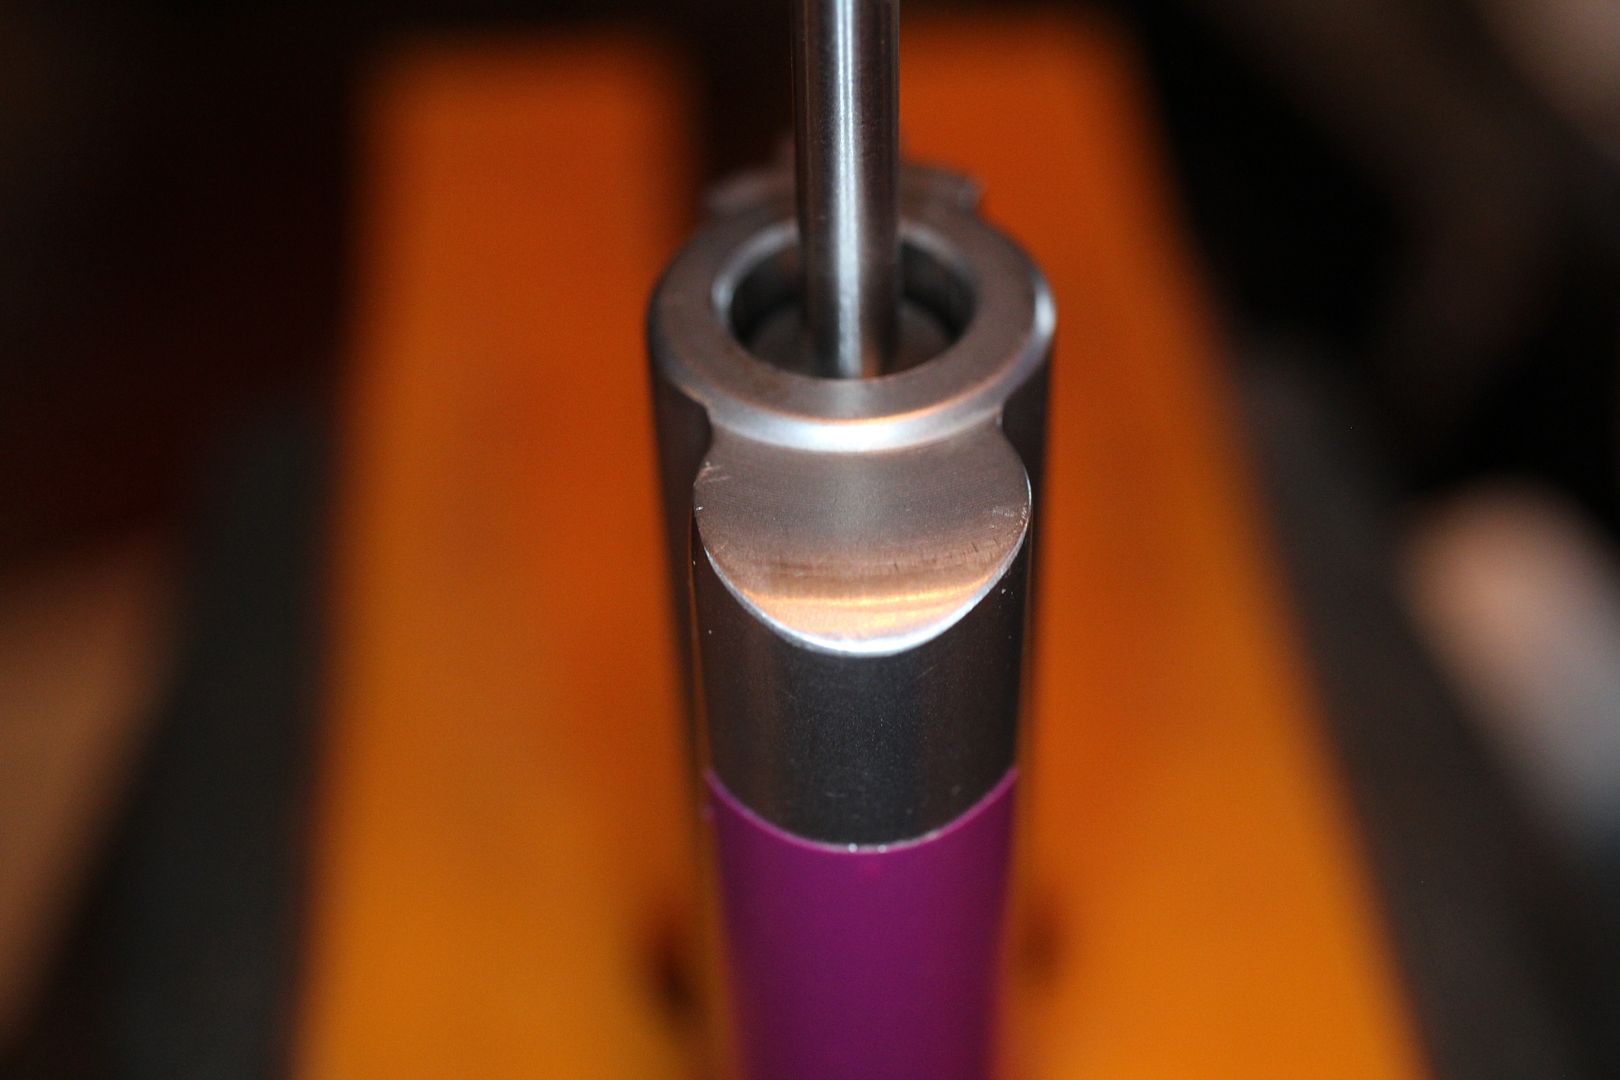
And now we have an 11° recessed crown.
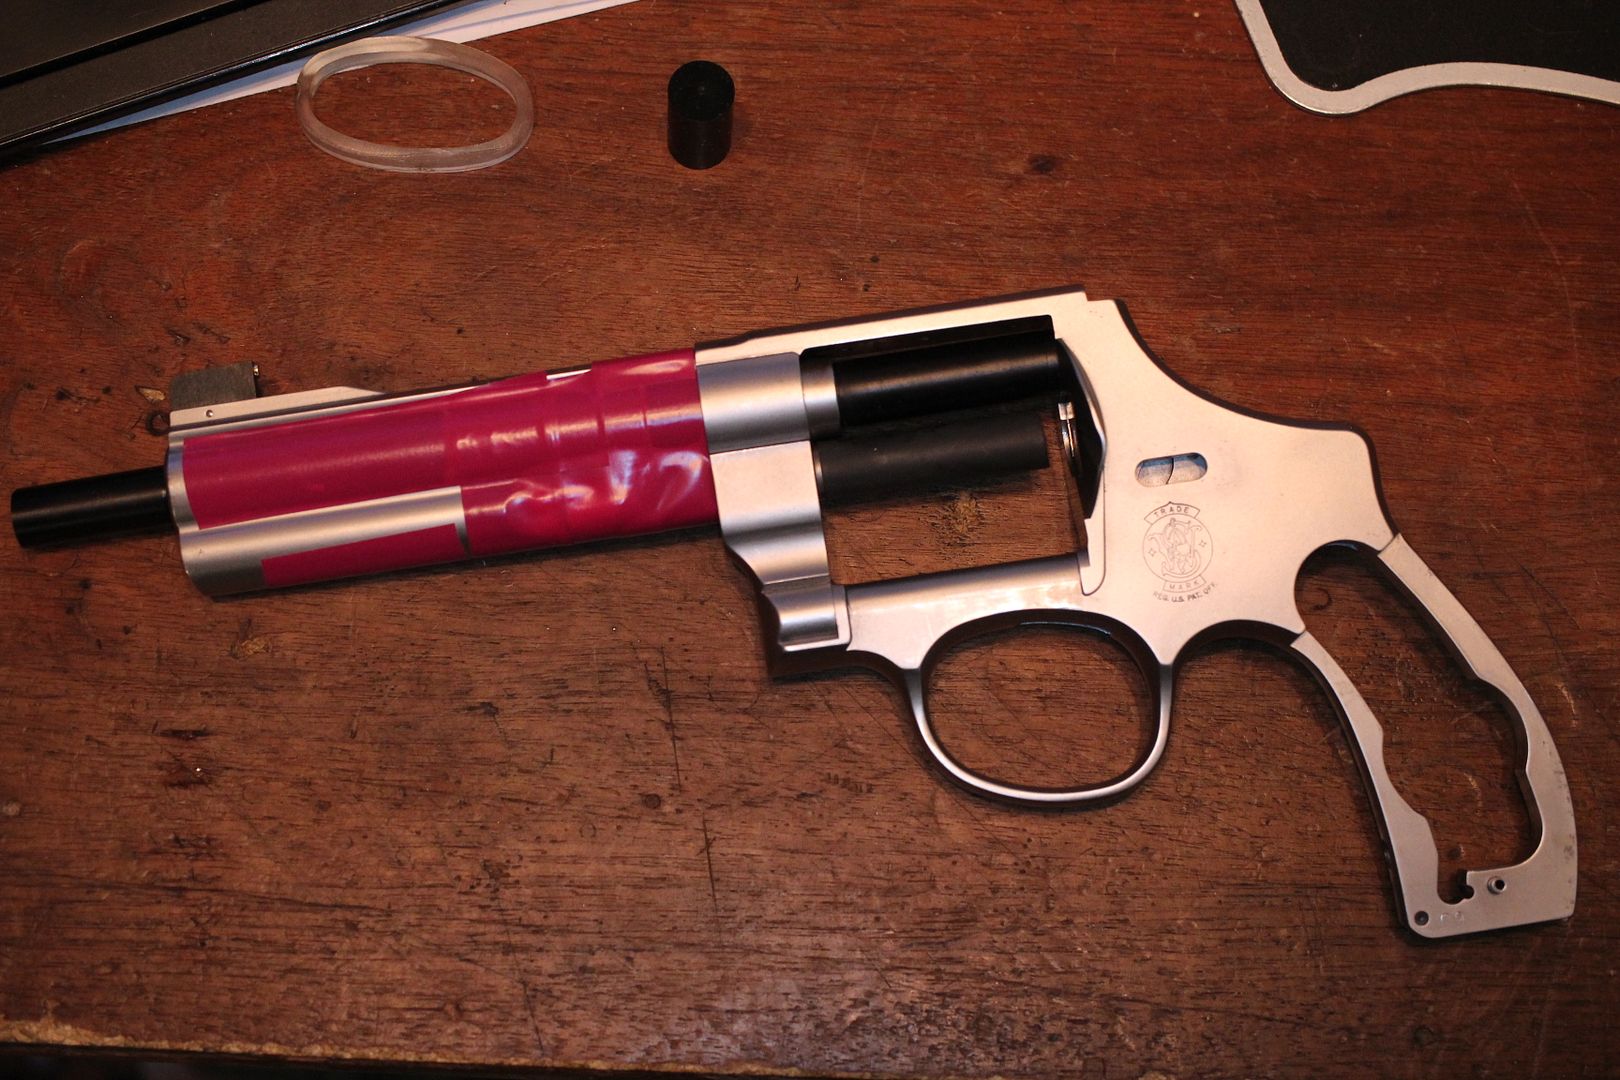
Next up is prep for some media blasting. I need the mask off the barrel to protect the laser etching and to keep any media out of the locking bolt. Also going the install the yoke, sideplate and the three screws and bead blast that all together except the yoke barrel will also be masked. I will blast the stripped cylinder separately.
My blast cabinet is loaded with mixed media (glass beads + aluminum oxide). That stuff has too much tooth for this surface finish so I'm going to go with straight glass beads. I'll have to do this open air weather permitting with my Paasche hopper gun. I'll get on that perhaps tomorrow or Wednesday, that's all for now.
Cheers
Bill
__________________
Because they don't make a .46
|
|
The Following 14 Users Like Post:
|
75Vette, Hoosier45, jdlii, johnbeaver, kraynky, muddocktor, Muley Gil, Outrider, Protocall_Design, Redford, S&WIowegan, sinister, snowman.45, TAROMAN |
03-12-2019, 08:53 AM
|
|
US Veteran
|
|
|
Join Date: Jun 2005
Location: S.W. Fl.
Posts: 1,579
Likes: 678
Liked 1,162 Times in 449 Posts
|
|
I wish you were my next door neighbor.
|
|
The Following 3 Users Like Post:
|
|
03-12-2019, 11:41 PM
|
|
Member
|
|
|
Join Date: Aug 2017
Posts: 34
Likes: 23
Liked 27 Times in 11 Posts
|
|
Amazing level of detail here!
|
|
The Following User Likes This Post:
|
|
03-13-2019, 01:27 AM
|
|
US Veteran
|
|
|
Join Date: Jun 2012
Location: SW Mississippi
Posts: 1,351
Likes: 2,236
Liked 6,228 Times in 1,044 Posts
|
|
Ahoy there Gents,
Tended to the bead blasting today...
Here's a couple shots all masked off & plugged up. I turned a couple plugs out of some delrin rod, one to stop off the muzzle and and another to fit the forcing cone wedged in place against the recoil shield. Also put a sleeve of shrink tube over the yoke barrel.
And the starboard side.
I used straight number 10 glass beads which are 100-170 mesh size in a Paasche hopper gun at 60 psi.
Only took perhaps 30 minute to do everything. Still, I don't particularly care to blast stuff in the open, it makes a big mess. I have a good size patch of the gravel drive that looks like fresh snow Anyway I think the finish came out pretty nice.
Here's all the bits right after cleanup.
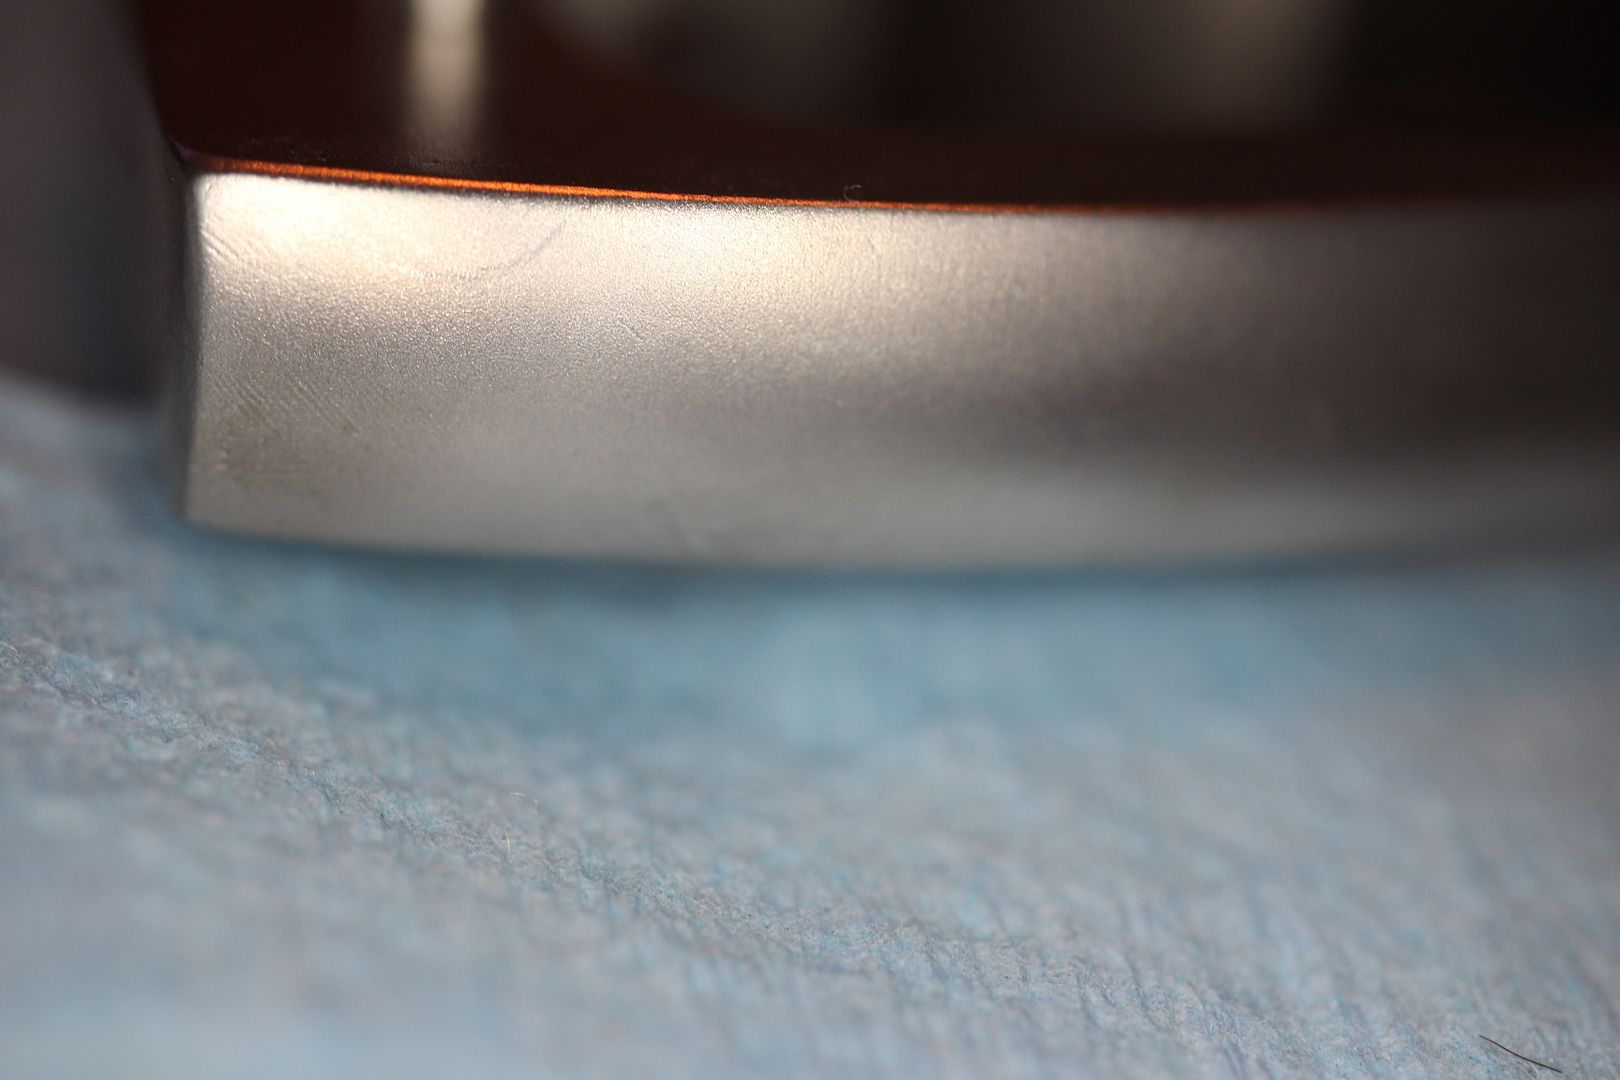
A closeup of the spot where the cylinder was smackin' the frame.
While you can still just make out where the dings were, I think it cleaned up pretty well.
The area of the backstrap that was all chewed up.
Seems I need to put this back together
Training day tomorrow... Squats, press & deadlift so... I'll probably get after this on Thursday. Until then...
Cheers
Bill
__________________
Because they don't make a .46
|
|
The Following 10 Users Like Post:
|
|
03-13-2019, 02:13 AM
|
 |
Member
|

|
|
Join Date: Jul 2014
Location: Mojave Desert
Posts: 10,469
Likes: 18,212
Liked 24,597 Times in 6,936 Posts
|
|
Very nicely done!!
Silly question: Not being a fan of the new-style frame lug, how hard would it be to remove the section above where the original stop would be located, i.e., make it look like the old style?
I know it's not practical, but never cared for the look of it. If I had your abilities and was already that deep into the "spa day" project, Id probably find away to remove it.
__________________
213th FBINA
Last edited by CH4; 03-13-2019 at 03:03 AM.
|
03-14-2019, 07:59 PM
|
|
US Veteran
|
|
|
Join Date: Jun 2012
Location: SW Mississippi
Posts: 1,351
Likes: 2,236
Liked 6,228 Times in 1,044 Posts
|
|
Quote:
Originally Posted by CH4

Very nicely done!!
Silly question: Not being a fan of the new-style frame lug, how hard would it be to remove the section above where the original stop would be located, i.e., make it look like the old style?
I know it's not practical, but never cared for the look of it. If I had your abilities and was already that deep into the "spa day" project, Id probably find away to remove it.
|
Yeah I don't much care for the new look either. It wouldn't be too much trouble to mill that off. The tricky bit would be getting the cut areas to blend with the existing flats such that it doesn't look like a hack job. I'd almost be more inclined to wipe to whole thing off and poke a hole in there to install an old style frame lug instead of trying to fiddle with shaping one out of that cast in lug. In any event, I only try experimental stuff on my personal guns and since it's pretty unlikely I'll be owning one of these new models the point is moot
Cheers
Bill
__________________
Because they don't make a .46
|
|
The Following User Likes This Post:
|
|
03-14-2019, 08:35 PM
|
|
US Veteran
|
|
|
Join Date: Jun 2012
Location: SW Mississippi
Posts: 1,351
Likes: 2,236
Liked 6,228 Times in 1,044 Posts
|
|
All done but the test drive
Evening Gents,
Wrapping this job up...
Started out with trial fitting some sideplate shims in there since there was a bunch of lateral slop in both the trigger and hammer.
I wanted to take some of that slop out without binding of course.
Set the shims in place with just the hammer & trigger in there then bolt the sideplate down and check for function. I wound up adding 0.002" on each side of the hammer and 0.004" on both sides of the trigger.
A light polish on the bottom & left side of the rebound slide with a fine ceramic stone then stuffed all the remaining bits in there.
Strategically lubed here and there with a bit of Brownells action lube plus and some Lubriplate FMO 350AW
Before I buttoned her up.
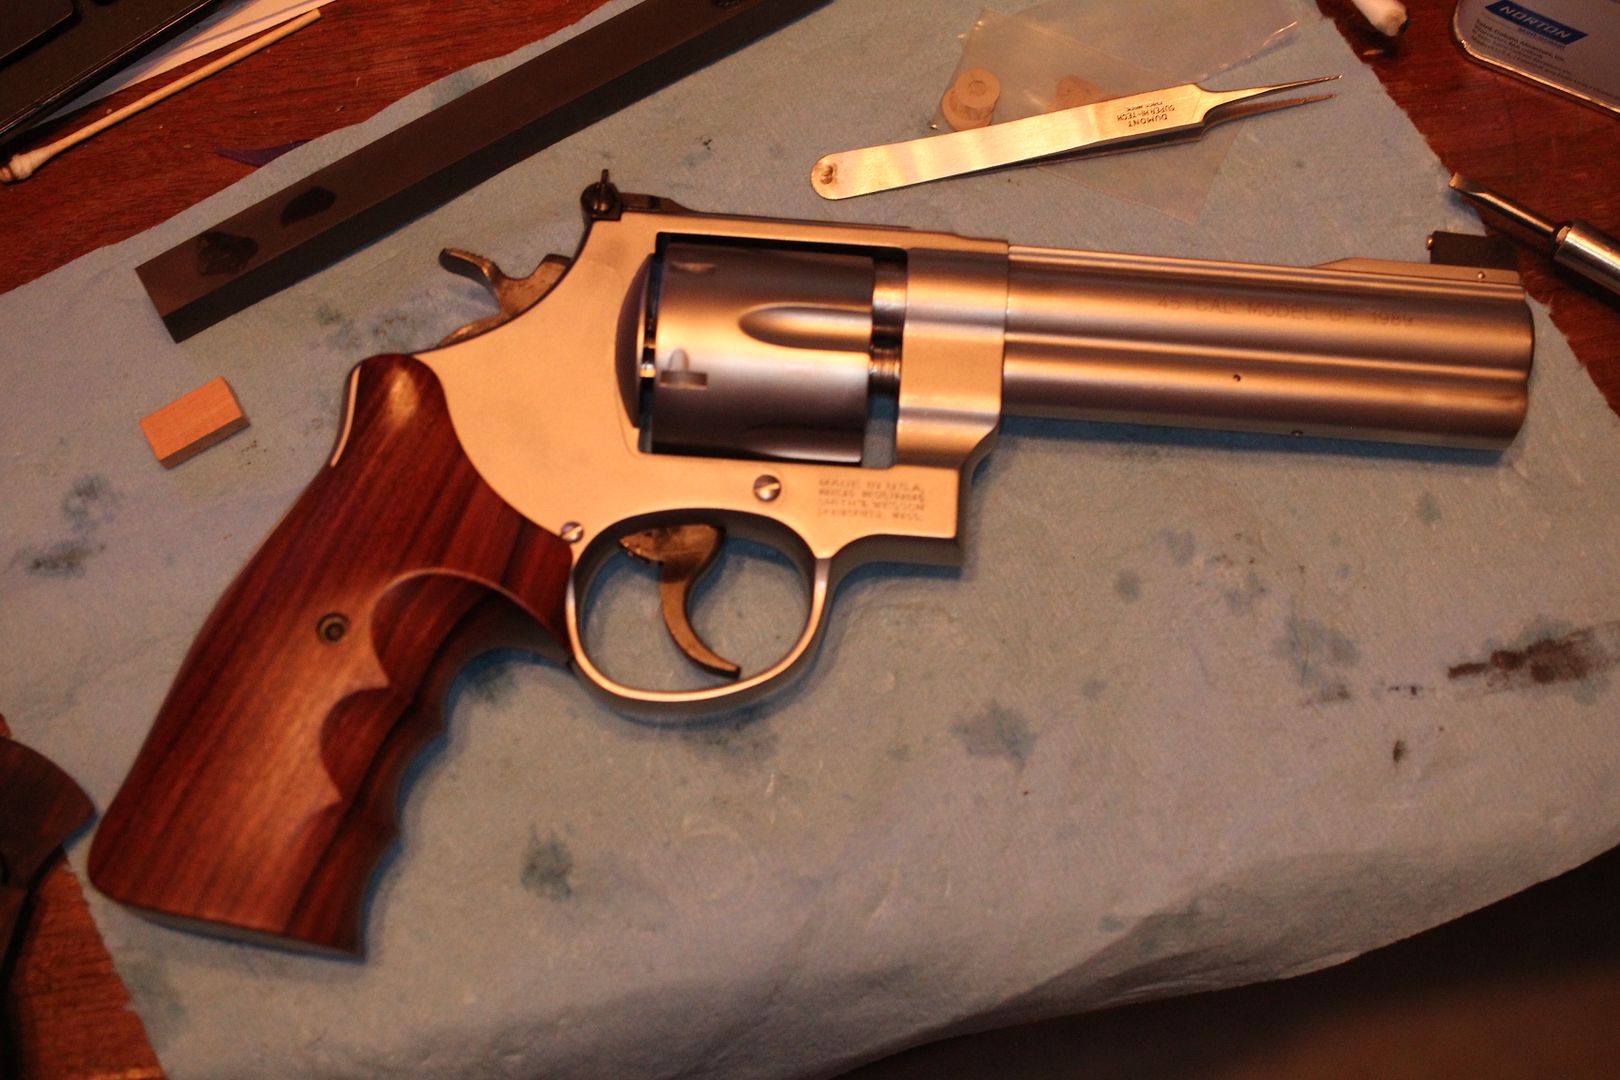
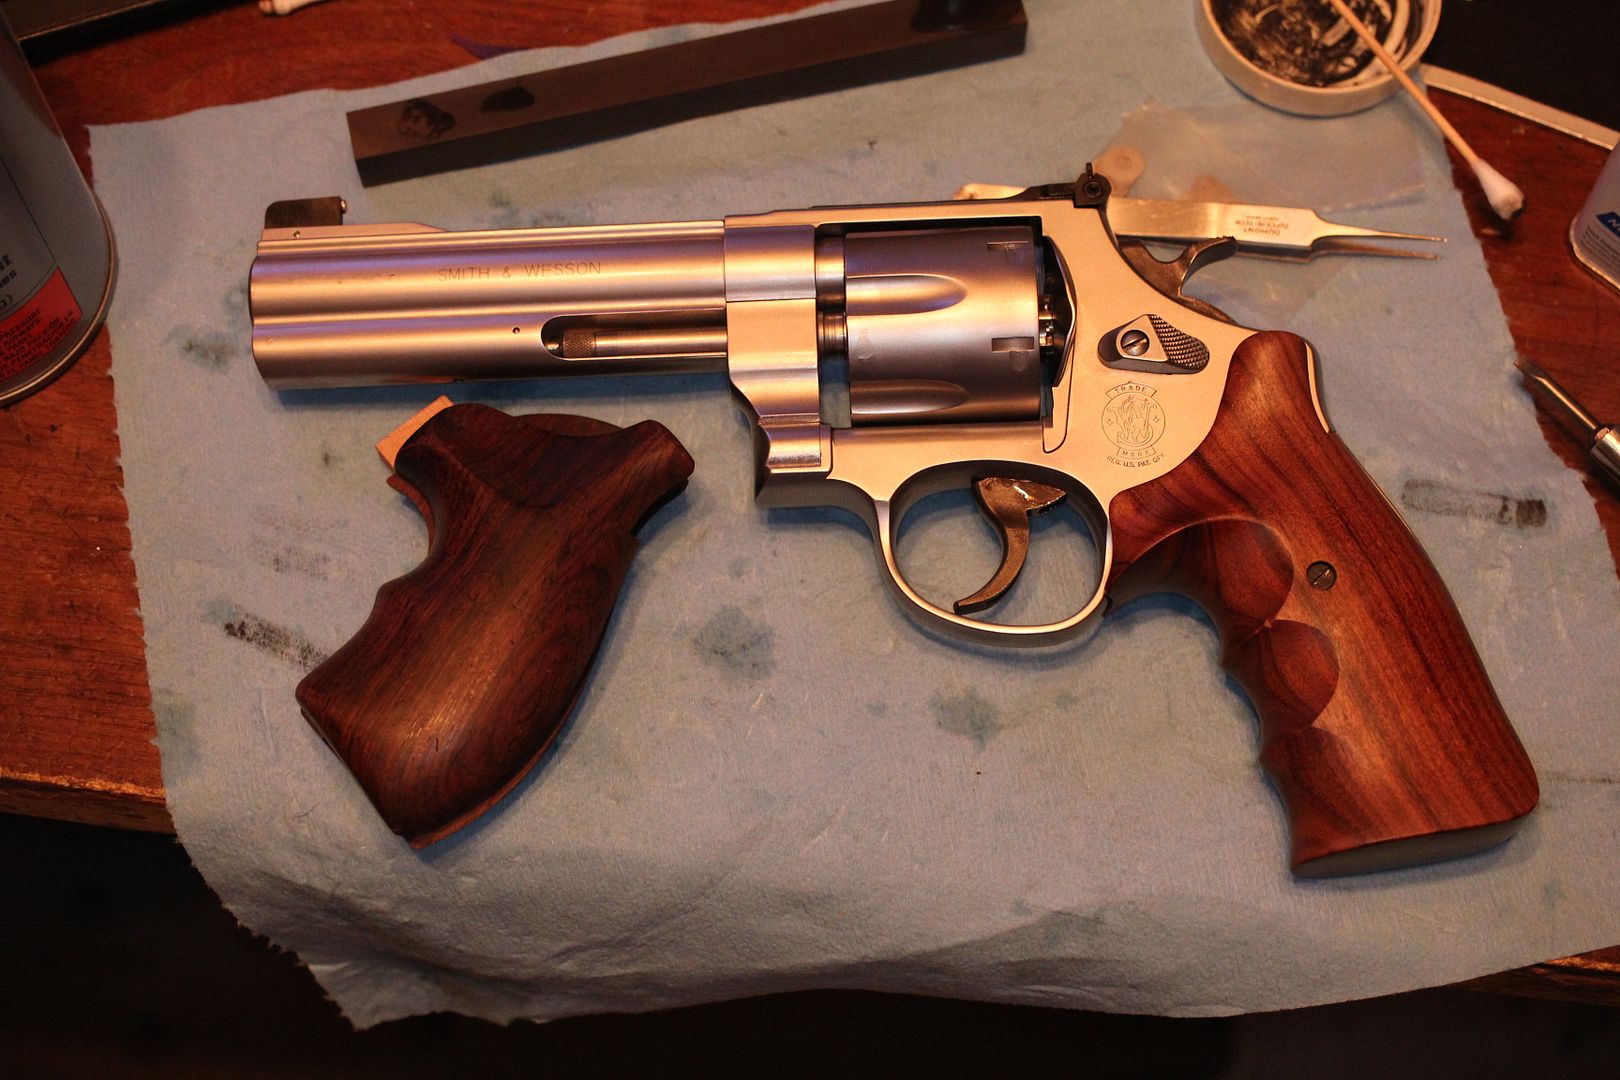
The Spegel boot grips I degreased and cleaned a few days back and left them to dry thoroughly. Gave 'em a wipe down with some tung oil today.

But those grips a too small for me so I stuck these open backstrap Nill grips on there. They're a bit small for me too but much better than the boot grips.
Weather permitting I'll be heading over the the Concordia Parish SO range on Saturday for a test drive and to regulate the new sights.
Range report to follow sometime Saturday.
Cheers
Bill
__________________
Because they don't make a .46
|
|
The Following 15 Users Like Post:
|
75Vette, ArchAngelCD, Doug M., jdlii, Jebus35745, johnbeaver, ladder13, lolaralph, Moo Moo, Outrider, Protocall_Design, rbmac52, S&WIowegan, sinister, TAROMAN |
03-14-2019, 08:45 PM
|
|
Member
|
|
|
Join Date: Jul 2014
Location: Mojave Desert
Posts: 10,469
Likes: 18,212
Liked 24,597 Times in 6,936 Posts
|
|
Quote:
Originally Posted by BMCM
Yeah I don't much care for the new look either. It wouldn't be too much trouble to mill that off. The tricky bit would be getting the cut areas to blend with the existing flats such that it doesn't look like a hack job. I'd almost be more inclined to wipe to whole thing off and poke a hole in there to install an old style frame lug instead of trying to fiddle with shaping one out of that cast in lug. In any event, I only try experimental stuff on my personal guns and since it's pretty unlikely I'll be owning one of these new models the point is moot
Cheers
Bill |
Thanks for your concurrence. I like your idea about eliminating the entire cast lug and installing an old style lug. Nonetheless I am very impressed the outcome.
__________________
213th FBINA
|
|
The Following User Likes This Post:
|
|
03-14-2019, 09:44 PM
|
 |
US Veteran
|
|
|
Join Date: Jan 2010
Location: The wet side of Oregon
Posts: 6,293
Likes: 8,827
Liked 7,790 Times in 2,378 Posts
|
|
Better than new!
A masterful job, Master Chief.
__________________
-jwk-
US Army '72-'95
|
|
The Following User Likes This Post:
|
|
03-15-2019, 03:51 PM
|
|
Member
|
|
|
Join Date: Nov 2018
Posts: 64
Likes: 20
Liked 50 Times in 17 Posts
|
|
Wow that's a beautiful gun, now. I can't believe it's the same one as
Before.
|
03-16-2019, 01:59 PM
|
|
Member
|
|
|
Join Date: May 2008
Location: Washington State
Posts: 7,500
Likes: 14,669
Liked 9,362 Times in 3,739 Posts
|
|
Looking good. I am going to be glad to get it back, and I think all who read this can see why I am confident that having Bill do the inspection and work was a great idea.
__________________
NHI, 10-8.
|
|
The Following User Likes This Post:
|
|
03-17-2019, 12:18 AM
|
|
US Veteran
|
|
|
Join Date: Jun 2012
Location: SW Mississippi
Posts: 1,351
Likes: 2,236
Liked 6,228 Times in 1,044 Posts
|
|
Evening Gents,
Well, it's all dirtied up again
Considering my lousy eyesight I can't complain about the accuracy. This is six shots of TZZ 185gr match wadcutter at 15 yards.
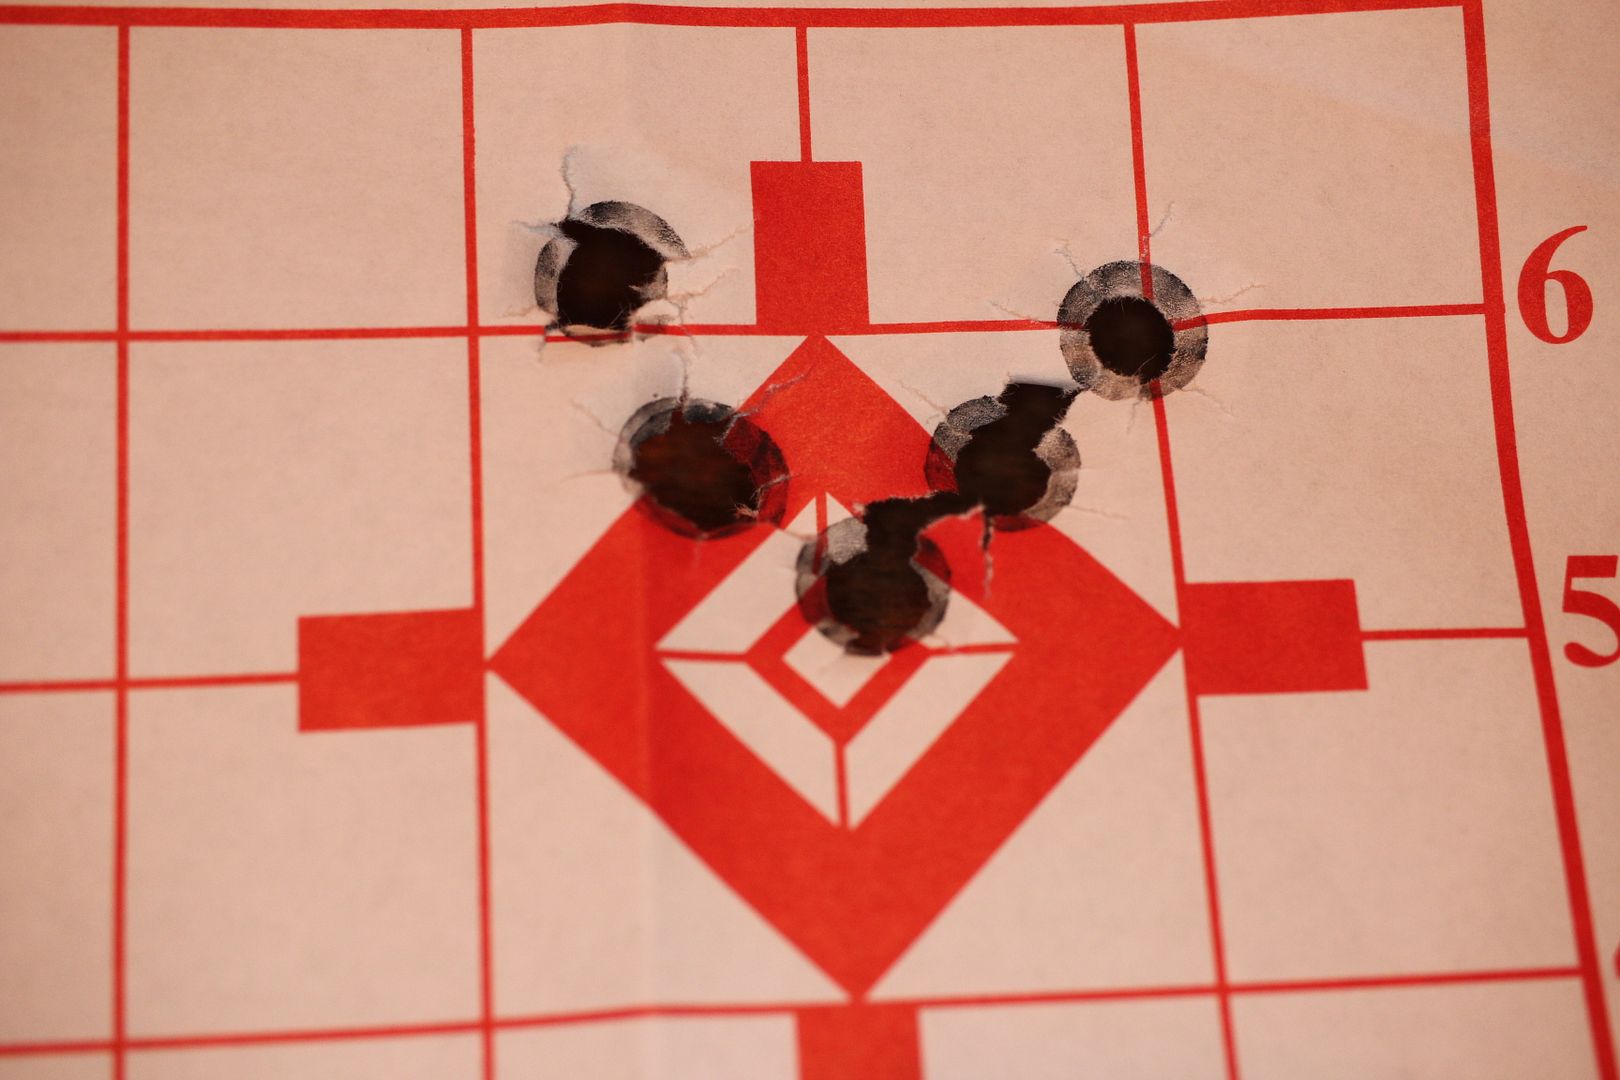
Did identify one issue with the sights though. The thing is... the shooter's eye is drawn to the gold bead so when you center the bead in the "V" notch the front sight blade is proud of the backsight by a good measure such that I ran out of elevation adjustment. If I leveled the the top of the sights fore & aft then half of the bead is obscured.
This scribble sort of represents what the sight picture looked like.
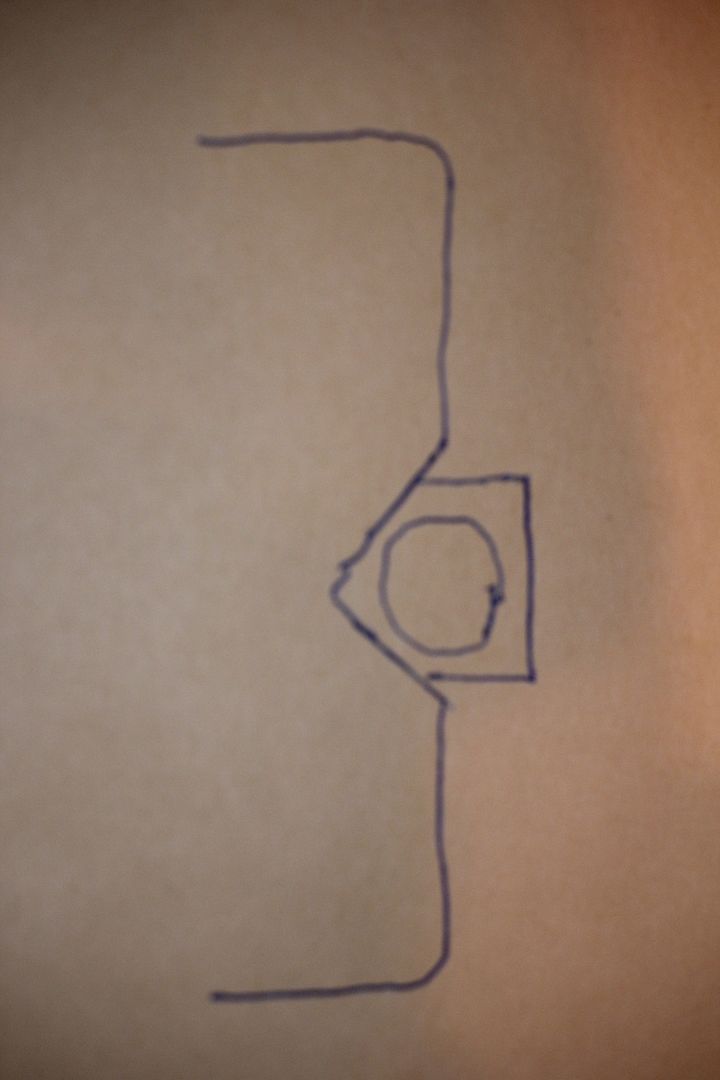
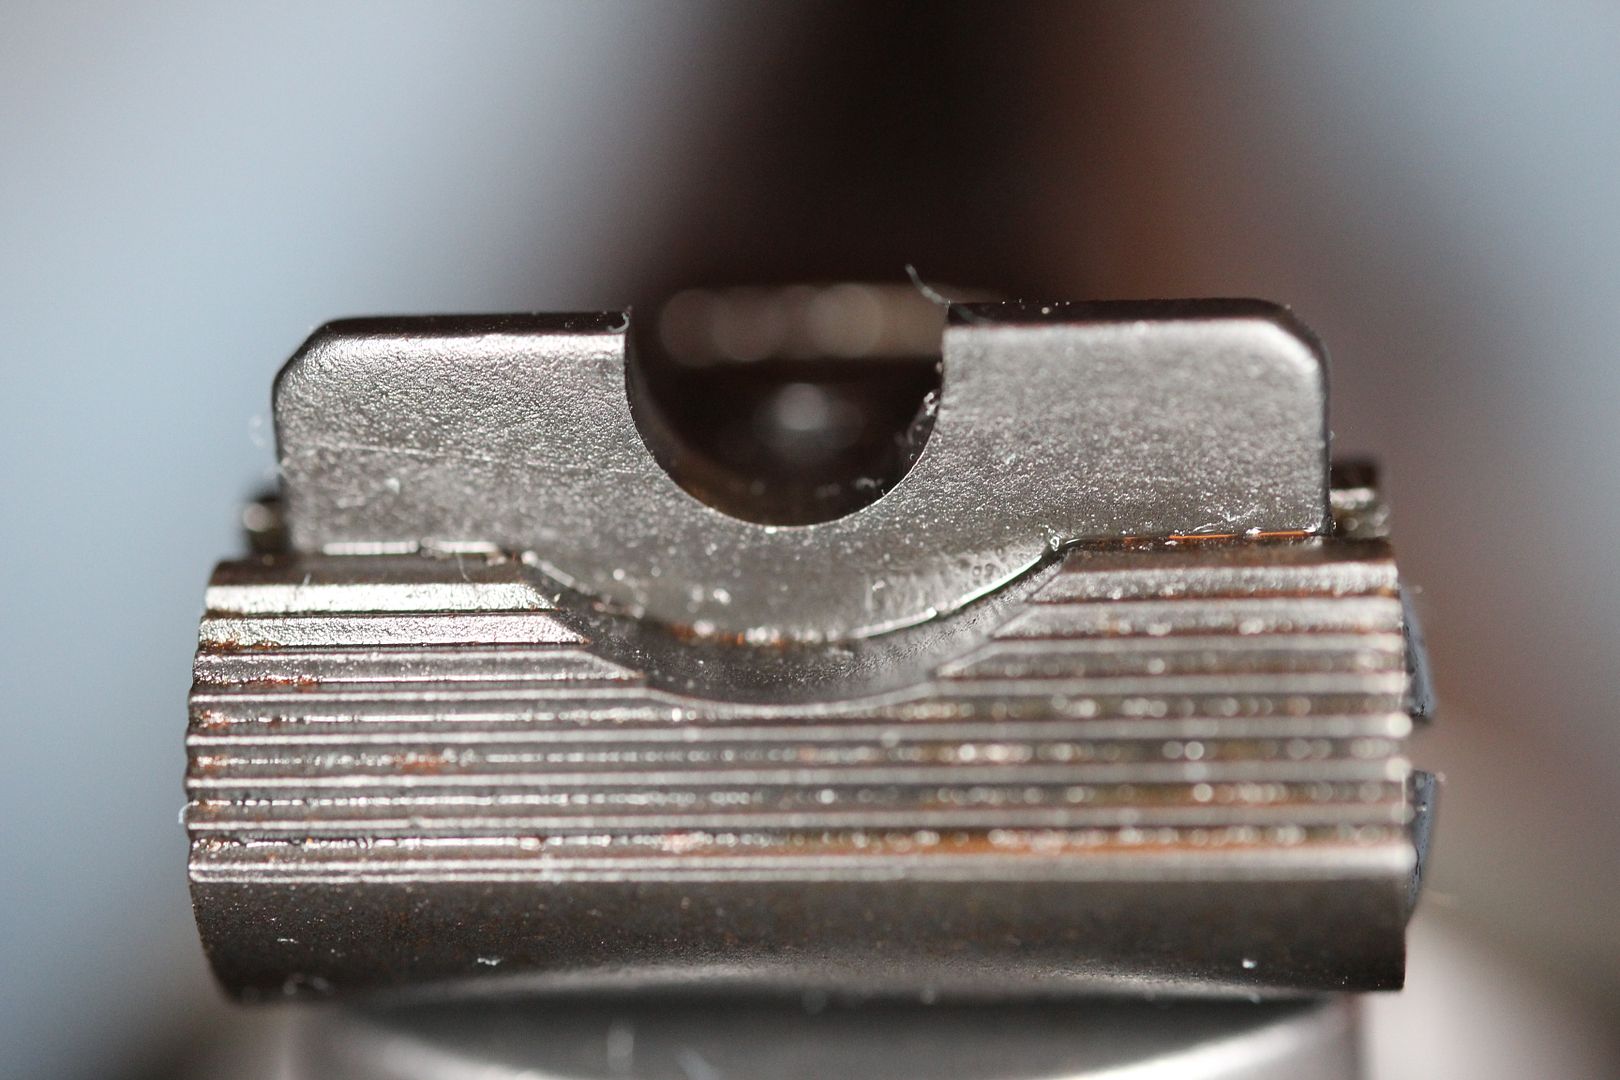
Back in early February we were discussing the sights and Doug asked about a wide "U" for the rear. Knowing that wasn't an available part anyone made I suggested the "V" notch slide. Well, while mine was was a good idea in theory, in practice it sucked. So, I made it into Doug's wide "U" notch.
This will do much better.
Now I gotta go clean the thing again
Cheers
Bill
__________________
Because they don't make a .46
Last edited by BMCM; 03-27-2019 at 07:17 PM.
|
|
The Following 9 Users Like Post:
|
|
03-17-2019, 12:41 AM
|
|
Member
|
|
|
Join Date: Dec 2008
Location: Pacific North-Wet
Posts: 5,662
Likes: 5,255
Liked 16,828 Times in 4,351 Posts
|
|
I wonder if a gold/brass insert in a front sight would be a possibility- like the XS white line (which I like) but in gold. A sliver of brass inserted into the blade could be flush with the top, rather than stopping short as the SDM bead does. And I guess the head of the SDM bead isn't "larger enough" than the shaft behind it that the blade itself could be milled down to allow the bead to sit right at the top.
In any case, Doug is going to be one happy fella when he gets that back
|
|
The Following User Likes This Post:
|
|
03-17-2019, 02:32 PM
|
|
Member
|
|
|
Join Date: May 2008
Location: Washington State
Posts: 7,500
Likes: 14,669
Liked 9,362 Times in 3,739 Posts
|
|
I darned sure am. A significant portion of my affection for the "U" notch is the work of a pistol smith who himself getting older; I think it was Chuck Rogers. He advocated a wider "U" and relatively larger front sight and calls them "old guy" sights. A few years ago, I learned the hard way that I was now in the group that needed such a crutch.
__________________
NHI, 10-8.
|
|
The Following 2 Users Like Post:
|
|
03-17-2019, 04:19 PM
|
|
Member
|
|
|
Join Date: Dec 2008
Location: Pacific North-Wet
Posts: 5,662
Likes: 5,255
Liked 16,828 Times in 4,351 Posts
|
|
Quote:
Originally Posted by Doug M.
...A few years ago, I learned the hard way that I was now in the group that needed such a crutch.
|
Join the club 
|
|
The Following User Likes This Post:
|
|
03-21-2019, 11:40 AM
|
|
Member
|
|
|
Join Date: Jun 2006
Location: CO
Posts: 152
Likes: 36
Liked 155 Times in 33 Posts
|
|
What an awesome thread, thanks for posting it! Excellent work as well, I really enjoyed watching the transformation.
It makes me think I need to get a 625 now...
|
|
The Following User Likes This Post:
|
|
03-24-2019, 12:22 AM
|
|
Member
|
|
|
Join Date: Sep 2005
Location: SW Ohio
Posts: 2,127
Likes: 1,916
Liked 2,384 Times in 1,066 Posts
|
|
Thanks for the education Bill!! I really appreciate you doing posts like this.
|
|
The Following 2 Users Like Post:
|
|
03-27-2019, 06:48 PM
|
|
US Veteran
|

|
|
Join Date: May 2004
Location: Iowa
Posts: 4,106
Likes: 14,444
Liked 3,764 Times in 1,784 Posts
|
|
 Beautiful work and pics
I have been a USPSA competitor since 1989 and early on developed a fondness for shooting S&W 625s in revolver division. I started out shooting 5"bbl. 625-2s and 3s. By the late 1990s, I had obtained one of the 625s designed by Jerry Miculek which had a 5 1/4" bbl. and a short cylinder. During a major match at PASA Park near Quincy IL the cylinder started skipping notches and essentially free-wheeling. I was using Federal factory 230gr hardball. Fortunately, I had a back-up 625 and used it to finish the match.
My gunsmith and I found the peening and raised burrs exactly as pictured above. We cleaned up the burrs and normal function returned. I think a combination of factors cause the peening. First, fast double action shooting; second heavy 230 gr hardball, and finally relatively soft stainless steel in the cylinder. I have never had noticeable peening when using a titanium cylinder nor do 8-shot 627 cylinders suffer severe peening. Also, blue carbon steel doesn't peen badly.
I don't consider using an S&W revolver in USPSA matches abusive but others may disagree.
__________________
Bob.
SWCA 1821
|
|
The Following 3 Users Like Post:
|
|
03-27-2019, 07:03 PM
|
 |
Member
|
|
|
Join Date: May 2018
Location: WI
Posts: 507
Likes: 212
Liked 804 Times in 287 Posts
|
|
That was really a pleasure to read through, your photography is excellent. Thank you for post this! You caught things I wouldn't have even thought to look for. One day I hope to have a shop outfitted like yours!
|
|
The Following User Likes This Post:
|
|
03-30-2019, 04:08 PM
|
|
Member
|
|
|
Join Date: May 2008
Location: Washington State
Posts: 7,500
Likes: 14,669
Liked 9,362 Times in 3,739 Posts
|
|
I'm not sure when I can take the time to go to the range and shoot, but I will be going to pick this up today.
I keep telling Bill he does not charge as much as he should for the quality of work he does, but I don't think he takes me seriously.
__________________
NHI, 10-8.
|
|
The Following User Likes This Post:
|
|
08-07-2019, 08:46 AM
|
 |
Member
|

|
|
Join Date: Jun 2004
Location: Independence, OH, USA
Posts: 6,975
Likes: 29,126
Liked 7,286 Times in 2,623 Posts
|
|
Bill, how did you make the U notch rear? That is a sight combo I like, Larry
|
|
The Following User Likes This Post:
|
|
08-07-2019, 12:29 PM
|
|
US Veteran
|
|
|
Join Date: Jun 2012
Location: SW Mississippi
Posts: 1,351
Likes: 2,236
Liked 6,228 Times in 1,044 Posts
|
|
Started out with a .160 tall "V" notch slide. Cut the notch with a Grobet 2cut parallel round file ahhh 3/16" as I recall.
Cheers
Bill
__________________
Because they don't make a .46
|
|
The Following User Likes This Post:
|
|
06-28-2020, 05:59 PM
|
|
Member
|
|
|
Join Date: May 2008
Location: Washington State
Posts: 7,500
Likes: 14,669
Liked 9,362 Times in 3,739 Posts
|
|
Ok, so life happens and I can't believe it took this long to get to the range with this revolver. I was trying to get down there to test another pistol and had the brilliant inspiration to take this along. I loaded up 5 moonclips with Black Hills 230 grain ball, and 5 more with my old duty ammo (230 grain gold dot). I was ... tired and maybe sugar crashing when I shot, so my performance was not anything to brag on or post, but pretty clearly this revolver is back to doing what it should do. Every penny I spent to have Bill do the work he showed was worthwhile.
__________________
NHI, 10-8.
Last edited by Doug M.; 07-04-2020 at 01:57 PM.
Reason: I can't type or proofread
|
|
The Following 3 Users Like Post:
|
|
08-06-2020, 04:58 PM
|
|
Member
|
|
|
Join Date: Jul 2010
Location: Central VA
Posts: 8,685
Likes: 1,583
Liked 9,478 Times in 4,248 Posts
|
|
I found this thread while looking for something else... what a pleasure it was to read. Bill, your handiwork is amazing, until you said you cut that round groove by hand with a needle file, then it went to a whole other level! I can only sit back and say WOW. I know Doug is pleased and he has every right to be!
Froggie
|
|
The Following 6 Users Like Post:
|
|
|
 Posting Rules
|
|
|
|
|


 Linear Mode

