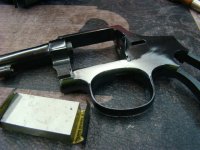
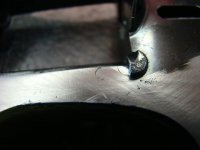
Cylinder Retaining Frame Lug

Joined
Sep 1, 2014
Messages
836
Reaction score
1,455
Location
Ozarks
Can the frame lug that retains the cylinder when open, be removed and replaced? Can you reuse the original or do you need to get a new one?

Thanks for any information,
 
Register to hide this ad
Thanks for the link.
Has anyone had experience with R&R of the lug?

And exactly what possible reason could you have for asking this question? Or are you just one of those people who just have to take things apart for no good reason? Even if the frame lug works loose the fix is to tighten it up by riveting the stud with the lug in place. There is never a reason to remove it except in the extremely rare case of the original fame lug not being high enough the retain the cylinder, and even then it is probably because the yoke is sprung!
 
If the pressed in frame lug ever needs to be replaced, that usually also means you are going to need a refinish as the replacement part is in the white-or at least it was when I had it done in Springfield many years ago. Ditto for any pressed in "studs" for the trigger, etc.

Bruce
 
Last edited:
FRAME LUG

Yes I am a tinkerer, I've been taking apart things since I was knee high to a grasshopper. I've always seemed to get them back together it working order.

The reason I was thinking about removing the frame lug is that there is deep pitting on the side of the frame under the cylinder window. I started to sand the area and thought that to make it completely flat it would be better to remove the lug, sand the area flat and then replace it.

Last night I started with 220 w/d on a small steel block, and it may turn out that the lug will not have to be replaced. I will have to see how well the sanded area blends with the rest of the surface. There is still one small area of pitting at the edge of lug's outer surface that I will just Probably will have to live with.

Looks likely that it will end up with a fine bead blast finish.

I bought this gun as a project piece. Evidently it had been stored in a leather holster for many years, it is a model 10-5.

Unfortunately I forgot to take pictures before I started.

I am retired and have lots of time on my hands and have been doing hobby gunsmithing for myself for about 25 years.

Thanks for the replys and questions, always good to get all kinds of input.
 
Last edited:
Just in case..........

The lug is replaced by putting the frame on a firm bench with the cylinder stop resting on a brass bench block.
A WELL rounded center punch is used to flare the hollow tube on the cylinder stop to tighten it tightly in place.

As a "belt and suspenders" you can also put a drop of Loctite Red under the new lug to make sure it never loosens or turns in the frame.

Once riveted in place, you'll usually need to shape the lug to clear the cylinder as it opens, but being careful to insure the stop prevents the cylinder from moving back at any point during it's opening or closing cycle.

If you have a small lathe you can easily make cylinder stops.
Once, in a pinch I used a drill and a fine cut, safe edge file as a "lathe" to turn a new stop from stainless rod stock.
 
dfariswheel,

Good information, thank you. Hopefully it won't come to that, it looks like I will be able to clean up the pitting around it.

Thanks Again,
 
As others have mentioned, unless absolutely necessary, do not remove the Lug! However - if you must, I would not try to reinstall the original (it's post is too short and has already been peen softened) I'd get a new one and install. Slight fitting will be required but it's not difficult.
 
Here are a couple of pictures of the area that was deeply pitted after an hour of careful sanding. I am using a small machinist 1-2-3 block as a sanding block to keep the area flat as possible. The back of the trigger stud is clearly visible where the joint has been corroded. The cylinder and side plate are also also effected, so lots more to do.

Thanks for all the comments.
 

Attachments

  • DSC03344.JPG
    DSC03344.JPG
    121 KB · Views: 58
  • DSC03343.JPG
    DSC03343.JPG
    100.9 KB · Views: 70
Back
Top