|
|
 |

06-21-2020, 04:44 AM
|
|
Member
|


|
|
Join Date: Jun 2019
Posts: 550
Likes: 228
Liked 970 Times in 310 Posts
|
|
 short extractor rod
Hello all, first off I really appreciate all of the knowledge shared here. I've searched the 'smithing threads for answers to this problem and I think I've got it figured out but I've got a follow up question:
background--I bought a used a 29-2 that was sent back to S&W years ago to have a 6" Classic barrel (full underlug) fitted. I finally got the opportunity to shoot it a couple of days ago and after 24 rounds (240 gr. plated/8 grs. Unique) the cylinder became very difficult to open/close and would not turn.
I disassembled the revolver and scrubbed the extractor, ratchet, frame window, cylinder face, etc. Disassembled the extractor rod assembly, wiped off all of the crud and reassembled the revolver.
The cylinder still had some resistance when dry-fired and I noticed that the cylinder gap was a very tight .0025, with very little endshake.
After researching the threads I looked over the revolver more carefully and saw that the very tip of the front locking bolt was barely engaging the extractor rod recess. I had tightened the extractor rod using the Brownells universal tool and I made sure not to overtighten the rod.
After comparing it to another Smith that has proven reliable, I loosened the rod, re-tightened it to barely finger-tight, then backed it off a half turn.
Now the locking bolt snaps cleanly into place, the cylinder opens and closes easily and the cylinder spins freely despite the tight gap. My follow up questions are as follows:
a. if it shoots without binding up again, do I need to replace the extractor rod (or is it "okay" to shoot it with the loose rod)?
b. will a replacement rod collar give me the proper length needed without having to replace the existing rod?
c. if it does bind up again after shooting what do I do next?
Thank you all in advance for your input.

|
06-21-2020, 10:07 AM
|
|
Member
|
|
|
Join Date: Sep 2000
Location: Indiana
Posts: 249
Likes: 21
Liked 165 Times in 80 Posts
|
|
Is the rod straight when it is tight? If you open the cylinder and spin it does the tip of the rod wobble at all?
__________________
Mark
|
06-21-2020, 12:58 PM
|
|
Member
|
|
|
Join Date: Jun 2019
Posts: 550
Likes: 228
Liked 970 Times in 310 Posts
|
|
The rod is straight, no visible wobble. I do not have any of the tools/gauges to measure runout, so there may be some that I can't see.
|
06-21-2020, 01:40 PM
|
 |
Member
|

|
|
Join Date: May 2012
Location: Evansville, Indiana USA
Posts: 6,225
Likes: 484
Liked 11,391 Times in 3,522 Posts
|
|
I wouldn't shoot it with the rod unsecured. The rod will likely loosen more during use and tie up the cylinder so that the cylinder can't be opened with the thumbpiece as usual.
Rod collars used to come in three different lengths, .150", .179", and .190", to accommodate changes made during fitting. Now, the current production standard rod collars are usually .175" -.180" , so you may be able to open/close the gauge if needed with a new collar, depending on how long yours is now.
I would check the OAL length of the center pin to confirm that it is properly fit to the current extractor rod. You can do this by tightening the rod using your fixture, then push the breech end of the cylinder assembly down on a flat surface to push the end of the center pin fully forward. When checked this way, the front of the pin should come to the end of the extractor rod, or just slightly (.004 - .010") past the end.
Also check the muzzle end of the center pin for "peening" damage. The pin can be damaged during recoil, and this "mushrooming" damage on the end can cause the pin to become trapped inside the rod. This ties ip the cylinder and makes the cylinder hard to open.
The other issue that comes to mind is what you said about "very little" endshake. It's possible that the cylinder may be binding on the yoke, or there may not be adequate gauge in the assembly for the cylinder to rotate as it should, particularly when the gun is in use. Some "endshake" or gauge is required in the assembly for the gun to open and close, and still accommodate shooting debris, the heat generated by shooting, and lubricants. (.002" or so) Yoke misalignment can also make this situation worse, so be sure the yoke is aligned properly.
You can check the amount of endshake by measuring the barrel/cylinder gap, and then holding the cylinder back and measuring again. The difference in the two measurments is your "endshake". Be sure to check in different chamber positions, as the gauge can be slightly different one or two chambers over.
If your front gauge is only .002", debris on the barrel extension and on the face of the cylinder may be hindering the proper rotation of the cylinder and contributing to the gun being hard to open. You need about .004" in terms of front gauge, particularly if you are shooting lead bullets. Atomized lead buildup can cause all kinds of issues if the front gauge is too small.
__________________
Ret. LE, FA Instr, S&W Armorer
Last edited by armorer951; 06-21-2020 at 07:48 PM.
|
06-21-2020, 01:56 PM
|
|
SWCA Member
|


|
|
Join Date: Oct 2007
Location: California
Posts: 19,252
Likes: 11,936
Liked 20,601 Times in 8,584 Posts
|
|
The problem is the minuscule barrel/cyl gap; that's way too tight. Dry firing is not a proper test because it does not create cyl heat expansion. You must test it with live fire.
Then trouble shoot the ext rod/cyl ctr pin for needed adjustment, but never leave the ext rod un-tightened fully. I guarantee it will loosen during shooting and tie up the cyl.
__________________
Jim
S&WCA #819
|
06-21-2020, 02:23 PM
|
|
Member
|
|
|
Join Date: Jun 2019
Posts: 550
Likes: 228
Liked 970 Times in 310 Posts
|
|
Thank you all for your information and suggestions. I'm headed out to the range today to test out this revolver with a few rounds. I will probably be ordering a new extractor rod and collar--I too am sure that a loose rod will create problems in the long run.
Question--if there is very little endshake, how does one go about increasing the gauge? Do you remove metal from the end of the yoke "tube?"
Also--if the cylinder gap is still very tight what is the recommended way to increase the gap?
Thanks again!
|
06-21-2020, 02:30 PM
|
|
Member
|
|
|
Join Date: May 2012
Location: Evansville, Indiana USA
Posts: 6,225
Likes: 484
Liked 11,391 Times in 3,522 Posts
|
|
First, I wouldn't consider dealing with the tight gauge or endshake in the cylinder assembly until you remedy the front gauge situation. To answer your question, yes, the correct space in the cylinder and yoke assembly is created during fitting by removing material from the yoke barrel. (if necessary) There is a special piloted facing cutter made for this purpose.
The cylinder/barrel gap can be opened up by stoning or filing, but a much better way is to use a facing cutter from Brownells. This cutter gives a very square face to the barrel extension, and is easy to use.
__________________
Ret. LE, FA Instr, S&W Armorer
Last edited by armorer951; 06-21-2020 at 02:49 PM.
|
|
The Following User Likes This Post:
|
|
06-21-2020, 02:51 PM
|
|
Member
|
|
|
Join Date: Jun 2019
Posts: 550
Likes: 228
Liked 970 Times in 310 Posts
|
|
Thank you armorer951, your info has always proven valuable to me. It does make sense to open up the front gauge first, then deal with the endshake. I'll look into the tools from Brownells's.
There's a definite lack of revolver smiths here in Honolulu. We do have a number of guys who work on 1911s but with the exception of Ed Masaki no one really does professional pistolsmithing as a business. Sadly, Ed retired a couple of years ago and no longer takes in any work.
I'm trying to learn how to fix minor problems with my revolvers but I've got no intention of "setting up shop." However, since it pretty much costs $200 round trip to send a piece out to have it worked on, investing in the proper tools seems like a good idea.
|
|
The Following User Likes This Post:
|
|
06-21-2020, 03:13 PM
|
|
SWCA Member
|
|
|
Join Date: Oct 2007
Location: California
Posts: 19,252
Likes: 11,936
Liked 20,601 Times in 8,584 Posts
|
|
I completely agree with armorer951; you don't want to increase end play.
You want to increase bar/cyl gap. File then stone the end of the barrel carefully, keeping it square. Check often by closing cyl and checking light space for squareness.
To easy to do and not worth the cost of a cutter. You'll get it at least as good as the factory which do not always get it square.
__________________
Jim
S&WCA #819
|
06-21-2020, 04:21 PM
|
|
Member
|
|
|
Join Date: May 2012
Location: Evansville, Indiana USA
Posts: 6,225
Likes: 484
Liked 11,391 Times in 3,522 Posts
|
|
If you want to learn about your S&W revolvers, pick up Jerry Kuhnhausens's book, "Smith and Wesson Revolvers - A Shop Manual".
Useful and correct information, with a lot of easily understandable illustrations and data included.
__________________
Ret. LE, FA Instr, S&W Armorer
Last edited by armorer951; 06-21-2020 at 07:50 PM.
|
06-21-2020, 09:22 PM
|
|
Member
|
|
|
Join Date: Jun 2019
Posts: 550
Likes: 228
Liked 970 Times in 310 Posts
|
|
Back from the range--78 rounds of moderate reloads (240 gr./8-9 gr. Unique) with no problems encountered. This tells me that at the least I will have to install/fit a longer extractor rod.
No scraping of the cylinder face or barrel but the front gauge should be increased.
I'm going to tear down the cylinder once again and inspect/clean it thoroughly once I get the new rod. I suspect that there may be an endshake bearing in place, I'll see what can be done about that.
Thanks again armorer951 and Hondo44 for the help!
|
07-06-2020, 08:18 PM
|
|
Member
|
|
|
Join Date: Jun 2019
Posts: 550
Likes: 228
Liked 970 Times in 310 Posts
|
|
Well, my new extractor rod finally arrived from Midway. I did a quickie measurement and the new one is a few thousandths longer so I swapped it out and for the most part, with the rod finger tight, it works. The locking bolt still hangs up a little on the rod recess so I'm going to polish it with some 320 paper wrapped around a chopstick, working very slowly.
When I have both of the rods out I'll measure again and my reporting will be a little more precise.
|
07-06-2020, 08:35 PM
|
|
Member
|
|
|
Join Date: May 2012
Location: Evansville, Indiana USA
Posts: 6,225
Likes: 484
Liked 11,391 Times in 3,522 Posts
|
|
The locking bolt has a slot cut into it to facilitate it's front to back, spring loaded motion under the crosspin during the open and closing sequence.
This "cutaway" in the bolt can also serve as a way to "let out" the bolt and adjust it to the degree available on the front ledge (muzzle end) of the slot. If material is removed here, this allows the locking bolt to move to the rear further, toward the extractor rod end, if that is required for proper fitting.
The extractor rods are all the same length, (within a few thousandths) depending on the barrel length designation. Minor differences in length in terms of the fitting of the interface between the locking bolt and the end of the extractor rod are modified/adjusted either by letting out the locking bolt, or decreasing the OAL of the extractor spring collar in the assembly.

__________________
Ret. LE, FA Instr, S&W Armorer
Last edited by armorer951; 07-06-2020 at 10:17 PM.
|
07-06-2020, 09:34 PM
|
|
Member
|
|
|
Join Date: Jun 2019
Posts: 550
Likes: 228
Liked 970 Times in 310 Posts
|
|
Thanks Armorer, I always seem to learn something new from you.
Here's the best pic I could get of the front locking bolt--it looks a lot different from the pic you shared. It is much more angular and "sharp" for lack of a better description.
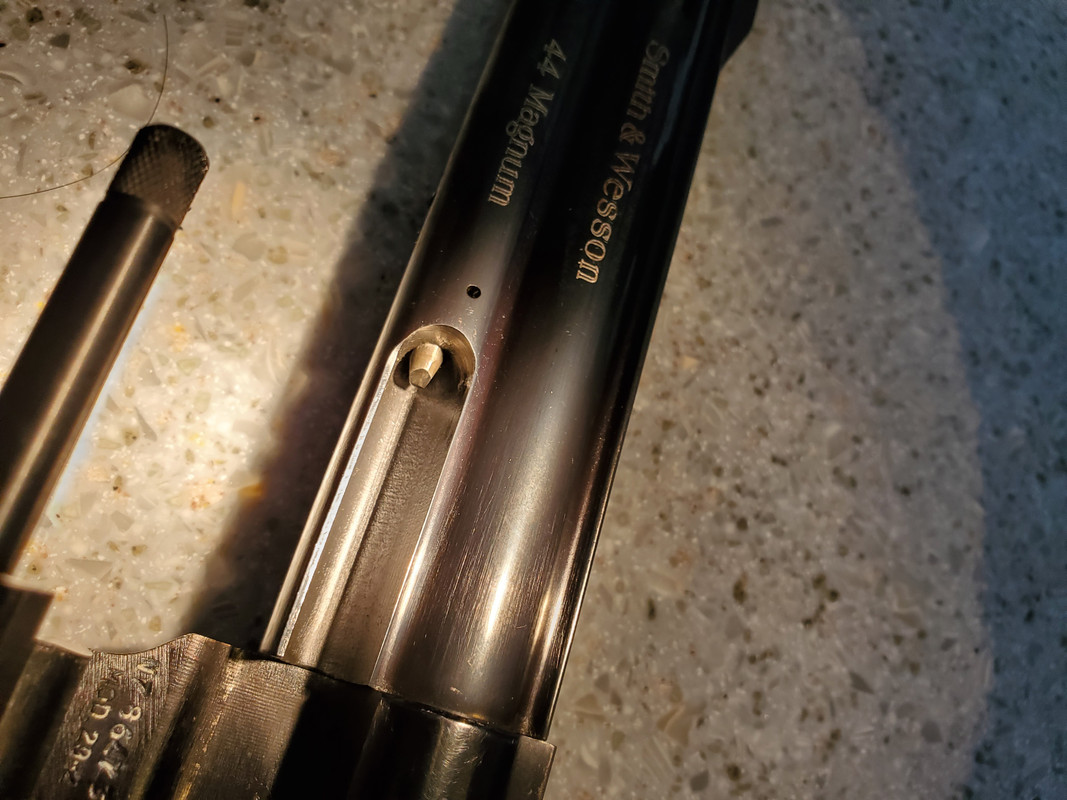
After I polished the front of the extractor rod the locking bolt will snap into place 9 times out of 10. When it doesn't snap into place, turning the cylinder 2-3 chambers will usually cause it to snap in place and lock. I don't have any problems unlocking/opening the cylinder.
The old rod is on the left

The old rod measured 2.272-3, the new one measured 2.278-9, if I read my caliper correctly.
After polishing, the new rod measured 2.275-6 Do you think a little more polishing is in order?
The rod seems to be pretty straight, no wobbling that I can see.
|
07-06-2020, 10:23 PM
|
|
Member
|
|
|
Join Date: Jun 2019
Posts: 550
Likes: 228
Liked 970 Times in 310 Posts
|
|
OK, it always pays to go back to the basics; I broke out my extractor rod tool and tightened the rod. I then oiled the locking bolt, took a short break and now everything works fine.
50+ opening and closings, some with empty cases, and no hang ups. Now off to the range for the real test!
|
|
 Posting Rules
|
|
|
|
|


 Linear Mode

