Note: Most of my knowledge comes from this site:
GABE SUAREZ BLOG. Suarez International has supplied sights, slide milling and even a complete pistol make-over for me. What I have written is my interpretation from trying what Gabe Suarez has written. The Red Dot Sight (RDS) photos are from Gabe's blog. I have three pistols with milled RDS, all set up for concealed carry, not target competition. I have been shooting with RDS for about 2 1/2 years now.
At very close ranges (<10) you can point shoot. You dont need irons or the RDS. At the next distance interval, 10-20, a rough sight picture is adequate for speed. Using just the window of the RDS to frame the target will work. It is beyond 21 where using the dot in the RDS will get your hits on target faster, better and more consistently. However, the dot is a simple, fast aid to sighting even at close ranges, more so than less forgiving iron sights.
Set Up
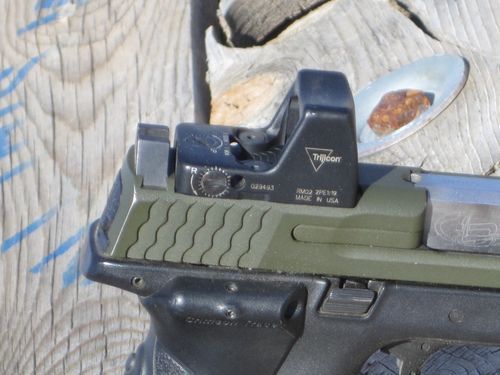
For personal defense, the ideal set up is to have as uncluttered a sight picture as possible. The rear sight should be at the rear of the slide, behind the RDS. It should be tall enough to protrude into the RDS window about 20-25% when the front sight is aligned properly in the notch of the rear. Less than that and they are too hard to align; more, they will block too much of the RDS window. Black sights are the simplest, although single dot night sights without white outlines work well also.
The most robust RDS cost the most. The leader currently is Trijicons RMR series. All other offerings have drawbacks that will degrade performance, such as being too tall, not sufficiently durable, smaller windows, bigger footprints, cluttered sight windows, etc. Smaller dots (3 MoA) are plenty visible, do not "flare" as much as bigger dots, and do not cover as much of the target, IMO.
S&W COREs, Glock MOS and other generic mass manufacturers RDS slide cuts require an RDS-specific mounting plate for different RD sights. The plate is secure in the OEM milled cut being tightly fitted front and back as well as screwed in place. However, the sight sits elevated on top of the thin plate, with only two short mounting screws holding it on to the plate. The sight has only the two shallow screws to stabilize it as it reciprocates at high velocity. Because the sight is mounted higher than necessary, you will need especially tall iron sights to co-witness properly. Many mass manufacturers are providing iron sights that are not tall enough to co-witness properly through their RDS mounting systems.

Note below how a custom milled slide for a specific RDS allows the sight to sit lower and attaches the sight directly to the slide. The screws are position holders only, not tiny stabilizing posts for rapid motion, because the fore and aft cycling forces are stabilized by the tight front and rear slide cuts. This is significantly more secure and keeps both the RDS and the irons closer to the bore. The irons do not have to be super tall.
There are a couple of right ways (depending on your needs--target or defense) and lots of wrong ways to mount and use these rather expensive upgrades. Done correctly, you will have a greatly enhanced shooting experience. Done wrong and you may end up frustrated, spending more money to get it right, or giving up on what is truly the next evolution of fast and accurate sighting.
Co-Witnessing Iron and RD Sights
Co-Witnessing iron sights and your RDS means they will both point to the same Point of Impact (PoI) at the same distance. To zero your front and rear iron sights and the RDS to hit the same bullet PoI at the same distance:
1. Turn off the RDS.
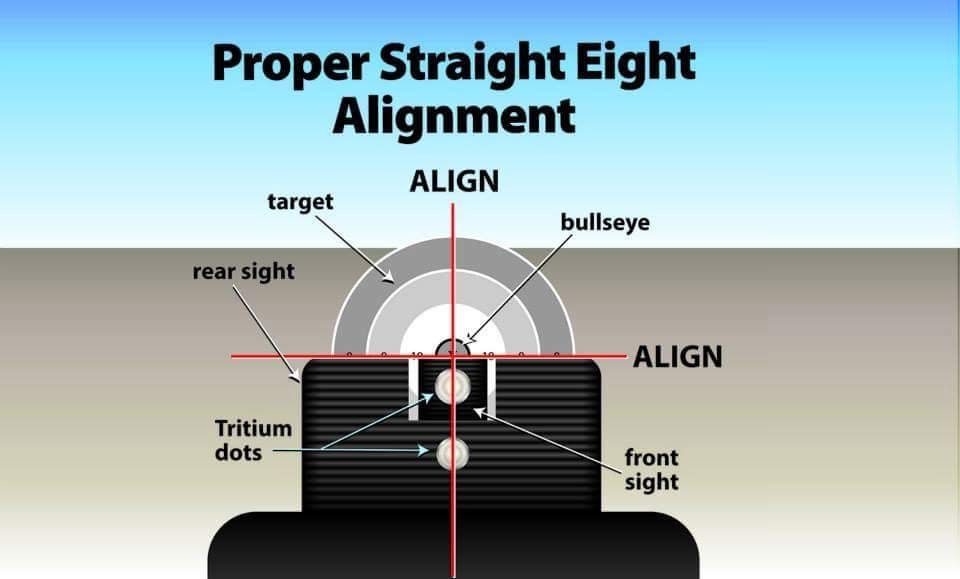
2. With your arms rested to steady the gun, use only the iron sights and get them aligned with the PoI. I do this at 20 yards. Adjust (drift) the rear sight for windage. Check where the PoI is relative to the front sight blade height. Sometimes it is right behind your front sight dot. Ideally, it should be just above your front sight blade. If your elevation is way off, you may have to replace your front sight blade with a different height (Dawson Precision Sights). I use Heinie Straight 8 night sights, or a similar Glock version that are taller from Suarez International. This photo is from the Heine website:
3. Turn on your RDS and using its elevation and windage adjustment dials, bring the red dot to the PoI relative to the front sight. This will either be superimposed on the front sight dot or ideally just above it. You don't have to shoot to do this.

4. Fire to confirm (rested) that you will hit the PoI when you have the irons aligned perfectly and the red dot right on the PoI. When this works, your sights are
cowitnessed AND
concurrently aligned. When aiming slowly and carefully, both sighting systems together will put the bullets where the two sighting systems are pointing. However, you can use either irons or the RDS
independently and get accurate shots.
5. Now, at home with the RDS off, practice dozens and dozens (hundreds) of dry presentations toward a target. You want to have your grip correct and consistent. You train your muscles to coordinate with your eyes that are focusing on the target first, then checking the iron sight alignment. Make small adjustments until the irons are consistently aligned and on target as you initially present the gun. When you can do this proficiently, move the gun and sights, without losing alignment, to two or three other targets at different heights and distances. If you cannot do this competently, you will have trouble learning to use the RDS. Do these exercises two handed both left and right, then one handed.
6. Next, turn on the RDS and do the same exercises, checking your iron sight alignment. You are now using your iron sights to train yourself to use the dot. The red dot will appear where the front sight points. You will find the dot in the window every time, as long as your irons are close to aligned. With your initial focus on the
target and both eyes open as you present the gun, you will see the red dot imposed on the target. You can now ignore the iron sights and use the dot independently with both eyes open.
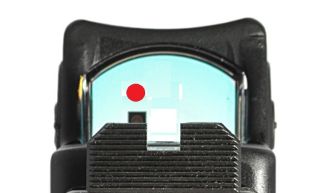
7. The red dot is the indicator of where the bullet will hit (PoI). If you can see the red dot in the window, even if it is in the upper left, place the dot on the target (ignoring your irons, using the sighting systems
independently) without losing focus on the target and that's where the bullet will hit. This is much faster than switching focus between target, front sight/rear sight alignment and back to the target. It is also gives you a much greater margin for sighting error. Focusing only on the target is natural, as that is what your brain will do in a self defense situation. As long as the dot in the window is on your PoI, you will hit it.
Conversely, struggling to align iron sights precisely with a post in a notch applied to the target's PoI is much slower, difficult, and provides only a narrow sighting avenue to the target. Most people need to close an eye to do this, losing peripheral vision and depth perception.
As well, instead of being able to focus only on the target with both eyes open and having the dot appear on the target, your focus with iron sights has to shift rapidly and repeatedly between the target, the front and rear sights and back to the target. This is not natural. It is an unnecessary learned skill. It is particularly difficult for older eyes or corrected vision.
Actually, your
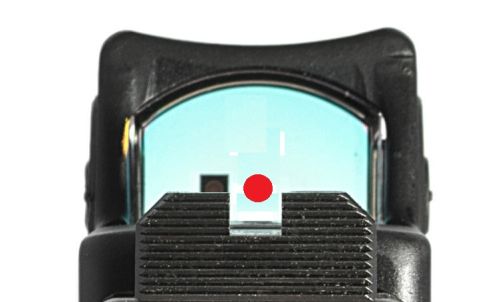
iron sight alignment, when properly co-witnessed, will always point to where the dot is in the window. Check it out at home with dry fire practice. For instance, if the red dot is in the upper left of the window and on your intended PoI, your front iron sight will be above the rear iron notch and skewed to the left--in truth, pointing to where the bullets will hit. Magic.
If your iron sights and red dot do not shoot to the same PoI or cannot be concurrently aligned, you do not have co-witnessed sights and you are wasting expensive technology and causing yourself unnecessary aggravation (inaccuracy). NOT co-witnessed:


 Linear Mode


