|
|
 |

11-03-2014, 01:52 PM
|
 |
Member
|


|
|
Join Date: Apr 2010
Location: South Florida
Posts: 38
Likes: 31
Liked 66 Times in 18 Posts
|
|
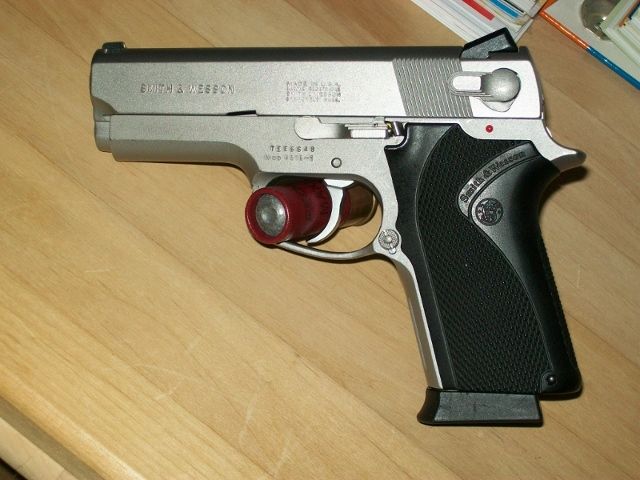
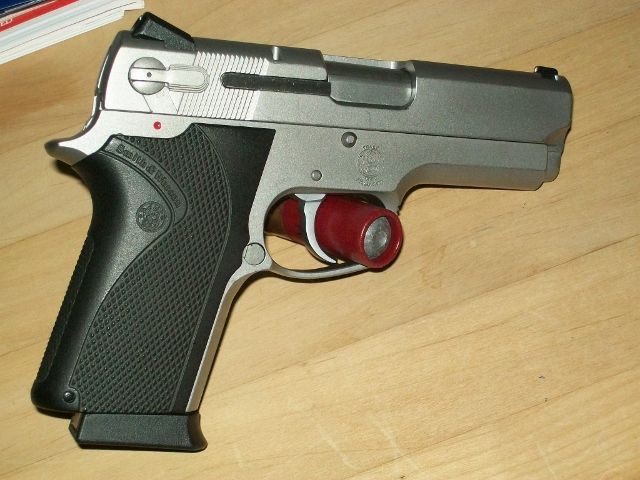
 4516-1 + 3M 320 Grit = Nice Finish
Last edited by ScubaSig; 11-03-2014 at 02:05 PM.
|
|
The Following 22 Users Like Post:
|
18DAI, Big Shrek, bilmc, classic bob, GJH77, Hugo1669, icemn, jfd, loeman, markyboy57, model3sw, nocents, Ozark Marine, Peakes, Shorty 45 MK2, t-bird, TercGen, tom 45, Trooperdan, TucsonMTB, waffenmac, yeti |
11-03-2014, 06:04 PM
|
 |
Absent Comrade
|


|
|
Join Date: Sep 2005
Location: GSO NC
Posts: 6,106
Likes: 23,604
Liked 13,203 Times in 2,861 Posts
|
|
Nice job! Great little 45. Enjoy it! Regards 18DAI
__________________
7 +1 Rounds of hope & change
|
|
The Following User Likes This Post:
|
|
11-03-2014, 08:40 PM
|
|
Member
|
|
|
Join Date: Oct 2012
Location: kentucky
Posts: 1,419
Likes: 1,142
Liked 427 Times in 300 Posts
|
|
Thanks for the info and pics. Best of luck.
|
|
The Following User Likes This Post:
|
|
11-03-2014, 10:04 PM
|
|
Member
|
|
|
Join Date: Jul 2012
Location: Kentucky
Posts: 105
Likes: 185
Liked 25 Times in 18 Posts
|
|
Very nice! Did you sand by hand or use dremel? Use any liquids? I have a 5946 I need to clean up but I don't know how.
|
|
The Following User Likes This Post:
|
|
11-04-2014, 09:02 AM
|
|
Member
|
|
|
Join Date: Apr 2010
Location: South Florida
Posts: 38
Likes: 31
Liked 66 Times in 18 Posts
|
|
Quote:
Originally Posted by bilmc

Very nice! Did you sand by hand or use dremel? Use any liquids? I have a 5946 I need to clean up but I don't know how.
|
Hey Bill, no sir no dremel, just by hand and always trying to keep it in the same direction. I also started by applying some pressure at first for the light marks then finishing it with very light pressure until I got it to be a smooth and even finish. I actually got the idea from a tutorial on a 1911 in this forum. I removed the slide and grips, wiped down the gun to remove any lube on it, cut the sanding sheets into small pieces where just my index finger would do the sanding. No liquids needed, just wiped it down when I was happy with the finish the re-lube. It was quite easy actually the scuffs came off with just a little pressure then it was just very light sanding for that "finished look". Hope this helped 
|
|
The Following 6 Users Like Post:
|
|
11-04-2014, 09:32 AM
|
 |
US Veteran
|


|
|
Join Date: Mar 2012
Location: Illinois
Posts: 2,366
Likes: 2,864
Liked 2,787 Times in 1,170 Posts
|
|
Looks like it turned out beautifully. Nice job!
|
|
The Following User Likes This Post:
|
|
11-04-2014, 10:01 AM
|
 |
Member
|
|
|
Join Date: Apr 2013
Location: New Mexico
Posts: 2,637
Likes: 2,354
Liked 3,824 Times in 1,348 Posts
|
|
Really nice ScubaSig. I'm really impressed that the end result is not too shiny. I've seen several polish jobs that have gone way too far. Yours looks right! Now I might consider a scratched up 3rd Gen knowing that it is possible to bring it back to looking good! Nice work.
|
|
The Following 2 Users Like Post:
|
|
11-04-2014, 10:19 AM
|
 |
Member
|
|
|
Join Date: Mar 2013
Location: s.w.Ohio
Posts: 1,932
Likes: 4,007
Liked 2,811 Times in 1,170 Posts
|
|
that 4516-1 looks great....the reason I love SS guns without a factory coating is that they are user friendly when it comes to finish repair..... 
__________________
witty signature goes here
|
|
The Following 3 Users Like Post:
|
|
11-04-2014, 10:39 AM
|
|
Member
|
|
|
Join Date: Apr 2010
Location: South Florida
Posts: 38
Likes: 31
Liked 66 Times in 18 Posts
|
|
Quote:
Originally Posted by loeman
Really nice ScubaSig. I'm really impressed that the end result is not too shiny. I've seen several polish jobs that have gone way too far. Yours looks right! Now I might consider a scratched up 3rd Gen knowing that it is possible to bring it back to looking good! Nice work.
|
Thanks loeman, yes I didn't want that polished mirror like finish either, best way to describe it would be a smooth brushed stainless steel, looks even better in person than the camera pics on top 
|
|
The Following 2 Users Like Post:
|
|
11-04-2014, 10:33 PM
|
|
Member
|
|
|
Join Date: Jul 2012
Location: Kentucky
Posts: 105
Likes: 185
Liked 25 Times in 18 Posts
|
|
Thanks for the tips and instructions ScubaSig! I'll give it a try!
|
|
The Following User Likes This Post:
|
|
11-04-2014, 10:41 PM
|
 |
Member
|
|
|
Join Date: Sep 2011
Location: Atlanta
Posts: 323
Likes: 198
Liked 158 Times in 76 Posts
|
|
Sweet, now I have to buy a 5906 police trade in and try this. Thanks for sharing.
__________________
The Lord cometh and right soon
|
|
The Following User Likes This Post:
|
|
11-13-2014, 12:05 AM
|
 |
Member
|
|
|
Join Date: Oct 2014
Location: San Diego
Posts: 4
Likes: 0
Liked 2 Times in 2 Posts
|
|
Nice work and how very appropriate. I get to pick up my 4516-1 in about 3 weeks due to California gun laws...yay. There is some holster wear which I wanted to remove. Why did you go with 320 grit versus the grey pads (800 grit)? Did you use a block for the flat surfaces also? Just doing research. Your 4516-1 looks great BTW.
|
|
The Following User Likes This Post:
|
|
11-13-2014, 01:15 AM
|
|
Member
|
|
|
Join Date: Jan 2013
Posts: 2,666
Likes: 3,512
Liked 1,579 Times in 912 Posts
|
|
Nice satin look.
I have a 5906 that spent a lot of time in a duty holster.
I'm torn between blasting it and using Scotchbrite.
One S&W accumulator I spoke with said he uses a sandblaster with walnut hull media to return stainless 3rd gens to their factory finish.
I may give it a try.
__________________
What would Jim Cirillo do?
|
|
The Following User Likes This Post:
|
|
11-13-2014, 05:36 PM
|
|
Member
|
|
|
Join Date: Apr 2010
Location: South Florida
Posts: 38
Likes: 31
Liked 66 Times in 18 Posts
|
|
Quote:
Originally Posted by WallaceWalcox
Nice work and how very appropriate. I get to pick up my 4516-1 in about 3 weeks due to California gun laws...yay. There is some holster wear which I wanted to remove. Why did you go with 320 grit versus the grey pads (800 grit)? Did you use a block for the flat surfaces also? Just doing research. Your 4516-1 looks great BTW.
|
Hey Wallace, I used the 3M 320 grit x-fine flexible pads out of coincedence. I went into Home Depot looking for the ScotchBrite Ultra Fine pads but they didn't have them so I figured I would give these a shot. Didn't use a block either, just index finger or thumb and applied a little more pressure in the beginning (though not much is needed for light scuffs) to get the scuffs out and ended with very light pressure for the finish. Just make sure to always go in the same direction and for the finish passing it the entire length of the slide to for an even look. It really does come out nice
|
|
The Following User Likes This Post:
|
|
11-13-2014, 05:52 PM
|
|
Member
|
|
|
Join Date: Apr 2010
Location: South Florida
Posts: 38
Likes: 31
Liked 66 Times in 18 Posts
|
|
Quote:
Originally Posted by Jaymo
Nice satin look.
I have a 5906 that spent a lot of time in a duty holster.
I'm torn between blasting it and using Scotchbrite.
One S&W accumulator I spoke with said he uses a sandblaster with walnut hull media to return stainless 3rd gens to their factory finish.
I may give it a try.
|
Makes sense, if you don't like the sanding finish you can always go ahead and sandblast and all you lose is $4.99
|
|
The Following User Likes This Post:
|
|
11-13-2014, 08:39 PM
|
|
Member
|
|
|
Join Date: Oct 2010
Posts: 499
Likes: 124
Liked 101 Times in 81 Posts
|
|
Very nice! You also did the frame?
|
11-14-2014, 12:44 AM
|
|
Member
|
|
|
Join Date: Apr 2010
Location: South Florida
Posts: 38
Likes: 31
Liked 66 Times in 18 Posts
|
|
Quote:
Originally Posted by icemn
Very nice! You also did the frame?
|
Thanks! yes both frame and slide, the slide had the famous idiot mark and some small marks.
|
11-14-2014, 12:48 AM
|
 |
Member
|
|
|
Join Date: Jan 2011
Posts: 1,238
Likes: 369
Liked 1,223 Times in 386 Posts
|
|
looks real good but some before pics would have helped us see the difference.
|
|
The Following User Likes This Post:
|
|
11-14-2014, 09:03 AM
|
|
Member
|
|
|
Join Date: Apr 2010
Location: South Florida
Posts: 38
Likes: 31
Liked 66 Times in 18 Posts
|
|
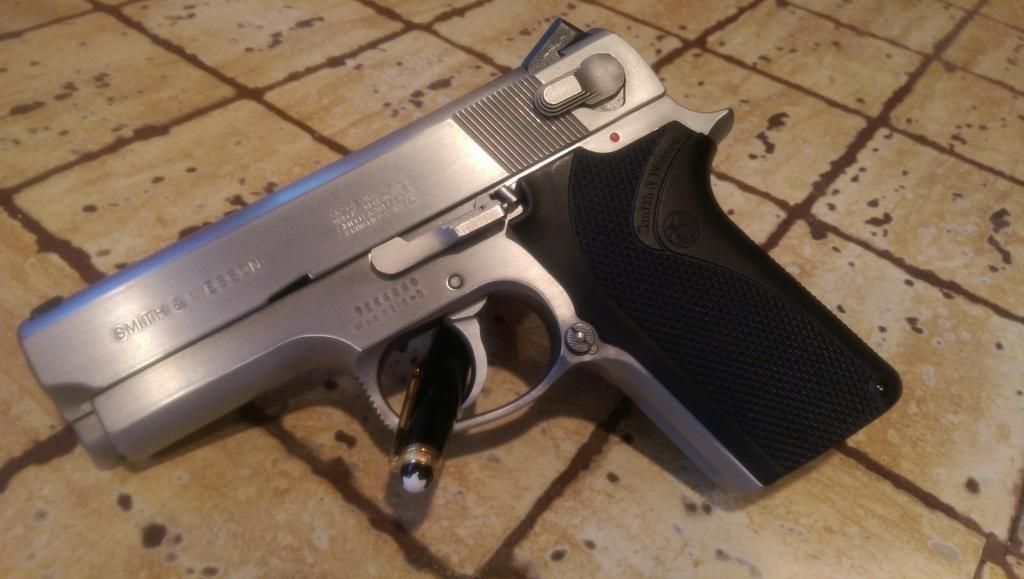
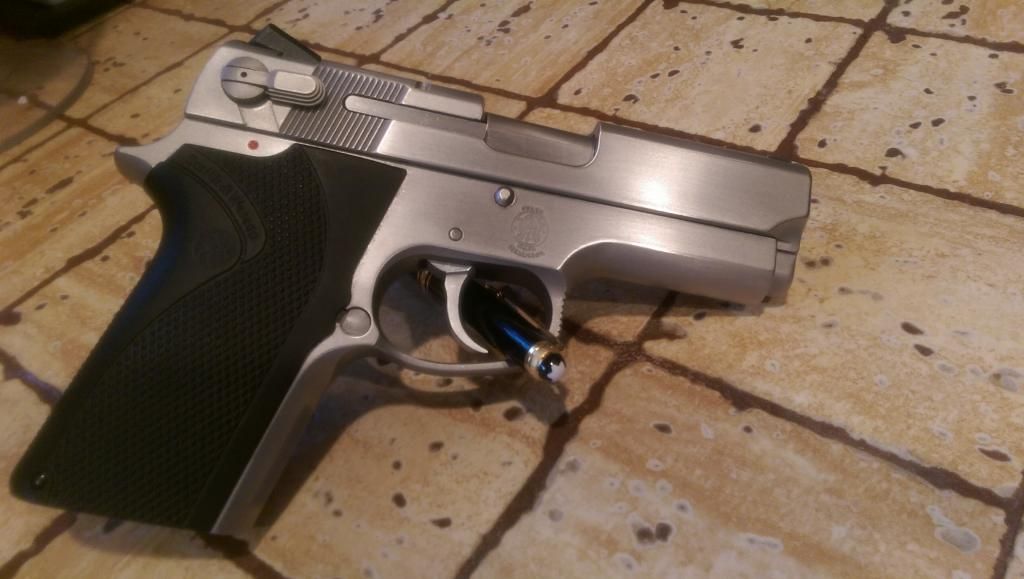
Ask and you shall receive LOL, Ok found some before pics:
|
|
The Following User Likes This Post:
|
|
11-29-2014, 03:40 AM
|
|
Member
|
|
|
Join Date: Oct 2014
Location: San Diego
Posts: 4
Likes: 0
Liked 2 Times in 2 Posts
|
|
Quote:
Originally Posted by ScubaSig
Hey Wallace, I used the 3M 320 grit x-fine flexible pads out of coincedence. I went into Home Depot looking for the ScotchBrite Ultra Fine pads but they didn't have them so I figured I would give these a shot. Didn't use a block either, just index finger or thumb and applied a little more pressure in the beginning (though not much is needed for light scuffs) to get the scuffs out and ended with very light pressure for the finish. Just make sure to always go in the same direction and for the finish passing it the entire length of the slide to for an even look. It really does come out nice |
Thanks so much for the tips on polishing these pistols. I just got a set of scotch brite pad (light grey and maroon) to polish up my 4516-1 (10 more days to pickup). I plan to respring the pistol and do a scotch-brite polish along with some internal polishing of trigger parts. Try post pics when I figure how to post pics on this forum. Thanks again scubasig!
|
|
The Following User Likes This Post:
|
|
01-06-2015, 02:35 PM
|
 |
Member
|
|
|
Join Date: Sep 2005
Location: Virginia
Posts: 856
Likes: 39
Liked 64 Times in 23 Posts
|
|
Thanks for the good advice! I just picked up a 4516 no dash and it needs a little polishing.
Steve
__________________
Steve
|
|
The Following User Likes This Post:
|
|
|
 Posting Rules
|
|
|
|
|


 Linear Mode

