|
|
 |
|

07-22-2012, 11:14 PM
|
 |
US Veteran
|


|
|
Join Date: Jun 2012
Location: SW Mississippi
Posts: 1,350
Likes: 2,228
Liked 6,220 Times in 1,043 Posts
|
|
 My next project - 4566TSW makeover
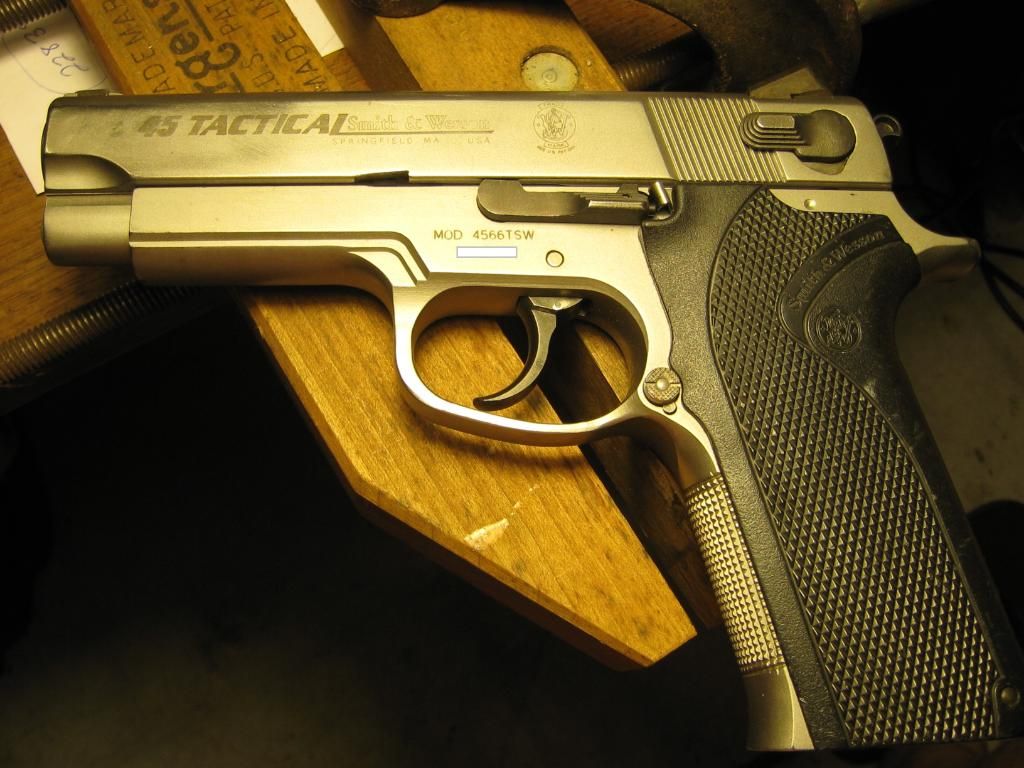
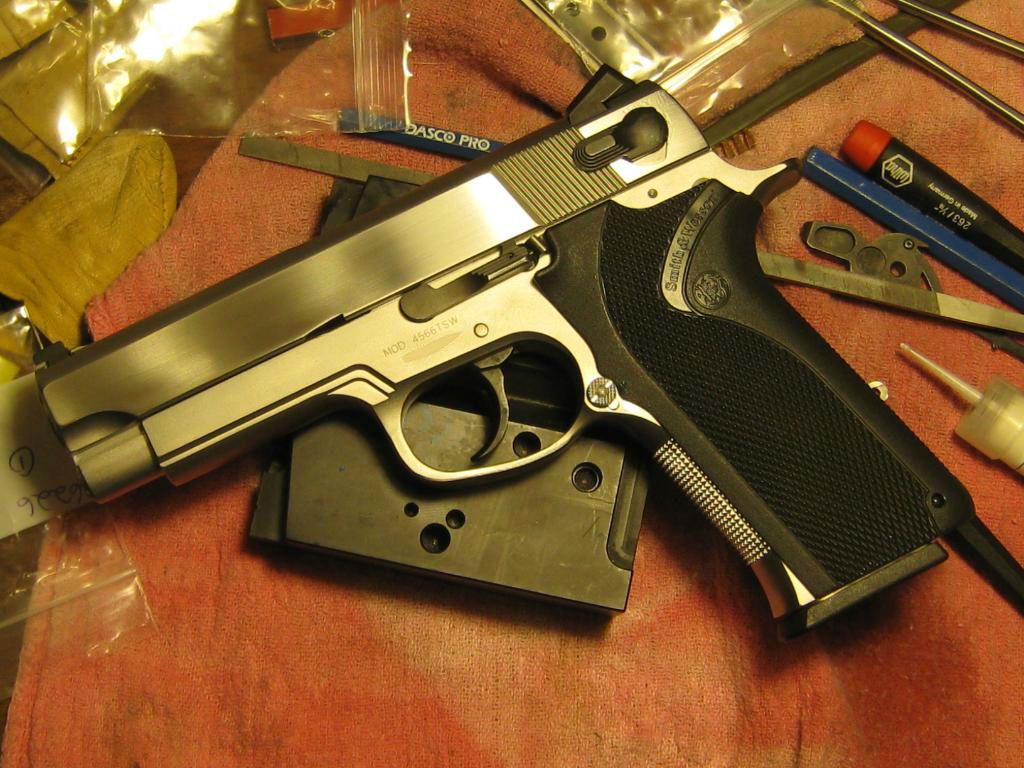
Something to keep me busy while I'm waiting for the 4516 to come back from Coal Creek. I just dont feel like messing with 1911s right now so this piece has moved to the head of the line.
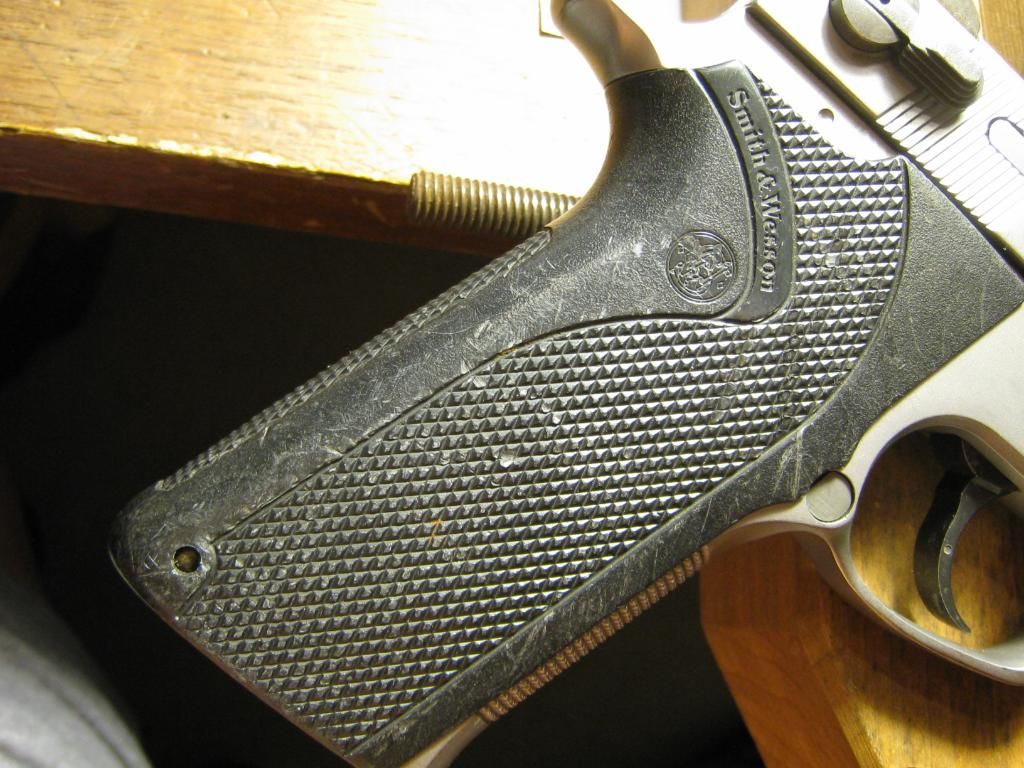
Picked this one up from my FFL guy last Friday. It's quite obviously a police turn-in. Has the expected holster wear along with lots of impact damage on the right side. I suspect she was dropped on concrete a few times too. Front sight is bashed down and dovetail deformed a bit. Some abrasion damage on the beavertail too looking like it met with cement at some time. Typical dings, dents & divots here and there I'd expect from a high mileage duty gun. In the plus column... slide to frame fit still nice and snug, Lockup is tight with no slop or movement at the breech or at the barrel bushing.
A little judicious filing will fix this
Ouch!
I will do a complete tear down & inspect, then compile my replacement parts list. At the bare minimum, she's going to get all new springs and a grip.
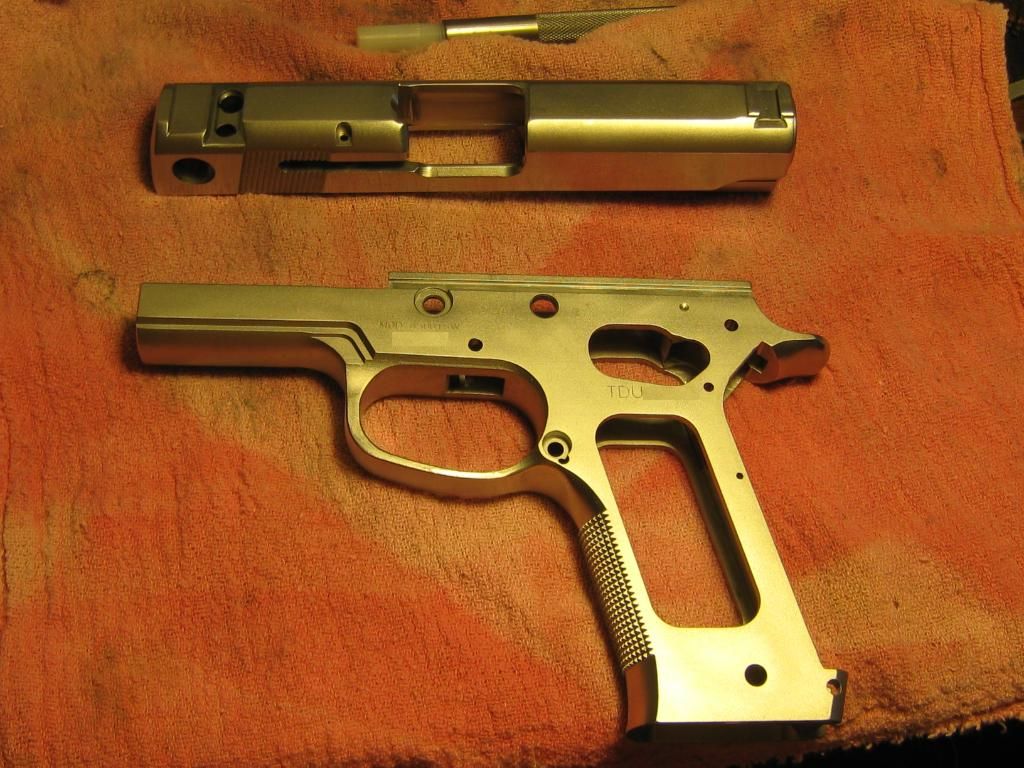
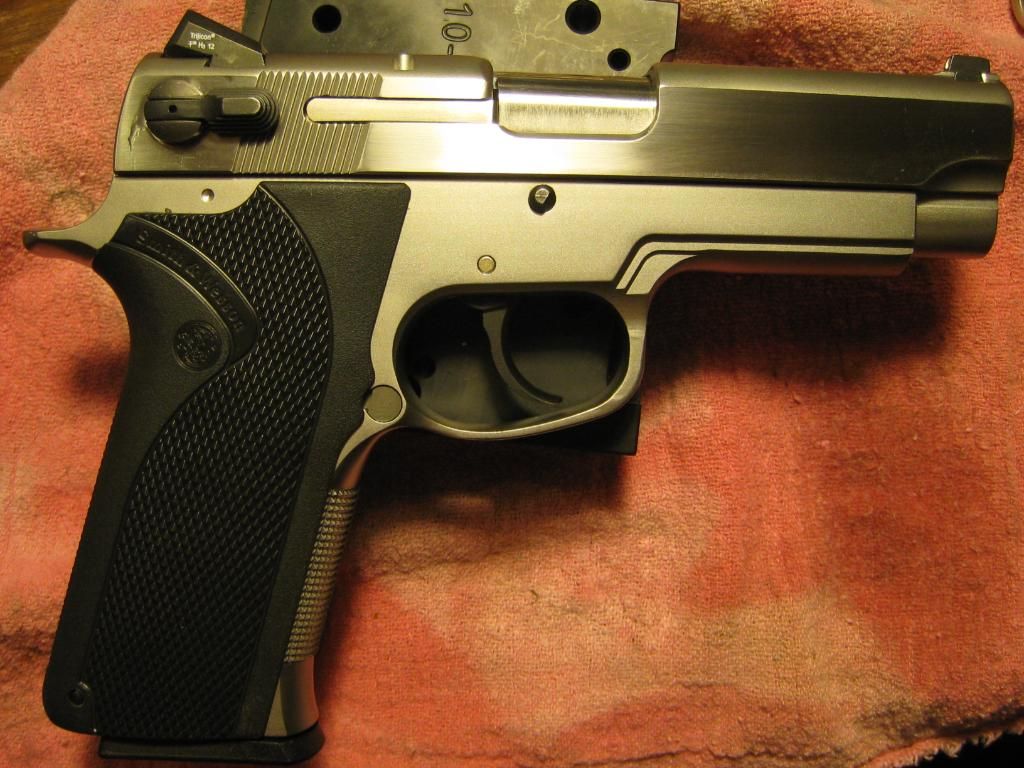
This is a particular version I've wanted for a while, meaning, a TSW without the scabbed on rail and no holes in the dustcover plugged with aluminum rivets. Since I don't have a CQB I will just have to roll my own... IMO this is the next best thing. I do plan some minor enhancements. Nothing so drastic as what I did on the 4516 project. Just some discrete light beveling & de-horning here and there and of course I will correct that checkering. I wonder if the PC still has any of those Briley bushings laying around? 
More to follow
Cheers
Bill

|
|
The Following 2 Users Like Post:
|
|
07-22-2012, 11:27 PM
|
 |
Member
|


|
|
Join Date: Feb 2002
Location: Victoria, Texas
Posts: 3,323
Likes: 380
Liked 1,016 Times in 358 Posts
|
|
Let me get the fritos, bean dip (hot) and a cold one....pull up a chair and watch the movie.
I has a 4566TSW at one time....out of the box was good to go for duty carry.
I look fwd to your mods.
|
07-23-2012, 12:20 AM
|
|
US Veteran
|
|
|
Join Date: Jun 2012
Location: SW Mississippi
Posts: 1,350
Likes: 2,228
Liked 6,220 Times in 1,043 Posts
|
|
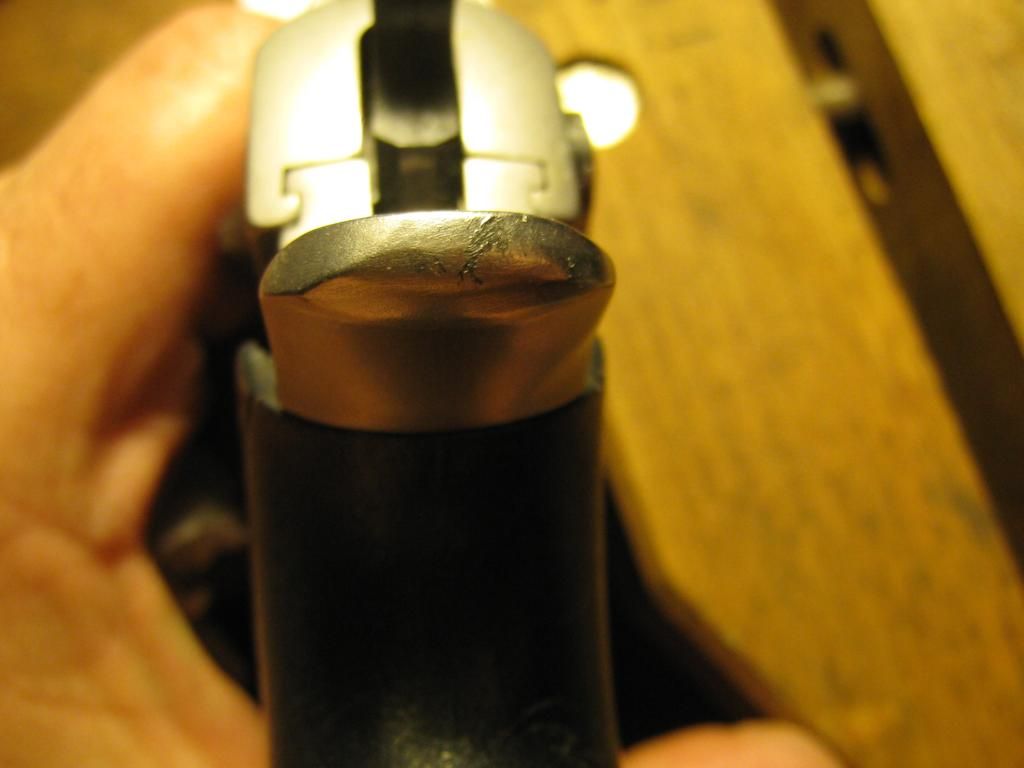
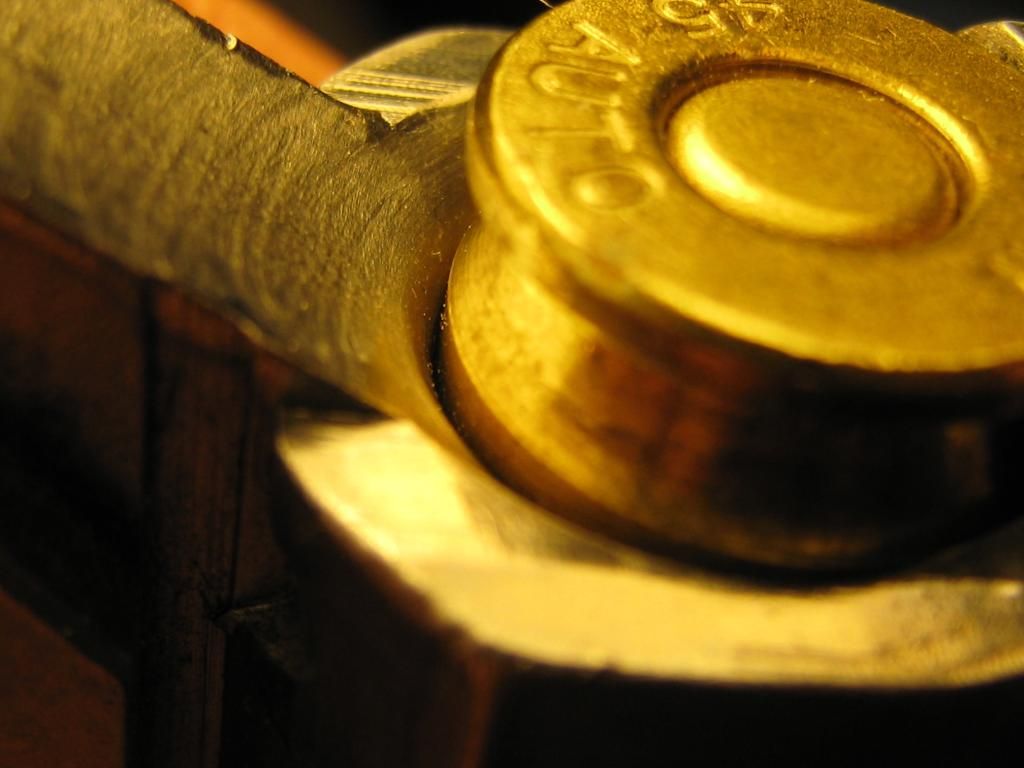
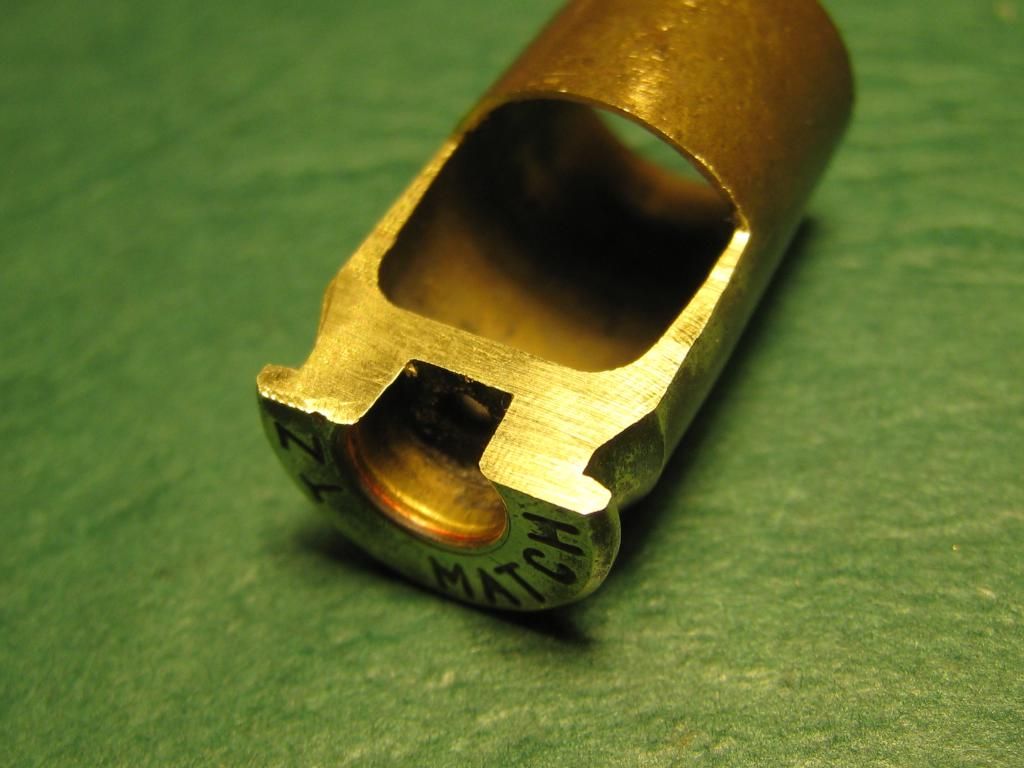
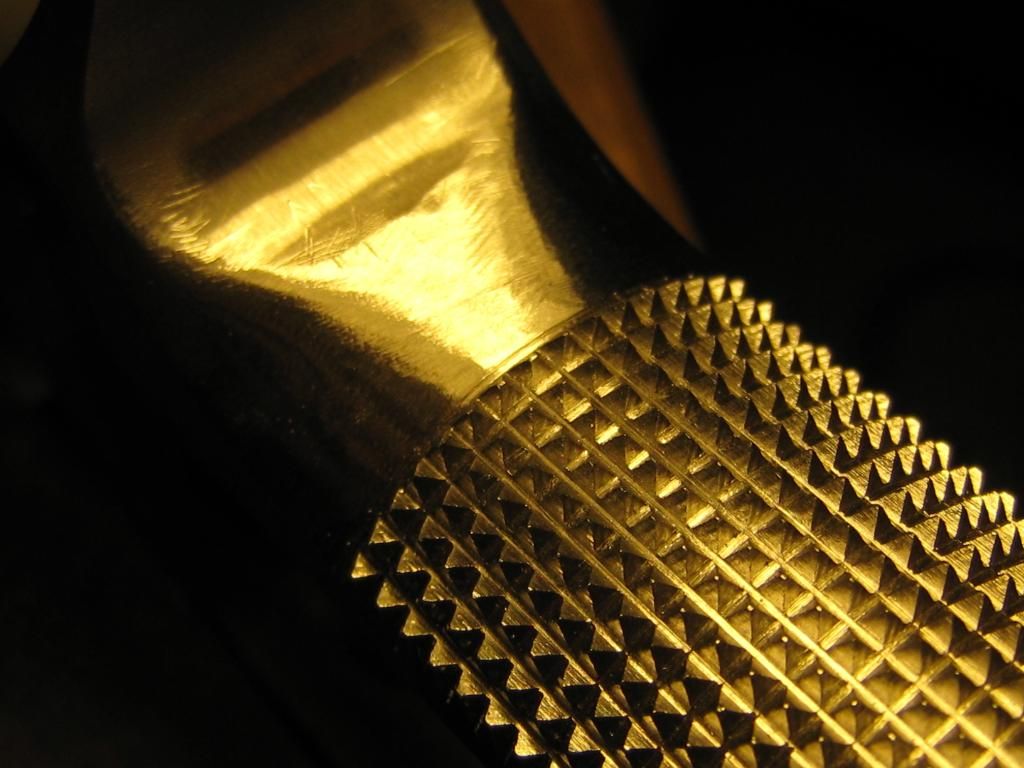
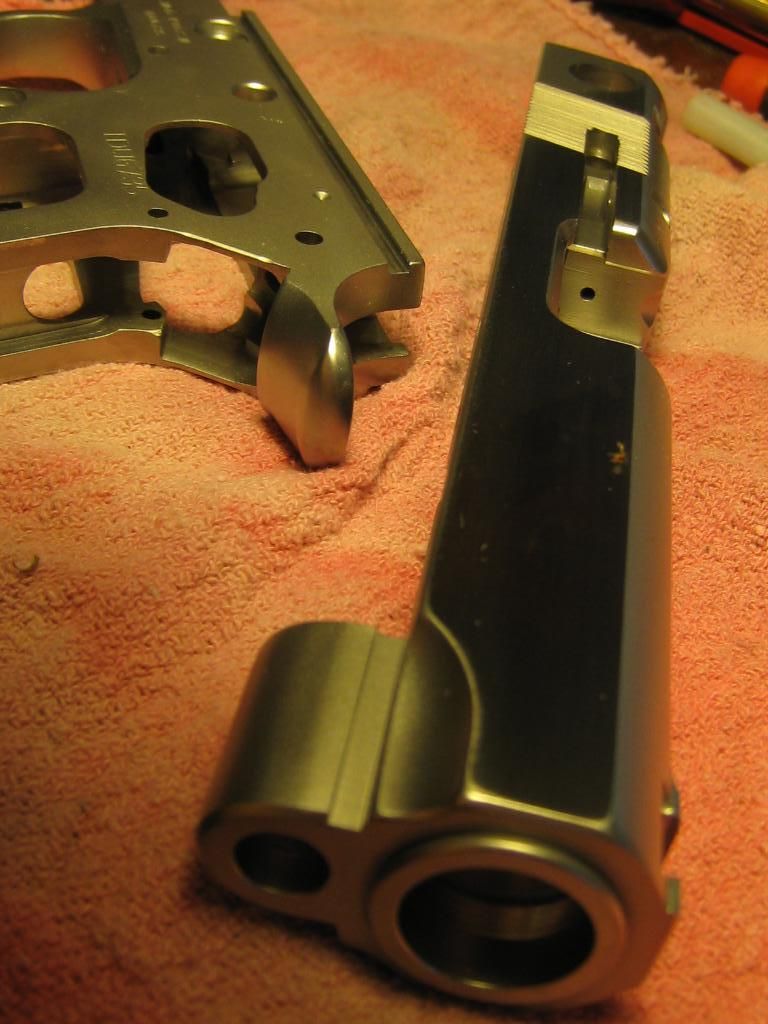
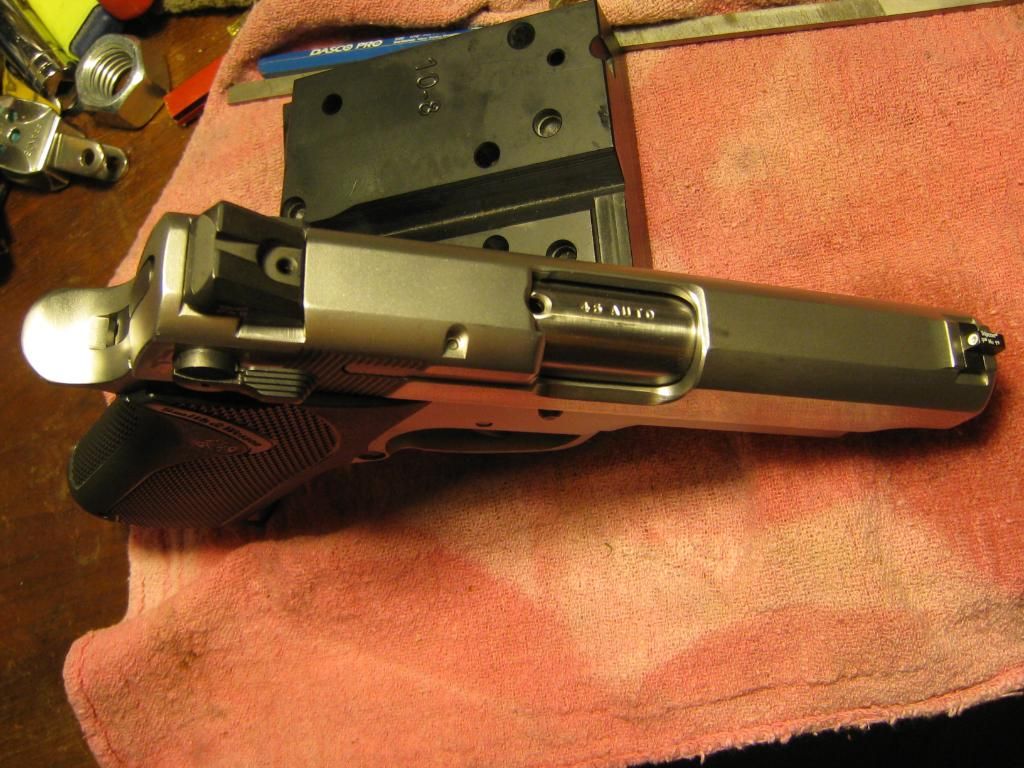
Barrel assessment:
I'll need to soak it in copper solvent for a week to get all the gilding metal out of there, however...
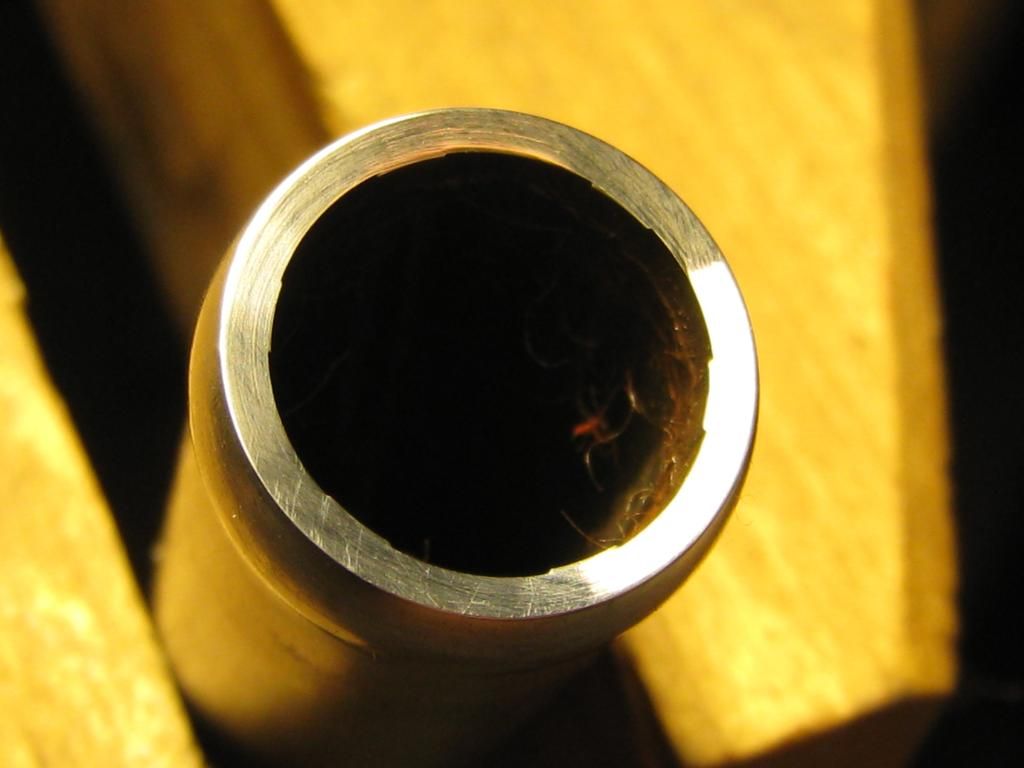
Crown looks good. Assuming I use this barrel I would re-cut the crown just enough to remove the toolmarks & polish it.
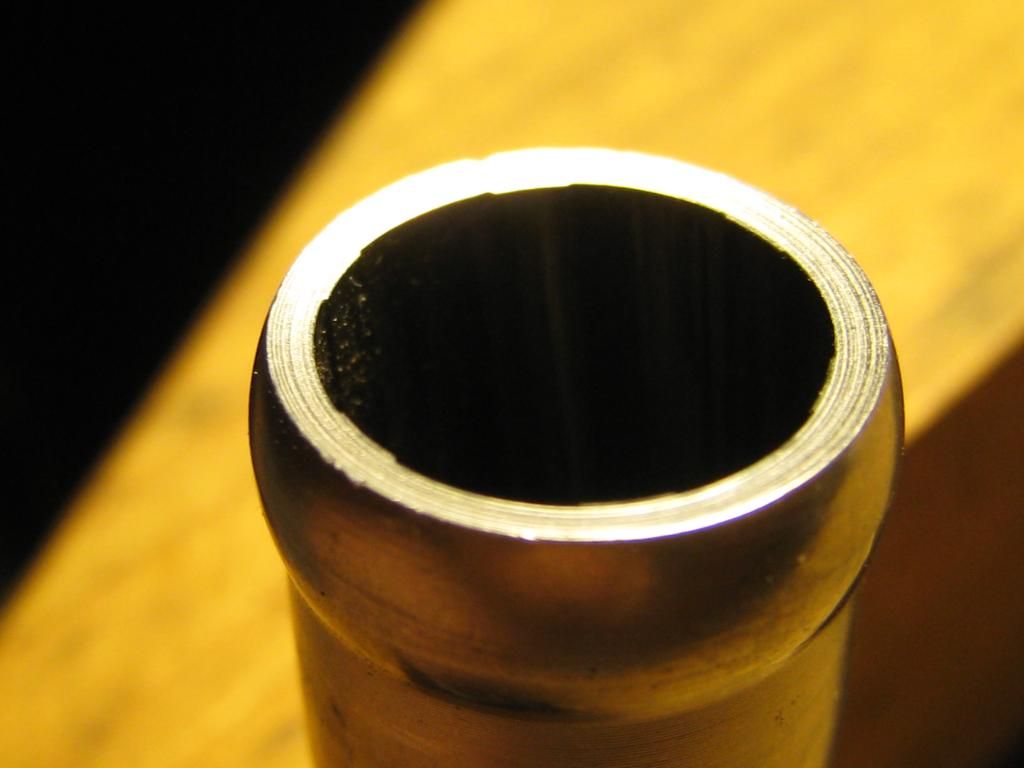
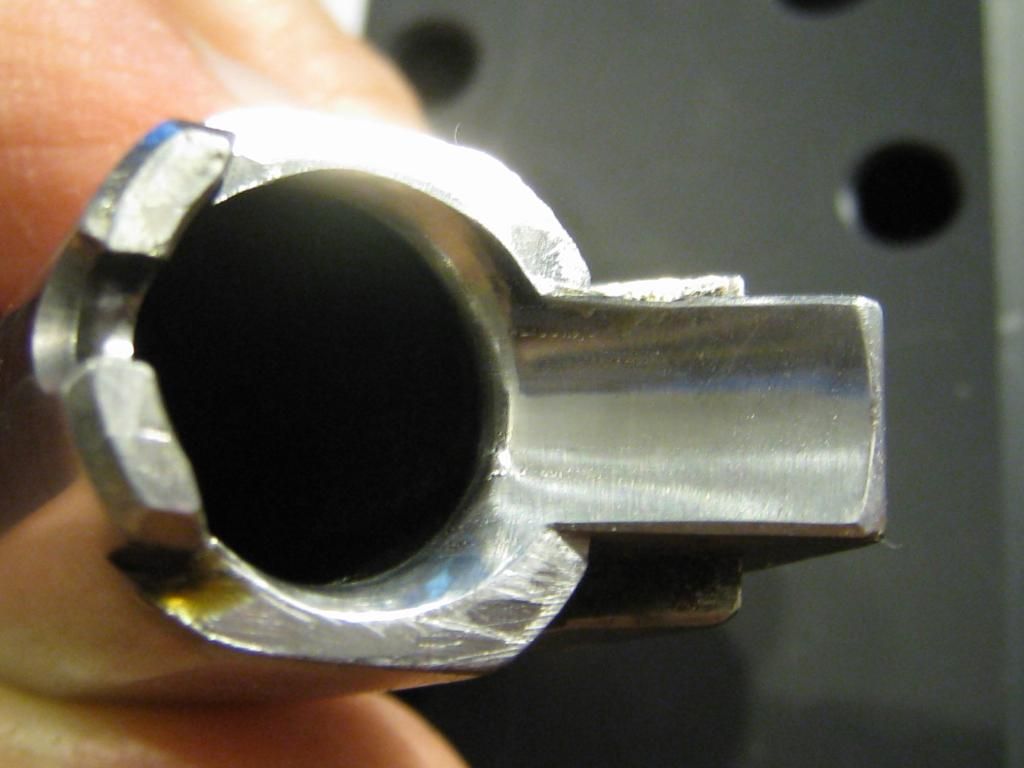
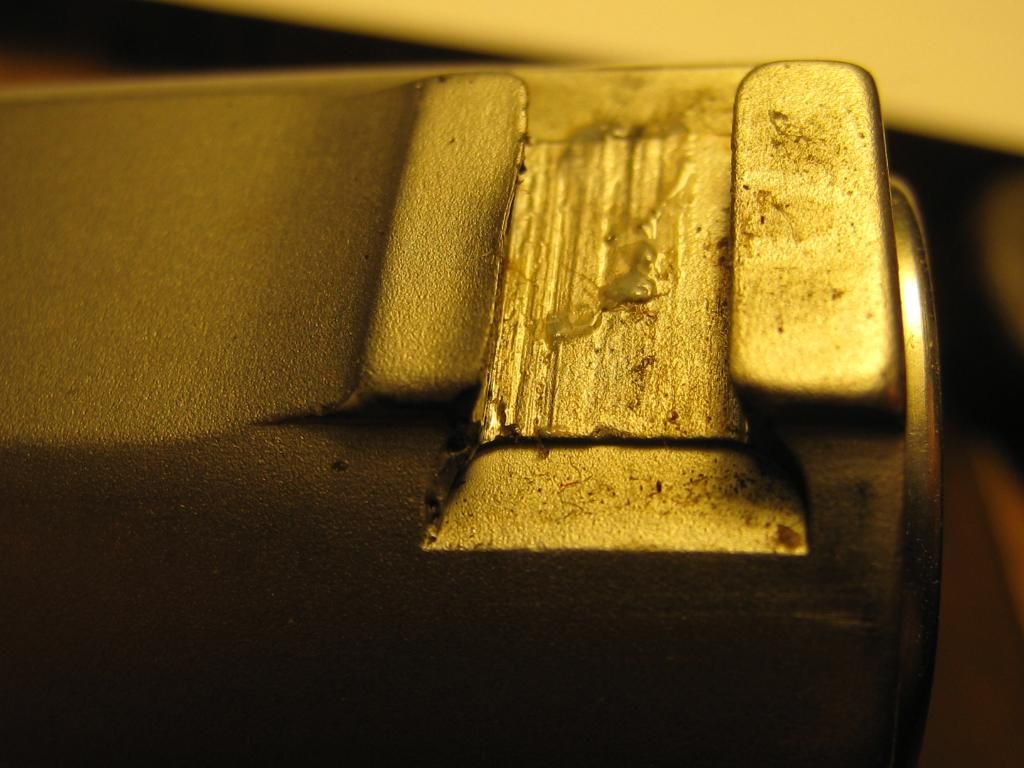
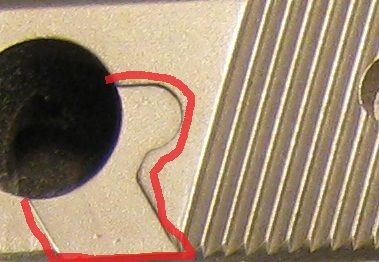
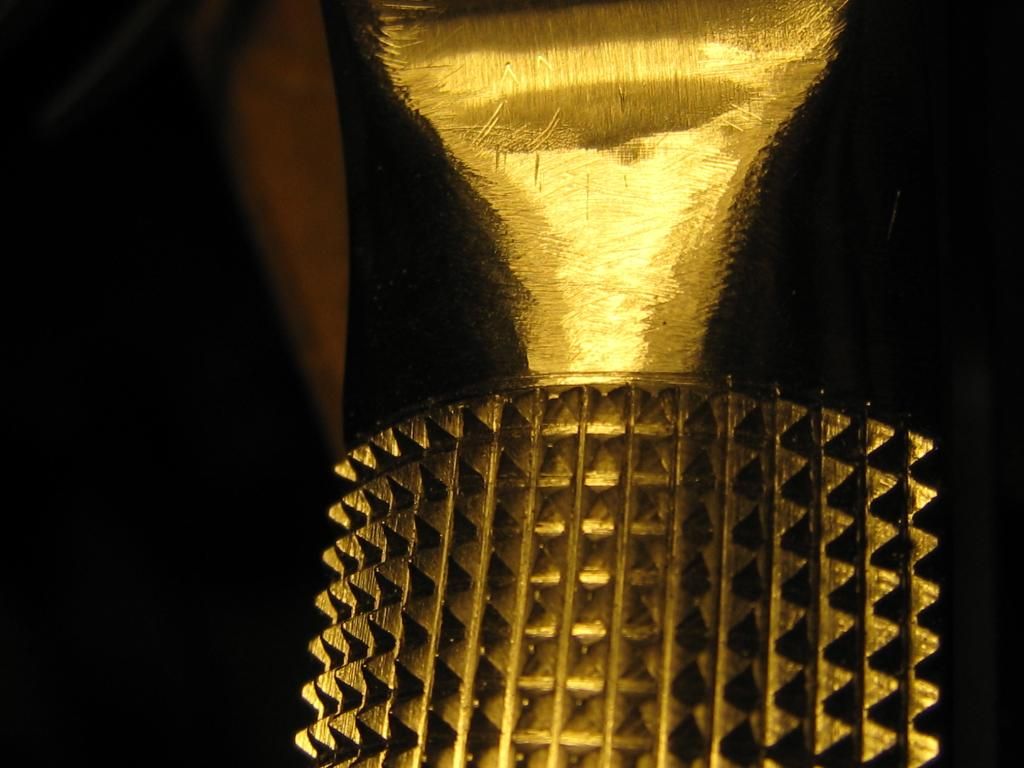
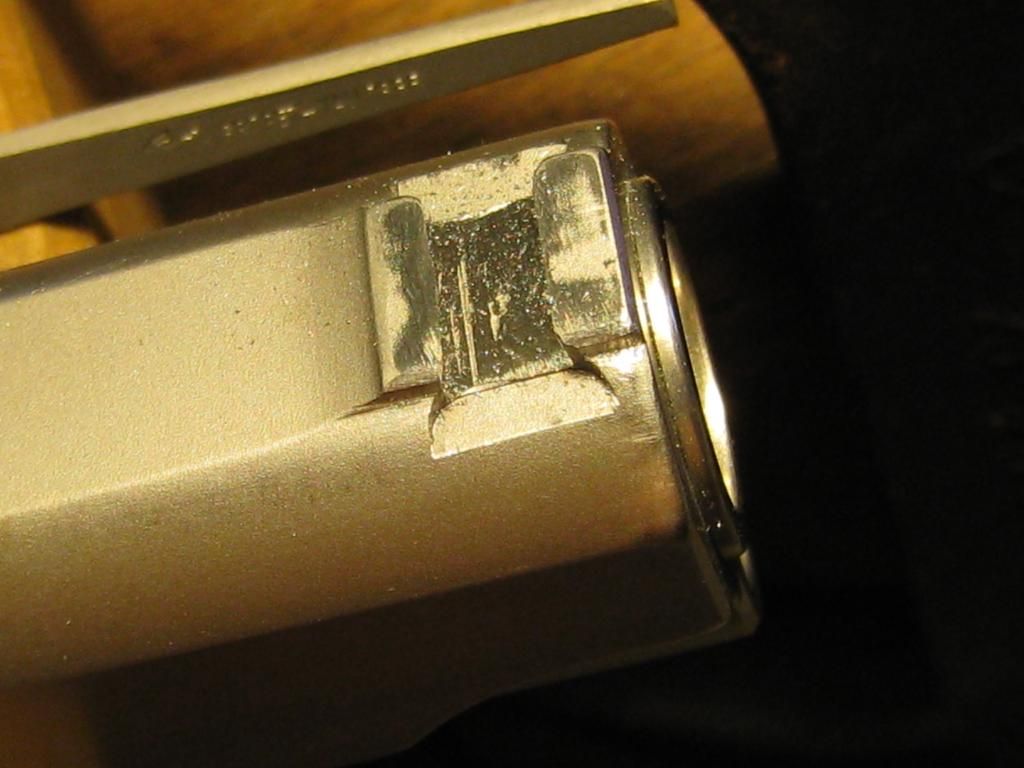
Breech though, looks like someone did some unauthorized throating here.
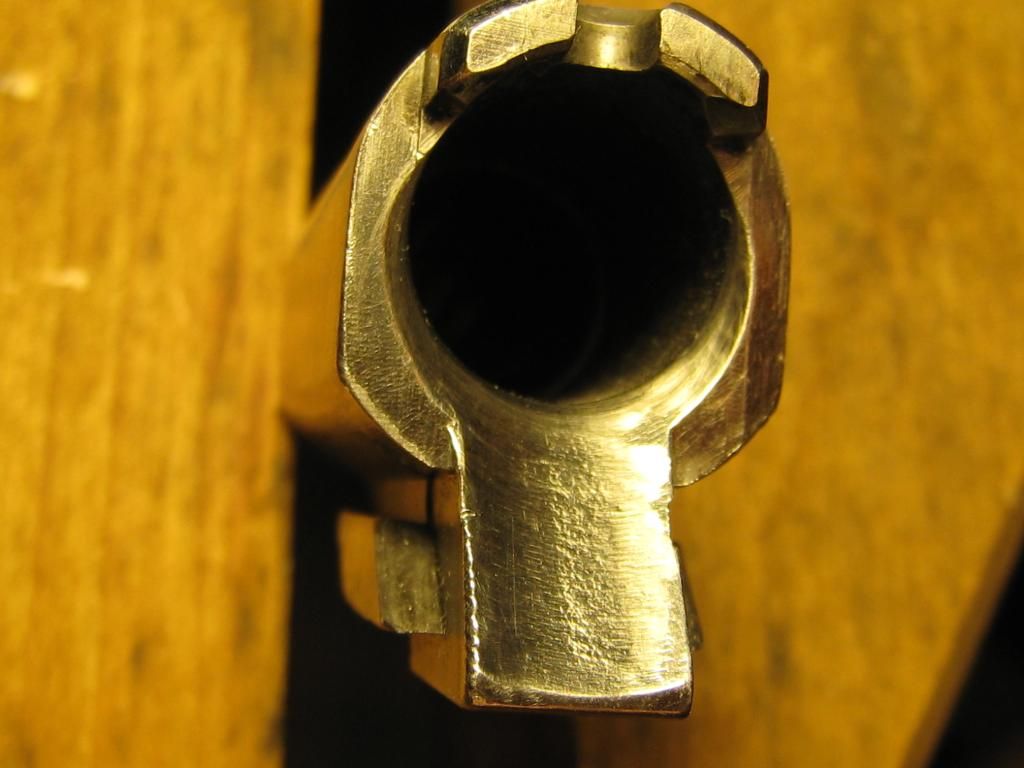
Note the "sawtooth" feature and burnishing on the left side. That comes from a bench mount wire wheel. Matches the interesting topography in the middle of the feed ramp too. Perhaps from cleaning some stubborn deposits with a less than ideal tool?
Not particularly liking on the amount of unsupported brass here and would like some opinions. I'm entertaining a replacement barrel because of this.
And...
Cheers
Bill
|
07-23-2012, 09:48 AM
|
 |
Absent Comrade
|

|
|
Join Date: Sep 2005
Location: GSO NC
Posts: 6,106
Likes: 23,604
Liked 13,198 Times in 2,860 Posts
|
|
Wow...that rail free 4566TSW is one of my holy grails too.
I'm usually a day late or dollar short when they make a rare appearance.
I'll be watching this thread too. Are you going to install a match grade barrel and Briley bushing? Regards 18DAI.
|
|
The Following User Likes This Post:
|
|
07-23-2012, 11:08 AM
|
|
Member
|
|
|
Join Date: Jul 2012
Posts: 30
Likes: 11
Liked 4 Times in 3 Posts
|
|
I took my 4566tsw out to compare breaches and mine is identical to yours, so too is my 4566 standard so i wouldnt worry too much about it. its possible its a factory thing mine has held up well even with +p's.
|
07-23-2012, 05:40 PM
|
 |
Member
|
|
|
Join Date: Oct 2006
Location: S.E. WI
Posts: 847
Likes: 114
Liked 135 Times in 75 Posts
|
|
Still looks more supported than my old G22 was.
__________________
M&P .40, M&P 9c & Shield 45
|
07-23-2012, 05:49 PM
|
|
Member
|

|
|
Join Date: Feb 2004
Location: Western Wisconsin
Posts: 337
Likes: 181
Liked 98 Times in 64 Posts
|
|
Regarding unsupported cases:
I think in one of Kuehnhausens' (I butchered the name, sorry) books there was a specification for how much unsupported case is acceptable. 3mm? Don't remember exactly...must be on the internet somewhere.
|
07-23-2012, 06:12 PM
|
|
Member
|
|
|
Join Date: Feb 2006
Location: East river South Dakota
Posts: 678
Likes: 6
Liked 107 Times in 57 Posts
|
|
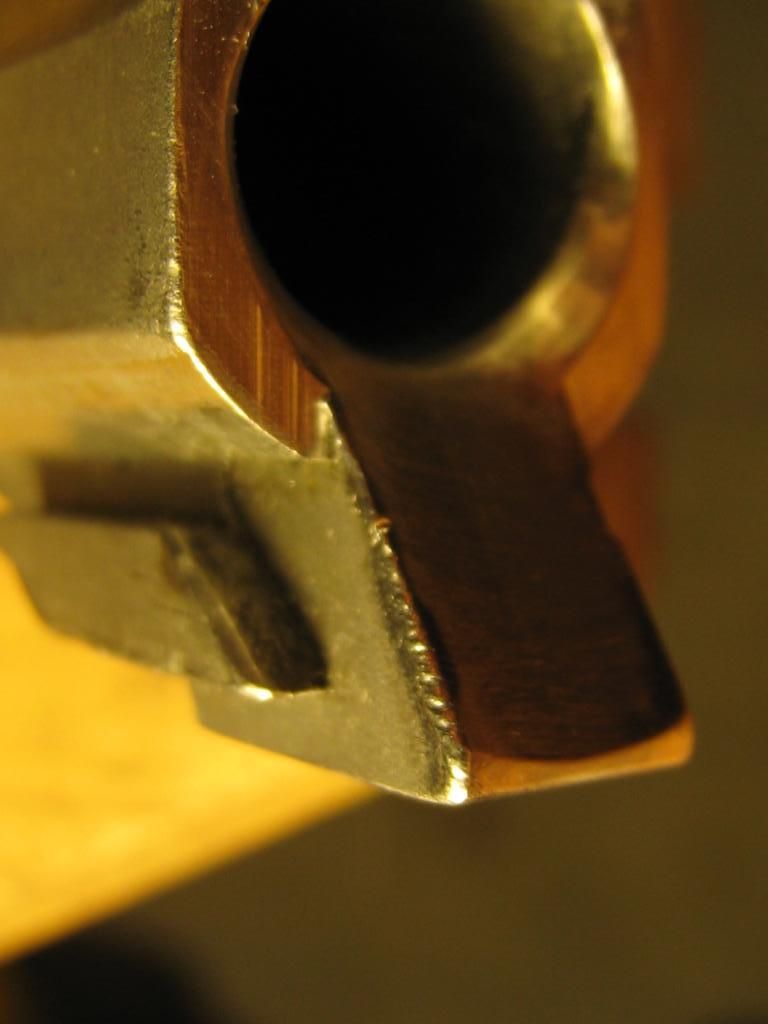
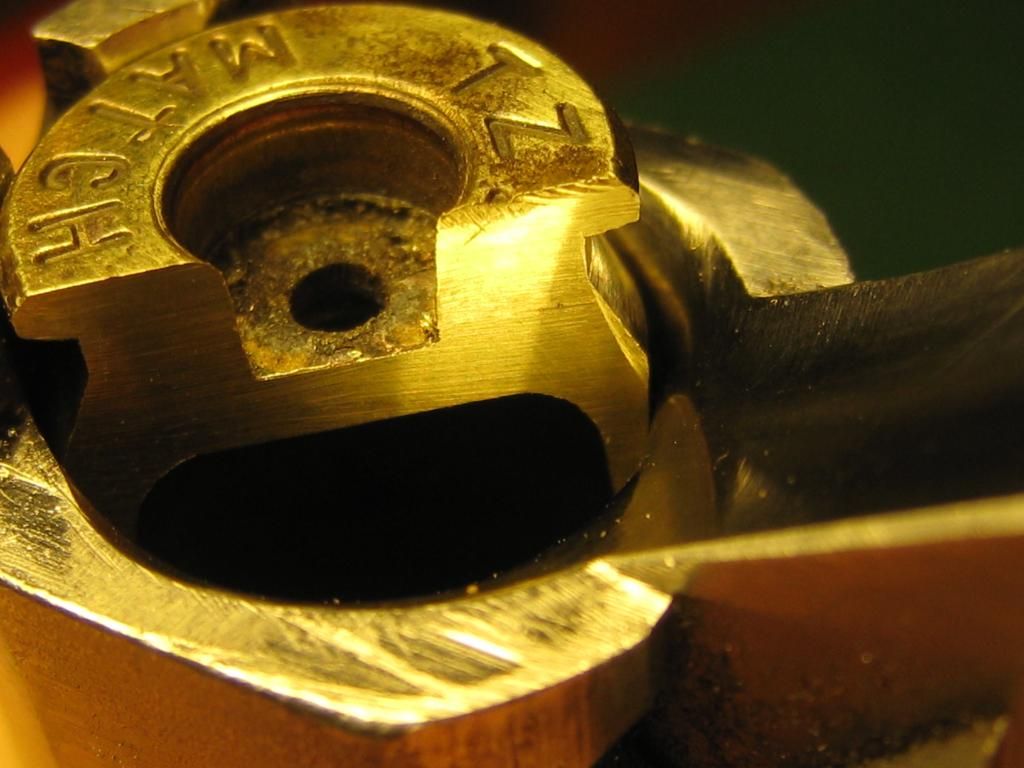
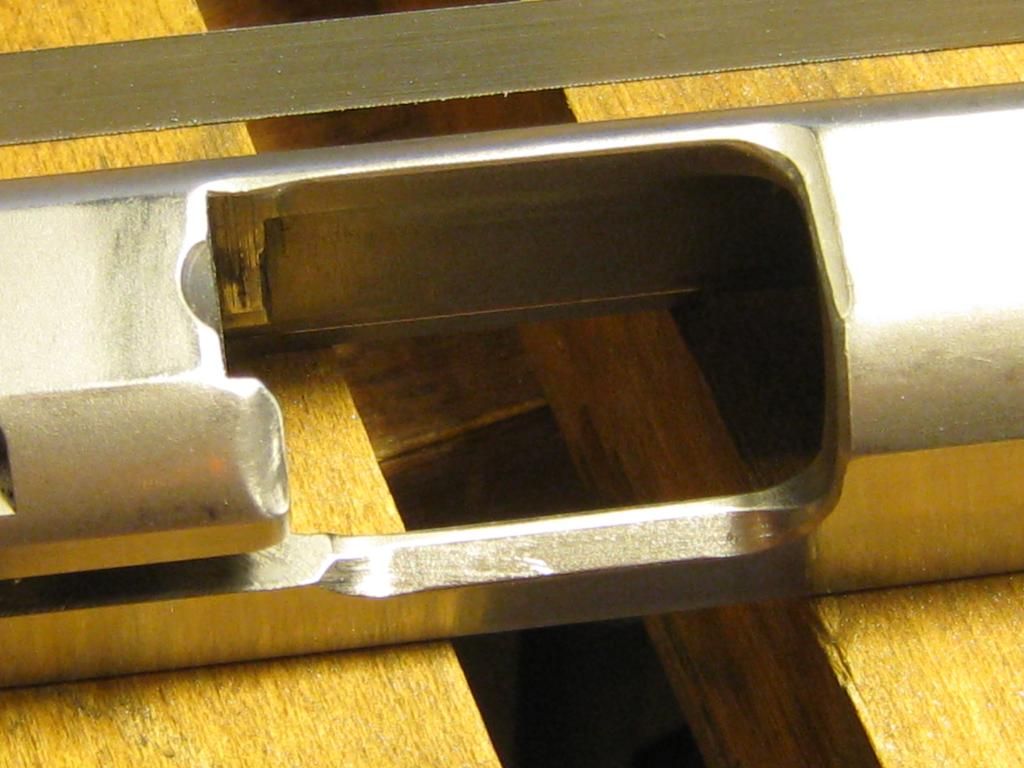
Man that is one ugly feed ramp.
Cat
__________________
Think for yourself.
|
07-23-2012, 06:31 PM
|
 |
Member
|


|
|
Join Date: Nov 2009
Location: Republic of Texas
Posts: 11,369
Likes: 9,388
Liked 17,304 Times in 6,652 Posts
|
|
I'm pretty confident that there are a lot of people with way more expertise than I have, but out of curiosity I put a round into the barrel of my 3913.
Comparing that to your last picture in the second set of photos I'd have to say that someone really hacked away at that feed ramp, especially the top where it transitions to the chamber.
I then took apart my 457 and did the same thing. I'd have to say that while it's closer to your photos, someone definitely did a number on that feed ramp.
Again, I'm no expert, but that feed ramp of yours looks very suspect to me.
|
07-23-2012, 08:40 PM
|
|
US Veteran
|
|
|
Join Date: Jun 2012
Location: SW Mississippi
Posts: 1,350
Likes: 2,228
Liked 6,220 Times in 1,043 Posts
|
|
Quote:
Originally Posted by 18DAI

Are you going to install a match grade barrel and Briley bushing? Regards 18DAI.
|
Man, I'd love to but S&W today told me today they don't do that anymore. I don't know any insiders there so I only have whatever the C/S guy tells me. Seems I'll be sticking with the stock tube. Kinda disappointing.
|
07-23-2012, 09:40 PM
|
 |
Member
|

|
|
Join Date: May 2010
Location: Louseyana
Posts: 309
Likes: 4
Liked 165 Times in 46 Posts
|
|
Quote:
Originally Posted by vista461
Still looks more supported than my old G22 was.
|
Anything is more supported than a glock
|
07-23-2012, 10:14 PM
|
|
US Veteran
|
|
|
Join Date: Jun 2012
Location: SW Mississippi
Posts: 1,350
Likes: 2,228
Liked 6,220 Times in 1,043 Posts
|
|
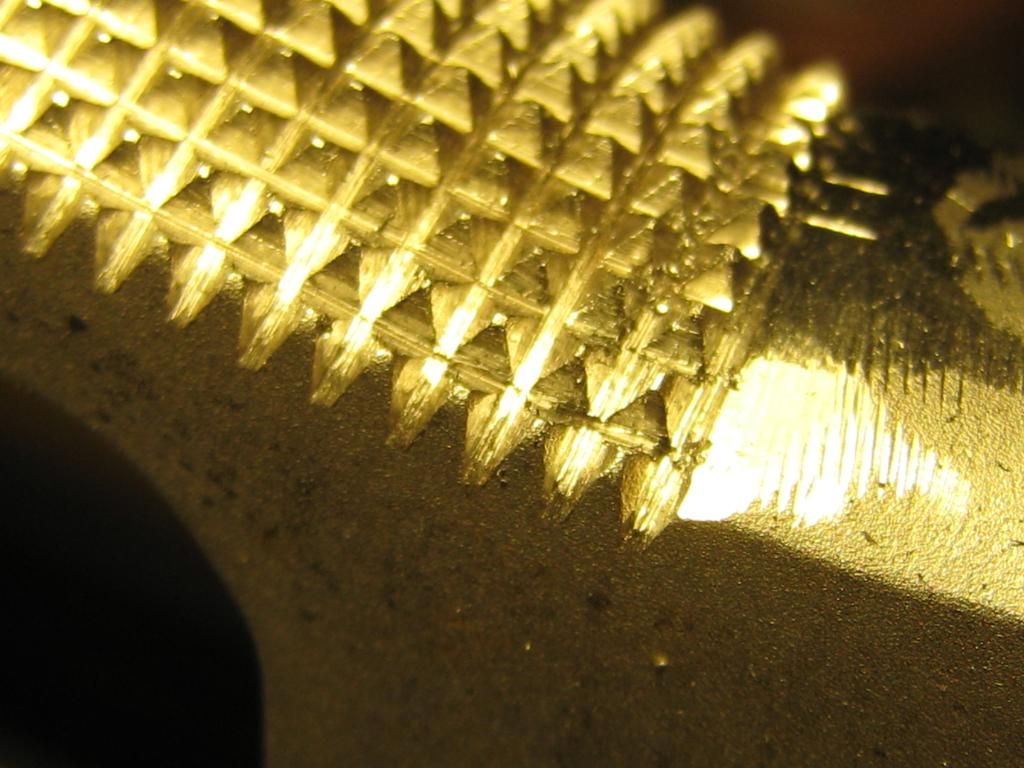
So, About the barrel... Last week I was reading about various Glock kB events and perhaps my imagination ran away a bit regarding this barrel. I noted everyone's comments (thank each of you by the way) and carefully compared the chamber with the two other 3rd gen 45s I have here. In the end there really isn't much difference in the unsupported case depth. Even my old series 70 shows more brass and never so much as a hiccup.
New barrels are on backorder at S&W so I'll work with what I have and order a new one later. With that in mind I fiddled with the barrel a bit today:
Fixed the scuzzy feed ramp. It's hard to get a good picture due to the shine and the droplets you see are bit of cutting oil.
Also re-cut and polished the crown. Interestingly, the factory crown was not quite perpendicular to the bore axis so it took some time to get it trued up and square.
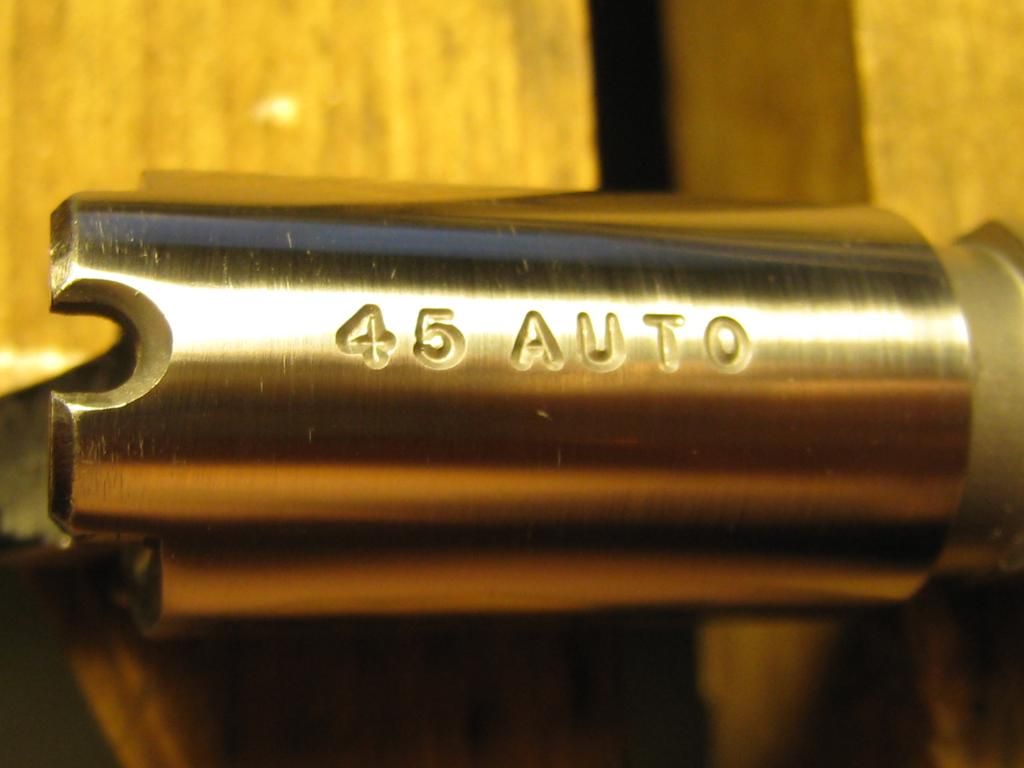
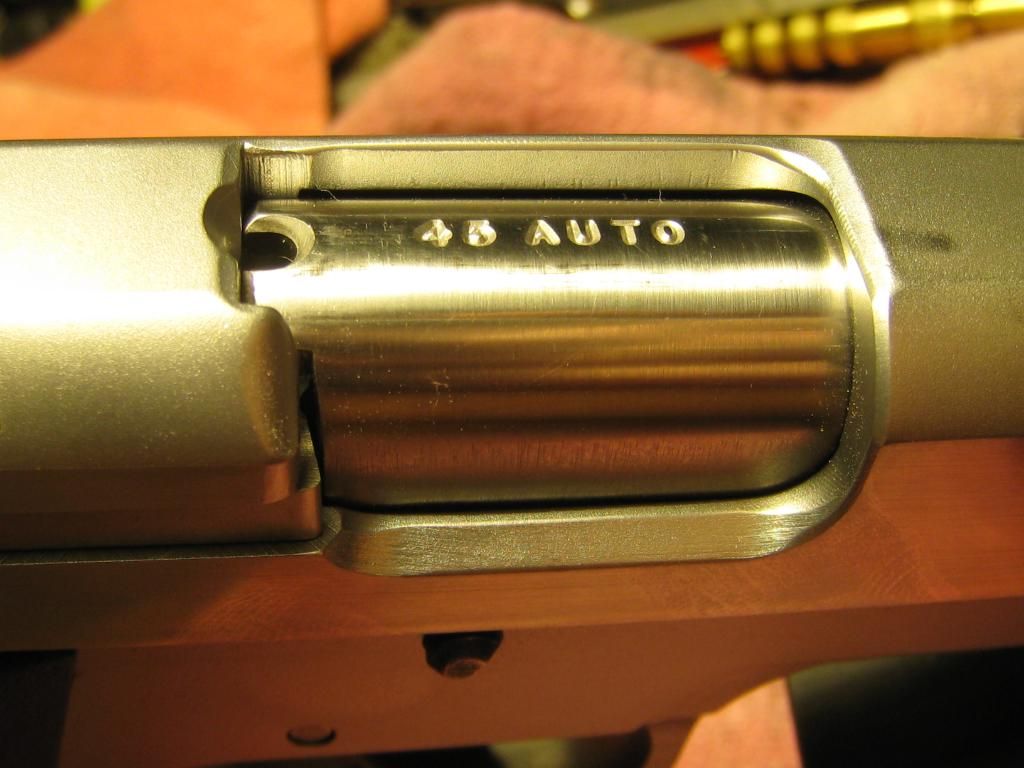
Consider it a pet peeve, I really dislike cratering around stamped markings like this (a little file work already done here).

So I fixed it.
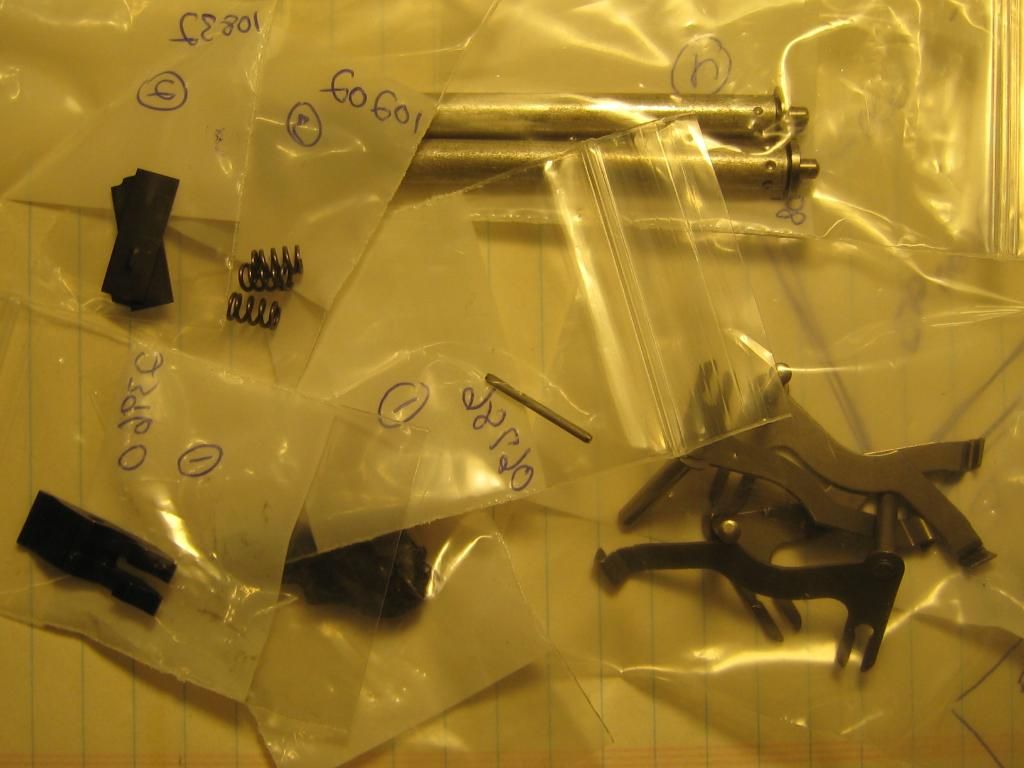
There were also a few more amusing discoveries during the teardown to share:
Yeah, this has seen better days.
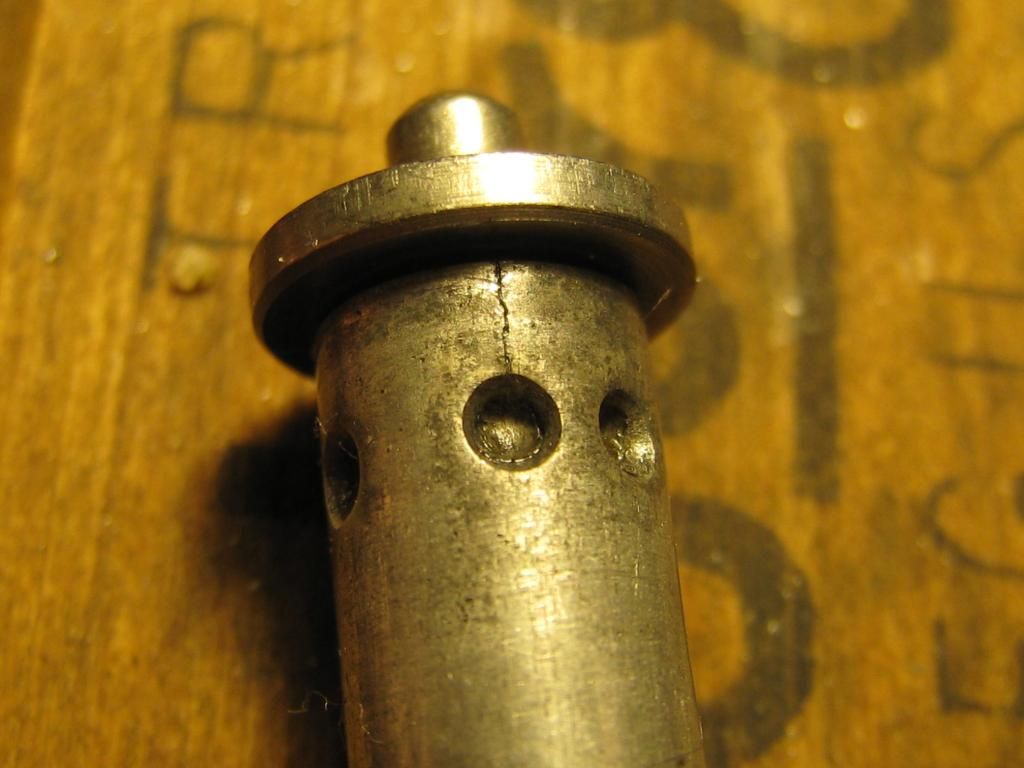
Sear engagements kinda rounded over. I'll put a new one in to go with the new bobbed hammer.
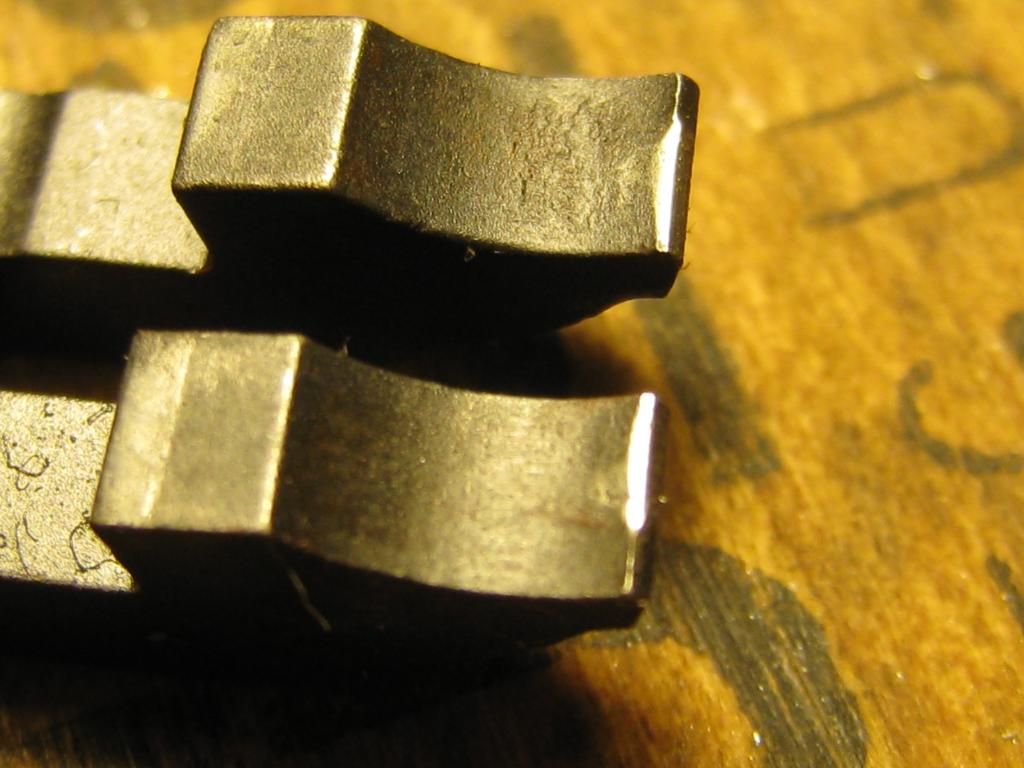
Two is better than one??
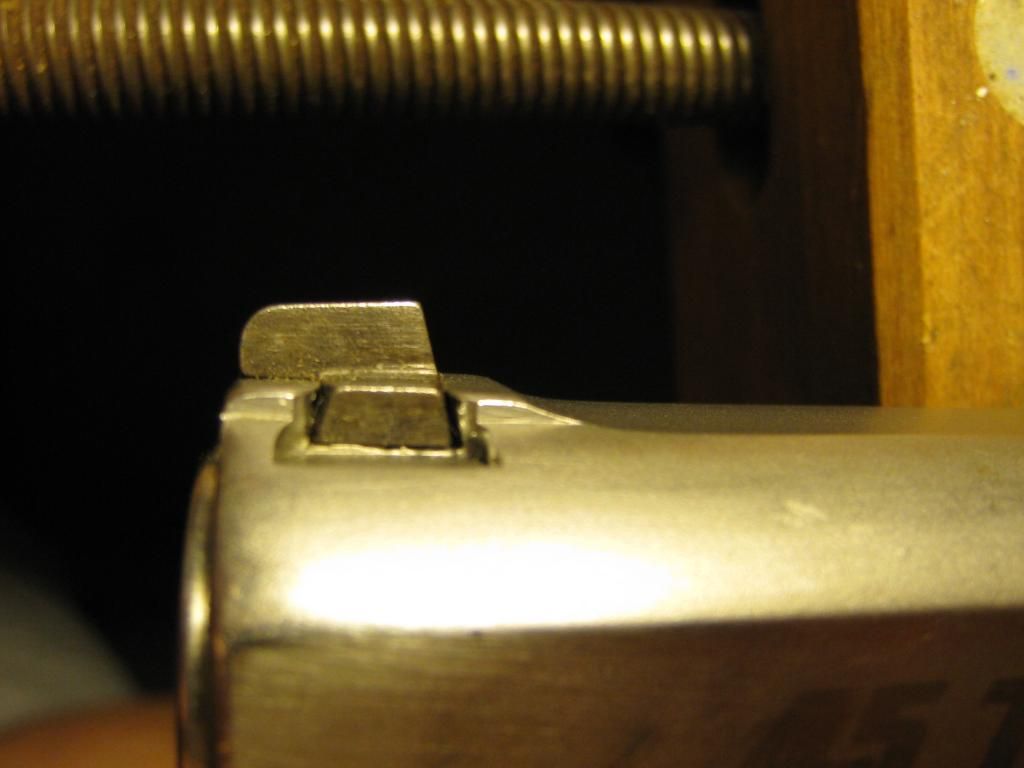
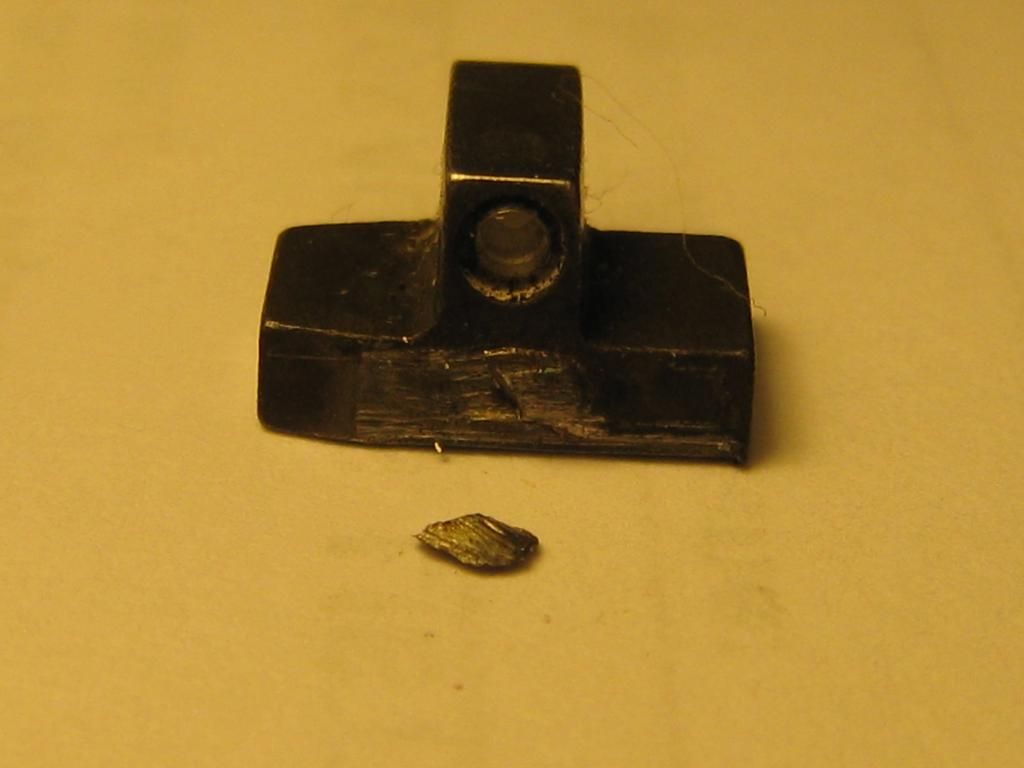
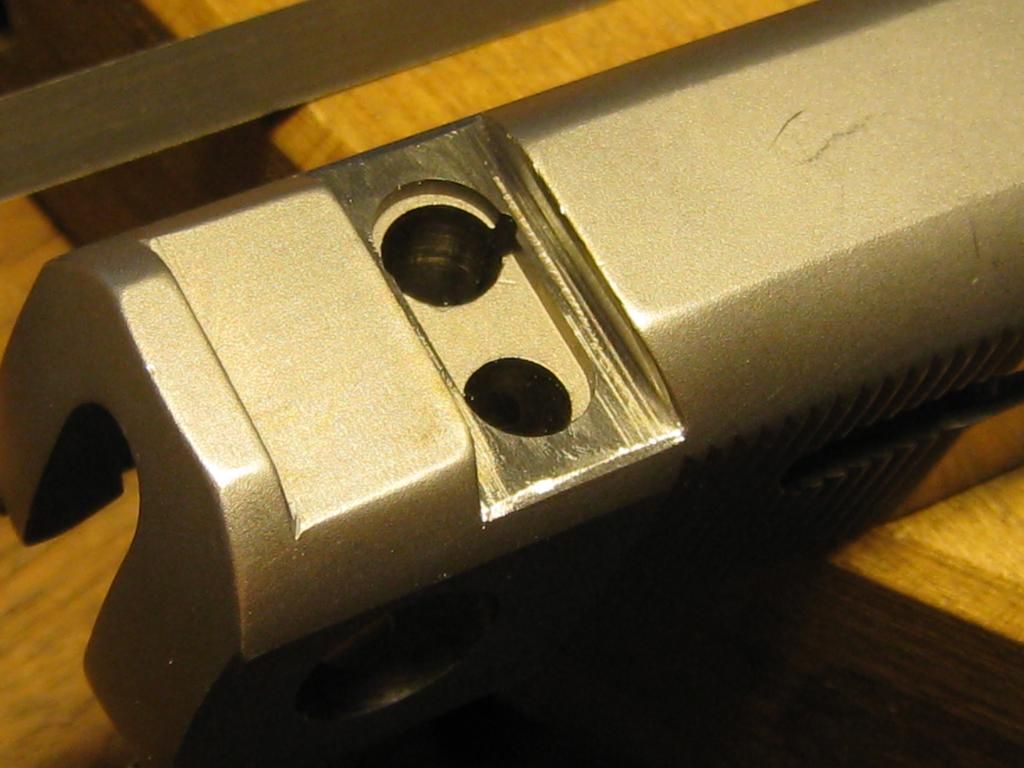
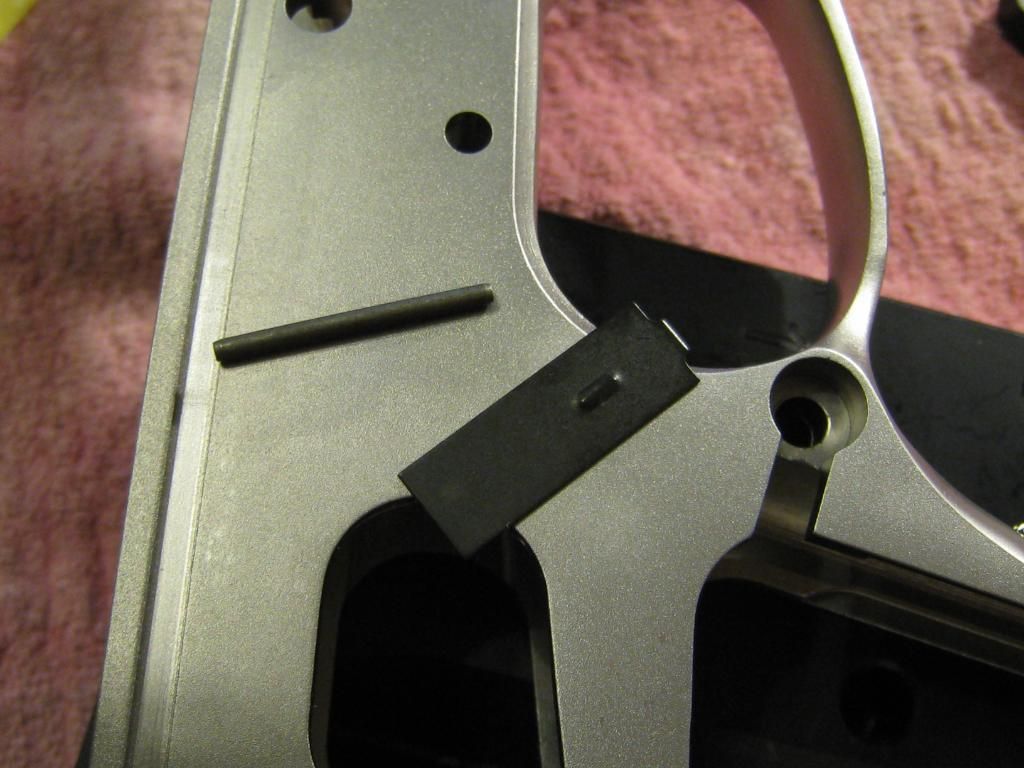
Front dovetail buggered up. Both sights were installed well to the right. Note the flash on the left that was never cleaned up.
And.
I think that little piece of metal (half of which is still embedded in the sight base) was a piece of flash or trash that was driven into the dovetail with the front sight. The front sight was jammed solid well short of the center line and the rearward half of the slide dovetail was deformed. I think I can fix the slide and I have a new set of sights.
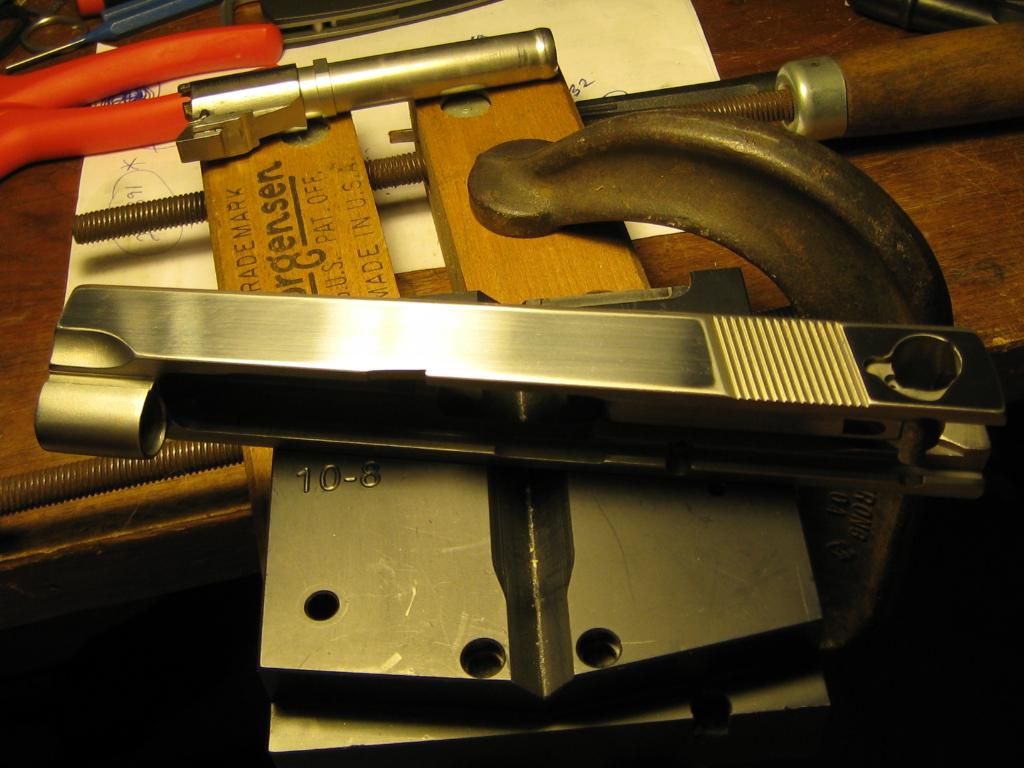
And lastly today... Never being a big fan of giant "tactikewl" logos or billboards on my guns... I wiped the slide flats which, it turns out weren't particularly flat to begin with.
Well a granite surface plate, some 220 followed by 400 grit some water with a pinch of detergent and a couple hours of elbow grease took care of that. The flats are certainly flat now and sanitized to boot
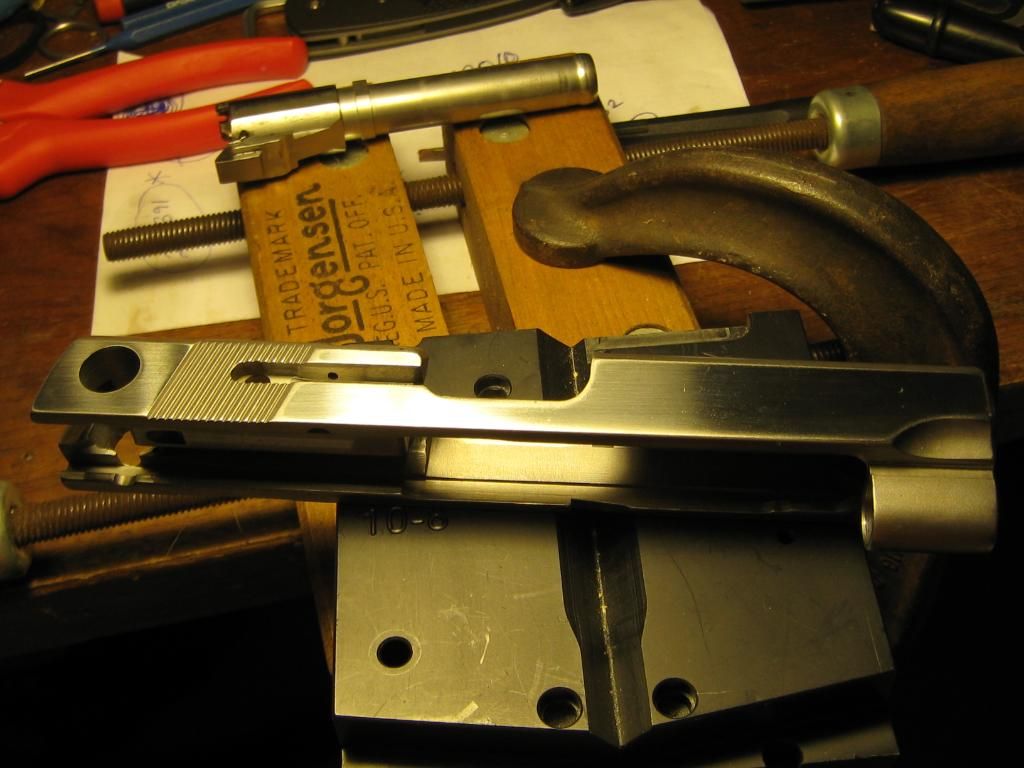
And the starboard side.
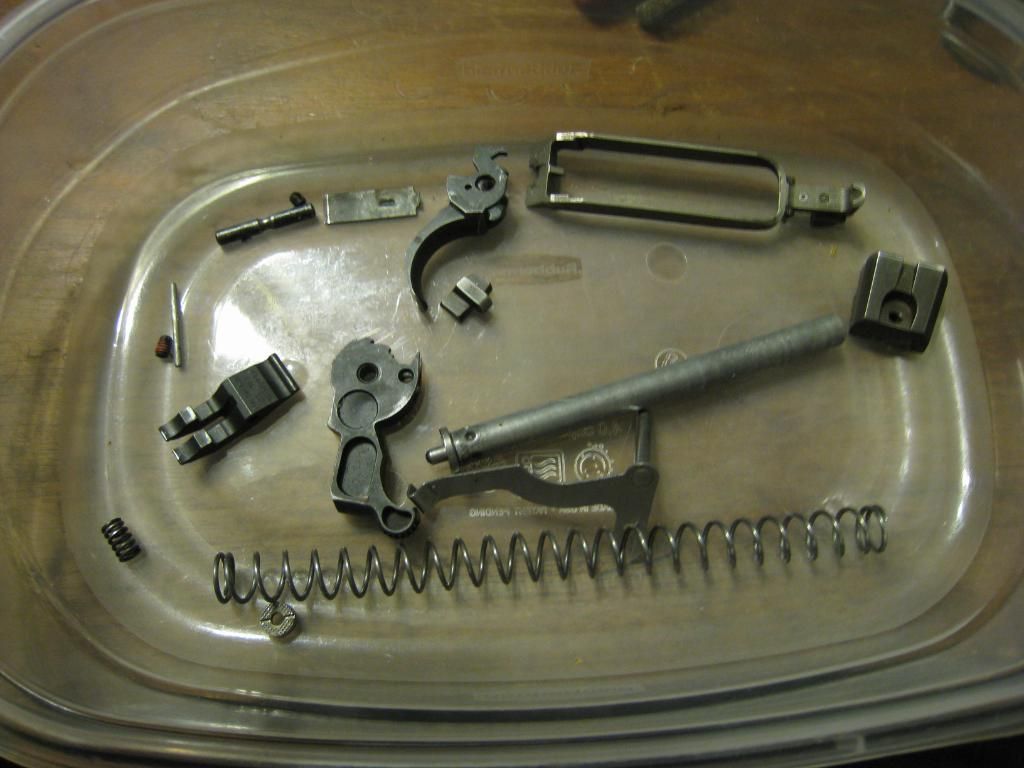
Lets see... All four of the tiny coil springs (the two by the hammer and two under the backsight) were rusted, sear spring rusted and the retaining pin was just beat to death. Had that look of a spoon that fell in the kitchen disposal.
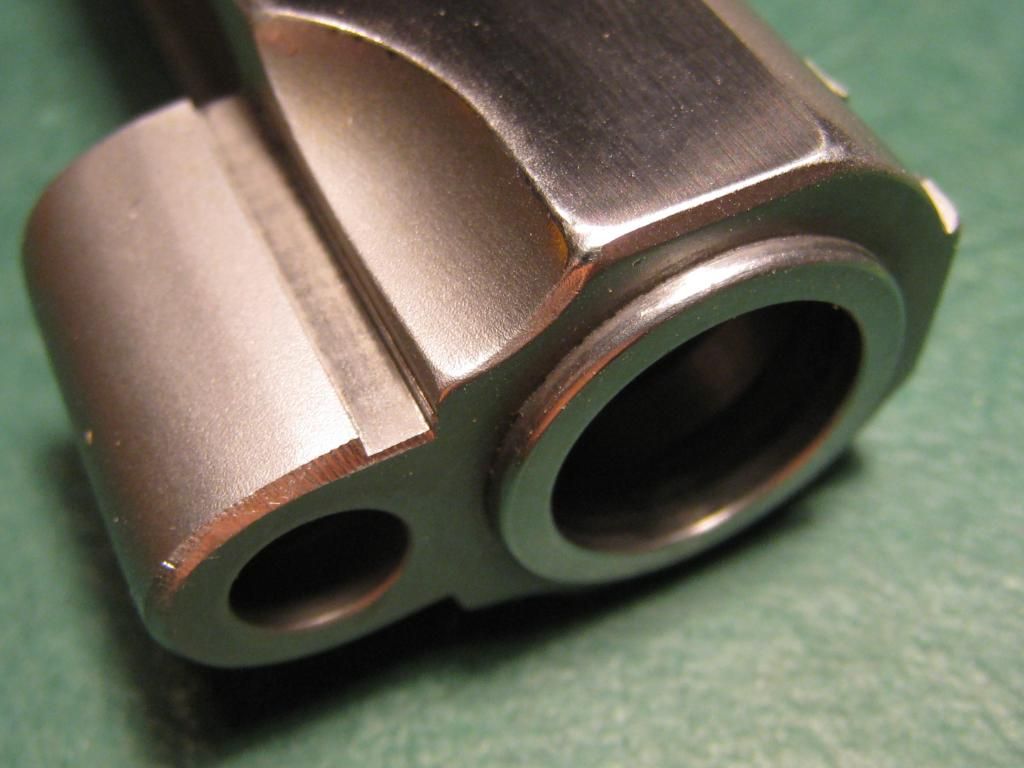
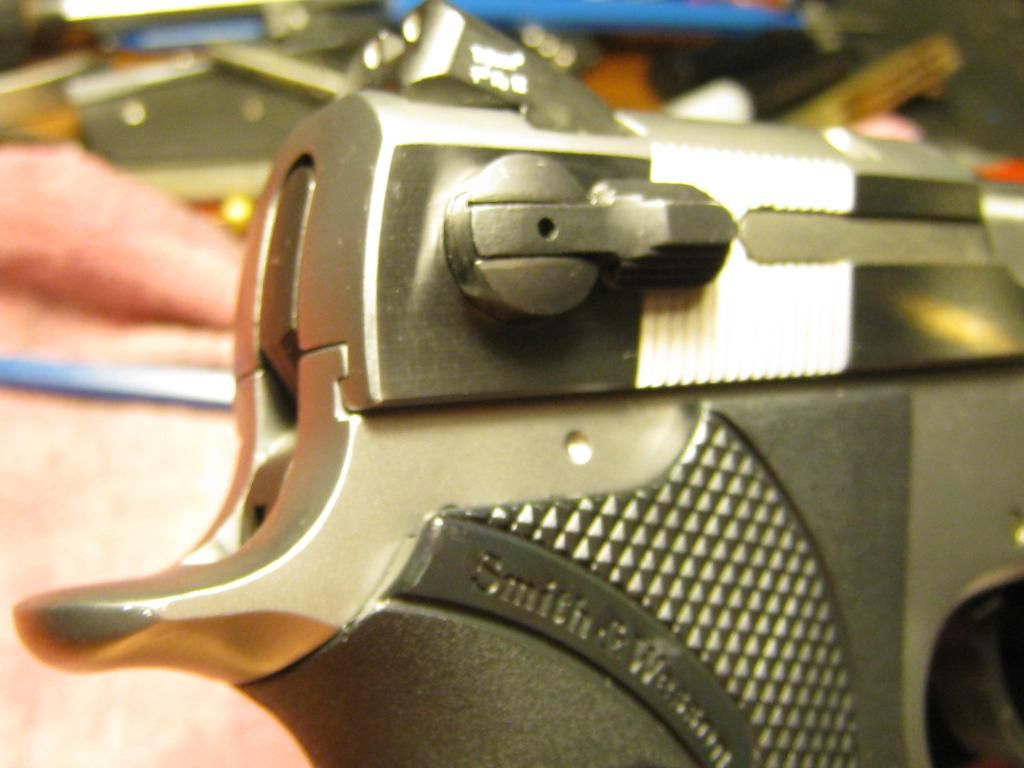
Those of you with sharp eye sight may have noted the lack of the little red dot. Yup this was a decock only gun but the spring loaded assembly was removed and a regular M/S safety installed. Fortunately I have new spring loaded one that I'll be fitting tomorrow and maybe do a little de-horning. That's all for now.
Cheers
Bill
Last edited by BMCM; 07-23-2012 at 11:17 PM.
|
|
The Following 5 Users Like Post:
|
|
07-23-2012, 10:19 PM
|
 |
Member
|
|
|
Join Date: Sep 2008
Location: Shenandoah Valley, VA
Posts: 126
Likes: 37
Liked 26 Times in 17 Posts
|
|
You're a miracle worker -- that doesn't even look like the same pistol!
|
07-23-2012, 10:53 PM
|
 |
Member
|
|
|
Join Date: Nov 2010
Location: The Old North State
Posts: 2,221
Likes: 2,867
Liked 3,205 Times in 1,083 Posts
|
|
OMG....I love following your posts!!! I'm always like "What's he gonna do next?". For the love of God don't stop now!
You are very skilled by the way.
__________________
Un-Reconstructed Southerner
|
07-23-2012, 11:35 PM
|
 |
Member
|
|
|
Join Date: Oct 2007
Location: N.E. OHIO
Posts: 509
Likes: 44
Liked 28 Times in 15 Posts
|
|
BMCM
Love reading and looking at the pics of your work in progress.
I am the point now where I dont want your post to end till finished.....I guess I am an instant gratification type at reading your posts too.
G
__________________
**Big Dog Grips**
|
07-24-2012, 12:52 AM
|
|
Member
|
|
|
Join Date: Feb 2002
Location: Victoria, Texas
Posts: 3,323
Likes: 380
Liked 1,016 Times in 358 Posts
|
|
I am interested in the double trigger play spring.
I am assuming the two leafs are stronger than the one (to minimize breakage?
I have never seen that before.
Definitely raises the level to hard use!!!!!!!!
Or am I completely wrong?
What does the detergent do when flattening?
Tia
Last edited by SW CQB 45; 07-24-2012 at 12:54 AM.
|
07-24-2012, 02:48 AM
|
|
US Veteran
|
|
|
Join Date: Jun 2012
Location: SW Mississippi
Posts: 1,350
Likes: 2,228
Liked 6,220 Times in 1,043 Posts
|
|
Quote:
Originally Posted by SW CQB 45
I am interested in the double trigger play spring.
I am assuming the two leafs are stronger than the one (to minimize breakage?
I have never seen that before.
Definitely raises the level to hard use!!!!!!!!
Or am I completely wrong?
What does the detergent do when flattening?
Tia
|
I've never seen nor heard of the doubled up play spring. I think it was done more so to double the springs force vice deter breakage. I have another drawbar assembly around her somewhere. I'll fiddle with both setups when I start putting stuff back together and see if I can detect a difference. ATM I'm really not seeing a downside to having it doubled up.
I used silicon carbide paper wet on a granite surface plate... A little dish soap in the water or a couple drops on the paper, main benefit is as a surfactant, breaks the surface tension of the water and keeps the filings in suspension. Also adds a little lubricity. Overall helps the abrasive cut faster & cleaner.
Cheers
Bill
|
|
The Following User Likes This Post:
|
|
07-27-2012, 09:39 PM
|
|
US Veteran
|
|
|
Join Date: Jun 2012
Location: SW Mississippi
Posts: 1,350
Likes: 2,228
Liked 6,220 Times in 1,043 Posts
|
|
Greetings Gents...
I've been attending to other things around the homestead of late so progress has been a bit slower than usual. I've ordered a few bits and a special file for the front dovetail from Brownells, and am still waiting for my parts order from S&W. Anyhow, here's where I'm at.
Been messing with checkering again.
Looks like this now.
Chamfered this hole to clean up some "idiot gouges". Still some light tracks there that the bead blasting will clean up I think.
Fixed the divots on the beavertail.
Rolled the sharp edge on the extractor.

Done some discrete beveling.
And...
And on the top end...
And...

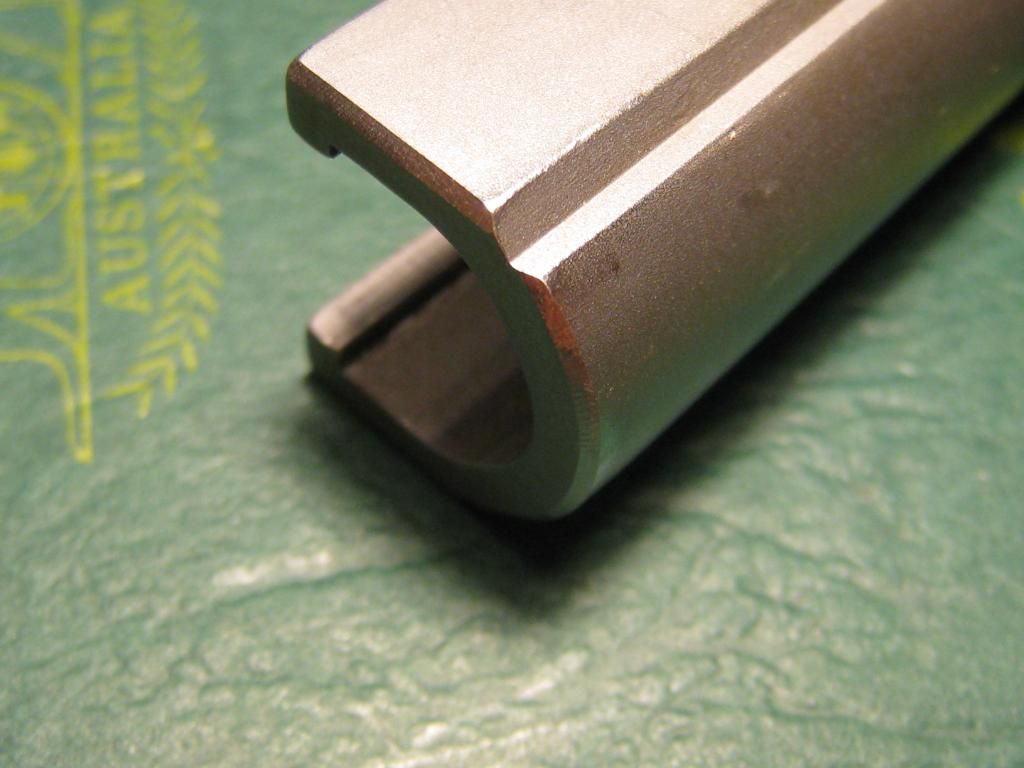
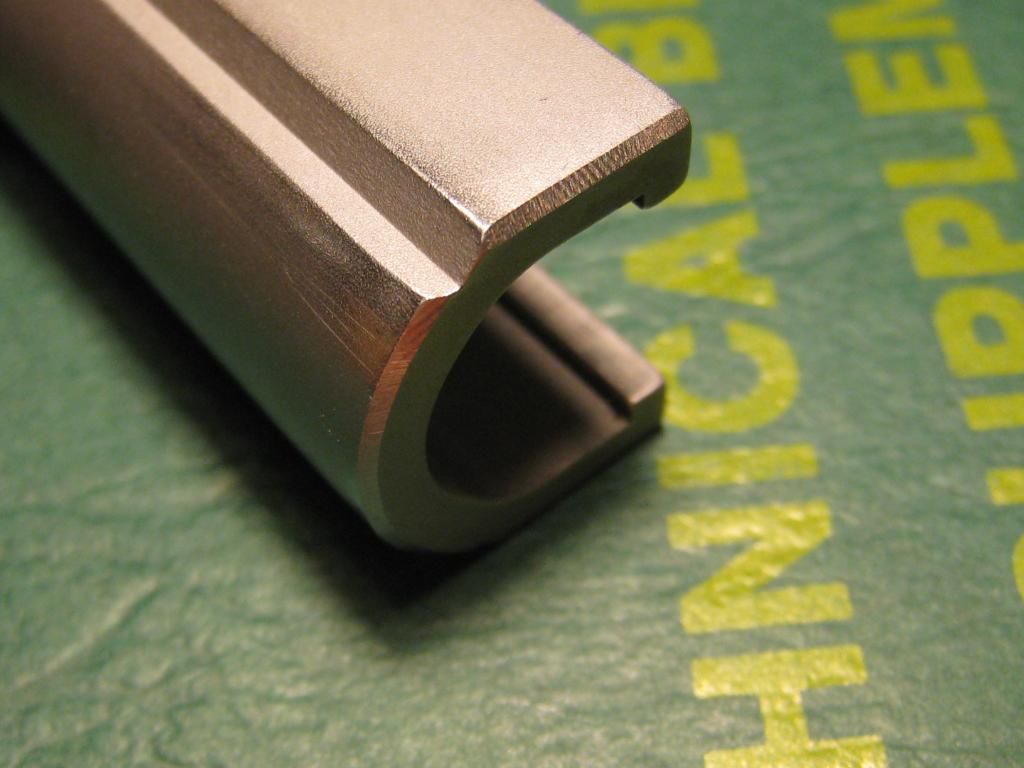
I have run into my first snag though. Since this gun was originally decock only, I intended to install this 4506 part:
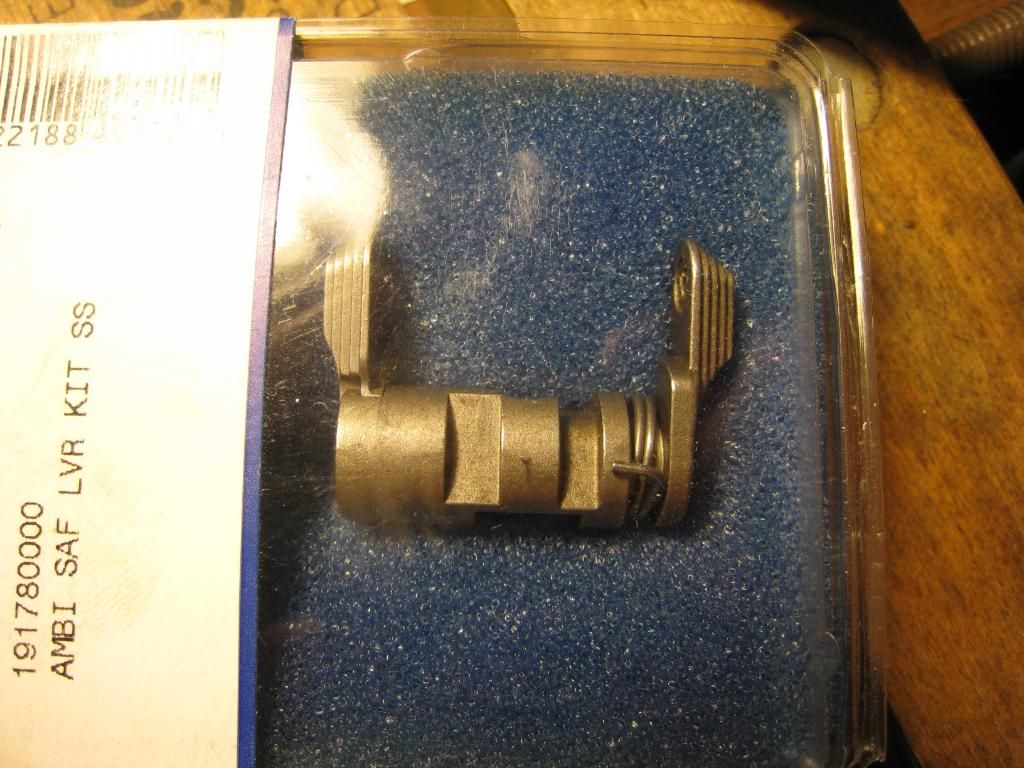
However the TSW guns lack this relief cut on the starboard side which the older Non-TSW models have.
The part I have is just not long enough to allow proper fitting of the ambi-lever without excessive metal removal. Even if I went ahead and filed the ambi-lever enough to install, It would be flappy loose.
The safety lever for the TSW gun is about .030" longer than the older 4506 part so, I'm now on the hunt for the proper spring loaded decock assembly for this gun. So far no joy from S&W and a couple parts suppliers I've tried and I have a WTB add posted. Any other ideas? That's it for now.
Cheers
Bill
|
07-28-2012, 11:23 AM
|
 |
Member
|
|
|
Join Date: Jan 2012
Posts: 433
Likes: 37
Liked 210 Times in 88 Posts
|
|
Bill,
With your skill level, why not modify the existing safety assembly to accept the spring? From the looks of it, you would just need to machine the groove to receive the spring.
Andrew
|
07-28-2012, 01:42 PM
|
|
US Veteran
|
|
|
Join Date: Jun 2012
Location: SW Mississippi
Posts: 1,350
Likes: 2,228
Liked 6,220 Times in 1,043 Posts
|
|
Quote:
Originally Posted by andrewb70
Bill,
With your skill level, why not modify the existing safety assembly to accept the spring? From the looks of it, you would just need to machine the groove to receive the spring.
Andrew
|
Well... Machine the groove and drill another hole to anchor the spring. It's a good idea but the show stopper is the existing plunger hole in the standard lever. there's a big hole right where that groove would go. I could probably do it but the resulting part would be pretty fragile. I'm afraid I'll just have to use the standard safety and keep looking for a spring loaded decock. There's lots of folks that prefer having a manual safety and don't care for the spring loaded lever so I'm confident one will eventually one will turn up. Thanks.
Cheers
Bill
|
07-28-2012, 05:59 PM
|
|
Member
|
|
|
Join Date: Feb 2006
Location: East river South Dakota
Posts: 678
Likes: 6
Liked 107 Times in 57 Posts
|
|
Bill,
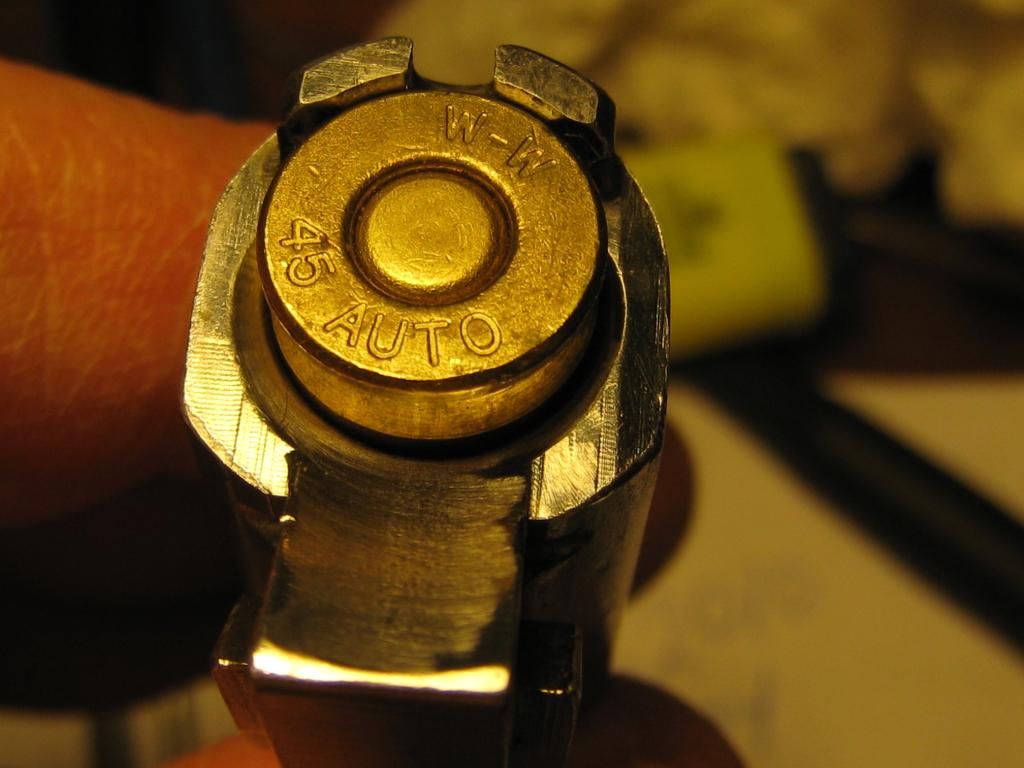
If you're concerned about chamber support, do this.
Take a 45 case and split it lengthwise with your Dremel. Clean it up and then plop it in the chamber. That will let you see where the chamber support ends and the brass web taper are in relation to each other.
You do nice work.
Cat
__________________
Think for yourself.
|
|
The Following User Likes This Post:
|
|
07-28-2012, 07:42 PM
|
|
US Veteran
|
|
|
Join Date: Jun 2012
Location: SW Mississippi
Posts: 1,350
Likes: 2,228
Liked 6,220 Times in 1,043 Posts
|
|
Quote:
Originally Posted by Catshooter
Bill,
If you're concerned about chamber support, do this.
Take a 45 case and split it lengthwise with your Dremel. Clean it up and then plop it in the chamber. That will let you see where the chamber support ends and the brass web taper are in relation to each other.
You do nice work.
Cat
|
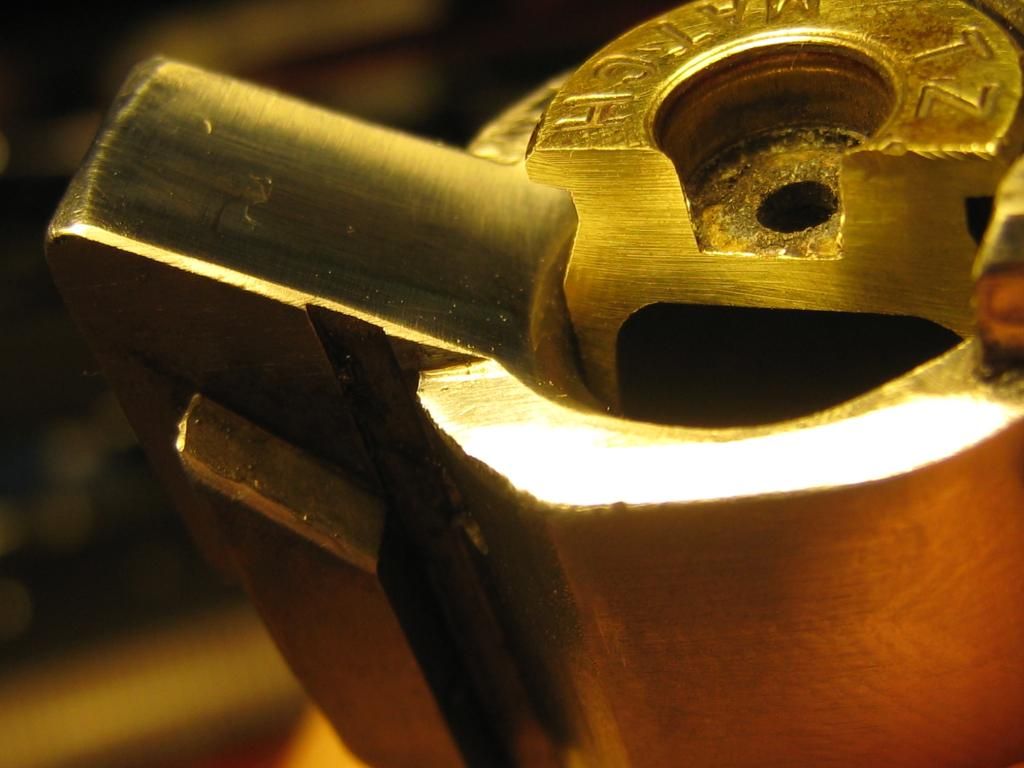
Now that is just a stellar idea! Why didn't I think of that? Well just goes to show ya even an old fart like me can pick up something new every once in a while. 
Like so?
It does look a lot better from this perspective.
And
Thanks Cat
Cheers
Bill
|
|
The Following User Likes This Post:
|
|
07-29-2012, 07:36 AM
|
 |
Member
|
|
|
Join Date: Aug 2010
Location: C-Bus
Posts: 6,335
Likes: 4,311
Liked 4,916 Times in 2,086 Posts
|
|
Quote:
Originally Posted by BMCM
Two is better than one??
|
I dunno. This looks a whole lot like one of those "Monday-morning-eyes-not-open-yet-running-the rivet-machine" moments!
|
|
The Following User Likes This Post:
|
|
07-30-2012, 11:51 PM
|
|
US Veteran
|
|
|
Join Date: Jun 2012
Location: SW Mississippi
Posts: 1,350
Likes: 2,228
Liked 6,220 Times in 1,043 Posts
|
|
Good evening Gents,
While the barrel soaks in copper solvent...
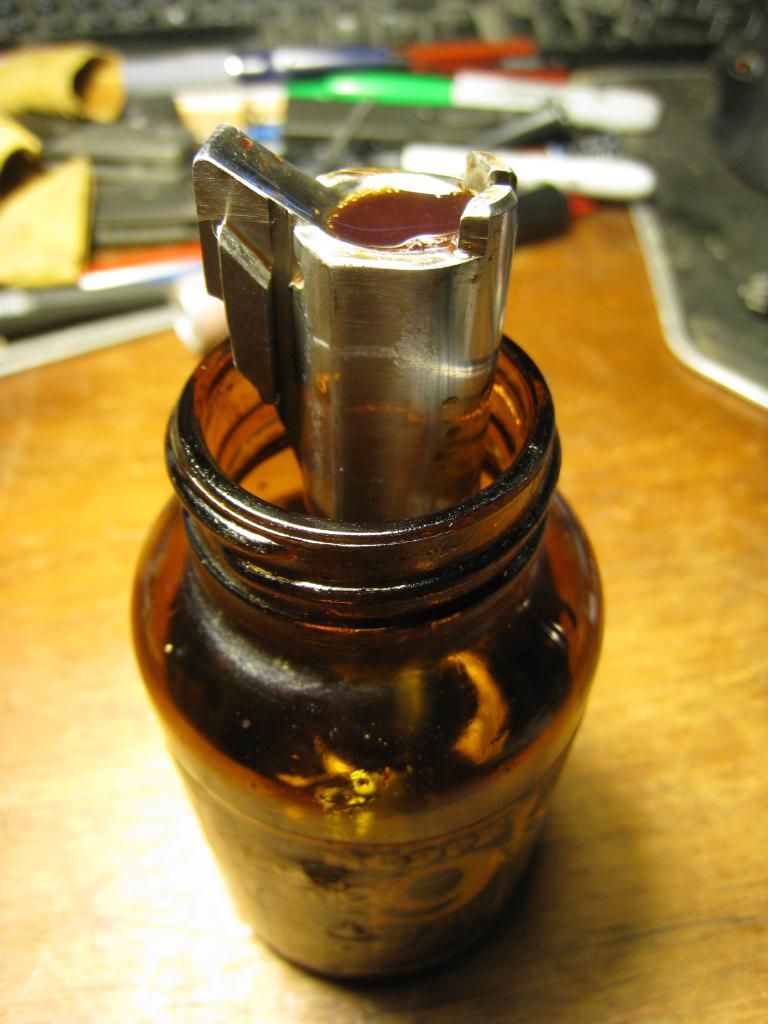
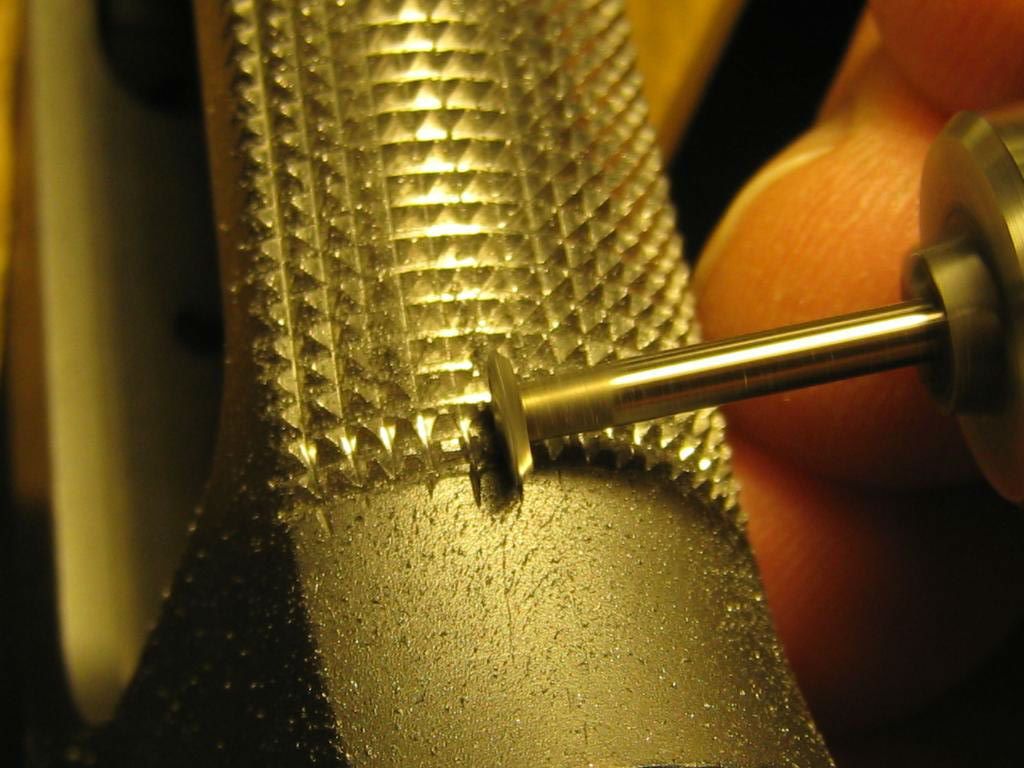
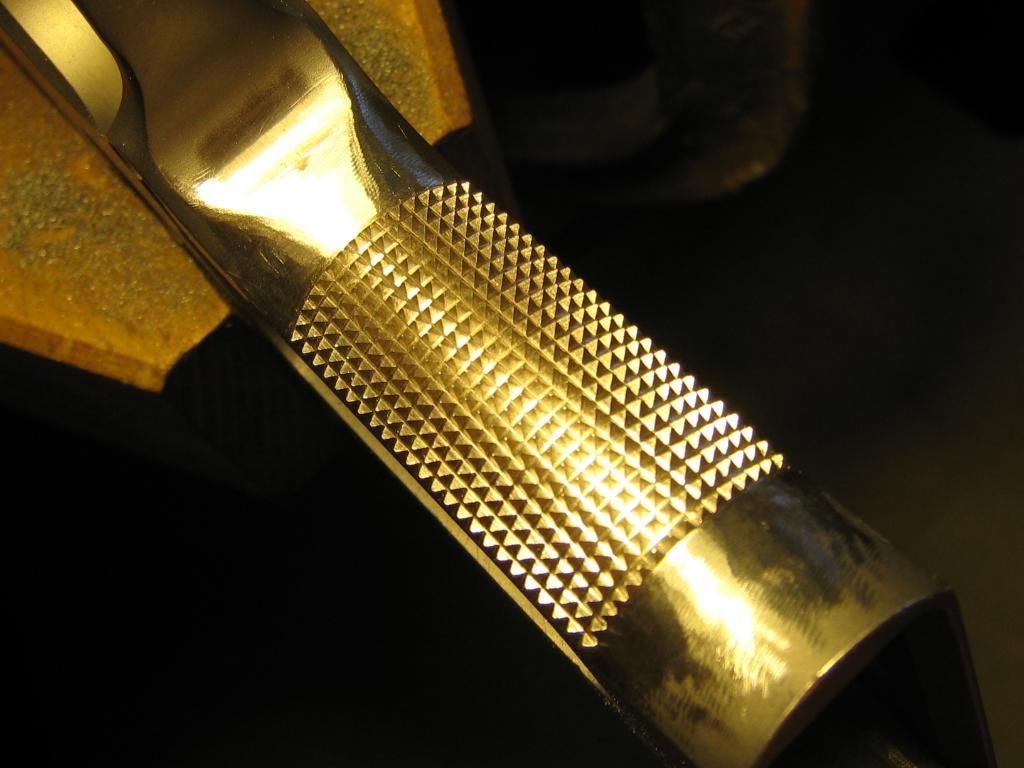
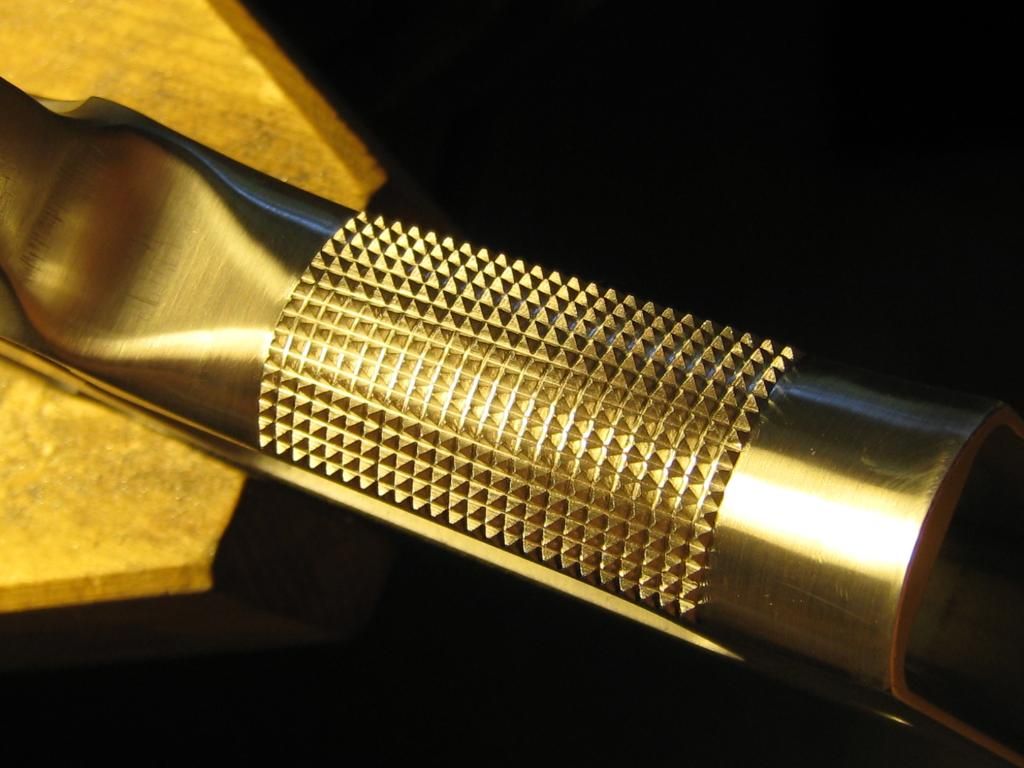
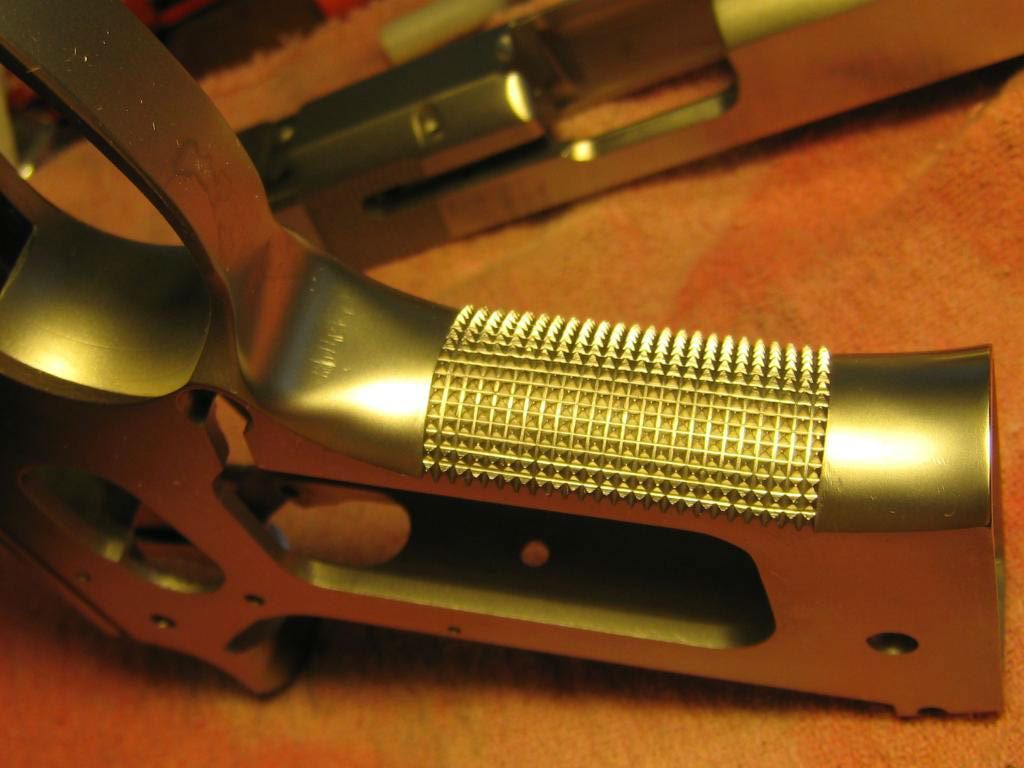
I've been working on the checkering. Here I'm deepening the last row at the bottom of the front strap with a 5mm carbide knifedge wheel bur. I'm using the bur for the bulk of the work because the forward curve at the bottom of the frame makes it very difficult to file here. I'll finish up hand filing this once the bulk of the metal work is done with the power tool.
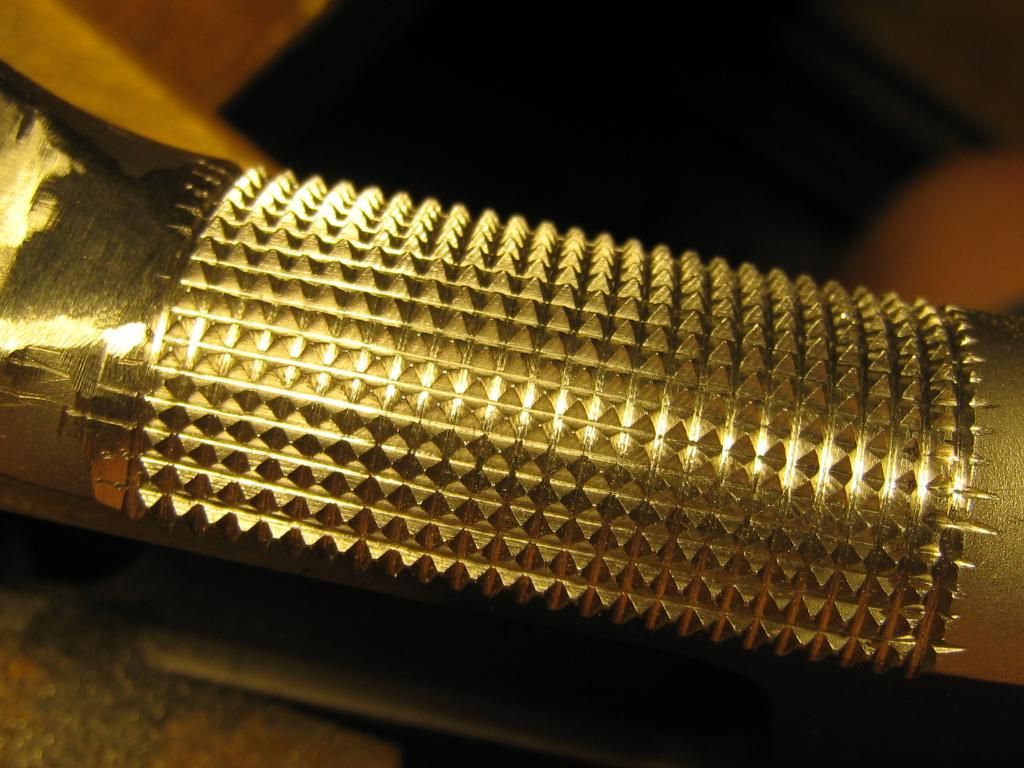
Here's what the frontstrap looks like now viewed from the right.
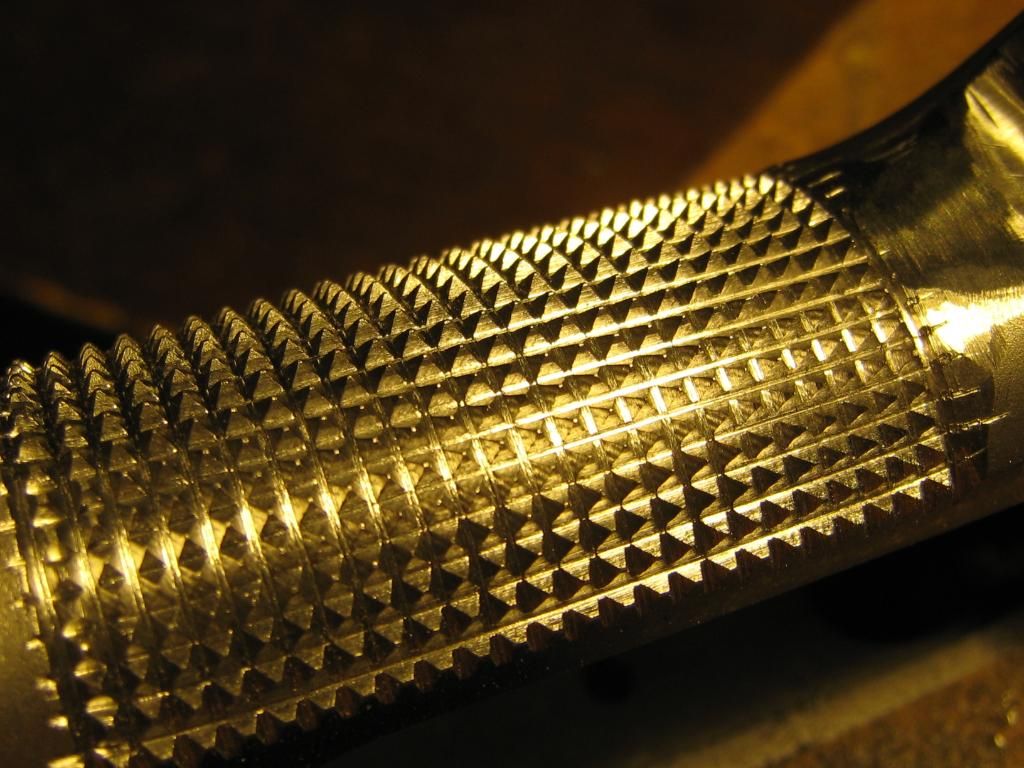
And from the left.
I still have the bottom couple of rows to cut and blend and some blending to do at the top then I'll be done with the frame. On the slide I've got a couple spots to de-horn around the ejection port and I need to clean up & de-burr the front sight dovetail. Once that stuff is completed it's off to the blast cabinet then once my part orders come in...re-assembly.
Cheers
Bill
|
07-31-2012, 01:01 AM
|
|
Member
|
|
|
Join Date: May 2010
Location: Louseyana
Posts: 309
Likes: 4
Liked 165 Times in 46 Posts
|
|
Quote:
Originally Posted by BMCM
Good evening Gents,
While the barrel soaks in copper solvent...
I've been working on the checkering. Here I'm deepening the last row at the bottom of the front strap with a 5mm carbide knifedge wheel bur. I'm using the bur for the bulk of the work because the forward curve at the bottom of the frame makes it very difficult to file here. I'll finish up hand filing this once the bulk of the metal work is done with the power tool.
Here's what the frontstrap looks like now viewed from the right.
And from the left.
I still have the bottom couple of rows to cut and blend and some blending to do at the top then I'll be done with the frame. On the slide I've got a couple spots to de-horn around the ejection port and I need to clean up & de-burr the front sight dovetail. Once that stuff is completed it's off to the blast cabinet then once my part orders come in...re-assembly.
Cheers
Bill |
Looks sharp, like some kind of medieval weapon but definately more grippy than the factory checkering. So, when can I send mine to you?
Ever think that this could be a second career? LOL
|
07-31-2012, 01:14 PM
|
|
Member
|
|
|
Join Date: May 2004
Location: Layton, UT. USA
Posts: 331
Likes: 34
Liked 101 Times in 55 Posts
|
|
Wow, that looks amazing!! You have a great touch.
__________________
Matt H.
|
07-31-2012, 04:45 PM
|
|
Member
|
|
|
Join Date: Feb 2006
Location: East river South Dakota
Posts: 678
Likes: 6
Liked 107 Times in 57 Posts
|
|
You're welcome BMCM, I was hoping that might help.
Now you can help me in return. I have wanted to checker the front strap of some 4516s over the years and that dang curve that is so close by has left me in tears more than once.
So tell me, where can I get one of those cute littel 5 MM carbide burrs? I want!!!
Cat
__________________
Think for yourself.
|
07-31-2012, 07:18 PM
|
|
US Veteran
|
|
|
Join Date: Jun 2012
Location: SW Mississippi
Posts: 1,350
Likes: 2,228
Liked 6,220 Times in 1,043 Posts
|
|
Quote:
Originally Posted by Catshooter
So tell me, where can I get one of those cute littel 5 MM carbide burrs? I want!!!
Cat
|
They're jeweler's tools...
I've used both of these for difficult to hand file spots.
Run the tool slow and be extra careful, things can go sideways in a hurry with these.
(L)8mm Busch knifedge bur & (R)Mega-Tool 5mm knifedge bur.
PM'ing you the source
Cheers
Bill
|
|
The Following User Likes This Post:
|
|
07-31-2012, 09:37 PM
|
|
Member
|
|
|
Join Date: Feb 2006
Location: East river South Dakota
Posts: 678
Likes: 6
Liked 107 Times in 57 Posts
|
|
Thanks a bunch Bill. Got a set coming now.
Cat
__________________
Think for yourself.
|
08-03-2012, 12:22 AM
|
|
US Veteran
|
|
|
Join Date: Jun 2012
Location: SW Mississippi
Posts: 1,350
Likes: 2,228
Liked 6,220 Times in 1,043 Posts
|
|
Quote:
Originally Posted by SW CQB 45
I am interested in the double trigger play spring.
I am assuming the two leafs are stronger than the one (to minimize breakage?
I have never seen that before.
Definitely raises the level to hard use!!!!!!!!
|
Quote:
Originally Posted by blujax01
I dunno. This looks a whole lot like one of those "Monday-morning-eyes-not-open-yet-running-the rivet-machine" moments! |
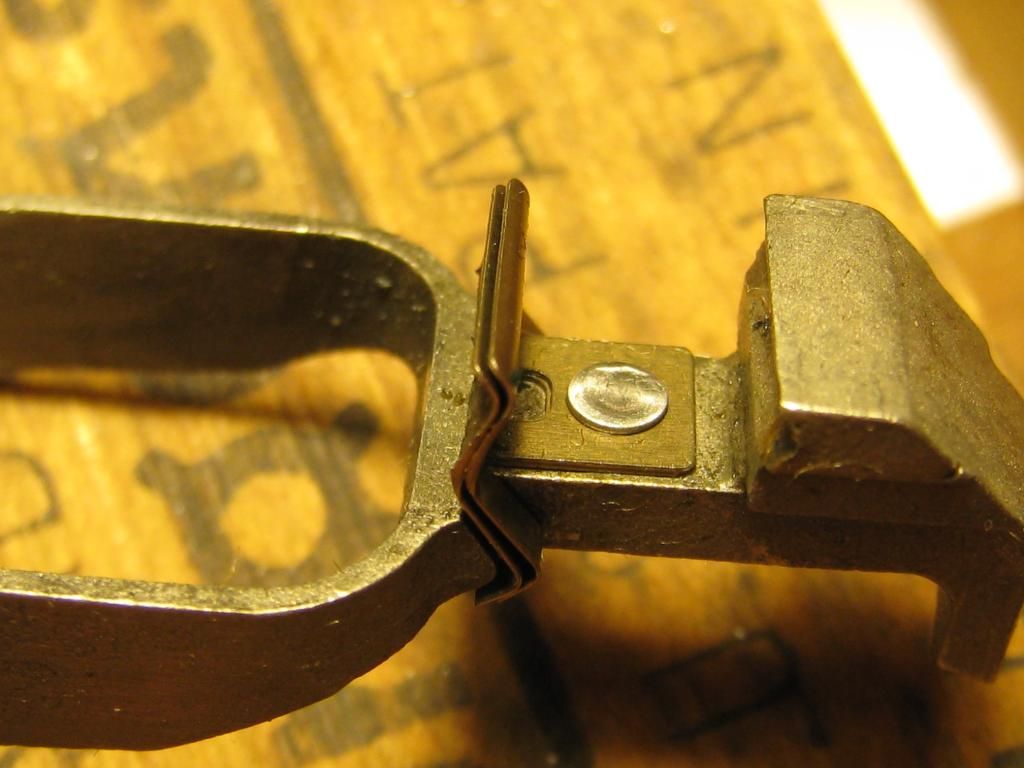
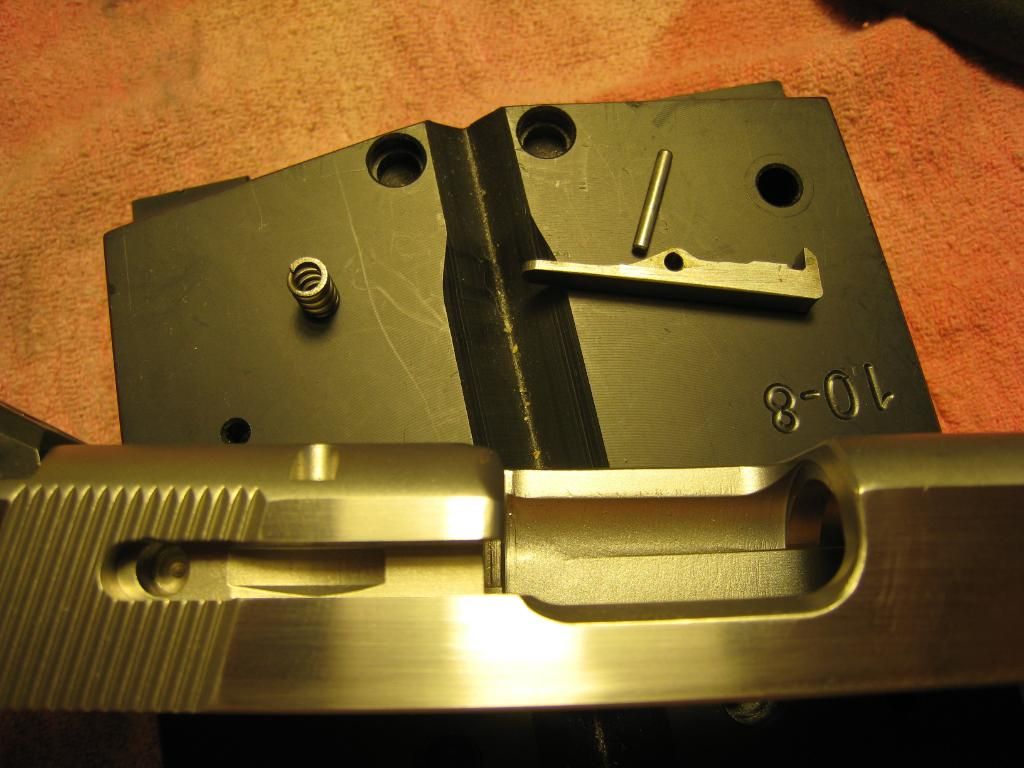
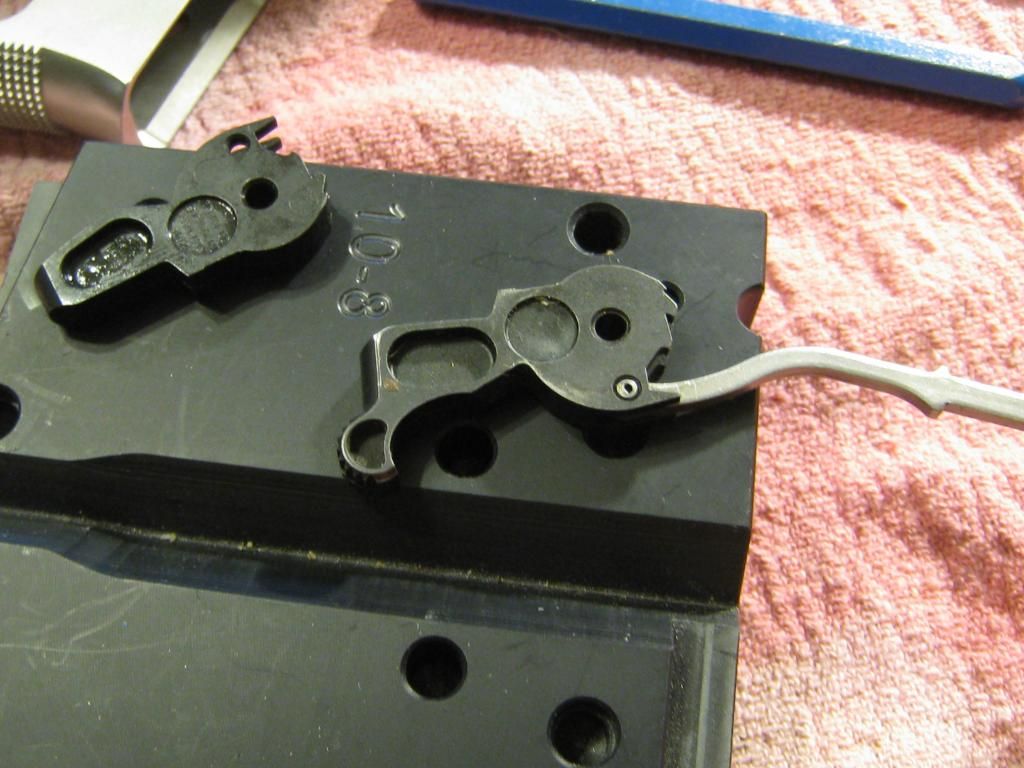
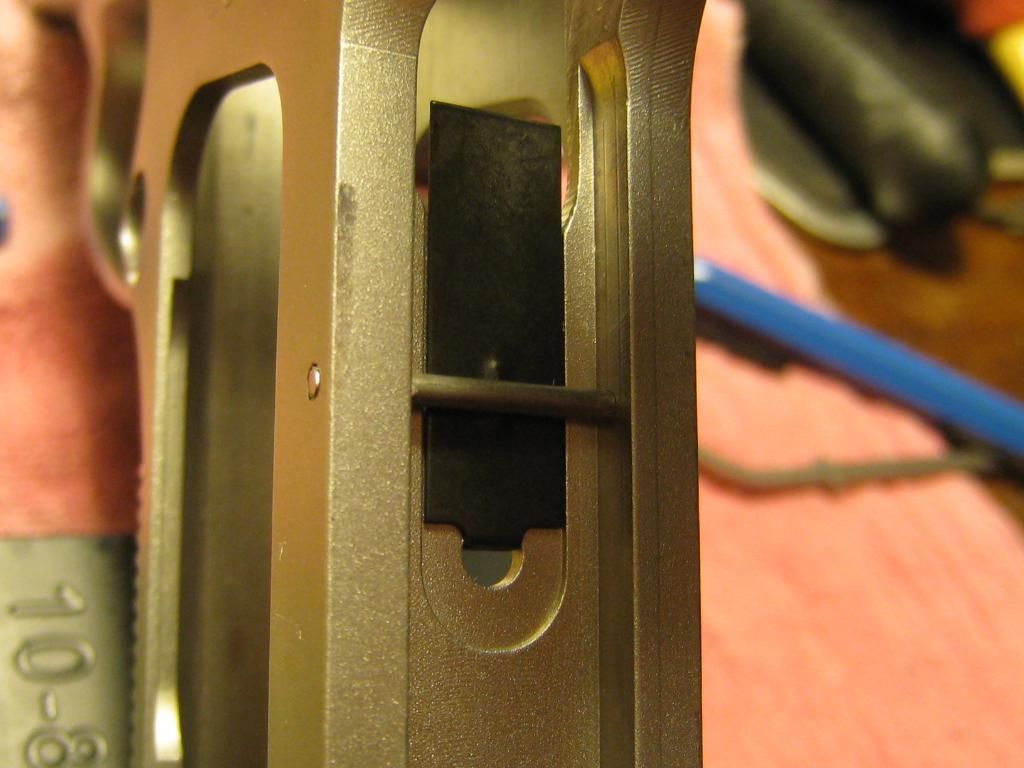
Got a brand new drawbar assembly a couple days ago and did some comparison with this double play spring deal. Just working a trigger back and forth on the two draw bars revealed a significant difference in the feel. With the double setup, there was a definite strong hitch in the trigger as the stroke went from mere contact with the play spring to fully to the rear.
From here.
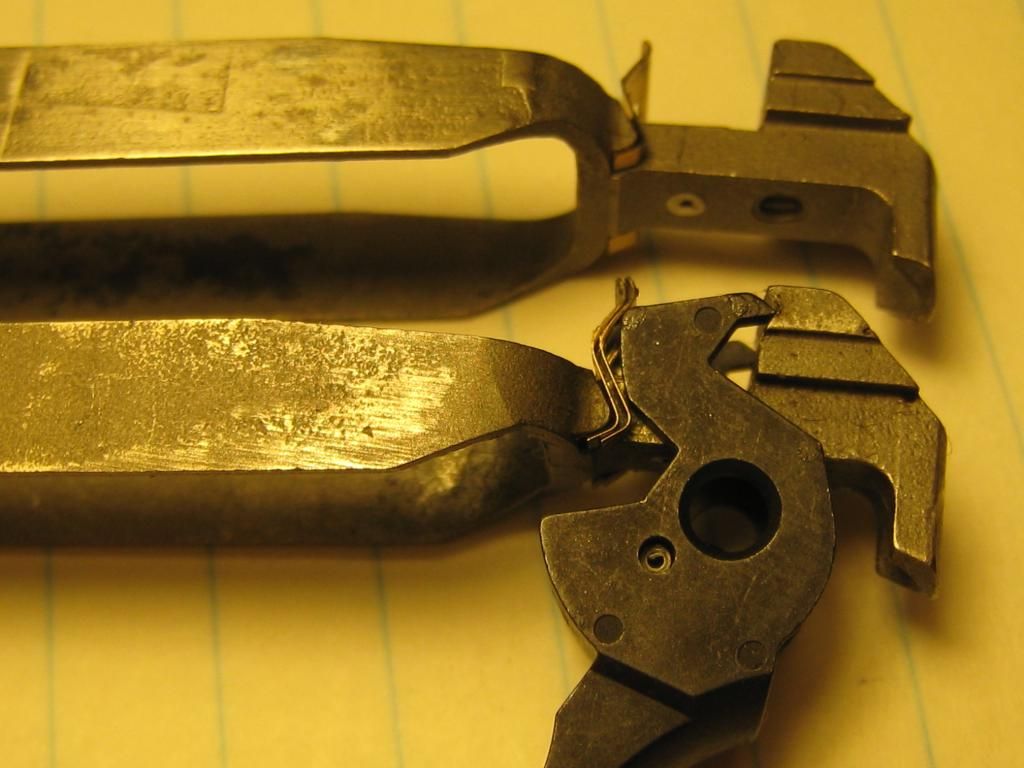
To here.
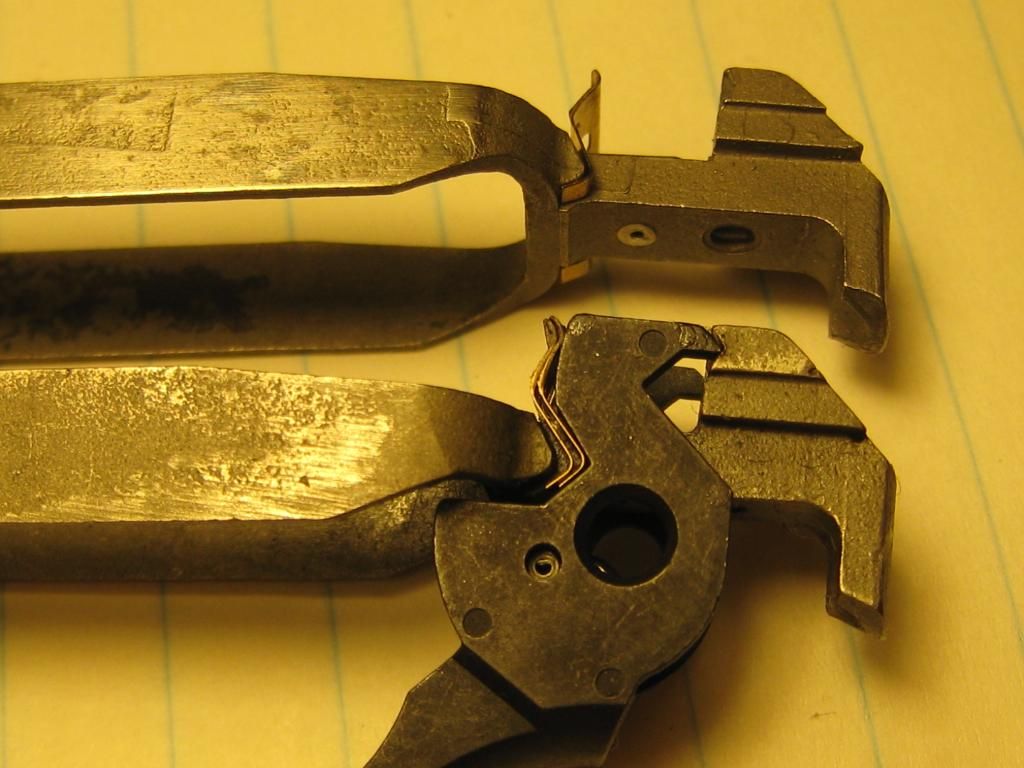
Same thing on the single spring... nice and smooth with just enough tension to keep the trigger hooks snug . Another thing I noted was where the spring was flexing. The doubled spring being twice as stiff only flexed at the 90 degree that forms the tab riveted to the drawbar. On the the single, the flexing is much less concentrated, the whole top of the spring flexes to some extent instead of just at the 90 degree bend. I would wager metal fatigue at the 90 would cause the doubled spring to fail before the single one would. In any event, I can't imagine the double one being any benefit especially with a quality action job.
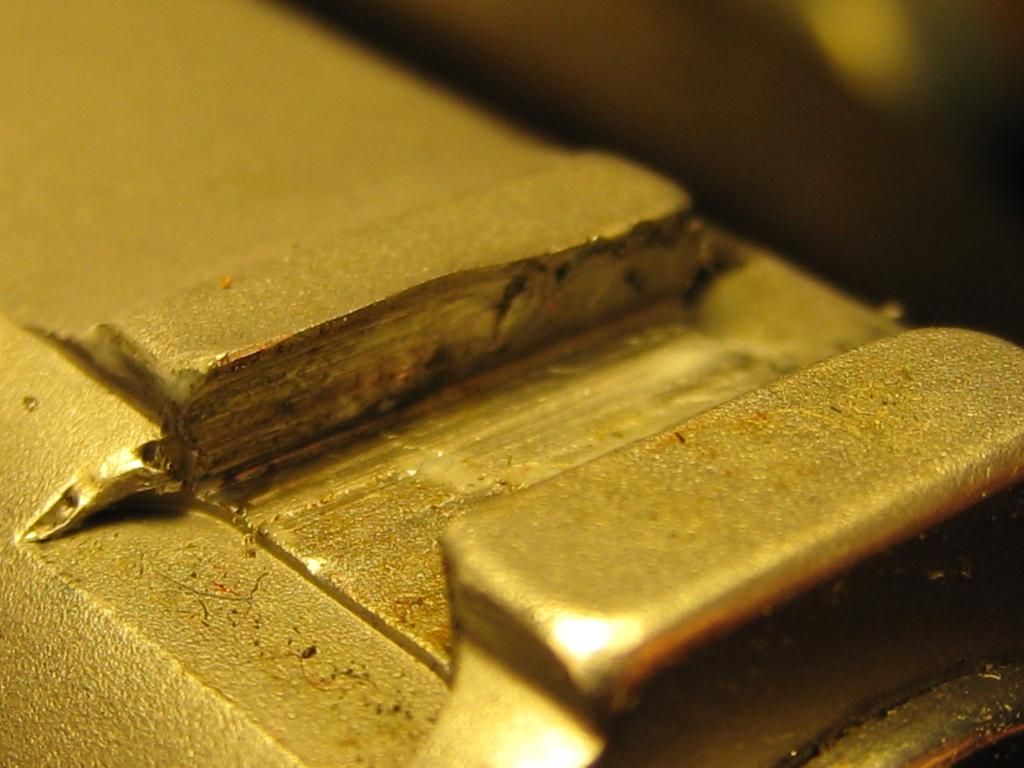
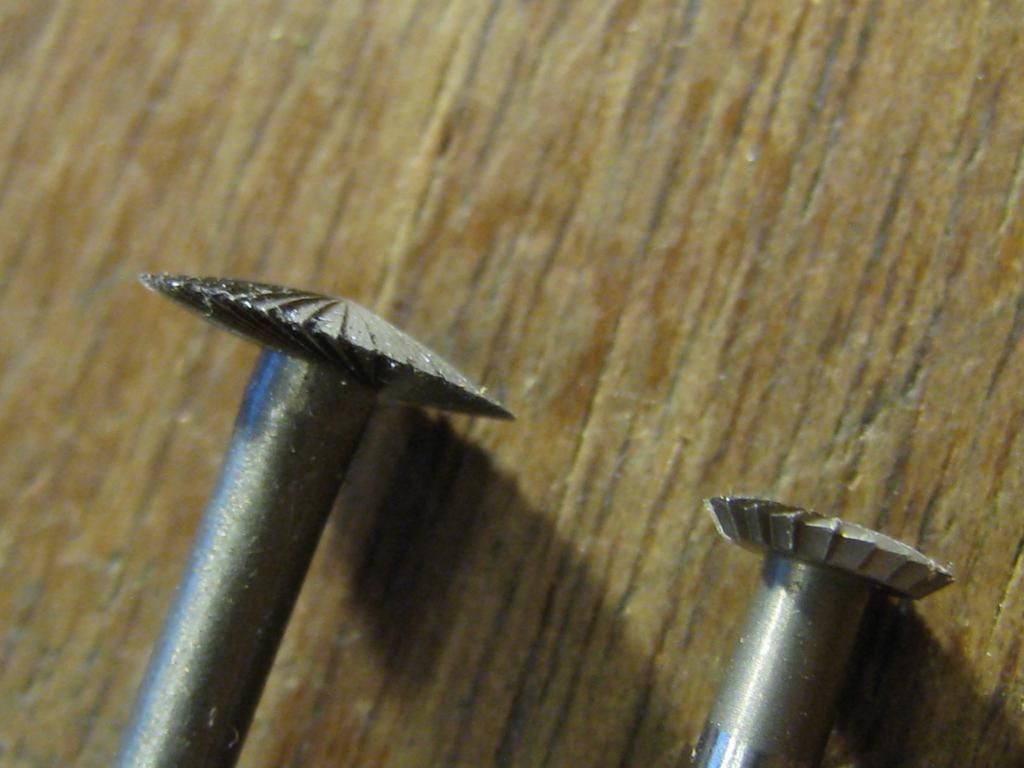
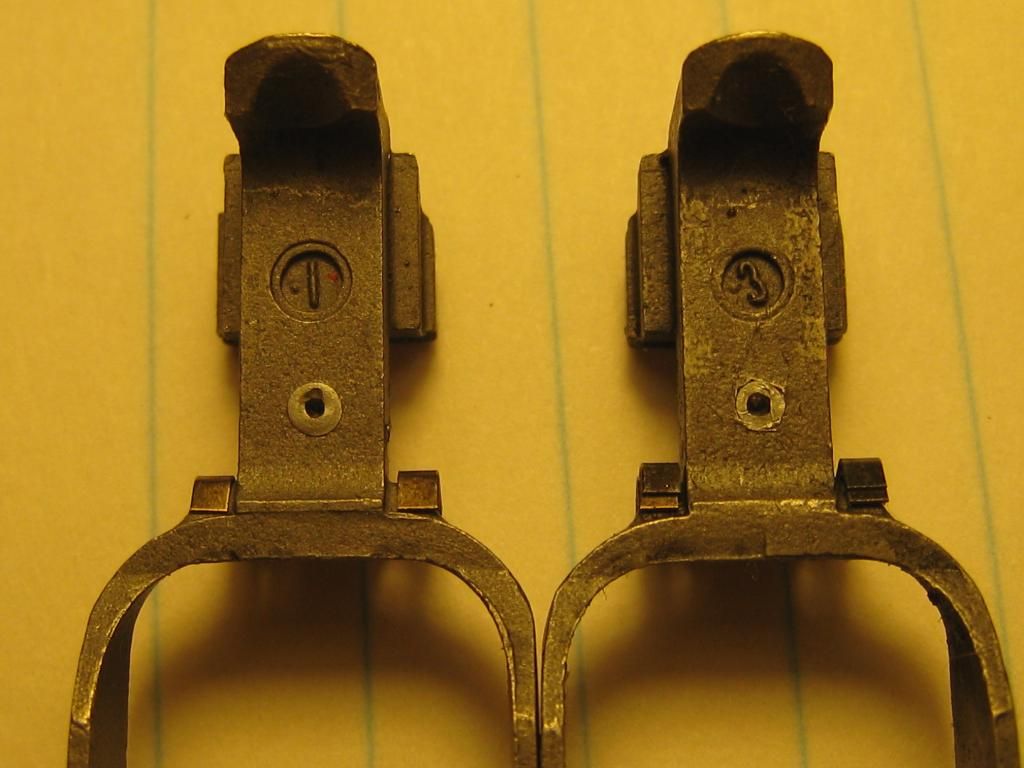
I also noted some difference in the fixing rivets and don't believe this was a "Monday morning at Springfield" thing. Have a look, notice the unusual tool marks around the rivet hole on the right. I don't think it came from S&W that way.
I'll not be installing a double play spring.
Cheers
Bill
Last edited by BMCM; 08-03-2012 at 12:59 AM.
|
|
The Following User Likes This Post:
|
|
08-03-2012, 12:55 AM
|
|
US Veteran
|
|
|
Join Date: Jun 2012
Location: SW Mississippi
Posts: 1,350
Likes: 2,228
Liked 6,220 Times in 1,043 Posts
|
|
Things are moving right along. Got my care package from S&W today.
Still messing with checkering too. Finished up the top rows beneath the trigger guard and did the rough filing/contouring the transition area. I'll still need to go over the trasition with a cratex to clean up the tool marks smooth out the bumps before blasting.
Looks like this right now.
Another view.
Finishing up the bottom few rows especially the last row has been a real *******.  When the original machine cuts were made they curved at the bottom on both sides.
Like so.
Quite difficult to cut a curved line with a straight file so....
I ground the tips of a couple of my files to make what amounts to a 3square chisel.
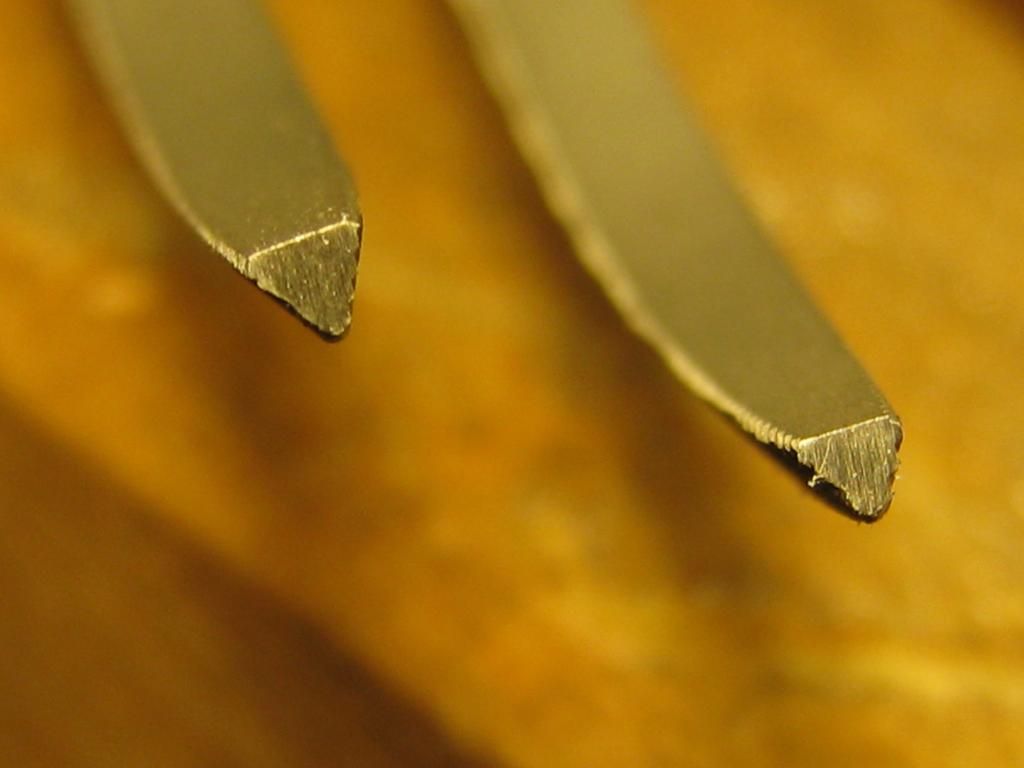
They last for a few minutes then I resharpen the tips. The points are gradually coming up. I had half a mind to just cut that bottom row right off of there but that would have left the grip plastic proud of steel right there so I'll just keep scratching away. I get this spot done and blend the lower transition and the frame is complete, ready for the blast cabinet.
Still need to finish de-horning the slide and get the dovetails de-burred & cleaned up for the new sights.
BTW... I did some mathmaticiafying and determined this checkering is 17.2413793 points per inch. 
Cheers
Bill
|
|
The Following User Likes This Post:
|
|
08-03-2012, 10:04 AM
|
|
Absent Comrade
|
|
|
Join Date: Sep 2005
Location: GSO NC
Posts: 6,106
Likes: 23,604
Liked 13,198 Times in 2,860 Posts
|
|
BMCM did S&W send you those sideplates?
If so, thats very interesting as they have told more than one member here, recently, that the sideplates are unavailable. It would appear that was incorrect information. Regards 18DAI
|
08-03-2012, 11:34 AM
|
|
Member
|
|
|
Join Date: Feb 2002
Location: Victoria, Texas
Posts: 3,323
Likes: 380
Liked 1,016 Times in 358 Posts
|
|
When I originally saw the dbl spring set up....I thought it would increase trigger pull with the added tension and spring thickness when it came in contact with the trigger.
Thanks for the info.
|
08-03-2012, 05:09 PM
|
|
US Veteran
|
|
|
Join Date: Jun 2012
Location: SW Mississippi
Posts: 1,350
Likes: 2,228
Liked 6,220 Times in 1,043 Posts
|
|
Some progress shots as I finish up the front strap...
And...
Done here...Next stop is the blast cabinet.
Now to finish up the slide.
Cheers
Bill
|
08-03-2012, 06:06 PM
|
 |
Member
|

|
|
Join Date: Mar 2011
Location: Colorado
Posts: 298
Likes: 299
Liked 218 Times in 114 Posts
|
|
And I thought I was really doing something with my blast cabinet "touch up" projects. You, sir, are a master!
|
|
The Following User Likes This Post:
|
|
08-03-2012, 06:16 PM
|
 |
Member
|
|
|
Join Date: Jul 2009
Location: Colorado
Posts: 510
Likes: 2
Liked 86 Times in 58 Posts
|
|
Beautiful work!
For the checkering you might want to try to find some gravers. I had several curved ones that I used to engrave pear inlays. Looked very much like the files you have. This is what they look like.
STEWMAC.COM : Essential Engraving Kit
I really look forward to watching your progress. Wish I had the skill.
Dave
|
|
The Following User Likes This Post:
|
|
08-03-2012, 06:31 PM
|
|
US Veteran
|
|
|
Join Date: Jun 2012
Location: SW Mississippi
Posts: 1,350
Likes: 2,228
Liked 6,220 Times in 1,043 Posts
|
|
Quote:
Originally Posted by D Rock
Beautiful work!
For the checkering you might want to try to find some gravers. I had several curved ones that I used to engrave pear inlays. Looked very much like the files you have. This is what they look like.
STEWMAC.COM : Essential Engraving Kit
I really look forward to watching your progress. Wish I had the skill.
Dave |
I'll have a look at those... thanks for the tip
Cheers
Bill
|
08-03-2012, 06:34 PM
|
|
US Veteran
|
|
|
Join Date: Jun 2012
Location: SW Mississippi
Posts: 1,350
Likes: 2,228
Liked 6,220 Times in 1,043 Posts
|
|
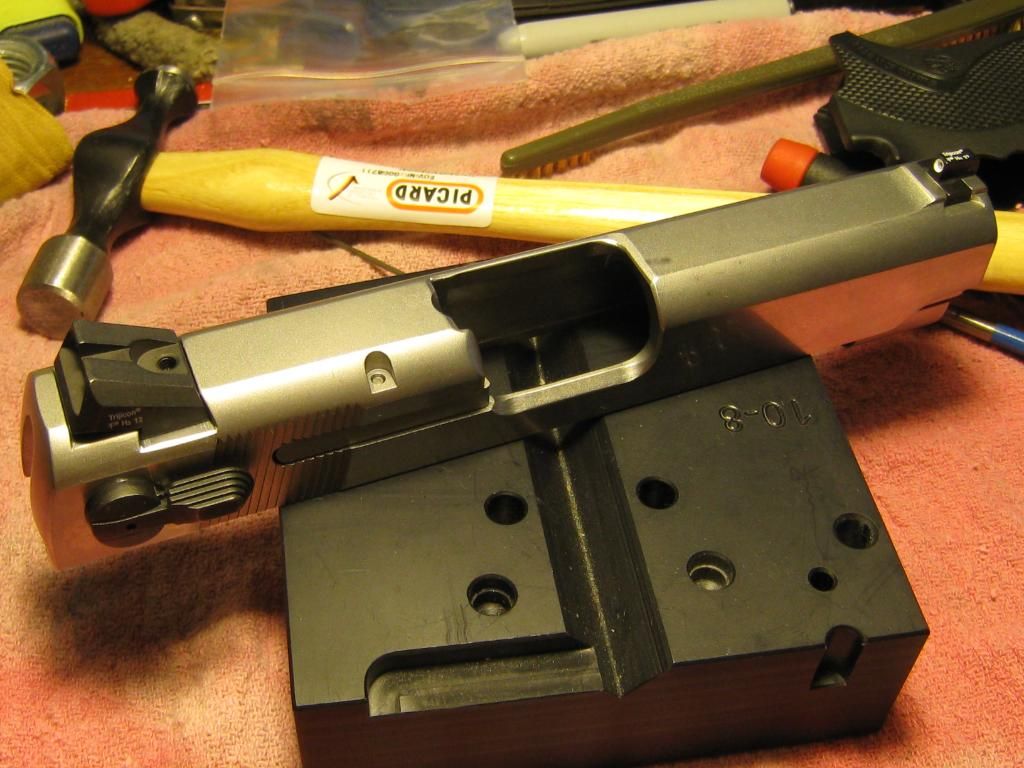
About done fixing up the slide....
Sight dovetails de-burred & cleaned up.
And the front.
Some mild de-horning around the ejection port.
I'm heading to the blast cabinet. At this rate, might be doing some re-assembly tonight
Cheers
Bill
|
08-03-2012, 07:02 PM
|
|
Member
|
|
|
Join Date: Jul 2009
Posts: 741
Likes: 1,440
Liked 528 Times in 220 Posts
|
|
Are you sir a machinist?
|
08-03-2012, 08:22 PM
|
 |
Member
|
|
|
Join Date: Jul 2010
Posts: 110
Likes: 3
Liked 5 Times in 5 Posts
|
|
Quote:
Originally Posted by 18DAI
BMCM did S&W send you those sideplates?
If so, thats very interesting as they have told more than one member here, recently, that the sideplates are unavailable. It would appear that was incorrect information. Regards 18DAI
|
S&W told me that awhile back, I could use one for a 4006 .
|
08-03-2012, 08:44 PM
|
|
US Veteran
|
|
|
Join Date: Jun 2012
Location: SW Mississippi
Posts: 1,350
Likes: 2,228
Liked 6,220 Times in 1,043 Posts
|
|
Quote:
Originally Posted by geddylee10002000
Are you sir a machinist?
|
Nope... Just an old retired ship driver
Quote:
Originally Posted by 18DAI
BMCM did S&W send you those sideplates?
If so, thats very interesting as they have told more than one member here, recently, that the sideplates are unavailable. It would appear that was incorrect information. Regards 18DAI
|
Yup... from S&W... I fully expected the customer service rep to say not available when I read off the part number. But no! he said in stock! and I said put me down for 4. S&W is closed until the 13th except for LE emergencies but I suspect they'll be getting some calls that week
Cheers
Bill
|
08-03-2012, 09:14 PM
|
|
US Veteran
|
|
|
Join Date: Jun 2012
Location: SW Mississippi
Posts: 1,350
Likes: 2,228
Liked 6,220 Times in 1,043 Posts
|
|
Ok, we're all done making metal dust.
Here we are fresh from the blast cabinet and a bath.
I hit the flats again with 600 on the surface plate. I kinda like the shiny flats.
Yup, I Like.

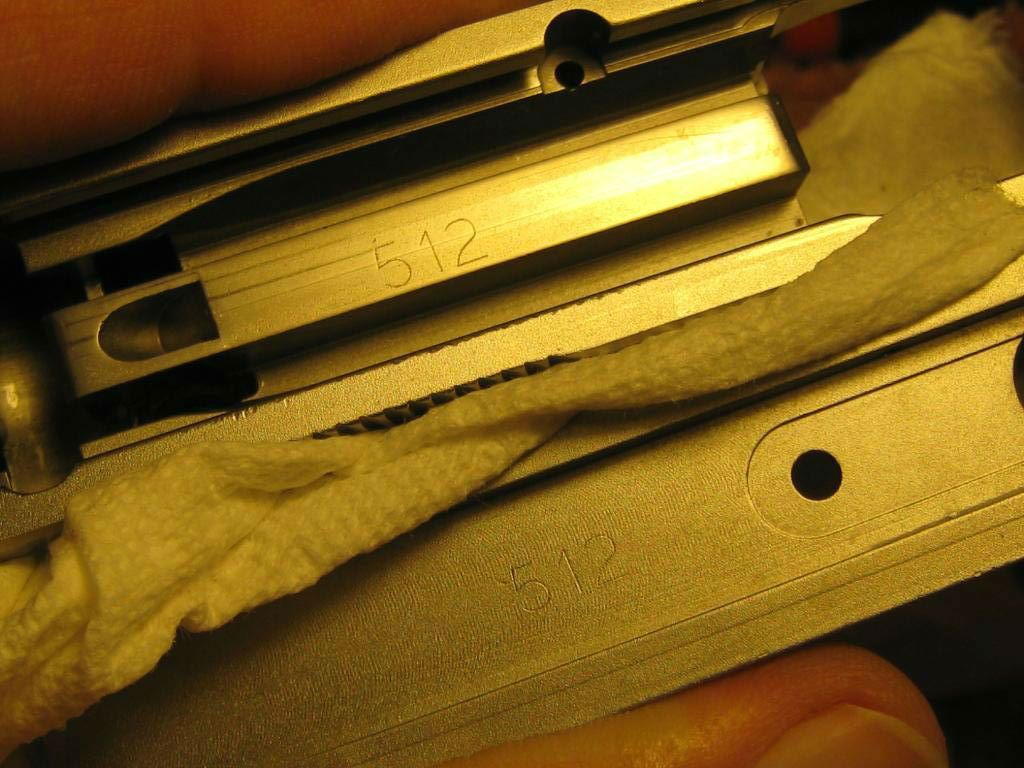
Yay for matching build numbers.
Front strap came out ok I guess ")
A sequence of the top end going together:
This looks a lot better.
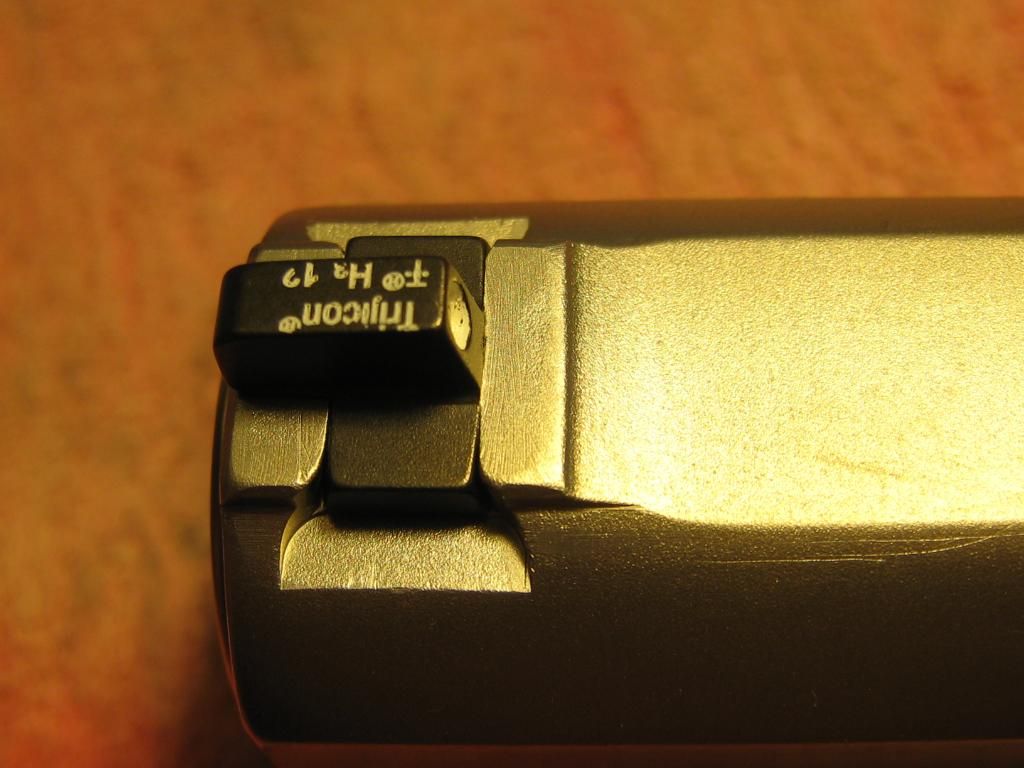
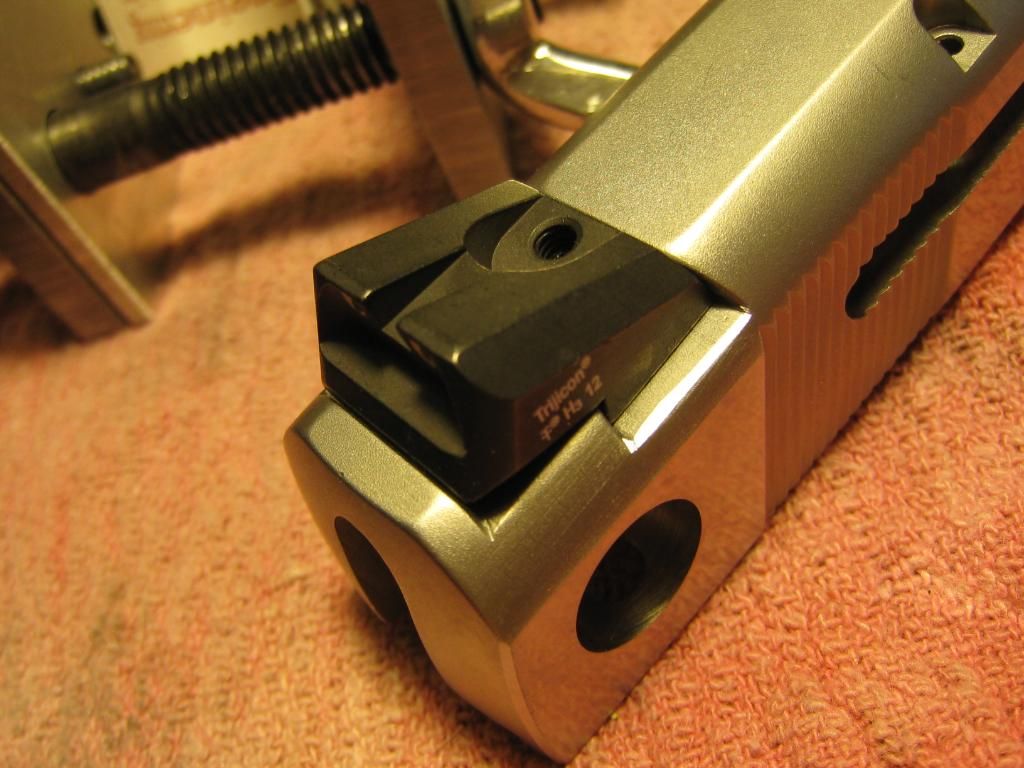
And the backsight.
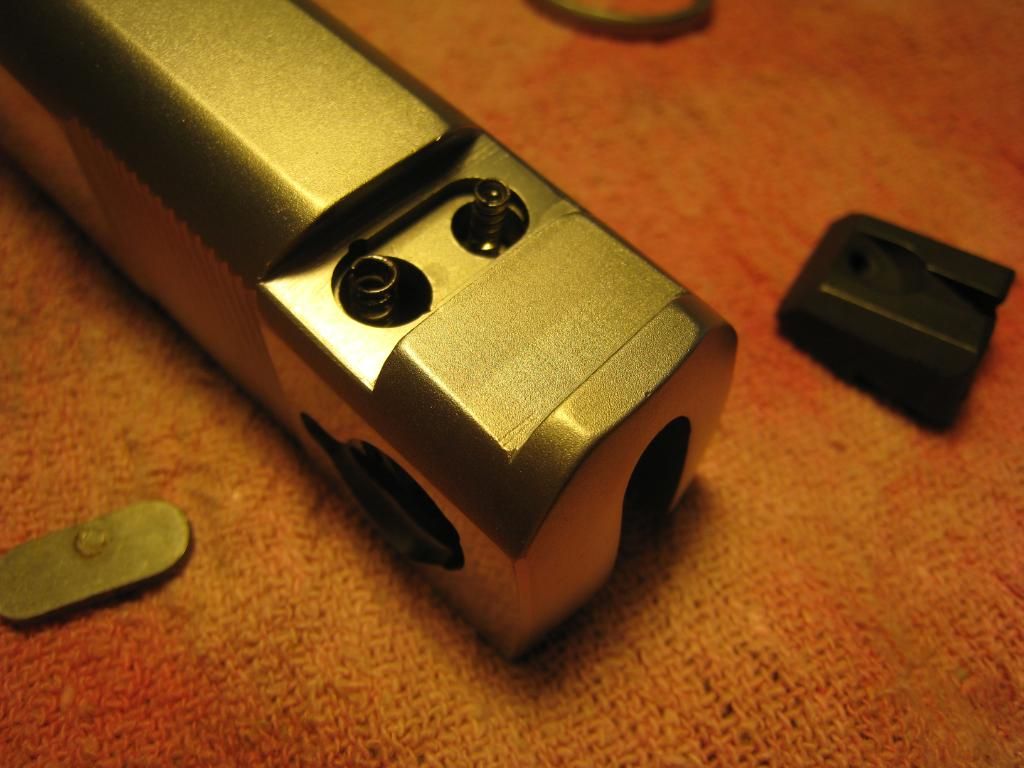
Extractor with a new spring.
And were done.
Taking a break... I'll finish her up after dinner
Cheers
Bill
|
|
The Following 2 Users Like Post:
|
|
08-03-2012, 09:54 PM
|
|
Member
|
|
|
Join Date: Feb 2002
Location: Victoria, Texas
Posts: 3,323
Likes: 380
Liked 1,016 Times in 358 Posts
|
|
looks good.
what grit and media you use for that finish?
glass beads?
alum oxide?
TIA
|
08-03-2012, 10:52 PM
|
|
US Veteran
|
|
|
Join Date: Jun 2012
Location: SW Mississippi
Posts: 1,350
Likes: 2,228
Liked 6,220 Times in 1,043 Posts
|
|
Quote:
Originally Posted by SW CQB 45
looks good.
what grit and media you use for that finish?
glass beads?
alum oxide?
TIA
|
270+ here's the stock number at Brownells
084-063-270WB
|
08-03-2012, 11:13 PM
|
|
Member
|
|
|
Join Date: Jul 2012
Posts: 30
Likes: 11
Liked 4 Times in 3 Posts
|
|
you done with dinner yet? Im dying to see the finished product. I wish i had your skills and tools to make mine look like that.
|
08-03-2012, 11:26 PM
|
|
US Veteran
|
|
|
Join Date: Jun 2012
Location: SW Mississippi
Posts: 1,350
Likes: 2,228
Liked 6,220 Times in 1,043 Posts
|
|
Quote:
Originally Posted by boomer1983
you done with dinner yet? Im dying to see the finished product. I wish i had your skills and tools to make mine look like that.
|
Uploading my pictures right now. Tools you buy from Brownells. Skills you acquire by playing with the tools. Buy a beat up junker... get some tools and see what you can do. Patients good sir... Updating shortly.
Cheers
Bill
|
|
The Following User Likes This Post:
|
|
08-04-2012, 12:05 AM
|
|
US Veteran
|
|
|
Join Date: Jun 2012
Location: SW Mississippi
Posts: 1,350
Likes: 2,228
Liked 6,220 Times in 1,043 Posts
|
|
Ok here comes the wrap-up....
First I need to get that stirrup off the old hammer so I can pin it to the shiny new bobbed hammer.
New sear spring & pin goes in next.
Like so.
Install all the little bits in the frame. All the lockwork components are new. Trigger, hammer, drawbar, sear and springs were all replaced. New sideplate installed as well. Oops, forgot to install the mag catch.
Magazine catch is in. New recoil spring and guide rod installed and liberally grease with TW25. Also greased up the lugs on the underside of the barrel and the slide rails.
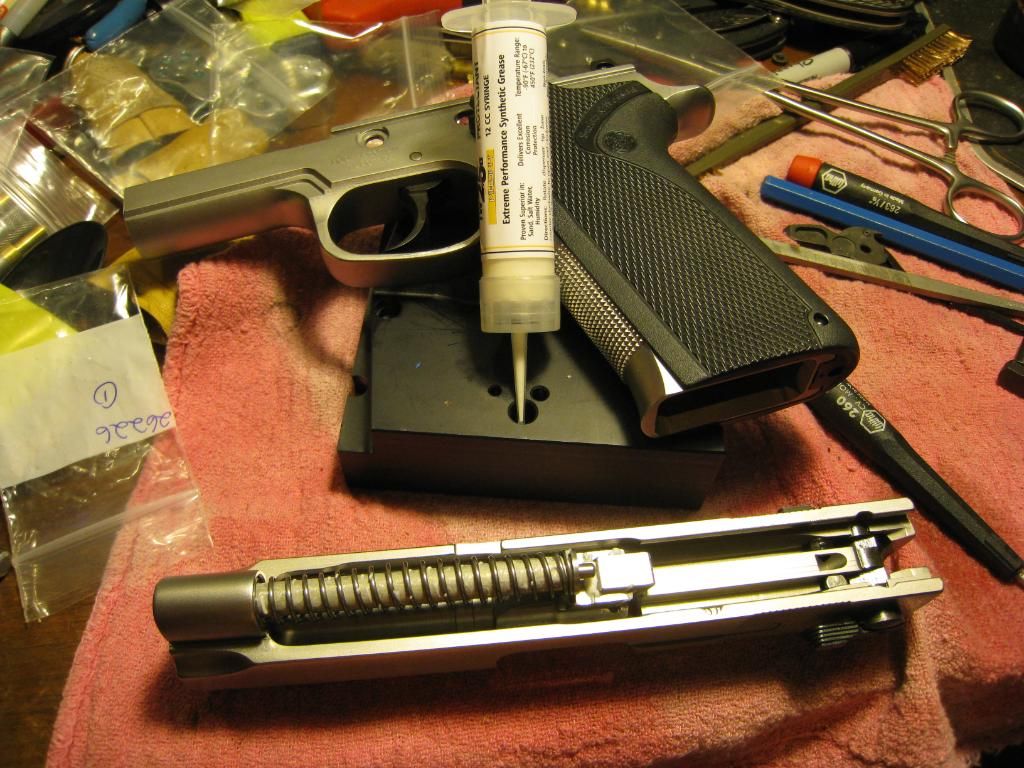
And... Presto.
I'm pretty pleased with the results.
Sort of a before & after alongside my other one.

And lastly the rejected parts bin.
Well I'm damn happy with the outcome. Feels like a brand new gun & the trigger is just wonderful. Can't wait to take her out for a test drive. In any event I'm calling this mission accomplished. I hope you all enjoyed the show. 'tis time for an adult beverage.
Cheers
Bill

|
|
The Following 13 Users Like Post:
|
18DAI, boomer1983, Cooter Brown, EdF702, gtoppcop, jughed440, lefty60, maxjames2, mycobrars, Poohgyrr, Shorty 45 MK2, Snakeshift, Steve912 |
08-04-2012, 02:00 AM
|
|
Member
|
|
|
Join Date: May 2003
Location: No. Florida
Posts: 198
Likes: 8
Liked 19 Times in 11 Posts
|
|
(clapping). 
Hmmm...that top end of my 4043 IS looking kinda dull...and I'm fresh out of W.L. Weller...
Last edited by Big Mike; 08-04-2012 at 02:03 AM.
|
08-04-2012, 09:08 AM
|
 |
Member
|
|
|
Join Date: Aug 2005
Posts: 852
Likes: 54
Liked 188 Times in 76 Posts
|
|
Just wow! That is excellent workmanship!
__________________
N.R.A. BENEFACTOR Member
|
|
The Following User Likes This Post:
|
|
08-04-2012, 12:57 PM
|
|
Member
|
|
|
Join Date: Jan 2012
Posts: 433
Likes: 37
Liked 210 Times in 88 Posts
|
|
Well done Sir!!!
Andrew
|
|
|
 Posting Rules
|
|
|
|
|


 Linear Mode

