|
|
 |

12-23-2023, 07:36 AM
|
|
Member
|


|
|
Join Date: Dec 2023
Posts: 23
Likes: 18
Liked 76 Times in 12 Posts
|
|
 Third Generation Safety/Decocker Stiff/Gritty?
Hello all!
Im a longtime reader, first time poster on the S&W forums, so Ill start with this question I cant seem to find any answers to!
Has anyone experienced their 3rd-Gens thumb safety/decocker not smoothly snapping back to the fire position when swept up? I have a 4506-1 (I believe the 03 variant too) which has a safety that is rather
gritty and occasionally gets caught partially on and partially off if you dont deliberately rotate it fully up. The 4506-1 had virtually no wear or use before me (scored it as an alleged police trade-in, but it appeared unfired and not carried). The safety/decocker was like this when I got it.
My older (1991) 5906 and (1989) 6906 both are much smoother and snap very easily to the fire position with a quick sweep forward, even if you dont fully manipulate/rotate them into the fire position. Theyre still very positive in their engagement, but there is no grit or stoppage going on and off essentially. My understanding is that this is how they should operate.
Ive swapped out the decocker spring, removed and oiled the safety/decocker assembly, and even took a fine Scotchbrite pad to the rounded internal area of the thumb safety itself to lightly smooth it over some, all to no avail. Does anyone know what the solution could be to make it run more smoothly? Its more of an annoyance than a fatal flaw, but Id still like to make it operate as intended if I can.

|
12-23-2023, 08:23 AM
|
 |
Member
|
|
|
Join Date: Sep 2018
Location: Pompano Beach, FL
Posts: 579
Likes: 1,139
Liked 2,182 Times in 383 Posts
|
|
Hi,
Sometimes the safety body plunger is damaged, and needs replacement.
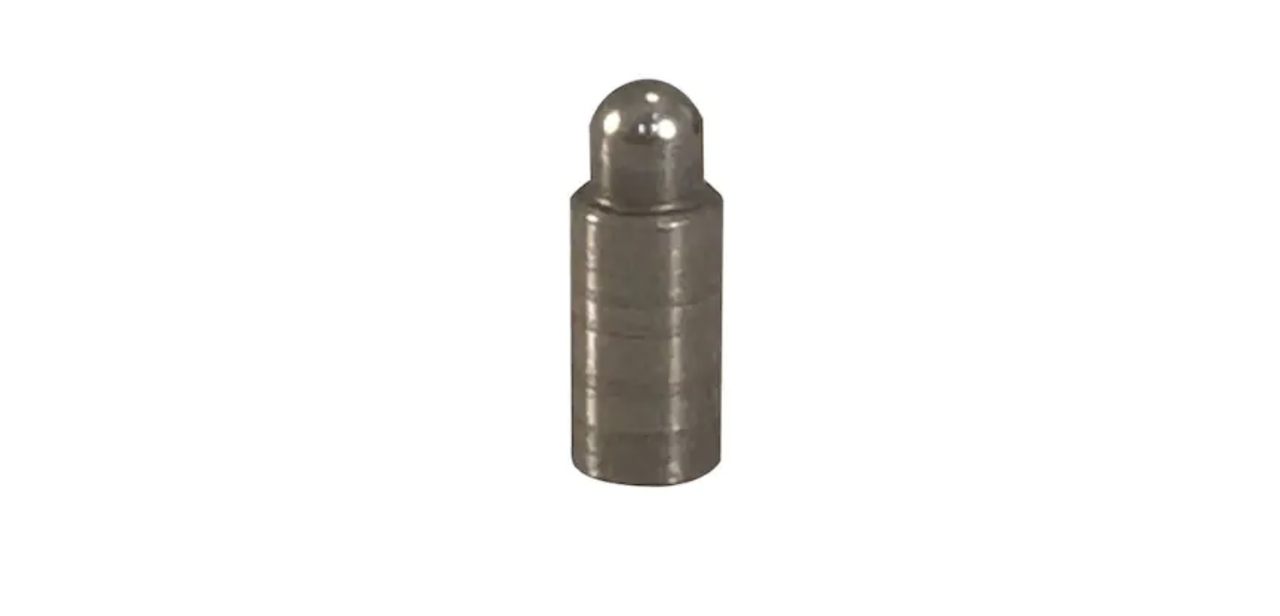
available at Midway...
Check yours to see condition...
|
|
The Following User Likes This Post:
|
|
12-23-2023, 08:28 AM
|
|
Member
|
|
|
Join Date: Sep 2018
Location: Pompano Beach, FL
Posts: 579
Likes: 1,139
Liked 2,182 Times in 383 Posts
|
|
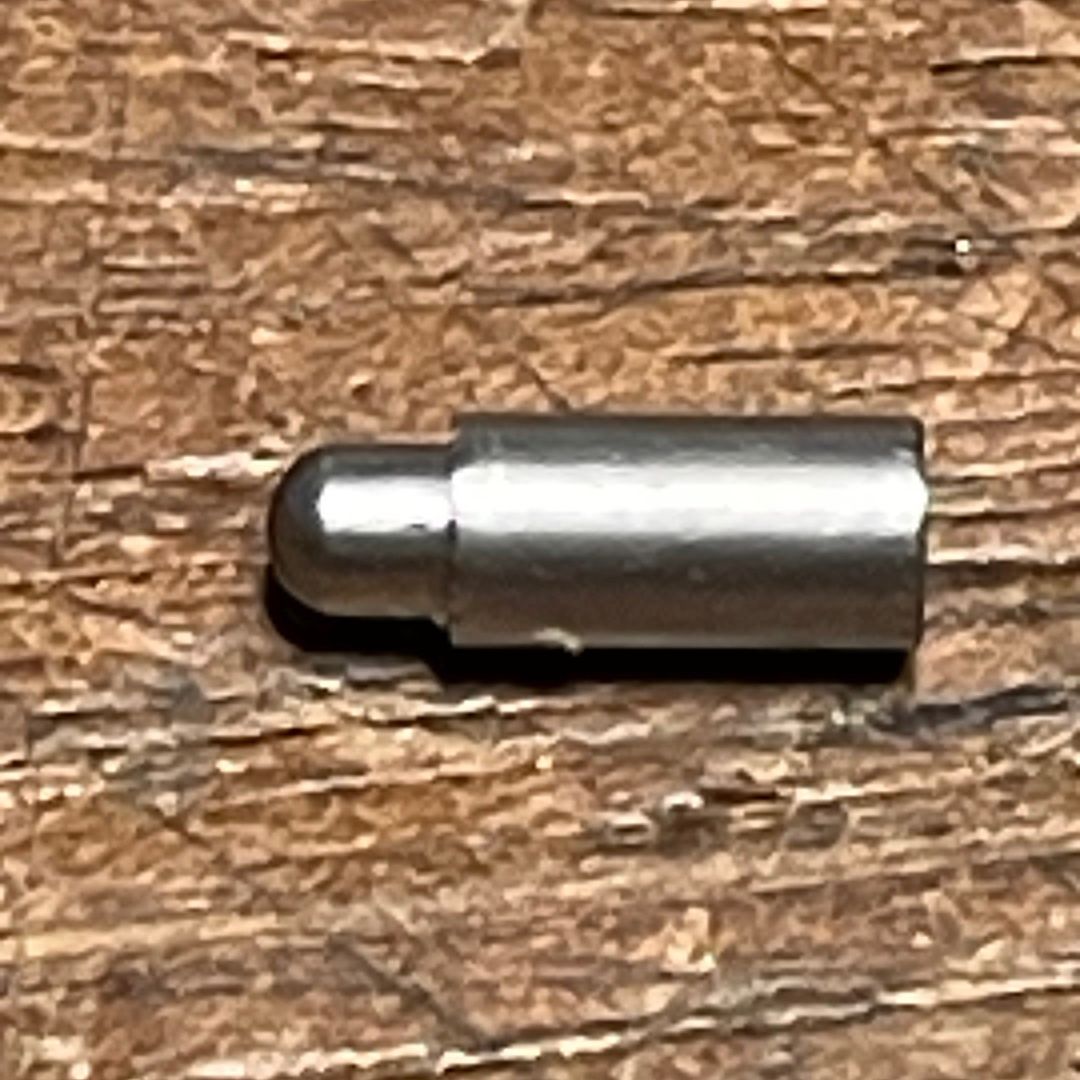
Found a pic of a damaged one...
BMCM thread... The PC 4506.... Has arrived!
check if yours looks like this...
|
|
The Following 5 Users Like Post:
|
|
12-23-2023, 08:57 AM
|
 |
Member
|

|
|
Join Date: Jan 2014
Posts: 3,018
Likes: 4,460
Liked 5,836 Times in 1,899 Posts
|
|
Yes, yes you can!
Here's the solution; take the gun 100% completely apart and polish every single part that makes contact with another. Don't touch the sear unless you know what you're doing.
I did this to my 1066, upgraded the springs to Wolf and refinished the frame and slide.
Now, she's as slick as snot and has a beautiful 3lb. pull in DA.
Notice the "boingy, boingy" hammer/trigger action they're plagued with; completely gone now? Nice smooth draw in DA with a snap break. In SA minimal take-up with a nice crisp glass break like that of a 1911 with a trigger job.
The de-cocker is nice and positive with a butter like glide and snaps into position now. Spent a lot of time here to eliminate the grittiness. Lastly, I swapped out my bobbed hammer for a spurred hammer from the 4566 model.
It's doable, not easy and time consuming because these guns have a million parts when disassembled (about twice as many as a 1911), but achievable.


__________________
Dave Ramsey Cultist
Last edited by 03hemi; 12-23-2023 at 09:04 AM.
|
|
The Following User Likes This Post:
|
|
12-23-2023, 03:30 PM
|
|
Member
|
|
|
Join Date: Dec 2023
Posts: 23
Likes: 18
Liked 76 Times in 12 Posts
|
|
These are great suggestions! I took the safety body plunger out and it looks just like the one in the stock picture, but I swapped it with my 6906s safety plunger just to try it - as soon as I re-installed that one in the 4506-1, it was still just as stiff. It seems to me like it could have something more to do with the way the body of the thumb safety interacts with the channel it sits within. Almost like there could be a burr or something making it gritty.
I cant really take the whole gun down and polish all the parts, Im just looking for a fix to this one area. Im not really sure what surfaces or area of the safety or channel to focus on though, or what people might recommend I polish or smooth it with.
Im (again) very new to the forum, is there a way to message one of those 3rd-Gen super-gurus like BMCM or Fastbolt, or tag them in the thread?
Last edited by ThirdGen9623; 12-24-2023 at 02:46 AM.
|
12-23-2023, 06:26 PM
|
 |
US Veteran
|


|
|
Join Date: Jun 2012
Location: SW Mississippi
Posts: 1,350
Likes: 2,228
Liked 6,220 Times in 1,043 Posts
|
|
Seen this problem a number of times.
What I've found usually going on here is too much spring force/insufficient room for the spring to compress. The spring stacks solid, the plunger binds, the movement of the safety body is gritty & crunchy and if you keep it up it will start wearing away metal on the plunger. It's a tolerance stacking issue. Suppliers with different batches of springs. Different runs of safety bodies on the old machinery or new. Batches of plungers and sometimes the wrong plunger in the wrong hole.
Before going about swapping parts around amongst different guns there are some things to check/inspect...
First of all inspect the plunger and make sure the radius is still a radius and make sure there is no junk up inside the spring bore...
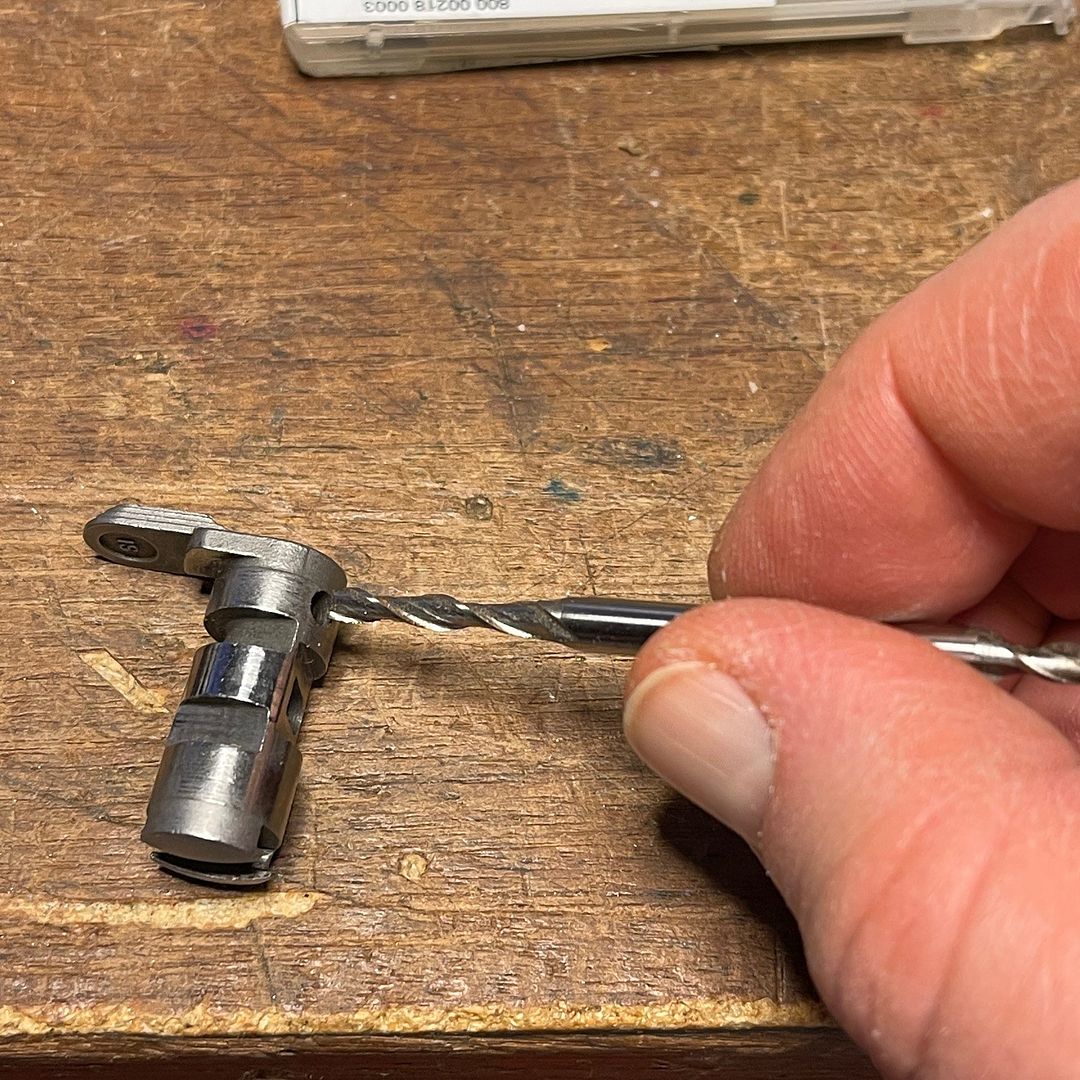
Then inspect the safety body. You want to make sure there is no junk up inside the bore housing the spring & plunger. I have had occasion to clean some burrs out of there for which I use a 1/8 inch end mill and only turn it by hand to clean up the bottom of the bore...
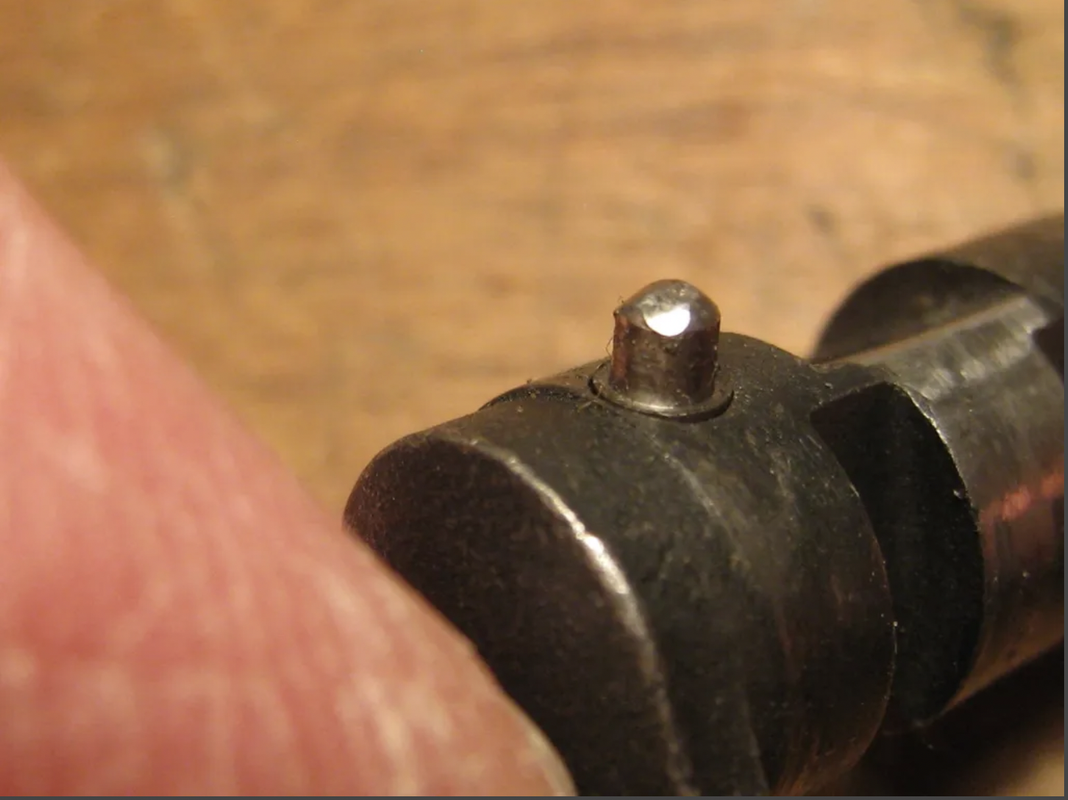
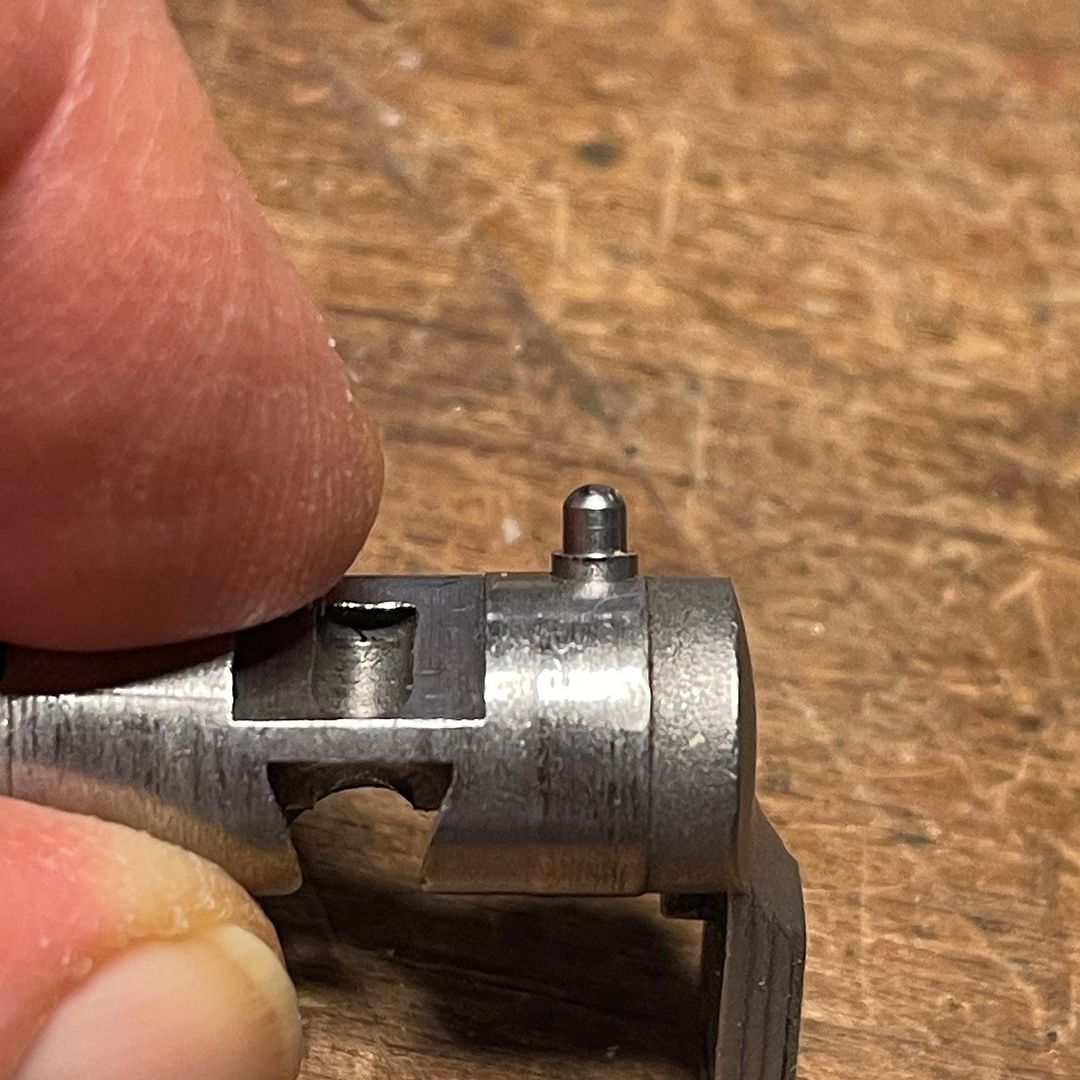
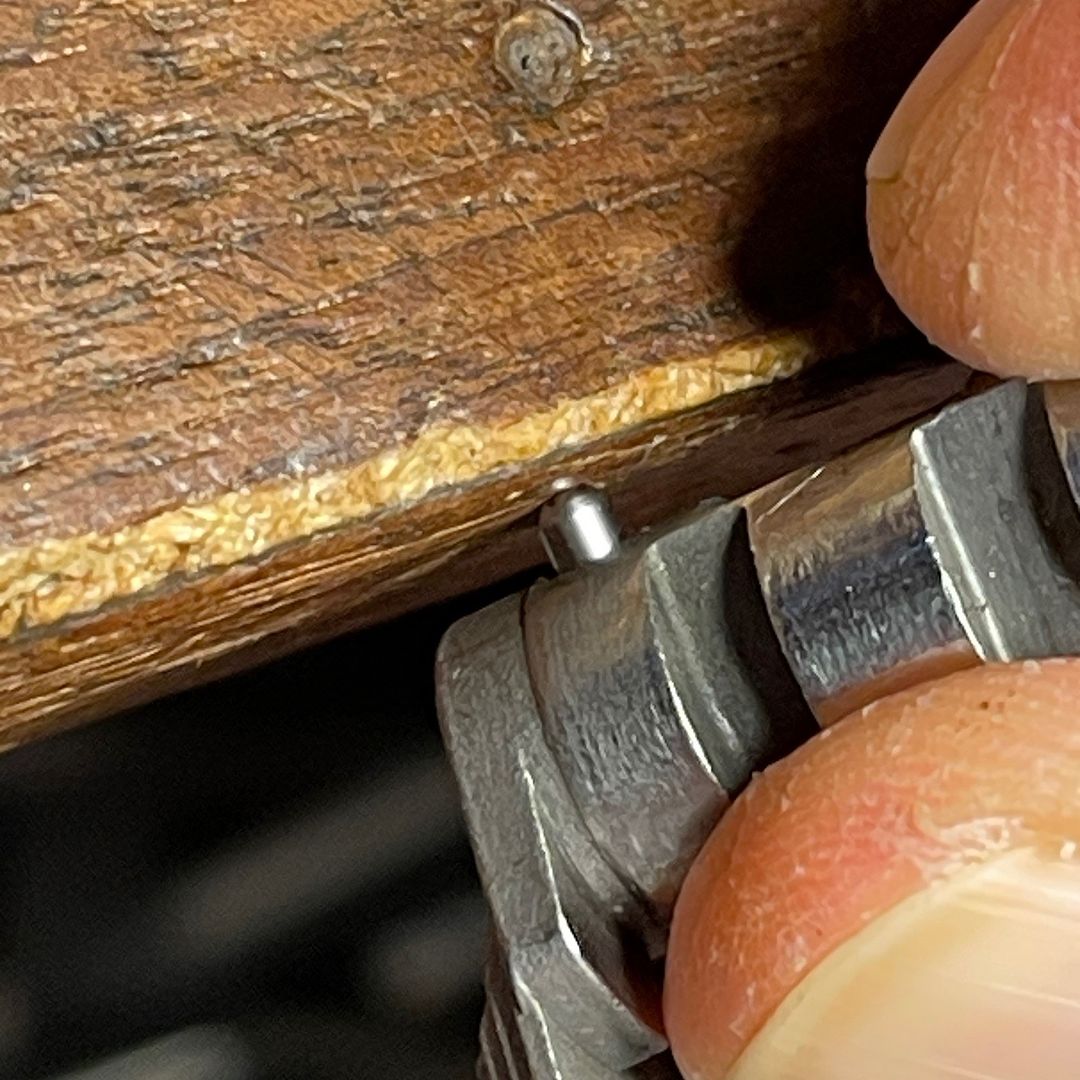
Now assemble your safety body with the spring & plunger then take a look at it from the side. Note how far the shoulder on the plunger is above the safety body. This one here is sticking up too much and has a good probability of binding...
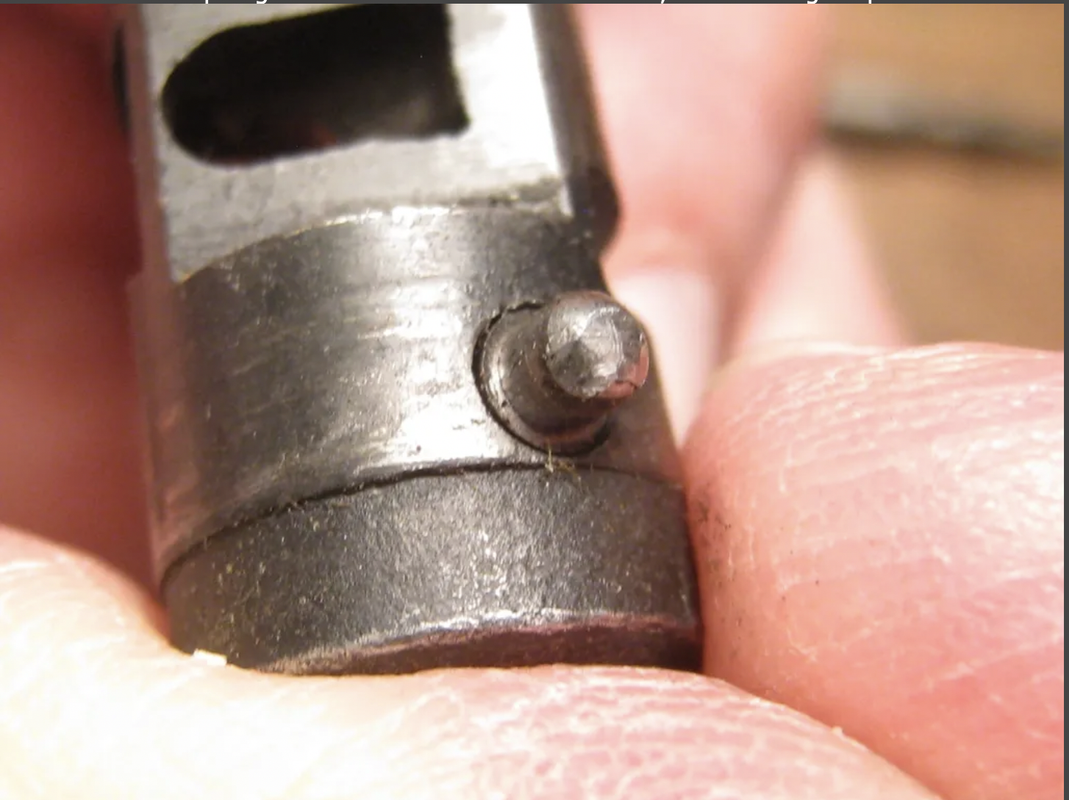
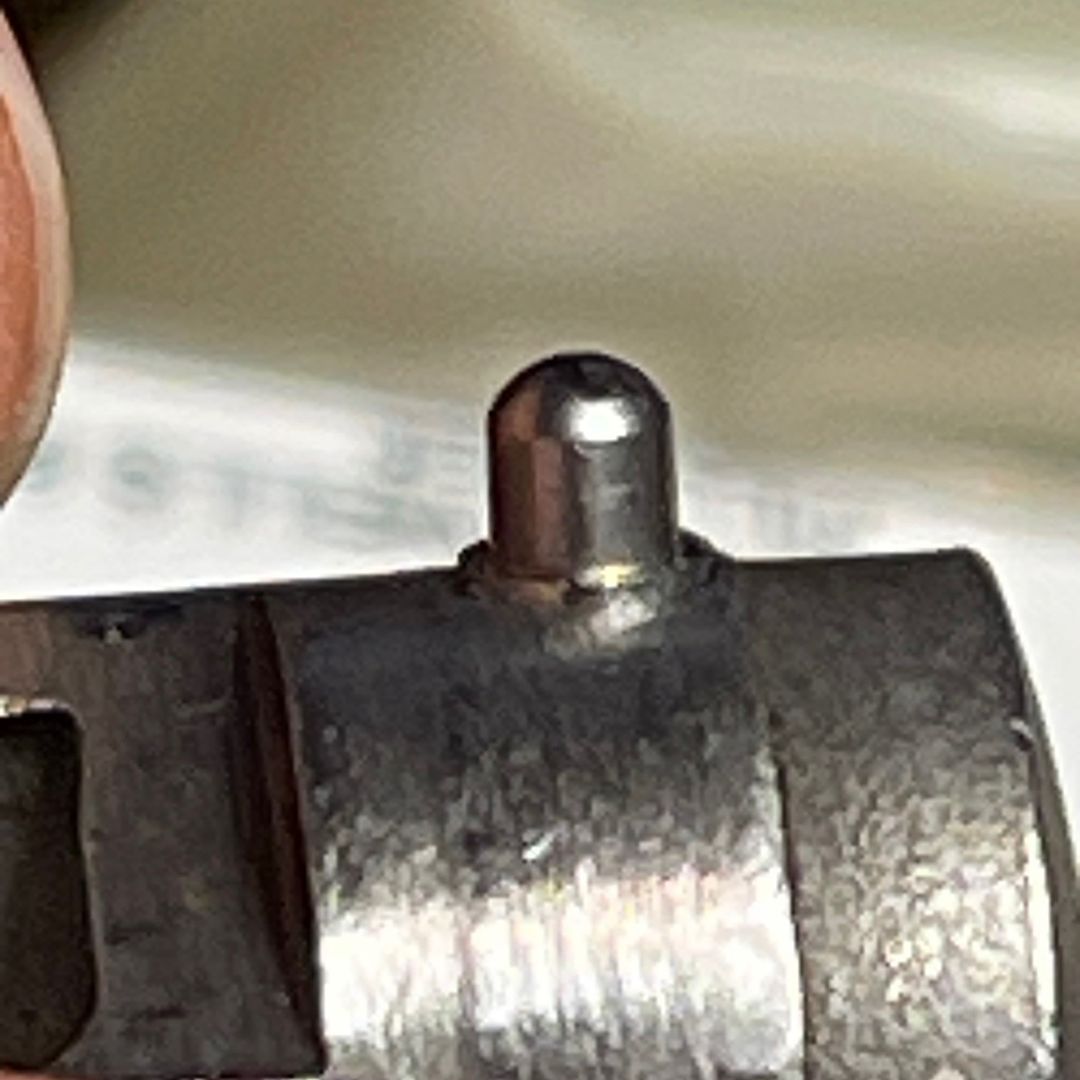
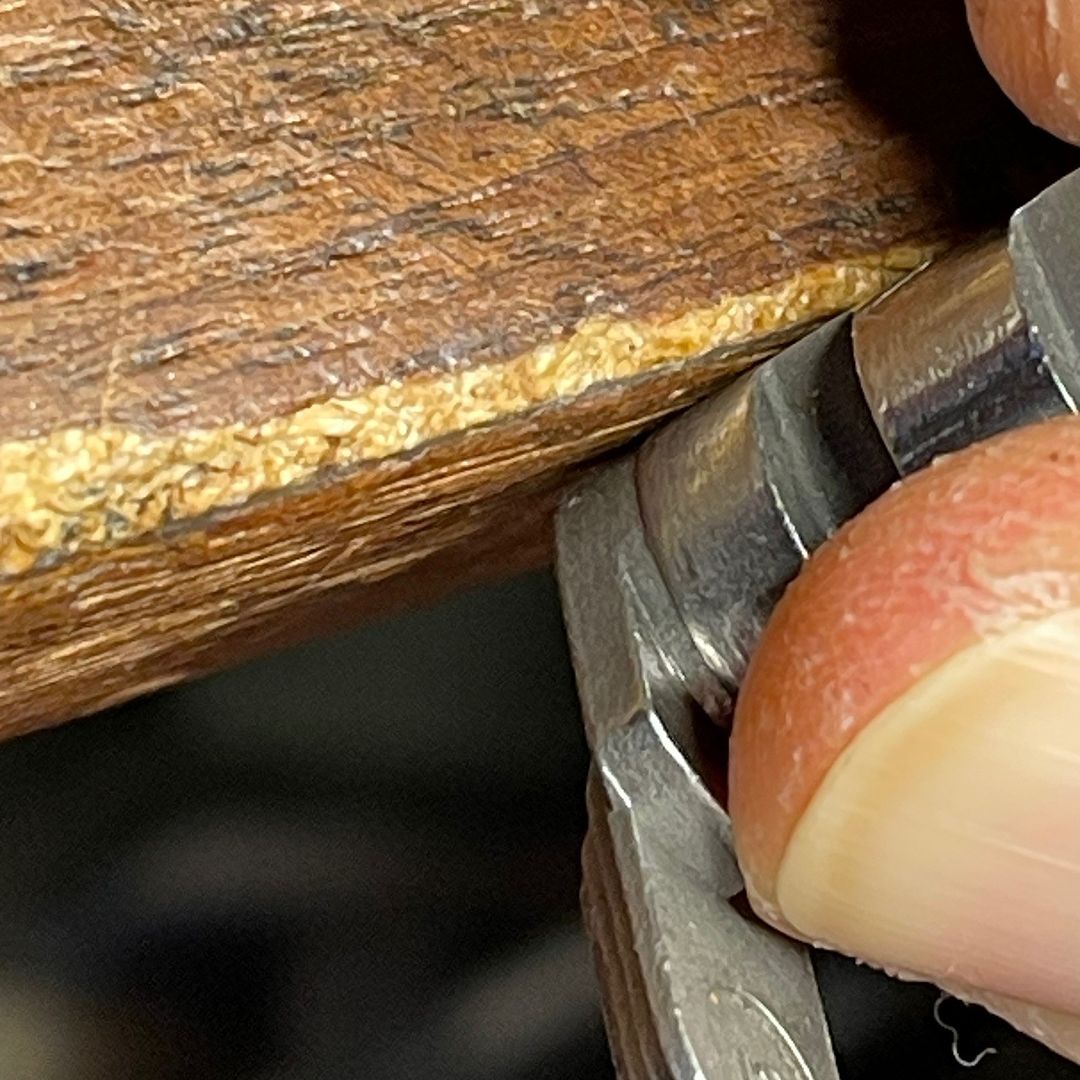
What you want to see is something more akin to this where the shoulder is slightly proud of, to at flush with the safety body but not below flush...
So, how do we get there?
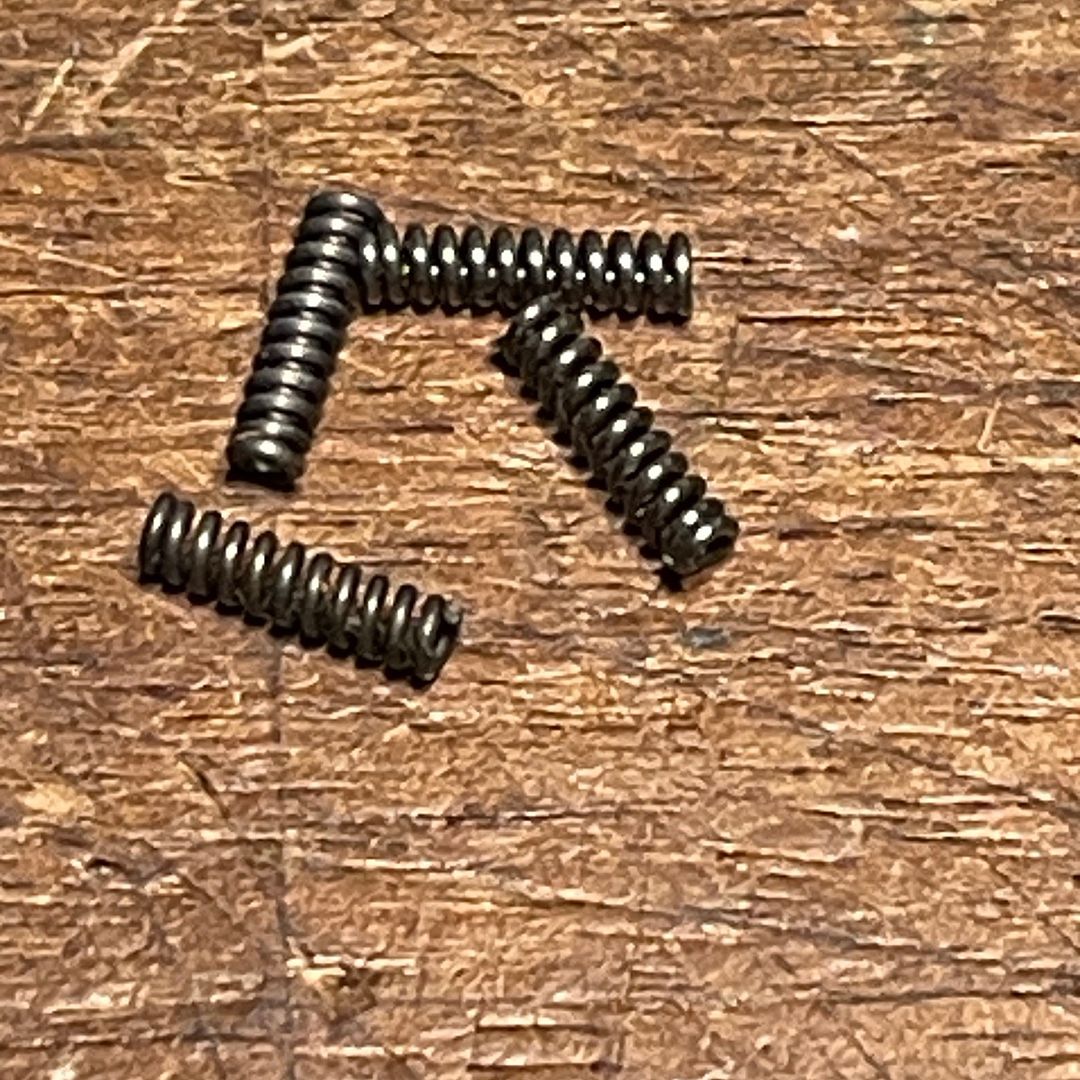
Here's four of those tiny springs. No two of them are the same length. Among these four alone they range in length from .337 to .350...
Assuming there's no junk or debris in the hole on either the safety body or plunger, what we can do is adjust the spring free length a little bit.
Some kind of tool to hold the tiny spring securely is required. Here I'm using a pin vise. Clamp the spring and flatten the end on a bench stone. No clipping coils off here just take a little material off the end coil to flatten it out then test for fit & function...
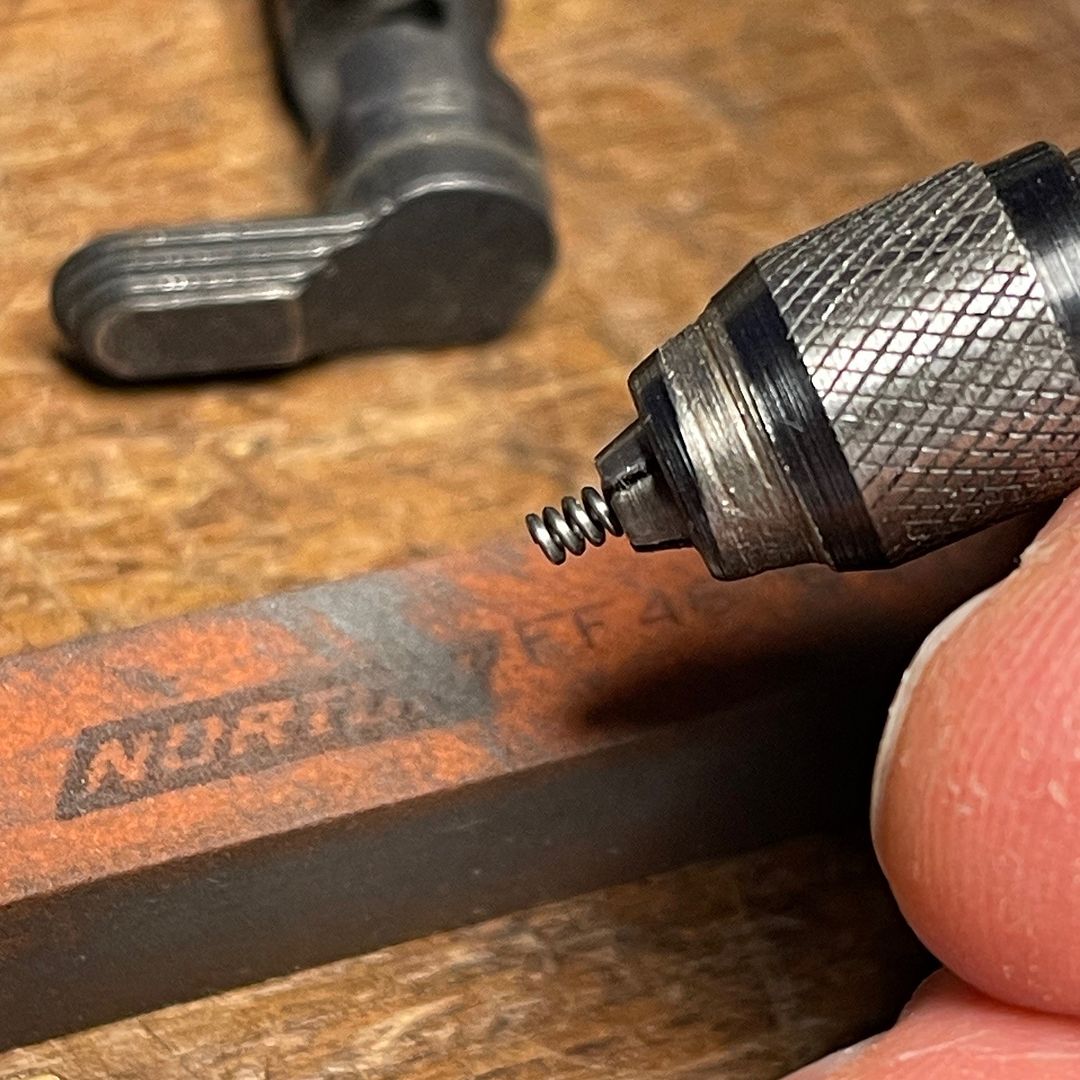
You may be tempted to use a power tool of sorts.
Dont! You can easily overheat and soften the spring wire and then it's not a spring anymore. Just scrub it on a bench stone taking care to keep it perpendicular to the stone and take a few thousandths off the end or even both ends.
It doesn't take much. When you think you've done enough, assemble the safety body and check it against the edge of your bench to make sure you can compress the spring & plunger fully into the bore...
If all checks out good, re-install in the slide and test for proper function.
Cheers
Bill
__________________
Because they don't make a .46
|
|
The Following 14 Users Like Post:
|
4T5GUY, Engine49guy, GaryS, guzzitaco, Heymatt, Infidel137, Jeppo, JohnHL, Kenna, Liftrat, NavyEngineer, snw19_357, ThirdGen9623, veeklog1 |
12-23-2023, 06:35 PM
|
|
Member
|
|
|
Join Date: Dec 2023
Posts: 23
Likes: 18
Liked 76 Times in 12 Posts
|
|
This is awesome! Thank you so much for the detailed reply. I’m gonna try all of these methods and report back what winds up being the case.
Thanks again to all!
|
12-24-2023, 02:46 AM
|
|
Member
|
|
|
Join Date: Dec 2023
Posts: 23
Likes: 18
Liked 76 Times in 12 Posts
|
|
BMCM, this cured the issue!
The channel where the plunger sits was clean, the plunger head itself looks perfect, so I took a bit off the spring. Little by little, I actually found I had to take off enough that the plunger sits just shy of flush (within) the channel. Odd, but when it was flush there was still some grit. Once I took that last little bit out, my safety is now as slick as butter but still clicks positively on and off.
Thank you all for your advice. I should have posted here a long time ago!
|
|
The Following 4 Users Like Post:
|
|
12-24-2023, 04:03 AM
|
 |
Member
|
|
|
Join Date: Apr 2015
Location: Oregon Coast
Posts: 1,859
Likes: 3,567
Liked 4,912 Times in 1,495 Posts
|
|
Quote:
Originally Posted by ThirdGen9623

BMCM, this cured the issue!
|
YOU have cured the issue with BMCMs most excellent tutelage.
Im lazy so Ive procured way too many NOS safety lever and safety body plungers with respective springs. As was pointed out even the exact factory numbered spring can be different. They are cheap and can be put in a parts order to make the shipping reasonable or even free. Same with trigger play springs and their rivets among other stuff one might eventually need.
Glad you got it fixed and with help you did it yourself. 👍
Jim
|
|
The Following 4 Users Like Post:
|
|
12-24-2023, 04:32 AM
|
|
Member
|
|
|
Join Date: Dec 2023
Posts: 23
Likes: 18
Liked 76 Times in 12 Posts
|
|
Extra springs and trigger play springs/rivets are definitely a great idea!
|
|
 Posting Rules
|
|
|
|
|


 Linear Mode

