Essential tools for building an AR?

Joined
Nov 24, 2003
Messages
4,309
Reaction score
4,933
Location
CNY
What tools are necessary (or just nice to have) for building an AR style rifle from a new stripped lower receiver? I bought a kit from Palmetto State Armory with a complete upper.
 
Register to hide this ad
Correct size roll pin punches. Roll pin starter punches can be helpful. Non marring hammer. Masking tape to protect the receiver when tapping in the roll pin that affixes the bolt release paddle. Buffer tube castle nut wrench. Something thin to assist holding the front pivot pin detent compressed while installing the front pivot pin. Anti-seize (optional) for the buffer tube threads. Something to support the lower receiver trigger guard "ears" when installing the trigger guard.

The only other thing I keep on hand is one or two "oops" kits. There is nothing more frustrating than to have a spring and detent launch and seemingly disappear into the 5th dimension never to be found again.
 
From PewPewTactical:


"Punch Set ($15): I prefer brass so you don’t mar up your lower receiver and it’s good for lots of other gun stuff too
Long Arm Hex Key Set ($12): You’ll be using hex keys or Allen wrenches in a lot of installations. Go with the long arm versions for extra reach.
Hammer ($10): I like the rubber/plastic ends instead of standard steel since there are very few times when you actually need that much force…also if you use it directly on gun parts, you will not mar the finish
C-Clamp ($10): Not super necessary but useful to install the trigger guard, 4-inch should be good
AR-15 Combo Tool ($20): Good for installation of the castle nut, but more useful for upper receiver builds
Utility Knife ($7): Needed for the pivot pin installation"
 
Thanks guys. The complete upper that I bought from Palmetto State Armory....can I "assume" that it is ready to use? Do I need "go/no go" gauges for checking headspace? What about one of those vise attachments that holds the lower by the magazine well? Also, trying to figure out what is the best book for ARs?
 
Just want to make you aware that pawn shops are over stocked with black rifles at dirt cheap prices.
Might be worth looking at before spending too much money.
 
I bought an upper that was somebody's project in 300 Blackout. I've had it all winter and still can't get it to function two shots in a row. I have the tools and know how to use them, but finding someone that actually KNOWS what to do, is next to impossible to find. EVERYBODY is a self proclaimed expert! But all they really are is parts changers. Try and find someone who actually understands the WHY of AR-15 repair! Good luck!

Ivan
 
It helps to live in a free state

The rifle I'm building will be fully legal under current State law (non-removable low capacity magazine). I bought the stripped lower at a local Runnings "big box" store and had to go through the same paperwork and background check as if it were a complete long gun. For what I want it for (target shooting), it will be fine. :)
 
Some people have the cash and just want the experience. I'm gonna do it some day, when I have the time . . .

(Looks like the above posts, taken in combination, are a pretty start on build tool kit. I totally agree with having multiples of small parts on hand, for the reason stated . . . )

Just want to make you aware that pawn shops are over stocked with black rifles at dirt cheap prices.
Might be worth looking at before spending too much money.
 
Last edited:
I've done a number of them with only a hammer, one punch, and a pair of pliers, but the castle nut wrench is a bonus and the tape is nice to protect from slips with the punch.
 
The most important tool for a successful AR-15 build (especially the first one) is patience with yourself. The detents and springs are the items that get me impatient, largely because the first two I did went in on the very first try. Since then ... not so much. As above, have spare springs and detent pins available.
 
I've built quite a few. Aside from what has been mentioned, there are two crux points that can be made a ton easier.

First - the roll pin for the bolt catch. Best technique I've learned is to take a pair of channel locks and wrap the jaws with a soft tape (I've got some medical tape left over from my EMT days and that works well - I've also used blue painter's tape). Wrapping the jaws with tape helps keep from marring the lower receiver. Lube the heck out of it with CLP, then line everything up (including the roll pin) and just squeeze it into place as far as it will go with the channel locks. You can finish tapping the pin into place with a roll pin punch. This eliminates a TON of frustration. I'm sure there's a special tool developed for this but I haven't found it yet.

Second crux is the detent pin on the front take down. Many folks have launched this thing across the room only to be lost in their deep shag carpet. My technique is to use an allen wrench to push the detent into place, the slide the takedown pin across the plane quickly - kind of like the pull the tablecloth out from under the dishes trick. Other folks have done this inside a plastic bag to avoid losing the pin.

The last thing I would recommend is needle nose pliers. These aren't always necessary, but can be handy for installing accessories like the Magpul ASAP sling attachment.
 
after launching my share of pivot pin springs into low orbit.....I got a pivot pin install tool....5 bucks and boom........no more cussing
 
Take a large, off white painter’s drop cloth and cover the floor where you will be assembling the AR. Springs and detent pins are easier to locate if they go flying.

A dab of white grease on springs and detents reduces one’s chance of launching parts across the room.

The front locking pin spring and detent can be pushed in using a single edge razor blade or a box cutter blade. Insert a temporary pin of some sort (drill bit, door hinge pin, etc,) through the left side to secure these parts then place the locking pin in from the right side, and push it through, while holding the left side temporary pin.

If a mag well block can not be found locally or cheaply ($12.00 to $45.00 here two months ago and no one had them in stock) buy a pack of wood wedges used to level door and window frames. Put them in the mag well then clamp the wood in your vise.

Install the front of the trigger guard first to hold it in place while you drive or press the rear roll pin in. Very carefully, support the opposite ear with a bench block or wood wedges if you use a hammer to tap the roll pin in.

I have been perfectly happy with my $345.17 PSA carbine.
 

Attachments

  • C32B8CD7-F101-4E49-AC79-0F9212435224.jpg
    C32B8CD7-F101-4E49-AC79-0F9212435224.jpg
    49.4 KB · Views: 17
The tools needed have been explained in the above posts. Find a couple of videos and watch them on a tablet beside you if you have that option. It's easy and the videos are plentiful and make the job fun and rewarding.
If you plan on keeping the gun It may be wise to buy a spare parts kit from PSA ad they are cheap and with all the pressure from states on those evil black rifles, it is nice to know you have a part that will make it run again in the unlikely event you have a failure.

BTW, I did stake the castle nut after torquing it to the correct specs.

BTW II, accessories for this thing can, and will, become addictive.
 
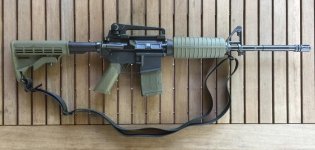
Since this is the internet and you really don't know me from anyone, I will post the standard go / no-go gauges are always a good to have when assembling your own rifle. If you plan on assembling your own uppers (and I mean multiple uppers), then the gauges are good to have.

Now that's over...

When I've purchased a complete upper from a reputable manufacturer who has been in business a few years and is a stable business that won't go out of business overnight, I don't feel the need personally to use go no-go gauges.

When I assemble an upper myself, I'll use go/no-go gauges just to be 100% sure. As long as I purchased quality parts from reputable manufacturers, I've never had issues. The AR-15 is built upon standardized dimensions. The barrel keys into the upper. The barrel nut gets torqued. Compared to building other rifles, the AR-15 is a comparative pleasure.

As a contrast, assembling an AK-47 from a flat is a comparative pain. Aside from rivets, pressing in the barrel into the trunnion, absolute necessity of checking headspace with a go / no go / field gauge is a must. Under supervision, I've done it one time. I don't ever want to do it again. Buying a surplus mosin, go / no go gauges are important.

Not sure if this helps.
 
Last edited:

Latest posts

Back
Top