Dandecoteau
Member
- Joined
- Mar 9, 2015
- Messages
- 181
- Reaction score
- 165
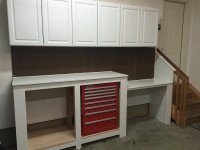
Took a week to finish. But boy is it sturdy.
All 2x4 and plywood with pegboard along the back. The lower portion is going to be for reloading and the taller part is a normal workbench. 3 sets of 36 inch cabinets along the top. The toolbox is built into the bench, so it can never be removed.
Haven't set up my reloading stuff yet, but any advice on how it should be organized would be GREATLY appreciated. I have no idea where to start.
Thanks
Attachments
Last edited by a moderator:
")