Looking for info on wood type of these target stocks, and best filler

Bripro68

US Veteran
Joined
Jun 27, 2014
Messages
32
Reaction score
42
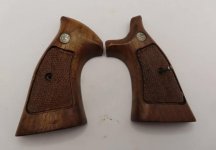
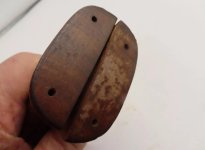
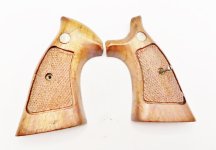
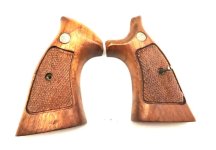
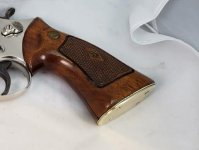
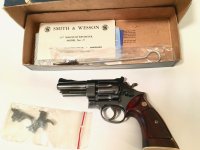
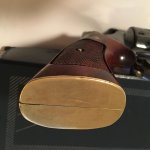
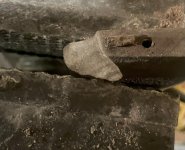
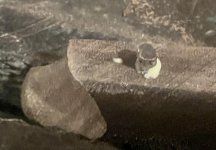
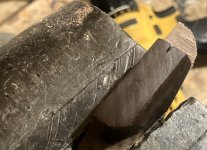
Unfortunately, the eBay market for N frame target stocks is through the roof right now. I paid 80 bucks for these fixer uppers, but I want to verify the wood type and ask if anyone on the forum knows the best matching filler for the holes the previous owner drilled in the bottom. Also, why do you think you would’ve put them there? My guess is some sort of hack job of a grip cap, but I really don’t know. I’m actually looking forward to the challenge of fixing them up but certainly not too proud to ask the advice of others who have gone before me. Thank you all.
 

Attachments

  • IMG_6361.jpg
    IMG_6361.jpg
    29.1 KB · Views: 223
  • IMG_6362.jpg
    IMG_6362.jpg
    28.3 KB · Views: 213
Register to hide this ad
We need a lighter picture. Just a little edit.

Bruce
 

Attachments

  • IMG_6361.jpg
    IMG_6361.jpg
    195.3 KB · Views: 107
Any better. Thank you.
 

Attachments

  • IMG_6361.jpg
    IMG_6361.jpg
    39.6 KB · Views: 88
They look to be walnut. The holes are from a steel or brass plate that a few LEO's would put on the bottom.

Don't use filler. Find some walnut and make small plugs that you can force into the holes with a touch of wood glue and sand. You want to try to match the grain, which should be easy. Make sure to cut the wood so the ends of the grain show as you look at the bottom of the stocks.

The cut-out is also modified, that would be a tougher repair. With a little time, you could find a better set for little more $ in the classifieds here.
 
Last edited:
I’m not suggesting this as a good idea… more as a desperation move if needed. One way to get a good color match is to harvest small pieces of wood from inside the grip and make your dowels from that. It’s the kind of thing I’d consider on a 50’s solid body guitar with a serious edge ding. Obviously fraught with peril…
 
They look to be walnut. The holes are from a steel or brass plate that a few LEO's would put on the bottom.

Don't use filler. Find some walnut and make small plugs that you can force into the holes with a touch of wood glue and sand. You want to try to match the grain, which should be easy. Make sure to cut the wood so the ends of the grain show as you look at the bottom of the stocks.

The cut-out is also modified, that would be a tougher repair. With a little time, you could find a better set for little more $ in the classifieds here.

Thank you for the tip on how plugging the holes. The cut out did catch my eye, but I’m not sure it’s modified or just looks off in the photo. We’ll see when they come in, but unfortunately, I have no other n frame with the speed loader cut out to compare them to.
 
I’m not suggesting this as a good idea… more as a desperation move if needed. One way to get a good color match is to harvest small pieces of wood from inside the grip and make your dowels from that. It’s the kind of thing I’d consider on a 50’s solid body guitar with a serious edge ding. Obviously fraught with peril…

I like taking chances, better yet I like taking chances that work out. I’ve done my share of wishing I never attempted things but everything’s a learning experience.
How would I go about making dowels to plug the holes? Whether from inside the grip or other source, I’m not sure how to go about making them that small.
 
The screw holes are consistent with the installation of a brass or other metal butt cap that some police officers installed on target stocks when revolvers were in most police holsters.

If I could acquire one of those plates, it would be problem solved. Unfortunately, I can’t even find an image of one on my Google searches.
 
This is what I would do. Just cut some pieces a little bigger than needed and cut, sand or stick in a drill and round them close enough. You want to have to pound them in, but not so tight to split the grips. The cut-out is not original, might even be cut into football stocks.

If you don't have any wood send me a PM, I can provide a hunk of S&W walnut.
 
If I could acquire one of those plates, it would be problem solved. Unfortunately, I can’t even find an image of one on my Google searches.

attachment.php
 

Attachments

  • S&W M28-2 Butt Plate Pic.jpg
    S&W M28-2 Butt Plate Pic.jpg
    32.9 KB · Views: 270
Unfortunately and oddly, I have the same problem with a set of target presentation k frame stocks myself. I thought I might just hollow the bottom of the grip out just like Ruger did with their target stocks so the serial number could be seen.

melvinwalker-albums-tg-s-picture28290-target-grips1.jpg


melvinwalker-albums-tg-s-picture28291-target-grips2.jpg
 
Last edited:
My first thought is for you to contact one of our Forum's woodworking experts...they are outstanding craftsmen that do great work for a fair price. Unless you're a very good DIY guy, that might be the best way to go. A few years ago I was fortunate to pick up this Model 27-2 from a friend's father, and IMHO the plates were installed much more tastefully than using several wood screws. I can remove the stocks without having to remove screws. Good luck!
 

Attachments

  • IMG_2254.jpg
    IMG_2254.jpg
    105.5 KB · Views: 42
  • IMG_2258.jpg
    IMG_2258.jpg
    38.2 KB · Views: 63
Unfortunately and oddly, I have the same problem with a set of target presentation k frame stocks myself. I thought I might just hollow the bottom of the grip out just like Ruger did with their target stocks so the serial number could be seen.

I would guess the plate that were on yours was in the design of a badge or other. I have seen several silver very ornate plates that have meaning to the officer that had them.

If those were repaired and refinished they would look quite nice. Not any where as "bad" as the OP's.

They actually are nice. Very heavy walnut..They came from a demilled Model 10 heavy barrel. Probably some department with bad politics that destroyed their service revolvers instead of trading them in.

I'd like to have the plate that was on there or at least see what it looked like.
 
Rather than fabricating plugs from walnut stock (or from the grip itself) you may want to consider simplifying the repair by searching online for a walnut dowel, then enlarging the holes as needed to the diameter of the dowel. A quick search turned up a number of sources, but I didn't go into great detail looking at diameters that are available. I'd probably opt for 1/4" myself (assuming that size is available). Then I'd place the grips in my drill press vice and carefully enlarge the holes to a diameter of 1/4" using a sharp drill, at a depth of about 1/4" or so. Then cut the dowel to a tad over that length, glue in the hole as a "plug", and once it's dry, sand flush. The end grain of the dowel should be a fairly close match to the end grain of the grips.

Good luck,
Lou
 
Here you go, at least how I do it. Doweling with never match and you would have to order it if you wanted walnut. Why bother for an an inch of wood. I made a hole and plugged it in less than 15 minutes, most of which was looking for my Tru-oil.

Here is a simplified step by step. Obviously didn't wait for the glue to dry and didn't spend any time on any portion of it but shows how to do it.


CUT PLUG: (make it long to start so you can handle, sand, cut it)

attachment.php


GLUE & POUND IN: (slight taper on plug will expand and fill voids)

attachment.php


TINT PLUG AS NEEDED: (can use markers)

attachment.php


attachment.php


APPLY FINISH (can still tint/blend and add grain lines if needed)

attachment.php
 

Attachments

  • IMG_0634.jpg
    IMG_0634.jpg
    88.9 KB · Views: 158
  • IMG_0637.jpg
    IMG_0637.jpg
    85.9 KB · Views: 157
  • IMG_0641.jpg
    IMG_0641.jpg
    127.8 KB · Views: 158
  • IMG_E0642.jpg
    IMG_E0642.jpg
    127.5 KB · Views: 159
  • IMG_0632.jpg
    IMG_0632.jpg
    73.1 KB · Views: 159
Back
Top