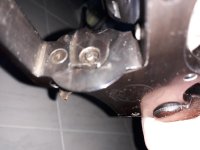
I got a revolver that's missing the bushing around the bolt in the recoil plate.
I can't find the part in the schematics, and I don't know it's proper name.
Can anyone shed some light on this?
I would try to fabricate one, if unable to buy one. But I would need to know the dimensions. It apoears to be press fit.
Here's a picture (quite bad ) but I think it shows what I mean.

Can anyone help out?
I can't find the part in the schematics, and I don't know it's proper name.
Can anyone shed some light on this?
I would try to fabricate one, if unable to buy one. But I would need to know the dimensions. It apoears to be press fit.
Here's a picture (quite bad
) but I think it shows what I mean.Can anyone help out?

")