Model 1 1/2 jamming up

rta72

Member
Joined
Nov 25, 2018
Messages
47
Reaction score
11
Hey all!

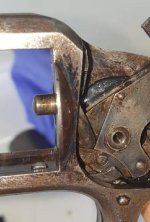
Suddenly my revolver started having problems. The gun jams up when trying to cock it. Hammer goes only a little bit backwards and cylinder won't rotate. This started only recently, I have been trying to clean and lube it if it would help, but with no success.

If I fiddle with the cylinder a bit, taking it off and pressing it back snugly the gun functions normally one time and after that binds up again at that point. Maybe the cylinder stop doesn't move as it should. Without the cylinder it cocks and locks normally in my opinion. Maybe I need to take it apart, if it's not too difficult?

Few photos below. Thanks a ton for help!!
8cca2982c6586e0ecb6c9f002d13aa40.jpg
Jamming point.
a4b56bfb46c1afce962a4d4afd1bbccd.jpg
97f3b5e9e6f162e20e8765377db41273.jpg
Hand moves normally?
b60fdea35f7d0afdf0e5188613e185f3.jpg
Cylinder stop hammer down
851557c423424e086c1198bd5bac1bc3.jpg
Cylindwr stop hammer cocked
 
Last edited:
Register to hide this ad
perhaps the tip on the rotating "hand" chipped ? I enlarged ... where is it ? Should be protruding
 

Attachments

  • 1-1-2 jams enlarged.jpg
    1-1-2 jams enlarged.jpg
    52.9 KB · Views: 41
Hmm, I probably need to disassemble it then to see if it is chipped. Probably no spare parts available? [emoji16]

Shouldn't the cylinder stop movw when cocking the hammer?
 
Hi,

I would take a look at the hand and cylinder teeth.

When the hammer is fully cocked like on your last pic, move backward the hand by using a toothpick for example, you will be allowed to see if it's worn.
 
Last edited:
Hey, thanks for the answers!

I took a few photos from the hand and also one from the cylinder.

The "finish" looks rough with the camera flash. [emoji16]
7a464cee4884c29e8e95e25e9dfefe52.jpg
288e1c5757e8c29c50d7b9094cb24be5.jpg
4a005cbbd50672691dc8aa5a2a32813b.jpg
c4a5e96a37825047148d61d92aabd4f2.jpg
 
To my mind, the hand seems to be worn.
I compared it with the hand of my Number 2 which has almost the same mode of operation.
1dc80110.jpg


I guess someone who owns a Model 1 could confirm.
 
I agree, also my impression from looking at it that it looks a bit dull on the tip.

Also the mechanism feels a little sluggish if you know what I mean? I have sprayed it with brake cleaner then applied hoppes oil and maybe some light spray oil. I've also used fine steel wool. Maybe combination of worn hand and oil/steel wool residue has caused it to start jamming up?

Few places sell spare parts I see. Cheaper to make a new one?
 
Watch the cylinder stop when cocking the gun. One of the lock-up problems these guns have is that the stop does not move enough to unlock the cylinder, so you cannot cock the gun?? If the stop does not lower enough, check the spring.

It has been a long time since I have taken apart a Model 1 1/2, 1st but believe the spring is under a plate ahead of the trigger that is held on by one cross pin.
 
Bolt is sticking or not engaging with hammer

I agree that it's likely a bolt issue.
With the cylinder in the frame, pull the hammer back slightly and try to manually turn the cylinder. It should spin freely!
If it turns then the bolt is released and that's not the issue. If the cylinder does not spin freely than the bolt is not dropping as it should which would lock up the action.
Look to see if it's engaging with the bolt release at the bottom of the hammer when you pull the hammer back. If it's not actuating the bolt then that's the issue.

Murph.
 
The Achilles heel of the 1st Model 1 1/2 is the cylinder stop (bolt). Yours appears broken in photo 4 of your first post. The cylinder stop is actuated by the nib on the bottom of the hammer (visible between the base of the hand and the pin holding the mainspring stirrup). The hammer nib should push down on the end of the cylinder stop at the instant the hammer is moved to cock the revolver. Your photo shows the end of the cylinder stop is chipped resulting in the cylinder starting to rotate but the bolt has not released the cylinder. I.e., the gun is out of time.

Added: the broken end probably is under the stocks in the frame. Also, this part is often difficult to find unbroken. Good luck.
 
Last edited:
Do you mean this part?
c94c7b83b11ad44b07141f363b796a36.jpg


Edit: just tested and cylinder stop does not move a bit when cocking.

I'm not sure how this works but should that knob (just over the arrow) thats been cut angled push that curved metal sheet that the arrow is pointing? The knob goes under it when cocking so if the sheet is just bent outwards?
76e6624aa451bcf7a711a7da1e37b393.jpg
It might be broken like this?
 
Last edited:
"Do you mean this part?". YES. The tip should be horizontal and extend under the knob. It is a spring of sorts. When the hammer is moved, it immediately pushes down on the lever and moves the cylinder stop out of the way. The knob clears the end and spring pressure pushes up to relock the cylinder when the next stop slot is encountered on the cylinder. When fired the knob "thats been cut angled" moves the cylinder stop 'lever' to the side bypassing the cylinder unlock function. That is the spring function of that lever.
 
OH bummer, that part did look a bit off when I first opened the side plate. And there's no fixing it? Just try to find a good condition spare?

Edit: So it's missing maybe one millimeter. [emoji17]
4785d1de57a4a8c07dbfcb24f5d24b9d.jpg
 
Last edited:
On the hammer being cocked the stud pushes the cylinder bolt down thus moving the bit that locks in the cylinder locking notches also down and freeing the cylinder to rotate. As the hammer is moving to full cock position the cylinder bolt is freed to jump back and will drag across the cylinder until it slots into the cylinder locking recess.
As the gun is fired the beveled section of the small stud on the hammer pushes the end of the cylinder bolt sideways and ends up behind its back end.
This is not as good as the Colt system used in their single actions. It is not as mechanically effective as the Colt system and perhaps why S&W returned to the top strap located cylinder locking bolt in its new model one and a half.
Gwyn
 
Now I'm starting to get a grip of how it works. [emoji846]

So they had a top locking cylinder stop in model 1 (and early model 2?) and it was problematic as it could unintentionally rise up too high and risk breakage or getting debree in and jamming tje cylinder?

Then they repaired it with this bottom locking stop in (also mine) model 1 1/2 1.st issue which was even worse? Then in 1 1/2 2nd issue it was returned back to top and improved from model 1?

Model 1 1/2 2nd issue was produced roughly four times more than 1 1/2 1st issue?
 
. . . Edit: So it's missing maybe one millimeter.

I do not believe it is shorter by looking at the image, rather the hammer was in a different position when the pic was taken on each gun. What you have to watch for, as stated above, is the interaction of the top tip of the flag when it contacts the small stud on the hammer. The stud should push the stop mechanism down slightly. The stud looks like it could be worn at an angle. Take a pic of the flag when it is directly under the stud to see what is happening.

It was a very poor design, with vulnerable and fragile parts inside, plus any wear in the mechanism would cause the stop to remain too high in the slot and jam the gun. There are fixes that can be performed and the easiest is to repair the stud only. It can be built up with a dab of weld and then re-shaped until the stop works properly. It should have a vertical ledge to the front and bottom and a ramp at the rear. Yours is badly worn, so I would start there.
 
Further to my post 12.09 PM.
Also perhaps it was thought desirable to have the cylinder locking notches at the bottom as in a 5 shot cylinder it would be located between the chambers but if the locking notches were at the top of the cylinder it would be directly over the weakest part of the chamber where the pressure of the fired cartridge would be greatest.
As mentioned previously it was basically a very inefficient system as the fall of the hammer in a Colt drives the cylinder locking bolt harder into the cylinder locking slot as it was a see-saw arrangement but the S&W system used in the 1st model one and a half the cylinder locking bolt was pivoted at its far end and the fall of the hammer on firing would not drive it harder into the slot.
Gwyn
 
Post #1: "Suddenly my revolver started having problems.". That statement is a good indication of a part breaking. I agree that Chris is your best bet for repair.
 
A word of caution: Gun Part Corporation lists the part but I have no idea what the part is that they are showing. It is NOT the part you need.
 
I do not believe it is shorter by looking at the image, rather the hammer was in a different position when the pic was taken on each gun. What you have to watch for, as stated above, is the interaction of the top tip of the flag when it contacts the small stud on the hammer. The stud should push the stop mechanism down slightly. The stud looks like it could be worn at an angle. Take a pic of the flag when it is directly under the stud to see what is happening.


It was a very poor design, with vulnerable and fragile parts inside, plus any wear in the mechanism would cause the stop to remain too high in the slot and jam the gun. There are fixes that can be performed and the easiest is to repair the stud only. It can be built up with a dab of weld and then re-shaped until the stop works properly. It should have a vertical ledge to the front and bottom and a ramp at the rear. Yours is badly worn, so I would start there.
Here is photos from cocking the hammer. Hope you can make out the parts.
1257729579b5e43abdd7319186100482.jpg
2e9800c47ba03dc1c33c22b32656212f.jpg
c690ed1ed5fe4995bae284243d893b8b.jpg
 
Back
Top