Mounting A Scope: HELP

Joined
May 21, 2003
Messages
11,671
Reaction score
17,793
Location
DUNNELLON, FLORIDA USA
1. install scope base
2. install scope rings
3.install scope on rings and level scope----- when tightening the scope rings screws ----WHAT is the method to keeping the scope cross hairs level ??

Thanks,
Jimmy
 
Register to hide this ad
If you don't have a scope level, put it in a gun vise as best to level as possible put a line level on the scope and tighten the rings. I tend to go cheap as possible, or take it to a gun shop, shouldn't run more than $35-50 to mount and boresight.
 
Hi Jimmy.

Assuming you checked to see if your scope mount needed bedding and you properly aligned and lapped the rings (unless not recommended by the ring manufacturer). If you got to this point and are concerned that the act of tightening the screws that secure the upper rings is going to throw your level/alignment off, I wouldn't worry too much about it as long as you start off level and alternate screws in small increments.

So if your rifle is in a rest and is verified by using a level (I like the Kapro 246M-D) on the scope rail, gently set the scope in, place upper rings and when snugging the ring screws, eyeball the gaps between uppers and lowers on each side to be sure they are the same. At this point, the screws should only be tight enough to be barely snug so you can set the eye relief and use a level on the top turret cap. Starting from the inner screws, work gradually from left screw to right screw, left, right, left, right, ring-to-ring using very small increasing torque increments until you get to the recommended torque settings recommended by the manufacturer of your ring system. Use a special-purpose torque wrench like a Wheeler FAT and don't over-torque.

At this point your scope will be properly mounted and will still be adequately lined up with the bore. Getting it this close will be fine.

The 2nd part of this is thinking about mounting a permanent level on your scope and getting this bubble level exactly level with your scope's reticle so that you can get your scope level when taking the shot. Most people don't think about this part of it but if you do any kind of hold-over or elevation adjustment to compensate for range, your scope needs to be level with gravitational earth when sighting in and taking shots.
 
Weaver Type Rings
If you're using Weaver rings with the steel scope attach (why I asked what rings) that "catches" on one side and has screws on the other side you need to look at how much it rotated as you tightened down the screws, then start over with the scope rotated that amount the other direction so as the screws are tightened the scope will rotate and end up aligned. It's kinda a "Kentucky windage" process.
 
Don't know if this pertains to your situation, but I got mine mounted for free at Academy, where I got the scope and rings.
 
>>... you start off level and alternate screws in small increments.


Bingo! Without a scope level, this is the key -- and a great deal of patience helps, too!
 
Common problem with Weaver rings. Easiest solution is to toss the Weaver and buy a set with screws on both sides of the rings.

The cheap solution is what tomcatt51 suggests.
 
Last edited:
I like weaver rings. Never had one fail, not cutting edge, taticool or fancy, but like my 1968 Chevelle , tough as nails, dead nuts reliable , and have never failed me.
Weaver's work, some folks haven't learned the secrete to mounting them....tomcatt51 knows what it's about !
Gary
 
If you're using Weaver rings with the steel scope attach (why I asked what rings) that "catches" on one side and has screws on the other side you need to look at how much it rotated as you tightened down the screws, then start over with the scope rotated that amount the other direction so as the screws are tightened the scope will rotate and end up aligned. It's kinda a "Kentucky windage" process.

Weaver also makes a similar set of rings that has two screws on each side of the ring, these work very well, and will solve the rotation problem with the "one sided" screws rings.
 
It's called "cross torquing". As mentioned above, snug all screws until scope can just be slightly rotated, then tighten down just a couple turns at at time, alternating back and forth from side to side. Scope rings don't need to be tightened gorilla tight, just a little more than good and snug. I believe the correct torque setting with a torque wrench is 19-20 inch lbs.
 
Weaver also makes a similar set of rings that has two screws on each side of the ring, these work very well, and will solve the rotation problem with the "one sided" screws rings.
Yes they do. That's why I asked what type of rings he had and specified which I was referring to in my response. The Weaver "steel strap", screws on one side rings are the ones that move the most while being tightened and "cross tightening", that seems to be the usual knee jerk response, doesn't apply.

Maybe jimmyj will follow up and tell us which style he has.
 
Last edited:
Assuming he has the Weavers with screws on both sides:
For this type, I use 2 screwdrivers/allen wrenches.
One on each side, turning in in synch does the trick to lock the scope in place.
 
I like Leupold Scopes but ALWAYS use BURRIS SIGNATURE RINGS - regardless of brand of scope! The Burris Signature Ring set comes with a set of plastic shims of different sizes that are used to basically get your cross hairs close to the bullseye without touching the cross hair adjustment screws. The final fine adjustment is then done by traditionally adjusting the screws. The purpose of all this is so you do not get distortion from having to crank the adjustments way too far to zero the scope. The added benefit is that the scope can be take off years later and there will NOT be a single mark on it from the steel rings! The soft plastic not only protects the scope tube, but it sort of crushes down for a custom 100% contact fit. I've done this at least a half dozen times on different rifles and it works like a charm. It takes a few minutes longer but IMHO it's worth it. By the way, the scope will NEVER move as these rings really grip the scope!

Burris makes Signature Ring sets for most common mounts and guns. You should look into and consider it. Their rings have been around for many many years and I am still amazed at how many still are unaware! If there are better Rings I have yet to see them.

Signature Rings
 
Last edited:
Jimmy,
also don't forget to zero out the scope prior to mounting! Turn both screws all the way one way. Then turn back the opposite way counting each click. Take the total amount of clicks and divide by two. Then when screw is all the way to opposite end adjust it to exact 1/2 amount of clicks - you are now dead center. Do the same for the other screw and your scope is at least starting from dead zero. There is no guarantee that even if your scope in new in the box it is perfectly zero'd unless the manufacturer specifically states that in the owners manual.

Also check for proper eye relief from the scope. The more powerful the rifle cartridge the more eye relief you will need. Use TWO levels while mounting the scope. One on the flat portion of the scope and the other on a flat on the rifle. Level rifle first, then scope.

Tighten scope mount screws gradually and keep all the screws at the same distance they go in. In other words do each screw the same amount working your way around the scope - a little at a time. Do NOT crank one all the way and then do another - scope will move.

Also follow the scope's instructions about focusing it. Look through it for only a second or two at a time while doing so.

Hope these hints help.
 
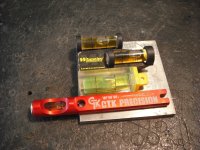
Jimmy, I have several bubble levels that I have purchased for leveling scopes and I don't think any two of them agree. Then you hope the rail,, scope turret ,, scope base , that you are sitting the level on is flat and level and repeatable.

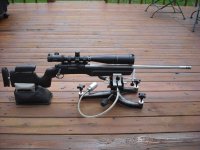
The method I use,, is a piece of orange para cord with a weight hanging on the storage building about 30 or 40 yards away.
Level the rifle with your best / repeatable level. Then line the vertical crosshair of the scope up with the hanging para cord.
Then line the scope anti-cant level with the crosshairs and the para cord. I like the Wheeler ,, but there are several other types and brands.
Wheeler Engineering Anti-Cant Indicator Hinged Matte

I figure gravity still works and knows which way is straight up. :D

( edit: a way to check your work,, on a big target shoot a 3 shot group,, adjust 10 or 15 MOA of vertical into the scope ,, and reshoot,, second group should be straight up ,, if it drifts left or right.. go back to square one.. :D :D )
 

Attachments

  • DSCF0024.jpg
    DSCF0024.jpg
    149.5 KB · Views: 10
  • DSCF0024 2.jpg
    DSCF0024 2.jpg
    123.8 KB · Views: 7
Last edited:
Back
Top