MY LATEST FAN RESTORATION PROJECT - BETTER PICS IN POST #13

Joined
Apr 4, 2006
Messages
19,363
Reaction score
30,336
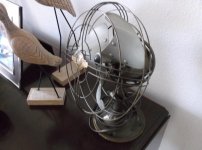
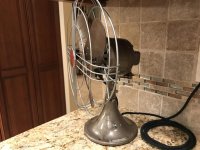
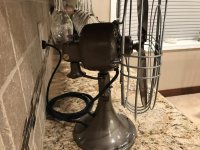
One of my hobbies is buying vintage electric fans and restoring them. They are becoming very hard to find these days - in any sort of descent shape for a reasonable price.

Anyway, I wanted one for my kitchen - even though we have Central Air in the house. There are many times that the temperature outside in not hot and the a/c is off but Mrs. Chief38 is busy cooking away. A fan sure helps out! Plus - I love nostalgic items!! :D

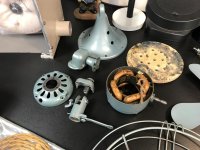
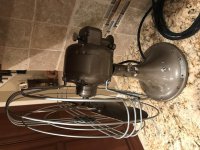
I bought this fan and the original color was turquoise blue blechhh! It was rusted, stained, had a bent grill and the motor ran very sluggishly. I spent one day tearing it apart, cleaning and straightening things out. Another day to paint it - I used Hammered Rustoleum paint (for the first time ever) and I was quite impressed. It gives a great nostalgic hammered look and very closely duplicates items from that era (1938). It also covered completely in only one coat!
i
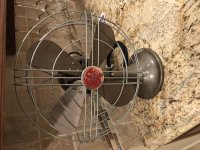
Anyway, the 3rd day I rewired and reassembled it and I am quite pleased! Not bad for 80 years old :). It is now a Hammered Copper which matches my kitchen perfectly and the damned thing works like new!
 

Attachments

  • IMG_1411.jpg
    IMG_1411.jpg
    110.9 KB · Views: 143
  • IMG_1412.jpg
    IMG_1412.jpg
    100.4 KB · Views: 134
  • IMG_1409.jpg
    IMG_1409.jpg
    129.3 KB · Views: 145
  • IMG_1429.jpg
    IMG_1429.jpg
    143.1 KB · Views: 143
  • IMG_1430.jpg
    IMG_1430.jpg
    130.3 KB · Views: 132
Last edited:
Register to hide this ad
You got yourself a very interesting hobby.

But me. I liked the third picture the best.


I apologize.:p
 
Nice! What does rewiring it entail? Does it mean to replace the old electrical wires or does it mean something more complicated than that?
 
Nice! What does rewiring it entail? Does it mean to replace the old electrical wires or does it mean something more complicated than that?

I belive it means rewiring the electric engine.
 
Nice! What does rewiring it entail? Does it mean to replace the old electrical wires or does it mean something more complicated than that?

Almost every single fan that is 70 - 80 years old has the cloth covered wire and it is almost always "petrified" or dried out to the point that it crumbles when touched. The power cord is very easy to replace as it originates in the fan base - piece of cake. The Head Wire is a bit more challenging and entails removal of the fan motor itself from the casing. That is sometimes a challenge as even after all screws are removed, the motor is difficult to get out. Obviously the age, heat cycles and shellac they used adds to the difficulty in removing it. The wire for the Head originates in the Winding and must be VERY CAREFULLY replaced. If you screw this part up you then have an expensive paper weight!

In this particular fan, I was able to actually strip the cloth insulation off the wire next to the winding (very gingerly), dip it in some No-corrode soldering flux and solder a new -old stock cloth covered wire to it. Then I shrink-tube insulated it and the rest of the job was easy. In this fan the winding itself and armature were both in great shape and only required degreasing and cleaning. They were in such great shape that the little thin strings that holds the insulation on the motor was still perfectly intact and the shellac was not cracked.

I buy authentic NOS wire, plugs, spacers, and switches - all authentic period correct parts - but getting them is a bit harder and more expensive now. The only new parts I install are rubber grommets (all old ones are usually too dry) and obviously new grease for the gear pots (I use Mobil 1 synthetic wheel bearing grease). The Bronze Bearings get soaked in Synthetic Birchwood Casey Gun Oil for a week so the oil impregnates them (hopefully) :).

Sometimes I replace the felt oil wicks and sometimes all I do is scrape the hardened coating of dried oil and grease off of them to rejuvenate them. This one only required a light scraping and re-oiling. I always try and keep them as original as possible and if I can avoid repainting them I do. this particular fan was NOT a color I liked but I got it for a really cheap price and couldn't resist! Not only that - but the red GE badge matches the red GE badges on all my kitchen appliances and really gives a cool look!

I guess I rambled on a bit too long here, but I really get into this stuff :)
 
I have never done anything to ours. It runs great and is quiet.

Am I supposed to oil/grease it? If so where??

I believe Dad replaced the power cord, will have to check it out closely. I know he put some felt pad on the bottom
 
I have never done anything to ours. It runs great and is quiet.

Am I supposed to oil/grease it? If so where??

I believe Dad replaced the power cord, will have to check it out closely. I know he put some felt pad on the bottom

Most of the GE vintage fans have an oil hole on top just behind the blades. A few drops of oil - 3 in 1, light machine oil, or Hoppes gun oil will do just fine. I use Birchwood casey Synthetic Gun Oil, but anything not too heavy is OK.

Some of the GE's have a small brass or nickeled brass oil reservoir under the fan blades that contain a cotton wick. You simply unscrew it, fill the reservoir with the oil and the wick will transfer the oil to the shaft. A fan that is old must have the wick replaced as they get clogged up and no longer serve the purpose. They are available on ebay and are really cheap. Just measure your old one as they do come in different diameters.

The grease in the gear pots SHOULD really be changed as the grease they originally put in is almost always caked up and no longer does it's job. Simply remove the two screws on top of the gear case and unscrew the thumb screw that locks up the oscillation control. After that, carefully remove all the caked up grease with a screwdriver, gun patches, or what ever. After you get all the old grease out and removed from the gear teeth, then use Mobil One Wheel Bearing Grease to replace it. Do NOT use axle or chassis grease. Only fill up to just enough to cover the gears - don't over fill because the grease heats up and expands. If you over fill the excess will find its way out. The new grease should last 30 + years :)

Replacing the power cord is very easy. The base is riveted on (3 rivets usually under the felt) and can be removed by straightening out the rivets and removing them. The cardboard base comes right off. If careful you can re-use the rivets.

If you run into trouble PM me and I'll be glad to assist. :)
 
I've got a bunch of antique fans ( nine I believe ) and I run them extensively! I am not kidding - they run for hundreds and hundreds of hours a year. We use them 24/7 in the summer months to aid the cool air the central a/c is pumping out. I have NEVER had one fail - NEVER! They just don't make them like this anymore!

These should be better pic's:
 

Attachments

  • IMG_1436.jpg
    IMG_1436.jpg
    134.5 KB · Views: 45
  • IMG_1437.jpg
    IMG_1437.jpg
    111.1 KB · Views: 39
  • IMG_1438.jpg
    IMG_1438.jpg
    119 KB · Views: 40
Last edited:
Just a side note to this thread. This was the first time I have used the Hammer-tone Rustoleum paint and I was blown away by it. It is the only spray paint I have ever used that actually covers in one coat and looks great. The can says two coats might be necessary but I found one descent coat is all you need. There is a small learning curve because to achieve the Hammered look, you need to spray it on a bit heavier than you would normal spray paint. However, it is not runny like regular Rustoleum is and so it's not that hard to use. Because it is thicker and sort of a two tone paint with texture it also hides a lot of sin if what you are painting has rust pitting. This project didn't but I did experiment with it before spraying the fan.

I believe it comes in about a dozen or so colors and is under $7 bucks at H-D. Obviously one would have to have an appropriate project for this type of paint but it does really work well and I did want to mention it here. The only downside I find with any Rustoleum spray paint is that it takes a while to properly dry. The can says 24 hours but 48-72 will assure that it is hard.
 
Ahhhh, looks like a GE Vortalex from the 1940's. Looks to be in great shape too. :)

You Sir, are right on the money.:)

It is a Vortalex FM9V1

Just looked it up and per this article is 1942-1945

Thanks for the info, I have always liked this fan.

Good something to take apart!:)
I also have a classic GE Kitchen Clock from the same time period. Will have to find that:eek: My folks had friends that worked for GE upstate NY, also Kodak and Corning. We used to go up there to see them and took tours of the plants.
They all made good stuff back then.

DT Vintage Fans
 
IMHO these fans built in the 1930's through the 1940's are about the best products GE ever made! It's extremely rare to find one (not abused of course) that does not work. Most common is to find a dilapidated power cord, a bent blade cage, or paint splattered all over the fan. Almost every one I've ever seen is in desperate need of lubrication, cleaning and grease replacement. It was quite common for kids to place pencils inside the spinning blades which sometimes unbalances them or dents them - but they can be re-balance of course. You can see that in the late 40's into the 1950's GE started cheapening their fans and they were no longer cast. They started making them out of sheet metal and one piece formed blades and so began their downward slide on quality. What else is new?

Today's plastic Chinese fans are utter garbage! Even in the world of Central A/C, these fans still have their place and actually help cut down on the a/c usage by efficiently circulating the cool and dry air and creating a breeze.
 
Last edited:
Back
Top