alienbogey
Member
- Joined
- Dec 21, 2010
- Messages
- 24
- Reaction score
- 1
I've read tons of threads and posts and have finally gathered the materials for my project. Picture:

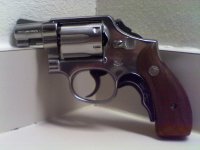
The revolver is a stainless Model 64-2, recently liberated from the California Department of Corrections, thus the CDC serno on the left side, and bought from a GunsAmerica seller. I'm an experienced shooter, but my gunsmithing has thus far been limiting to cleaning, swapping grips, and one trigger kit in a Ruger Mark II. My plans for the 64 are to give it a thorough, every-nook-and-cranny cleaning, replace the springs with a Brownell's kit, do some judicious internal polishing, then do my best to make the stainless look like chrome.
I have the Jerry Miculek Trigger Job DVD, Gun Scrubber, the spring kit, Mother's polish, a new Lyman digital trigger pull gauge, clean rags, etc. The before pictures:


As you can see it's a clean little revolver, but the stainless is scratched from use and there are some dings to be blended in, the worst is at 6:00 on the left side trigger guard. The screws aren't badly buggered, but I may look for new depending on how things turn out. Probably the last thing will be grips. I'm toying with the idea of making my own, but I've been having fun surfing for a store-bought set.
My intention is to periodically update this thread with progress updates. It will take me a while, though, months at least.
On Edit: I almost forgot, the 'before' average of 10 trigger pulls DA was 11lb 4 oz; the average of 10 pulls SA was 4lb 5 oz.
The revolver is a stainless Model 64-2, recently liberated from the California Department of Corrections, thus the CDC serno on the left side, and bought from a GunsAmerica seller. I'm an experienced shooter, but my gunsmithing has thus far been limiting to cleaning, swapping grips, and one trigger kit in a Ruger Mark II. My plans for the 64 are to give it a thorough, every-nook-and-cranny cleaning, replace the springs with a Brownell's kit, do some judicious internal polishing, then do my best to make the stainless look like chrome.
I have the Jerry Miculek Trigger Job DVD, Gun Scrubber, the spring kit, Mother's polish, a new Lyman digital trigger pull gauge, clean rags, etc. The before pictures:
As you can see it's a clean little revolver, but the stainless is scratched from use and there are some dings to be blended in, the worst is at 6:00 on the left side trigger guard. The screws aren't badly buggered, but I may look for new depending on how things turn out. Probably the last thing will be grips. I'm toying with the idea of making my own, but I've been having fun surfing for a store-bought set.
My intention is to periodically update this thread with progress updates. It will take me a while, though, months at least.
On Edit: I almost forgot, the 'before' average of 10 trigger pulls DA was 11lb 4 oz; the average of 10 pulls SA was 4lb 5 oz.
Last edited:
")


 That would be like cutting the nose off a statue
  , no disfiguring guns like that for me.
  (JMO)
(JMO)