Alright, I know how the sear on an auto functions, but what am I suppose to know about the hammer mounted sear on a revolver? I recently replaced a hammer and swapped the sears, but during the function test the hammer failed to strike/move. After I reversed the change it functions the way it should, and yes this is a used hammer. Is there a measurement to follow or an engagement angle to look for??
You are using an out of date browser. It may not display this or other websites correctly.
You should upgrade or use an alternative browser.
You should upgrade or use an alternative browser.
Revolver sear?
- Thread starter srgvaz
- Start date
Register to hide this ad
scooter123
Member
Actually there are two sears on a dougle action revolver. The DA sear has a block shaped flipper that is acted on by the top surface of the DA sear surface on the trigger. It's a bit hard to describe and I don't have any phtos available but a bit of googling will net you some pictures of the S&W lockwork.
Following is a link to a flash player that illustrates the way the lockwork functions. Take a look at it and see if this answers your questions. If not, spend some time with Google.
http://www.rattlesnakeridge.org/flash/SW357Mag1.swf
Following is a link to a flash player that illustrates the way the lockwork functions. Take a look at it and see if this answers your questions. If not, spend some time with Google.
http://www.rattlesnakeridge.org/flash/SW357Mag1.swf
Bullseye Smith
Member
Actually there are two sears on a dougle action revolver. The DA sear has a block shaped flipper that is acted on by the top surface of the DA sear surface on the trigger. It's a bit hard to describe and I don't have any phtos available but a bit of googling will net you some pictures of the S&W lockwork.
Following is a link to a flash player that illustrates the way the lockwork functions. Take a look at it and see if this answers your questions. If not, spend some time with Google.
http://www.rattlesnakeridge.org/flash/SW357Mag1.swf
Thanks, I have been looking for that. John
.... I actually have that video I'm looking for more info for the hammer mounted sear. It's easy to see how it all works, and what actually prompted me to do any of this was the uneven "scratches" on the sides of the hammer and trigger. I've compared the sear angles/surfaces and engagement to other revolvers but would anybody here have any technical data for the correct fit in the sear -to- sear area?
bountyhunter
Member
- Joined
- Jan 8, 2002
- Messages
- 1,862
- Reaction score
- 464
The Kuhnhausen S+W Revolver Shop manual has a good explanation of how the DA sear has to be fitted and what it affects..... I actually have that video I'm looking for more info for the hammer mounted sear. It's easy to see how it all works, and what actually prompted me to do any of this was the uneven "scratches" on the sides of the hammer and trigger. I've compared the sear angles/surfaces and engagement to other revolvers but would anybody here have any technical data for the correct fit in the sear -to- sear area?
scooter123
Member
Keep in mind that in most cases Sear surfaces are surface hardened. Depending on the process, this hardened layer can range from only 0.003-0.005 inch to as much as 0.030 inch innn thickness. So, it's not a good idea to do any re-shaping of these surfaces even if it seems like a good idea at the time. Break through that hardened layer and the wear on those surfaces will be at a rate 3 to 20 times faster than on a hardened part.
Bottomline, all you should do on any sear surface is smooth it up and to do only as much smoothing as is needed for a noticable improvement. Trying to get a mirror finish won't result in a better "feel" that can actually be felt and a fully polished surface does a very poor job of retaining lubricants. The simple truth is that a properly stoned surface will feel every bit as good as a full polish and last longer because it will act to retain lubricants in the scratches.
BTW, the key to properly stoning a sear is to stone in the direction of travel across the surface. This way the sears won't "catch" in that valleys and ridges of the scratch marks, it will just glide along those lubircant bearing scratches.
The Kuhnhausen S+W Revolver Shop manual has a good explanation of how the DA sear has to be fitted and what it affects.
Does anyone here have a pdf. version of the book?
")
SW CQB 45
Member
Serg.....
Pm me ur address and I will send u my kuhn manual.....make u some copies and mail it back to me.
Pm me ur address and I will send u my kuhn manual.....make u some copies and mail it back to me.
SW CQB 45
Member
Serg.....
Pm me ur address and I will send u my kuhn manual.....make u some copies or scan and mail it back to me.
Pm me ur address and I will send u my kuhn manual.....make u some copies or scan and mail it back to me.
You should have a universal block the Brownels sells. Don't pay to buy if you only do one gun but it sounds to me you've done this before. Sometimes used parts just will not line up especially if done by hand. The less you cut the better and absolutely maintain angles. I've had this happen before and have changed hammers to cure it, then tune.
I have never seen a specific angle cited. When other aspects of mating parts are involved there is likely no certain angle. Hammers and triggers fit on frame mounted pins which are likely not exact from gun to gun but well within spec to bring H & T into spec to operate properly with proper fitting. I always swap the original sear to the new hammer to see how it fits to the trigger. You commented that you did that and said it didn't work. Now, you are faced with altering that sear to the trigger or firing a new sear to the trigger. I would fit a new sear.
I have never seen a specific angle cited. When other aspects of mating parts are involved there is likely no certain angle. Hammers and triggers fit on frame mounted pins which are likely not exact from gun to gun but well within spec to bring H & T into spec to operate properly with proper fitting. I always swap the original sear to the new hammer to see how it fits to the trigger. You commented that you did that and said it didn't work. Now, you are faced with altering that sear to the trigger or firing a new sear to the trigger. I would fit a new sear.
Thanks, but it was someone else who wrote that, years ago.
I have three old sears, plus a new one that I intend to fit. The old ones are different enough from each-other that I don't really trust any of them as a reference -- one of them seems to have TWO angles, with an apex in the middle (this is the one that came on my hammer.)
Another is ground at an angle sideways
 . The last is a bit too short.
Anyway, I appreciate what you wrote about not having seen a published angle. I will try the angle already on the new sear. It looks close to the others. Maybe that's the reference?
We'll see how it goes. Thanks!
The angle filed at is roughly diagonal to the 90 degree angle on the DA action sear where it interacts with the trigger hook, and ideally perfectly even material removal across the edge or it negatively affects trigger pull.Thanks, but it was someone else who wrote that, years ago.
I have three old sears, plus a new one that I intend to fit. The old ones are different enough from each-other that I don't really trust any of them as a reference -- one of them seems to have TWO angles, with an apex in the middle (this is the one that came on my hammer.)
Another is ground at an angle sideways
Anyway, I appreciate what you wrote about not having seen a published angle. I will try the angle already on the new sear. It looks close to the others. Maybe that's the reference?
We'll see how it goes. Thanks!
Clearance is the measurement that actually matters here: too little material removed from the DA sear and the trigger hook won't initiate lift of the hammer; too much clearance and the hammer will drop too early on trigger pull.
Consult Khunhausen or let a trained revolversmith do the job.
- Joined
- Aug 21, 2005
- Messages
- 7,994
- Reaction score
- 7,045
The sear on a DA S&W is not something that can be successfully fitted by a "kitchen table gunsmith" (pardon the expression), but I am trying to get my point across that this is not a job for an amateur gunsmith. Sorry, but I prefer one less ruined S&W as opposed to one more ruined S&W. Find a good gunsmith who knows the S&W action in and out, and who has the right tools and the know-how for the job. You will be glad you did.
The sear on a DA S&W is not something that can be successfully fitted by a "kitchen table gunsmith" (pardon the expression), but I am trying to get my point across that this is not a job for an amateur gunsmith. Sorry, but I prefer one less ruined S&W as opposed to one more ruined S&W. Find a good gunsmith who knows the S&W action in and out, and who has the right tools and the know-how for the job. You will be glad you did.
Is the angle some sort of secret? There is only the length, and the angle.
I can figure the length (or work up to it.) I was just asking about the angle.
For the record, I do most of my work on my coffee table.
I'm a coffee table gunsmith.
Last edited:
stu1ritter
US Veteran
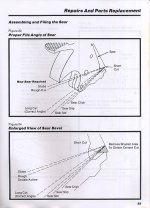
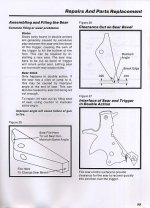
Here are the two pages from the S&W Armorers manual about adjusting the double action sear.
Stu


Oh, thank you, stu1ritter! That's just the thing! Thanks very much!
And just a couple of hours later, the new one is in, and I dare say it's about perfect.
This all started when the hammer nose on my M65 broke a month or so ago -- the top tang above the spring snapped off, and the spring left the gun with it. At the time, I was having a hard time finding a replacement, and so I just bought a replacement hammer from Numrich.
I tried it with the sear that came on it, but the DA pull was truly lousy, so I swapped in the one from my own hammer with the broken nose. That brought the DA pull back to "good," so I took the sear back out so I could examine them.
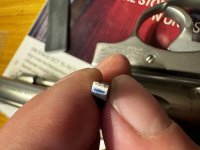
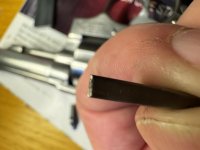
This is the one that came in the Numrich hammer

It's the one I described above as having two angles with an apex in the middle. You can see the remnants of Sharpie ink from when I was testing it. With this sear in place, I would liken the feel to an old car radio volume knob, with a detent for "off." The trigger would start out hard, and then sort of pop as it broke loose.
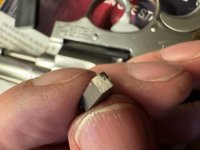
This is the one that came in my M65

It's the one I described as being ground at an angle. It the photo above, you can see where it was only getting engagement on one side, and most of that was at the very edge.
Here it is looking more or less straight-on, across the top of the bearing surface

Even the chamfer is cockeyed. One thing I noticed as I was playing around with it is that though the DA stroke was smooth, it would cant the hammer to the left on the DA stroke, which makes sense since it was making contact only at the right. I decided to get a new one and fit it on my coffee table. I won't reveal my methods, but my cut is very square and true.
I opened the diagrams in the images stu1ritter provided in a graphics package and estimated the angle of the cut at about 102 degrees from the front face of the sear that the trigger rides over on its way back down, or about -12 degrees from perpendicular to to that face. I checked the new sear as well as the one cut at an angle and the other I have that is too short (not pictured) with a protractor and they looked to be about -12 degrees as well.
So I set up my square and sleds, and after several trials to sneak up on the correct length, I am left with a very smooth DA trigger with minimal pre-travel, and it no longer cants to the left on the DA stroke.
My sincere thanks to stu1ritter and everyone else who replied!
This all started when the hammer nose on my M65 broke a month or so ago -- the top tang above the spring snapped off, and the spring left the gun with it. At the time, I was having a hard time finding a replacement, and so I just bought a replacement hammer from Numrich.
I tried it with the sear that came on it, but the DA pull was truly lousy, so I swapped in the one from my own hammer with the broken nose. That brought the DA pull back to "good," so I took the sear back out so I could examine them.
This is the one that came in the Numrich hammer
It's the one I described above as having two angles with an apex in the middle. You can see the remnants of Sharpie ink from when I was testing it. With this sear in place, I would liken the feel to an old car radio volume knob, with a detent for "off." The trigger would start out hard, and then sort of pop as it broke loose.
This is the one that came in my M65
It's the one I described as being ground at an angle. It the photo above, you can see where it was only getting engagement on one side, and most of that was at the very edge.
Here it is looking more or less straight-on, across the top of the bearing surface
Even the chamfer is cockeyed. One thing I noticed as I was playing around with it is that though the DA stroke was smooth, it would cant the hammer to the left on the DA stroke, which makes sense since it was making contact only at the right. I decided to get a new one and fit it on my coffee table. I won't reveal my methods, but my cut is very square and true.
I opened the diagrams in the images stu1ritter provided in a graphics package and estimated the angle of the cut at about 102 degrees from the front face of the sear that the trigger rides over on its way back down, or about -12 degrees from perpendicular to to that face. I checked the new sear as well as the one cut at an angle and the other I have that is too short (not pictured) with a protractor and they looked to be about -12 degrees as well.
So I set up my square and sleds, and after several trials to sneak up on the correct length, I am left with a very smooth DA trigger with minimal pre-travel, and it no longer cants to the left on the DA stroke.
My sincere thanks to stu1ritter and everyone else who replied!
Attachments
Last edited:
- Joined
- Aug 21, 2005
- Messages
- 7,994
- Reaction score
- 7,045
And just a couple of hours later, the new one is in, and I dare say it's about perfect.
This all started when the hammer nose on my M65 broke a month or so ago -- the top tang above the spring snapped off, and the spring left the gun with it. At the time, I was having a hard time finding a replacement, and so I just bought a replacement hammer from Numrich.
I tried it with the sear that came on it, but the DA pull was truly lousy, so I swapped in the one from my own hammer with the broken nose. That brought the DA pull back to "good," so I took the sear back out so I could examine them.
This is the one that came in the Numrich hammer
It's the one I described above as having two angles with an apex in the middle. You can see the remnants of Sharpie ink from when I was testing it. With this sear in place, I would liken the feel to an old car radio volume knob, with a detent for "off." The trigger would start out hard, and then sort of pop as it broke loose.
This is the one that came in my M65
It's the one I described as being ground at an angle. It the photo above, you can see where it was only getting engagement on one side, and most of that was at the very edge.
Here it is looking more or less straight-on, across the top of the bearing surface
Even the chamfer is cockeyed. One thing I noticed as I was playing around with it is that though the DA stroke was smooth, it would cant the hammer to the left on the DA stroke, which makes sense since it was making contact only at the right. I decided to get a new one and fit it on my coffee table. I won't reveal my methods, but my cut is very square and true.
I opened the diagrams in the images stu1ritter provided in a graphics package and estimated the angle of the cut at about 102 degrees from the front face of the sear that the trigger rides over on its way back down, or about -12 degrees from perpendicular to to that face. I checked the new sear as well as the one cut at an angle and the other I have that is too short (not pictured) with a protractor and they looked to be about -12 degrees as well.
So I set up my square and sleds, and after several trials to sneak up on the correct length, I am left with a very smooth DA trigger with minimal pre-travel, and it no longer cants to the left on the DA stroke.
My sincere thanks to stu1ritter and everyone else who replied!
Looks like you did a great job, and from what I can tell, you might have fitted it better than the factory, if what I hear lately is true! Congratulations!
Similar threads
- Replies
- 8
- Views
- 467