snowman.45
Member
I was lucky in that my department let us purchase our old issued revolvers when we made the change to semi-autos years ago. At that time, I bought my 66 4", and it has resided in a drawer as my wife's home protection gun for many years. A year or two before I retired, I was checking the department armory and found that there were still a number of 19's left. Now, as you can imagine, all of the really good ones were gone, so what was left needed a little attention. Some were just cosmetically challenged. Others also had mechanical problems ranging from a broken or missing rear sight to timing issues.
I checked to see that we could still buy these revolvers, as the armorers told me they needed the space for more autos and patrol rifles. I was told I could buy as many as I wanted at the same, used price as the ones previously sold. I bought three: one 4" and two 6" models. After the registration requirements were met, I took them home and started to work. New hands and sights were ordered for a couple of them.
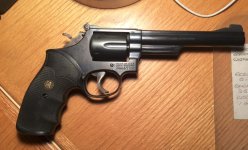
When I closely examined them, I got to thinking how much of a shame it was that these old revolvers looked so bad. I toyed with the idea of sending them to S&W for a factory blue job, but decided to tackle it myself using niter-bluing formulas I found on the net. I'm almost done, needing only to do a little more polishing and applying a paste wax job. Here are photos of them.
I checked to see that we could still buy these revolvers, as the armorers told me they needed the space for more autos and patrol rifles. I was told I could buy as many as I wanted at the same, used price as the ones previously sold. I bought three: one 4" and two 6" models. After the registration requirements were met, I took them home and started to work. New hands and sights were ordered for a couple of them.
When I closely examined them, I got to thinking how much of a shame it was that these old revolvers looked so bad. I toyed with the idea of sending them to S&W for a factory blue job, but decided to tackle it myself using niter-bluing formulas I found on the net. I'm almost done, needing only to do a little more polishing and applying a paste wax job. Here are photos of them.