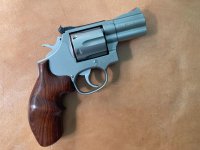
Stainless bead blasted restoration

stoneke

Member
Joined
Aug 16, 2006
Messages
183
Reaction score
327
Location
Klamath Falls, OR
I had to repair an area on my 65-5 Ladysmith that had required some file work to address. Thus, I had compromised the original flat bead blasted finish. I used a variety of grit sandpaper and fine grade emery cloth placed over the filed bright area and lightly hammered the area with a small hammer that had the edges rounded. I finished the hammer process with 400 grit wet/dry paper and was surprised at the results. Has anyone else had experience(s) to share?
 
Register to hide this ad
Yes, that's an old technique of blending in a bead blasted area.

Short of actual bead blasting this is the only way to cover and blend in a light scratch or mar.
The idea is to position the sand cloth over the area and tap with a plastic or steel hammer, then lift the cloth and reposition it without dragging it and leaving sanding marks.
 
Last edited:
Yes - Stainless is quite forgiving! If you have the patience and time, a bead blasted gun can be made to look almost like it never happened - except to the guy who actually did it.

I've refinished and helped friends refinish bead blasted and satin brushed stainless S&W Revolvers a bunch of times. The results are great! In fact I have even made new guns look better than they did when they left the factory.
 
I used the emery cloth and plastic hammer method to repair some scratches on the top strap and barrel of a recently acquired M/66 no dash. The scratches blended in nicely and the areas looked much better.
 
I love the look of the bead blasted guns and my gunsmith buddy has dome most of mine to give them the look and function of the factory “Combat revolver Package”. The latest example is below. Interesting technique described for repair Stone thank you.
 

Attachments

  • IMG_7448.jpg
    IMG_7448.jpg
    64.4 KB · Views: 42

Latest posts

Back
Top