|
|
 |
|

05-03-2020, 10:58 AM
|
 |
Member
|


|
|
Join Date: Sep 2018
Location: Pompano Beach, FL
Posts: 576
Likes: 1,136
Liked 2,155 Times in 380 Posts
|
|
 SSV Frankengun Project
Hi guys,
This is the first project that I post. I have done a couple others, but this is the first one where I wanted to do all the work. My skills are basic and compared to others in this forum Im a novice, so please be patient. I will try to highlight the many mistakes I made in my process, so others can learn from them (without having to go through them).
I would like start by thanking all the forum members that helped me with all my questions, in special Bill (BMCM) who has answered many question and provided with invaluable insight.
Ive been always intrigued by the SSV (short slide variants). Having a M6906 and a M5906 TSW, I wanted something that was in the middle and with a steel frame. Something like a 5967 but more affordable and that would feel ok to shoot a lot and carry around. Now that I have been at home for 40+ days (my business is closed) I have time to finish the project...
There are several threads of SSV frankenguns in this forum, but the project that I used an inspiration was this:
The 4566TSWSSV project
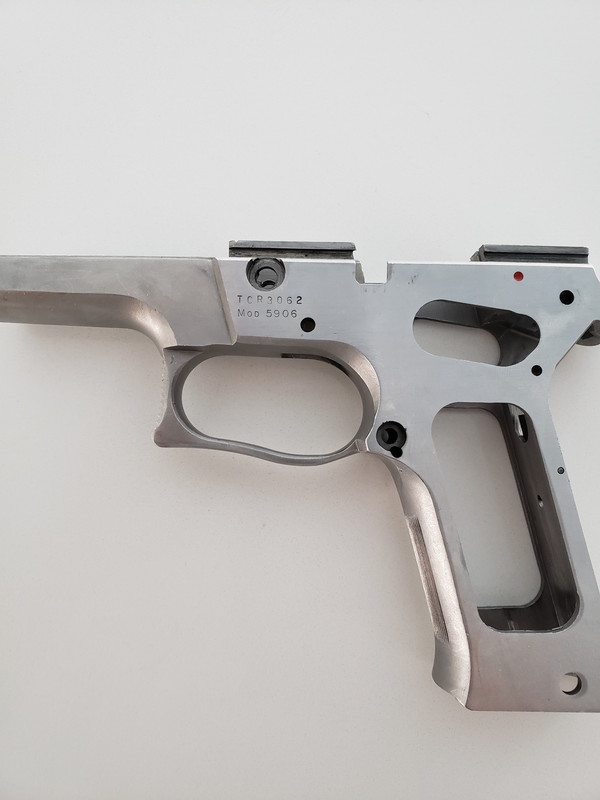
So, I started to look for a frame and found one in the big auction site. After shipping and transfer the total was $152. This was in Sep 2019. Here are some pics of the frame I got:


more to come...
Last edited by guzzitaco; 05-10-2020 at 06:21 PM.
|
|
The Following 11 Users Like Post:
|
1775usmarine, 18DAI, 4T5GUY, BMCM, GerSan69, Injunbro, JohnHL, nocents, Skeptic 9c, squidsix, TercGen |
05-03-2020, 11:02 AM
|
|
Member
|


|
|
Join Date: Jan 2006
Location: Southern Maine
Posts: 3,528
Likes: 1,902
Liked 5,630 Times in 1,544 Posts
|
|
I love a good FrankenSmith! Cannot wait!
|
|
The Following 3 Users Like Post:
|
|
05-03-2020, 02:31 PM
|
|
Member
|
|
|
Join Date: Sep 2018
Location: Pompano Beach, FL
Posts: 576
Likes: 1,136
Liked 2,155 Times in 380 Posts
|
|
Frame mods
Frame mods:
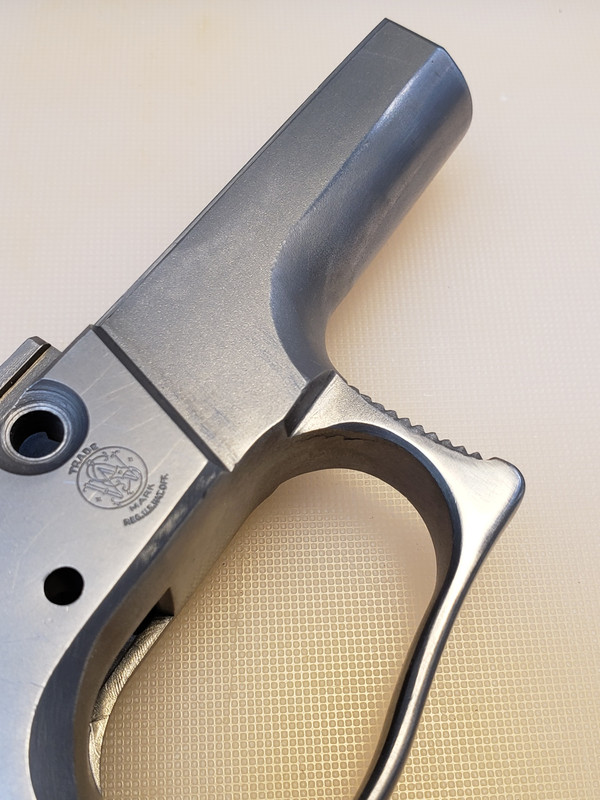
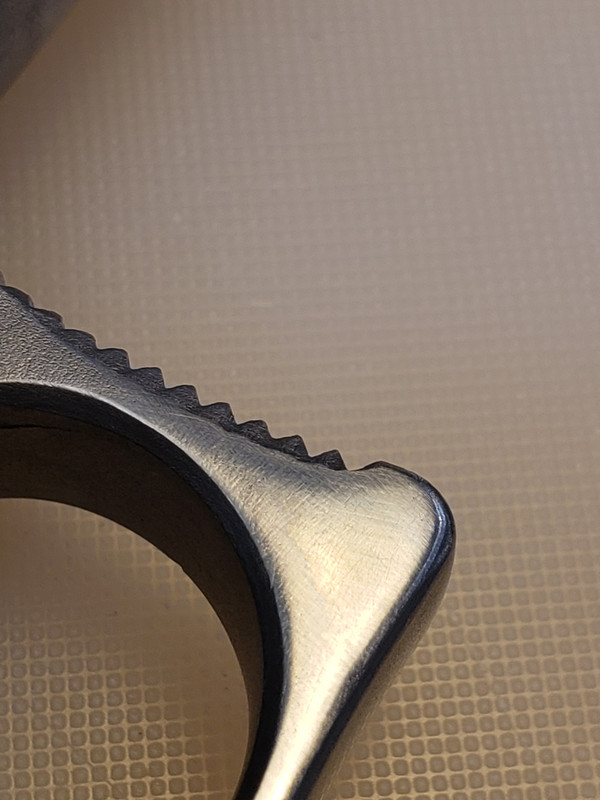
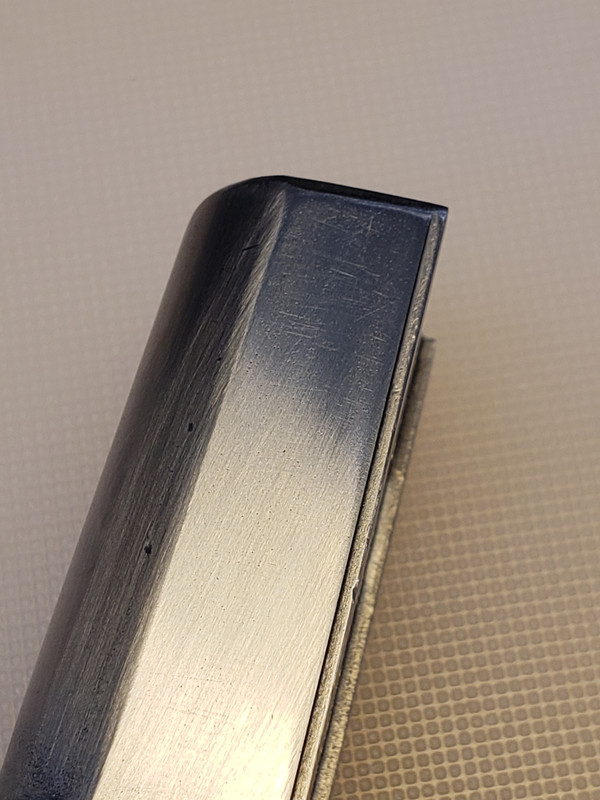
I suspect the frame was a police trade-in. It had a lot of dings and scratches all over. The first thing I did was to carefully start addressing the major dings, to prepare the project for the bead blasting
I also did some small mods to the frame. I shortened and recounted the beavertail to resemble the one of my M6906. I did this because it fits my hand better and since I would be using a bobbed hammer it made sense. I carefully removed material using files and took my time. I am sorry I didnt document this better with pics, but I had an issue with my phone and all my backup was lost.
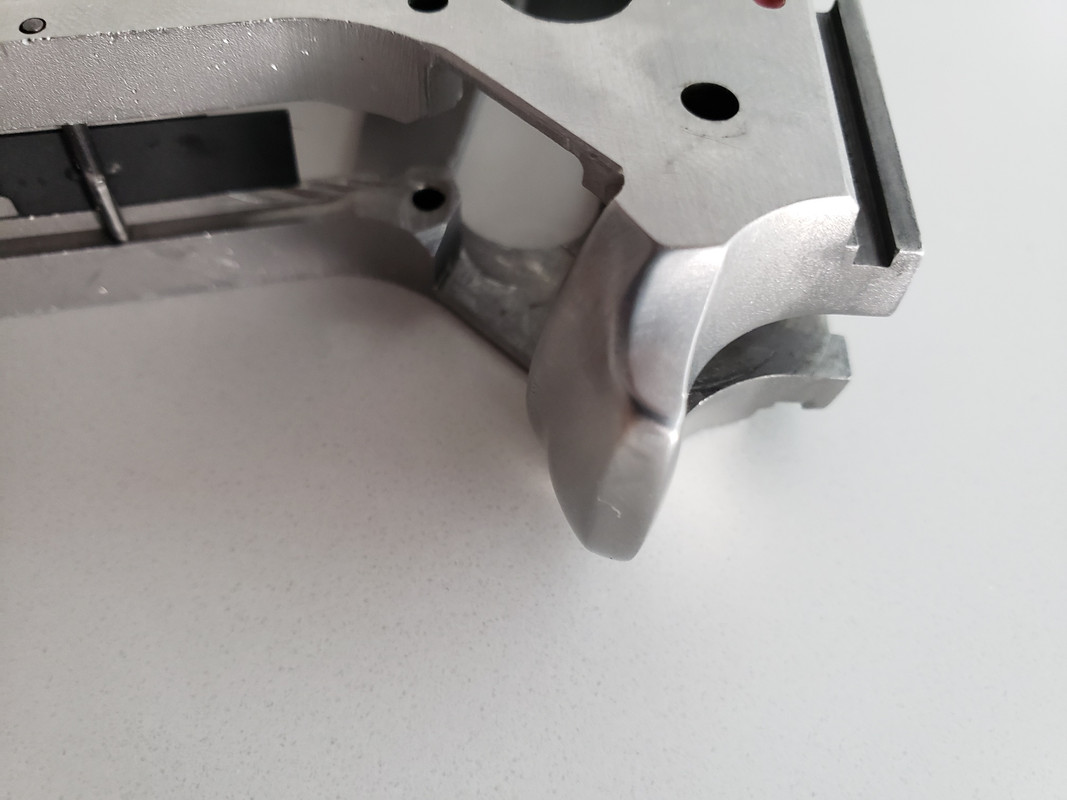
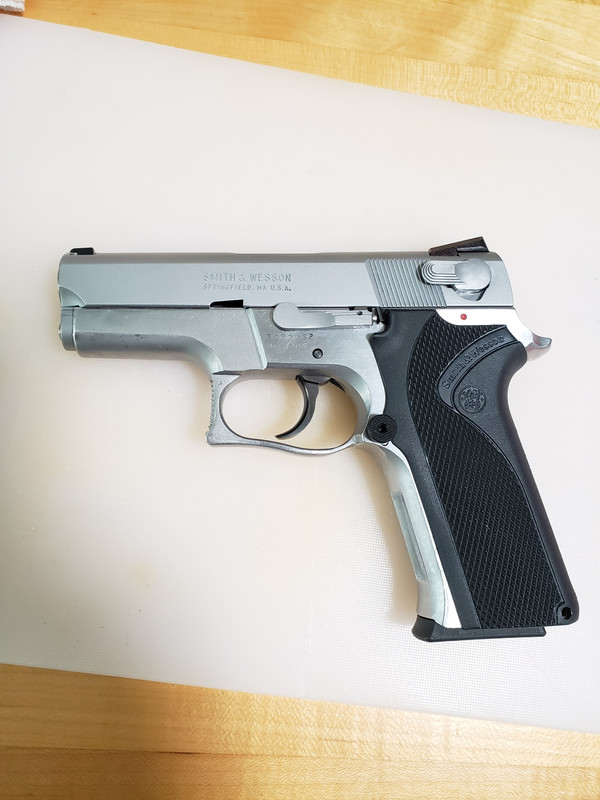
(pic with the slide of my M6906)
I also melted some sharp edges around the trigger guard area and did some discrete beveling to the front of the dust frame.
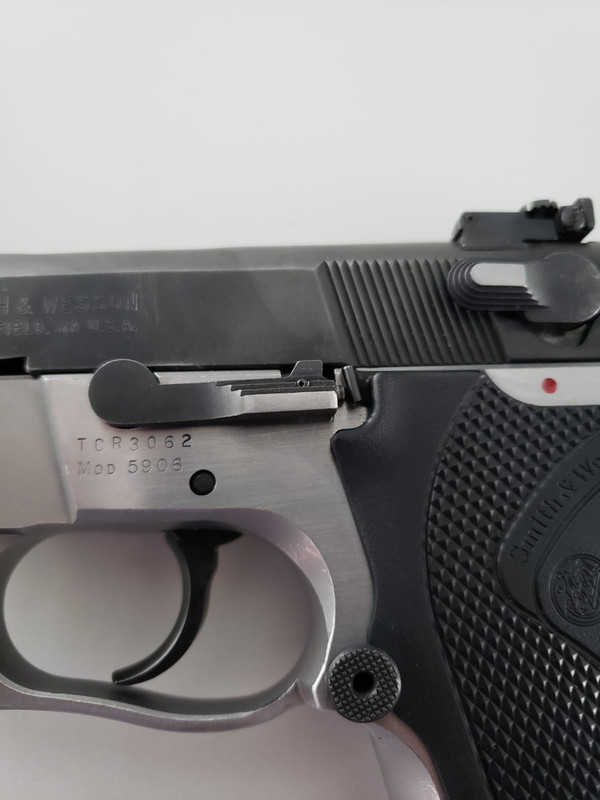
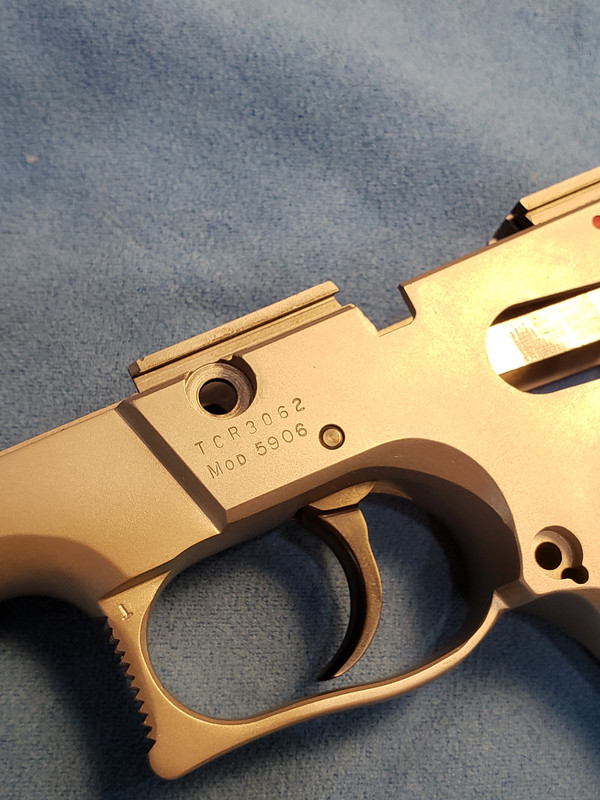
I tried to square the frame by carefully sanding the sides using the flat surface of a granite block, here I made a HUGE mistake. By obsessing with having a perfectly squared frame, I removed to much material and started to erase the serial number
. luckily I caught it on time and the damage was minimal.
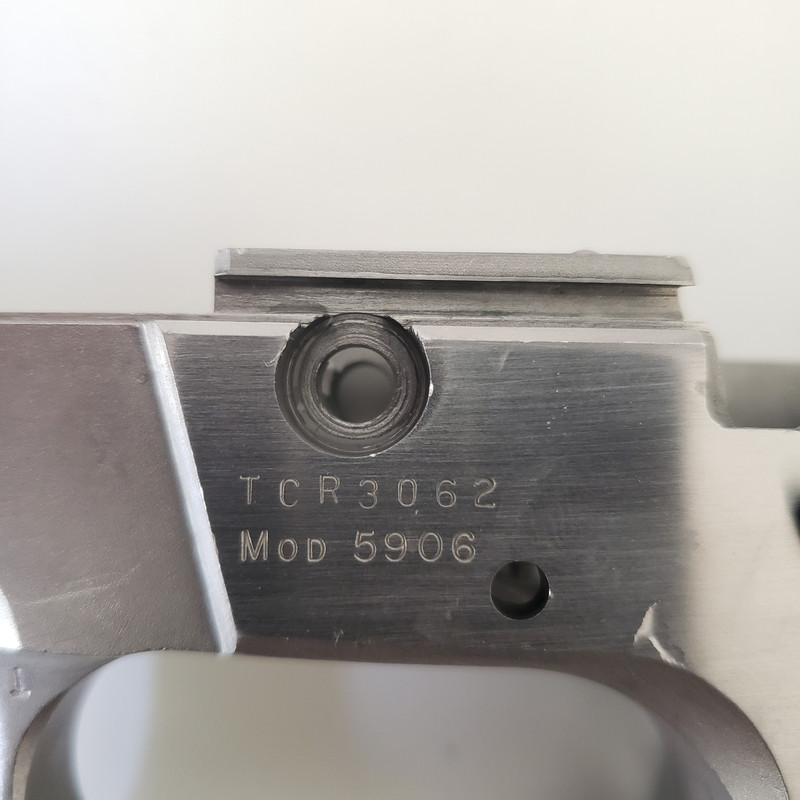
(pay attention to the lower part of the C, R, 0 and 2)
more to come...

|
|
The Following 7 Users Like Post:
|
|
05-04-2020, 05:33 PM
|
|
Member
|
|
|
Join Date: Sep 2018
Location: Pompano Beach, FL
Posts: 576
Likes: 1,136
Liked 2,155 Times in 380 Posts
|
|
Slide and parts kit
|
|
The Following 13 Users Like Post:
|
1775usmarine, 18DAI, BMCM, GaryS, GerSan69, JohnHL, nocents, Ohsheepdog, Old_Cop, Palmetto Sharpshooter, Skeptic 9c, squidsix, whitestang |
05-05-2020, 07:34 PM
|
|
Member
|
|
|
Join Date: Sep 2018
Location: Pompano Beach, FL
Posts: 576
Likes: 1,136
Liked 2,155 Times in 380 Posts
|
|
plastic guide rod
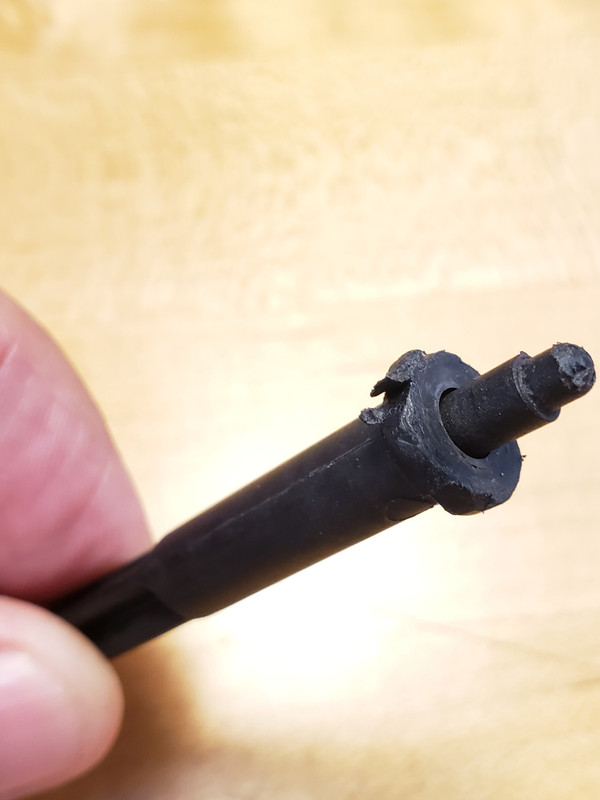
The guide rod that came with the kit was plastic, and was in poor condition.
I started a thread asking for help to find it: Looking for a 6906 guide rod
Many members of you helped with ideas and options. Jsbethel located a supplier on ebay that had some M5906 guide rods at a good price. it was longer, so it needed to be cut and refinished.

BMCM explained how to properly cut it.
I marked it with a sharpie and cut it with a dremel about 1/8" longer. Then I finished the bevel using a drill press and a file to give the bevel to the point. Polished with 800 and 1000 sandpaper.
moe to come...
Last edited by guzzitaco; 05-06-2020 at 11:55 AM.
|
|
The Following 20 Users Like Post:
|
1775usmarine, 18DAI, 4T5GUY, adwjc, browningcollector, brucev, GaryS, GerSan69, Injunbro, JohnHL, nocents, Ohsheepdog, Old_Cop, raljr1, shorty40, Skeptic 9c, squidsix, stansdds, TercGen, tge45 |
05-05-2020, 08:16 PM
|
 |
Member
|

|
|
Join Date: Apr 2015
Location: Oregon Coast
Posts: 1,857
Likes: 3,557
Liked 4,891 Times in 1,493 Posts
|
|
Hey, this if FUN.
Looking great, nice work. 
Jim
Last edited by 4T5GUY; 05-05-2020 at 08:17 PM.
|
|
The Following 3 Users Like Post:
|
|
05-06-2020, 07:24 AM
|
|
Member
|


|
|
Join Date: Nov 2013
Posts: 630
Likes: 292
Liked 573 Times in 249 Posts
|
|
I wish I had the skills to do what some of you all can do. Im just happy I can follow directions and aseemble functioning frankenguns. Would be nice to take my 2nd/3rd gen SSV franken a little further.
|
|
The Following 3 Users Like Post:
|
|
05-06-2020, 04:45 PM
|
|
Member
|
|
|
Join Date: Sep 2018
Location: Pompano Beach, FL
Posts: 576
Likes: 1,136
Liked 2,155 Times in 380 Posts
|
|
Rear sight
Rear Sight
For the rear sight, I found a compact LPA on EBay (model LPA TPU91SW30). I think it is the same model that some Shorty40s used to come with. I paid $20 for it including shipping. Listed as brand new, no packaging though.
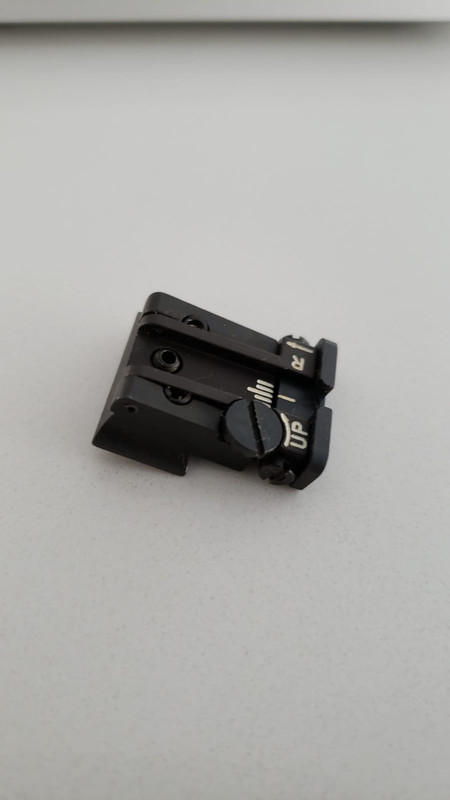
I like sights that are black on the back (no 3 dot system for me), so I erased the dots using paint remover (I used citristrip, took 2 minutes).
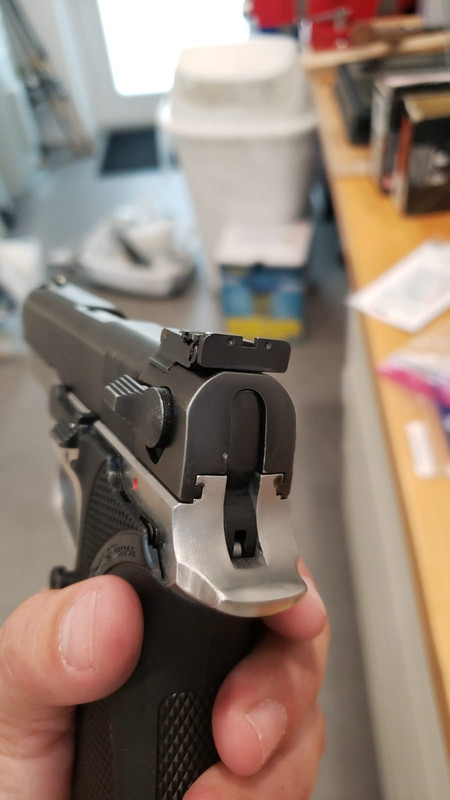
The LPA sight have lot of extra material, so fitting takes time. I used a small file and some stones to remove the material.
During the installation, I made two mistakes.
First, I got home from work late, the package had arrived, so I was eager to install them, but I was tired and I had a couple of beers during dinner. Not in the best mental condition to do the work.
Second, probably a consequence of the first mistake, but despite the fact of using a brass punch, I manage to ding the rear sight. The next day after I was rested and in a better mood, I fixed the ding by filing it and retouch it with some cold blue. It is almost perfect

I must learn to take my time.
More to come
Last edited by guzzitaco; 05-08-2020 at 01:31 PM.
|
|
The Following 13 Users Like Post:
|
1775usmarine, 18DAI, 4T5GUY, BLUEDOT37, brucev, GerSan69, Injunbro, JohnHL, nocents, Old_Cop, Skeptic 9c, squidsix, TercGen |
05-06-2020, 07:29 PM
|
|
Member
|
|
|
Join Date: Jul 2012
Location: USA
Posts: 1,111
Likes: 5,684
Liked 1,665 Times in 730 Posts
|
|
Excellent work guzzitaco! Looks like this project is coming along beautifully.
I read somewhere that Japanese swordsmiths would bathe and put on fresh clothing in order to put themselves into the correct state of mind before working on a sword. I keep this general idea in mind before starting on any project, being sure that I am not fatigued, stressed out, or overly-caffeinated. I try not to rush anything, spread the work out over a few sessions, and of course try not to get frustrated when things go awry.
I still have a set of Trijicons on a 3913TSW that constantly remind me to take things easy. The rear sight is so dented from a hasty installation that I will likely just buy a new set when they die rather than sending them in for re-lamping. Too embarrassed to let anyone see them. 
|
|
The Following 5 Users Like Post:
|
|
05-07-2020, 01:52 AM
|
 |
Member
|

|
|
Join Date: Dec 2012
Location: N.E. OKLA.
Posts: 6,486
Likes: 5,884
Liked 9,333 Times in 3,497 Posts
|
|
Quote:
Originally Posted by guzzitaco

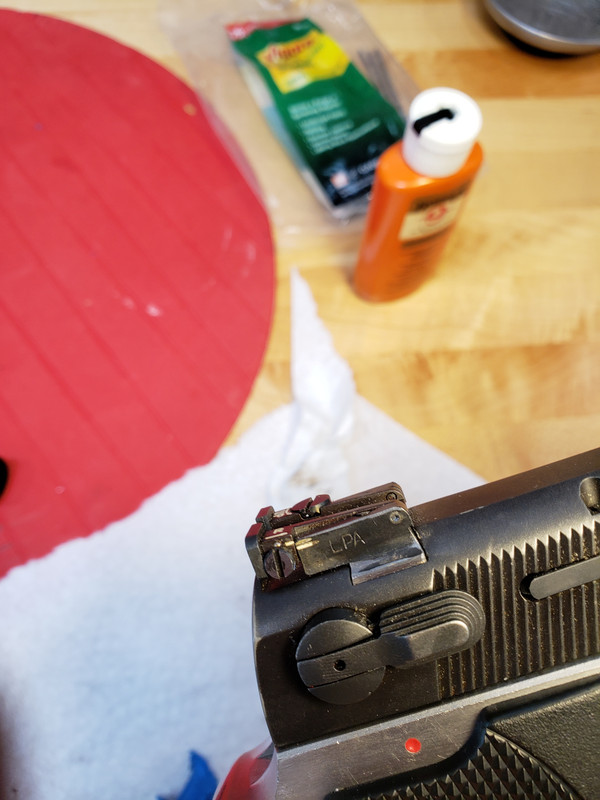
For the rear sight, I found a compact LPA on EBay (model LPA TPUSW30).
The LPA sight have lot of extra material, so fitting takes time.
|
The LPUs do require a lot of work to fit them.
The first time you fit one you start second guessing things after working on them a while.
The full LPA model# for yours is TPU91SW30, if anyone goes looking for one.
The last two digits are for the different blade types.
Keep us updated. 
.

.
__________________
Waiting for the break of day
|
|
The Following 2 Users Like Post:
|
|
05-07-2020, 07:44 PM
|
|
Member
|
|
|
Join Date: Sep 2018
Location: Pompano Beach, FL
Posts: 576
Likes: 1,136
Liked 2,155 Times in 380 Posts
|
|
Shaving the controls
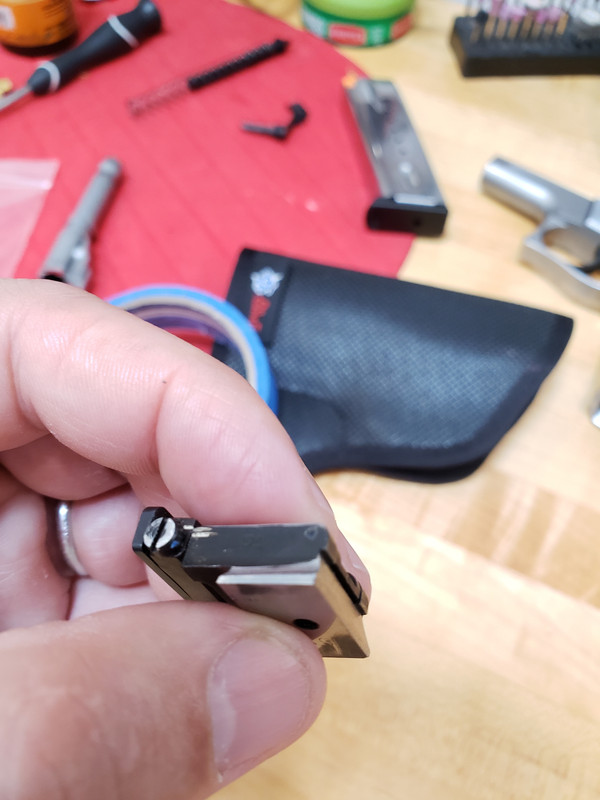
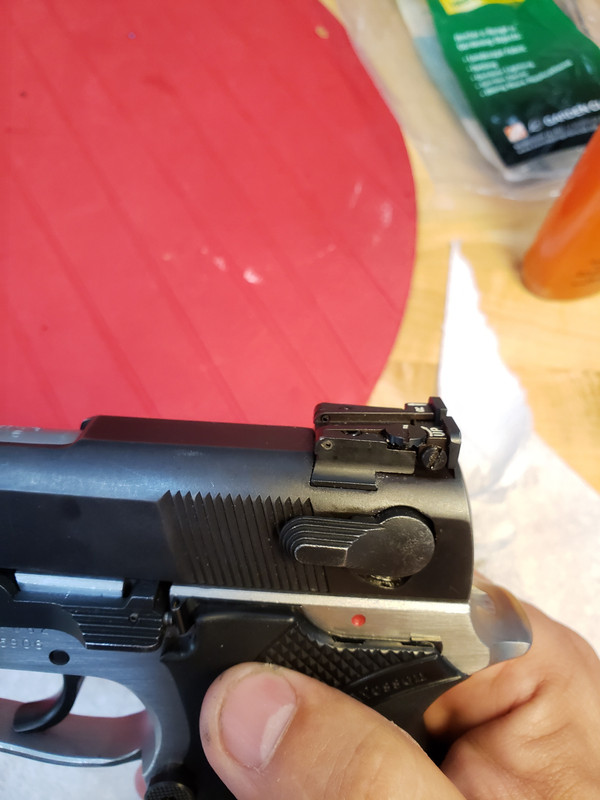
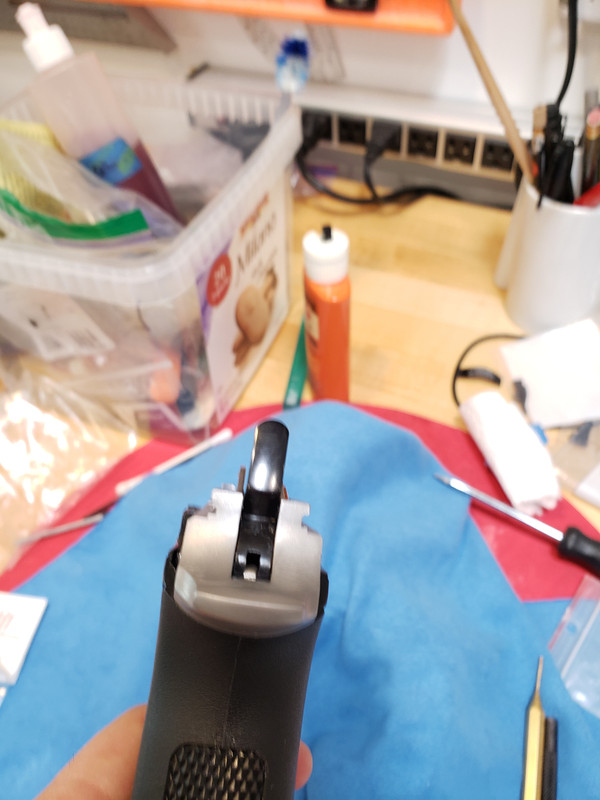
Levers and controls
After the coronavirus quarantine started, I had a bit more time to spend in the project
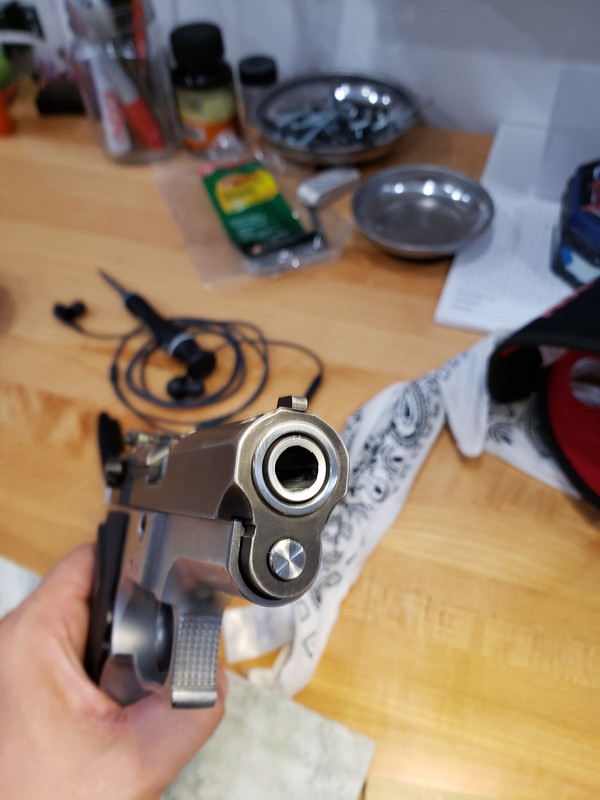
I wanted to reduce the profile of the ambi safe and of the slide stop.
So, I shaved one step of the right-hand side safety lever and one step of the slide stop. I did this using hand files (mainly one flat file). By shaving one step, all the controls on each side are about the same height, and slim the profile a bit (enough for my taste).
I took my time and there were no major complications. The hardest thing was to keep everything squared, so I took little material with every pass. It was time consuming. After the filing was done, I cleaned the marks using sad paper over a granite block
also, I spent some time dehorning the sharp edges after the filing was done !!!

.jpg)
For the magazine catch nut, I decided to go with the oversized one used for the 745. It works for me.
I coated all the controls with Brownells aluma-hyde and I baked them at 350 degrees for one hour (the smell is nasty). I've found that when I baked them I get better adhesion. I used aluma-hyde, because I have some left, it is easy to apply and easy to retouch.
more to come...
|
|
The Following 11 Users Like Post:
|
1775usmarine, 18DAI, 4T5GUY, BMCM, GerSan69, Injunbro, JohnHL, nocents, Skeptic 9c, squidsix, stansdds |
05-08-2020, 02:19 AM
|
|
SWCA Member
|

|
|
Join Date: Aug 2013
Location: Foothills of the Ozarks
Posts: 3,596
Likes: 10,678
Liked 5,588 Times in 2,179 Posts
|
|
Nice work!
And it's always best to go slow, guzzi!
But if you get in a hurry, remember to save your metal shavings, in case you want to go back...
John
|
|
The Following User Likes This Post:
|
|
05-08-2020, 09:18 AM
|
|
Member
|
|
|
Join Date: Jan 2006
Location: Southern Maine
Posts: 3,528
Likes: 1,902
Liked 5,630 Times in 1,544 Posts
|
|
You are doing great work. I admire the project!
|
|
The Following User Likes This Post:
|
|
05-08-2020, 12:15 PM
|
|
Member
|


|
|
Join Date: Nov 2011
Location: metro Phoenix
Posts: 3,196
Likes: 16,419
Liked 3,964 Times in 1,605 Posts
|
|
I don't mean to be the debbiedowner, but that #10 sight is for the .45ACP. The correct LPA for the 9mm is the one with #91 in it. 
|
|
The Following User Likes This Post:
|
|
05-08-2020, 01:30 PM
|
|
Member
|
|
|
Join Date: Sep 2018
Location: Pompano Beach, FL
Posts: 576
Likes: 1,136
Liked 2,155 Times in 380 Posts
|
|
Quote:
Originally Posted by GerSan69
I don't mean to be the debbiedowner, but that #10 sight is for the .45ACP. The correct LPA for the 9mm is the one with #91 in it. |
GerSan69,
you are totally correct...my bad
the model of sight I used is : model LPA TPU91SW30...
I have edited my original post
thank you...
|
|
The Following User Likes This Post:
|
|
05-08-2020, 05:47 PM
|
|
Member
|
|
|
Join Date: Nov 2011
Location: metro Phoenix
Posts: 3,196
Likes: 16,419
Liked 3,964 Times in 1,605 Posts
|
|
Thanks, Guzzi. As "pro-level" as you are doing this project, I was hoping it was a typo!
|
|
The Following User Likes This Post:
|
|
05-08-2020, 06:10 PM
|
|
Member
|
|
|
Join Date: Sep 2018
Location: Pompano Beach, FL
Posts: 576
Likes: 1,136
Liked 2,155 Times in 380 Posts
|
|
"Extractorgate"
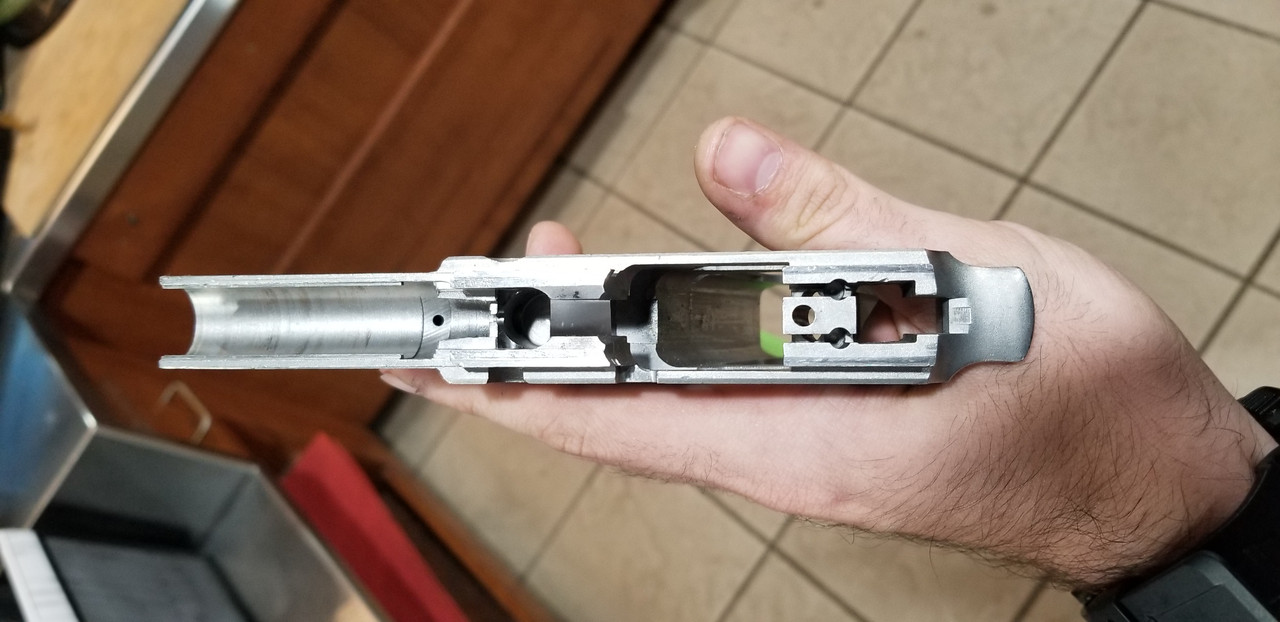
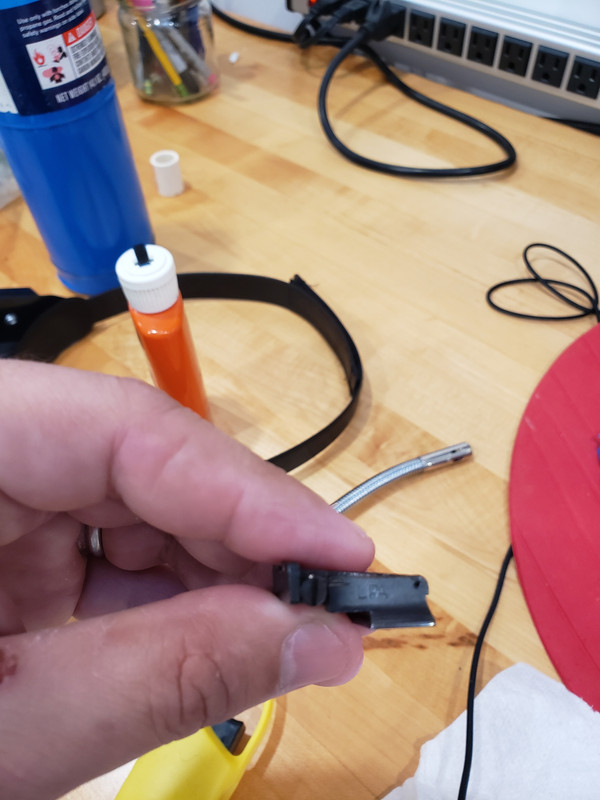
Removing the extractor
I guess in every project you hit a bump in the road. This was it for me
The removal of the extractor in the S&W 3rd gens is not an easy task. There are many threads about the subject in this forum.
Fastbolt and BMCM have written extensively about the subject. Here a couple of threads that you may want to check out:
CS9 extractor removal?
Unnecessarily pulling extractor - Just dont, this is why
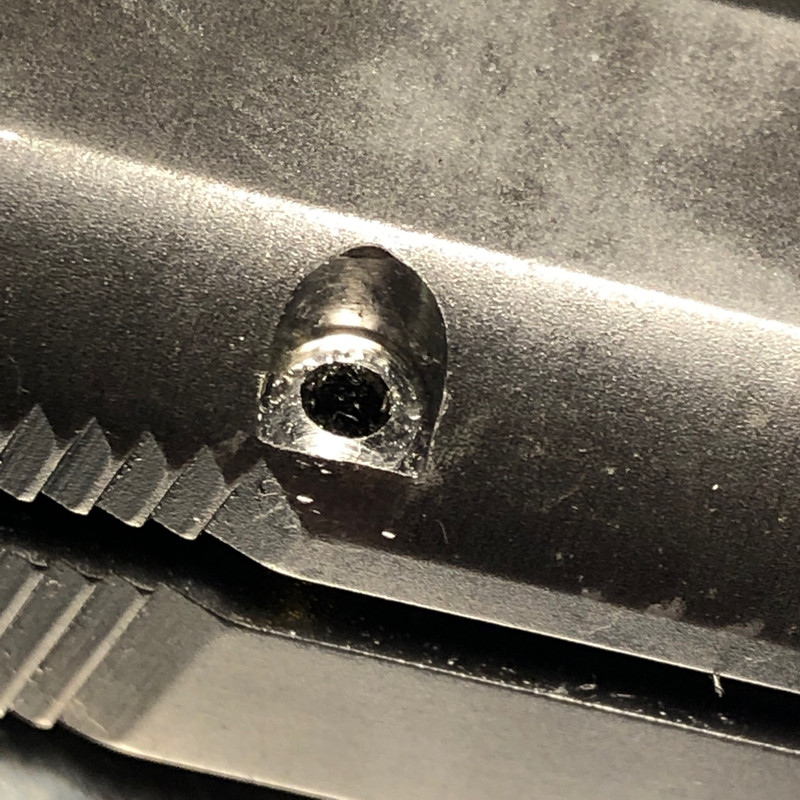
I think I got in trouble because I didnt do enough research and that lead me to tackle the task in the wrong way. I watch a video on YouTube that show the extractor being driven out from the bottom to the top
this is WRONG
extractor should be driven out from top to bottom
I had removed the extractor from my M5906 TSW before, in the wrong way and it was an easy task. So, I guess I was over confident and under prepared.
I should have loosen the pin with penetrating oil (Kroil orPB Blaster) for a day or two before starting the job. I also used a pin that was too big (5/64) instead of having use a starter punch of 1/16. Consequently, I damaged to top of the pin deforming it (mushroom shape). I also dinged the slide badly around the extractor pin area.
After I realized I was deep in trouble I emailed BMCM and sent him the slide. I wanted to do all the work in this project, but it was time to stop being stubborn or get ready to buy another slide.
This is what I sent him...


He made a thread about the incident:
You should check it out
(if you haven't already...)
Another extractor removal gone bad
Here are a couple of pics of the slide he sent me back...
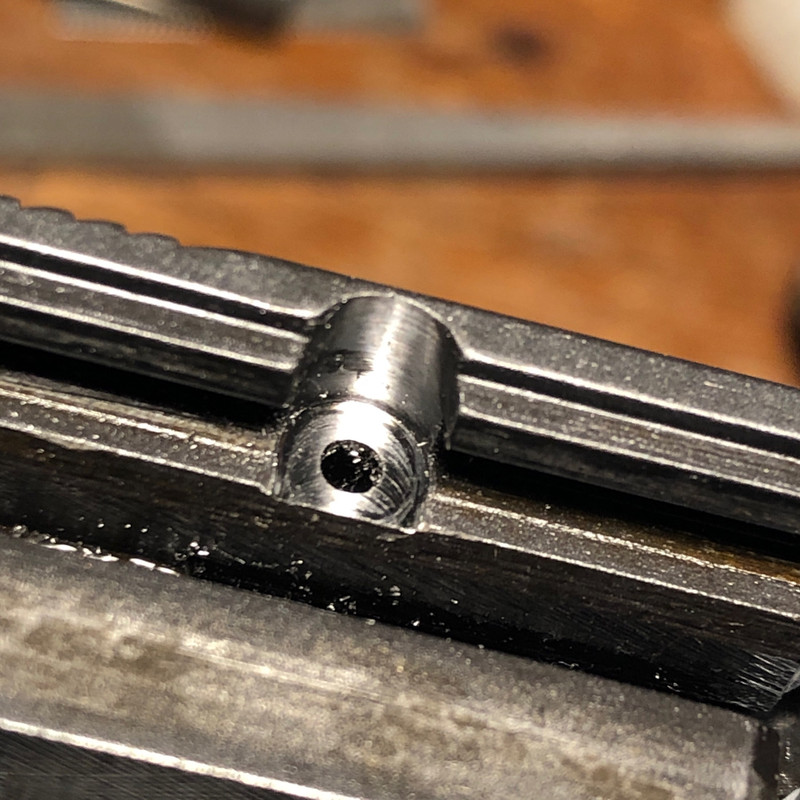
Yes, Bill is excellent at what he does...he is also fast (and a true gentleman).
Some of the things I learned:
First: dont mess with the extractor if you don't need to.
Second: if you MUST mess with the extractor, think about sending it to a qualified gunsmith or armorer.
Third: if you insist in doing yourself (because you want to learn or are a bit dysfunctional like me), soak the extractor pin in penetrating oil, buy a starter punch of 1/16, use the proper support for the slide. Make sure that you are in a "good state of mind" to start the task (like the Japanese sword-smith). Do your research before starting.
Be prepared to swallow your frustration if things go wrong...
So, far the extractor removal was the hardest thing in this build. I got stuck for 2 weeks.
I had an old M910 slide that I bought to harvest the one side safety for my M6906. I soaked the pin in oil for 3 days, I used my starter punch, and...everything work as it should...
I ended using the pin for the M910 in this build since I couldn't find a blue one...(Brownells and Midway sent me a stainless one 3 times...)
more to come...
|
|
The Following 6 Users Like Post:
|
|
05-09-2020, 08:54 PM
|
 |
Member
|
|
|
Join Date: Aug 2010
Posts: 328
Likes: 17
Liked 40 Times in 26 Posts
|
|
That looks great. I have always wanted a SSV, frankengun or other.
What seller had the 5906 frames?
__________________
5903TSW 5904 5906 6906 4006
Last edited by Craig19; 05-09-2020 at 09:29 PM.
|
05-09-2020, 09:51 PM
|
|
Member
|
|
|
Join Date: Sep 2018
Location: Pompano Beach, FL
Posts: 576
Likes: 1,136
Liked 2,155 Times in 380 Posts
|
|
 frame seller info...
Quote:
Originally Posted by Craig19
That looks great. I have always wanted a SSV, frankengun or other.
What seller had the 5906 frames?
|
Hi,
seller was Weaponspro in Salem, Indiana. I don't know if they have others in stock... ( [email protected])
Maybe, it would be better to buy a whole 5906 and sell the parts you don't need/want on eBay... I have seen some for $329
PS: more to come...
Last edited by guzzitaco; 05-09-2020 at 09:52 PM.
|
05-09-2020, 11:57 PM
|
|
Member
|
|
|
Join Date: Nov 2013
Posts: 630
Likes: 292
Liked 573 Times in 249 Posts
|
|
Quote:
Originally Posted by guzzitaco
Hi,
seller was Weaponspro in Salem, Indiana. I don't know if they have others in stock... ( [email protected])
Maybe, it would be better to buy a whole 5906 and sell the parts you don't need/want on eBay... I have seen some for $329
PS: more to come... |
Sounds familiar for where I got my frame. I believe there were 5 or 6 listings at the time when I won mine
|
|
The Following User Likes This Post:
|
|
05-10-2020, 09:49 AM
|
|
Member
|
|
|
Join Date: Sep 2018
Location: Pompano Beach, FL
Posts: 576
Likes: 1,136
Liked 2,155 Times in 380 Posts
|
|
Beadblasting I
Preparation for Beadblasting:
The next step in the project was to blast the frame and slide. I did a lot of research and corresponded with forum members asking questions.
The best thread I found on the subject was:
Glass Bead Media Testing on 5906 Frame
So, I ordered the econo-blend #4 for McMaster-Carr. It isnt cheap stuff. For 10lbs + shipping and tax it was $44.
I have a good compressor (Makita 3hp), so the next step was to buy a blasting gun. I ended buying a 20oz gravity feed blasting gun (HF). Since my initial intention was to blast out in the open (I do not have a blasting cabinet), the bulkiness of the blasting gun wasnt an issue.
However, after I thought about the cost of the blasting media, I wasnt happy to waste it. I thought about buying a blasting cabinet, but in the middle of the lockdown with my business closed, I felt guilty of spending the money in something that I dont know how many times I am going to use.
So, I decided to build a temporary (rudimentary) blasting cabinet. I watched some videos and I ended getting a plastic container at Walmart for $15. I made some mods with some scrap material I had at home and I was ready to go.


I prepared the frame for blasting. All the major dings were addressed (to the best of my abilities).
more to come...
Last edited by guzzitaco; 05-10-2020 at 04:57 PM.
|
|
The Following 6 Users Like Post:
|
|
05-10-2020, 10:18 AM
|
|
Member
|
|
|
Join Date: Aug 2010
Posts: 328
Likes: 17
Liked 40 Times in 26 Posts
|
|
Quote:
Originally Posted by guzzitaco
Hi,
seller was Weaponspro in Salem, Indiana. I don't know if they have others in stock... ( [email protected])
Maybe, it would be better to buy a whole 5906 and sell the parts you don't need/want on eBay... I have seen some for $329
PS: more to come... |
Yeah, it would have to be a reasonably priced frame. A few years ago a someone was selling 5906 frames for $250. I can almost buy the whole gun for that. In fact, my PD trade in 5906 was $300 even.
__________________
5903TSW 5904 5906 6906 4006
|
|
The Following User Likes This Post:
|
|
05-11-2020, 06:45 PM
|
|
Member
|
|
|
Join Date: Sep 2018
Location: Pompano Beach, FL
Posts: 576
Likes: 1,136
Liked 2,155 Times in 380 Posts
|
|
Beadblasting part deux
Last edited by guzzitaco; 05-11-2020 at 06:47 PM.
|
|
The Following 12 Users Like Post:
|
1775usmarine, 18DAI, 4T5GUY, BMCM, cnette01, GerSan69, JohnHL, nocents, shorty40, Skeptic 9c, squidsix, stansdds |
05-12-2020, 07:36 PM
|
|
Member
|
|
|
Join Date: Sep 2018
Location: Pompano Beach, FL
Posts: 576
Likes: 1,136
Liked 2,155 Times in 380 Posts
|
|
Beadblasting part drei
|
|
The Following 14 Users Like Post:
|
1775usmarine, 18DAI, 4T5GUY, BMCM, cnette01, Craig19, DMcBB, GaryS, GerSan69, JohnHL, nocents, Old_Cop, shorty40, squidsix |
05-12-2020, 09:01 PM
|
|
Member
|
|
|
Join Date: Aug 2010
Posts: 328
Likes: 17
Liked 40 Times in 26 Posts
|
|
That looks great. You would never know the slide was originally blued.
__________________
5903TSW 5904 5906 6906 4006
|
05-12-2020, 09:29 PM
|
|
Member
|
|
|
Join Date: Sep 2018
Location: Pompano Beach, FL
Posts: 576
Likes: 1,136
Liked 2,155 Times in 380 Posts
|
|
Quote:
Originally Posted by Craig19
That looks great. You would never know the slide was originally blued.
|
yes, came out great...however, the carbon steel of the 6904/3914 slide, rust very fast...
as soon as I finished blasting it, I took it for a "bath" and then dried with the air compressor. I must have left some wet spots inside, because when I took it inside the house I had some corrosion spots inside... 
I had to do some retouching...clean and dry properly...
but , I was happy with the result... 
Last edited by guzzitaco; 05-13-2020 at 10:49 AM.
|
|
The Following 4 Users Like Post:
|
|
05-12-2020, 11:09 PM
|
|
Member
|
|
|
Join Date: Apr 2015
Location: Oregon Coast
Posts: 1,857
Likes: 3,557
Liked 4,891 Times in 1,493 Posts
|
|
But you know we all are learning along with you, (well at least I am anyway,) and its great entertainment following.
Its pretty cool that youre just going full throttle on this. I kinda feel for you though in some of the things that have happened. Fortunately I researched, (before this forum existed,) prior to doing some of the things you have done so successfully in the end.
The REALLY amazing thing is you are documenting/posting EVERYTHING and I thank you for that. Ups and downs. I sure wish I had taken before and after pics of my endeavors. Thats true my with cars and firearms.
Jim
|
|
The Following 5 Users Like Post:
|
|
05-13-2020, 07:23 AM
|
|
Member
|
|
|
Join Date: Sep 2018
Location: Pompano Beach, FL
Posts: 576
Likes: 1,136
Liked 2,155 Times in 380 Posts
|
|
thank you
Quote:
Originally Posted by 4T5GUY
But you know we all are learning along with you, (well at least I am anyway,) and its great entertainment following.
Its pretty cool that youre just going full throttle on this. I kinda feel for you though in some of the things that have happened. Fortunately I researched, (before this forum existed,) prior to doing some of the things you have done so successfully in the end.
The REALLY amazing thing is you are documenting/posting EVERYTHING and I thank you for that. Ups and downs. I sure wish I had taken before and after pics of my endeavors. Thats true my with cars and firearms.
Jim |
Thank you Jim,
I did this project with the help of two of my kids trying to teach them that you can research and fix or build things, rather than the "buy a new one" mentality that isn't always right.
I have learnt a great deal from the people in this forum. Some threads are just amazing, like reading a manual. Many members have gone the extra mile in providing me with advice, some of them even complimentary parts !!! I am thankful for this.
The hardest part has always been "understanding my limitations and not confusing abilities with expectations"...but as a friend here in the forum says: "you learn by doing..."
more to come...
Last edited by guzzitaco; 05-13-2020 at 10:50 AM.
|
|
The Following 6 Users Like Post:
|
|
05-13-2020, 06:24 PM
|
|
Member
|
|
|
Join Date: Sep 2018
Location: Pompano Beach, FL
Posts: 576
Likes: 1,136
Liked 2,155 Times in 380 Posts
|
|
Hot bluing is hot
Research and preparation for Hot Bluing at home
Initially I was going to re-finish the slide by using rust bluing. However, after all the effort that was done with fixing the slide, the extractor and everything, I kind of wanted something better. I have done rust bluing in the past, and maybe there is something that I do wrong, but I always get a smoky color that has hints of brown. I didnt want a brown slide.
I started doing research about hot bluing and found some interesting videos at Youtube.
Also, I found a lot of forums and websites that had a lot of info and formulas for HOT CAUSTIC BLUING. I even found online the gunsmithing book of Roy F. Dulnap that details formula and procedure.
In my 20s I worked in an oil field, so I was trained in properly handling some chemicals. If you are not trained or used to on how to handle chemicals, perhaps you shouldnt attempt to do this by yourself.
SAFETY NOTE: HOT CUASTING BLUING IS DANGEROUS STUFF. THE BATH BOILS AT 280 TO 295 DEGREES AND THE CAUSTIC SOLUTION CAN BURN YOUR FACE, SKIN, EYES. VAPORS SHOULDNT BE INHALED.
I CAN NOT STRESS ENOUGH HOW IMPORTANT IS THE PERSONAL PROTECTION EQUIPMENT WHEN DOING THIS: CHEMICAL GLOVES, RESPIRATOR, FACE MASK, LONG SLEVES, CLOSED SHOES, LONG PANTS AND APPRON IS THE MINIMAL PROTECTION GEAR THAT YOU SHOULD WEAR. If YOU DECIDE TO DOTHIS, YOU DO IT AT YOUR OWN RISK.
I adapted the formula to the size of stainless-steel pot that I have in the garage. I wanted to do a small batch just for the slide. I bought the materials at the Walmart and the hardware store. Total cost was $16.
Slide preparation:
The slide was already blasted and free of rust, but following the recommendation of a forum member I deiced to polish the flats of the slide, to get a better look. I sanded over a granite block, with 400, 600 and 800 paper. I didnt want a super polished look, so I left it there. The slide isnt totally squared but again, I was concerned of erasing the roll marks by over sanding. There were some tiny spots that were not 100% perfect, but I didnt want to risk it further. I polished the front of the barrel bushing same as the flats. I also prepared the trigger and the hammer to be blued. I had already stoned the circumference of the hammer, carefully without touching any of the cuts. There is a great thread about this:
4506 gets a few more "adjustments"
After handling the slide, I cleaned it again by using simple green and warm water. The dried if completely and the degreased it with acetone. Same with hammer and trigger.
Hot bluing first try
I decided to do all the process out in the open using the side burner of an old bbq grill. That wy the fumes would be less of an issue. It was a Friday afternoon.
I set the bath and started to raise the temp. When it reached 280 degrees, I decided to put the parts in. I left the parts in for 20 minutes. I was concerned of over cooking them. Also, I didnt pay proper attention and didnt get the temperature constant at 285 to 295 degrees. This was a mistake. (some people decided to come and visit in the middle of the quarantine, I am working with a hot chemical bath and Im being interrupted.)

After it was done. I rinsed the parts in water, dried them well and coated them with WD-40.


The slide looked great, but the more I looked at it under "artificial light" the more I realized the color was off...way off...it wasn't black...it was purple-brown I wasn't happy with the color...
I didn't like it like that and I was determined to fix it somehow...but first I needed to find out what went wrong...
more to come...
Last edited by guzzitaco; 05-13-2020 at 07:17 PM.
|
|
The Following 8 Users Like Post:
|
|
05-13-2020, 08:30 PM
|
|
Member
|
|
|
Join Date: Dec 2011
Location: North-Central Texas
Posts: 278
Likes: 57
Liked 161 Times in 66 Posts
|
|
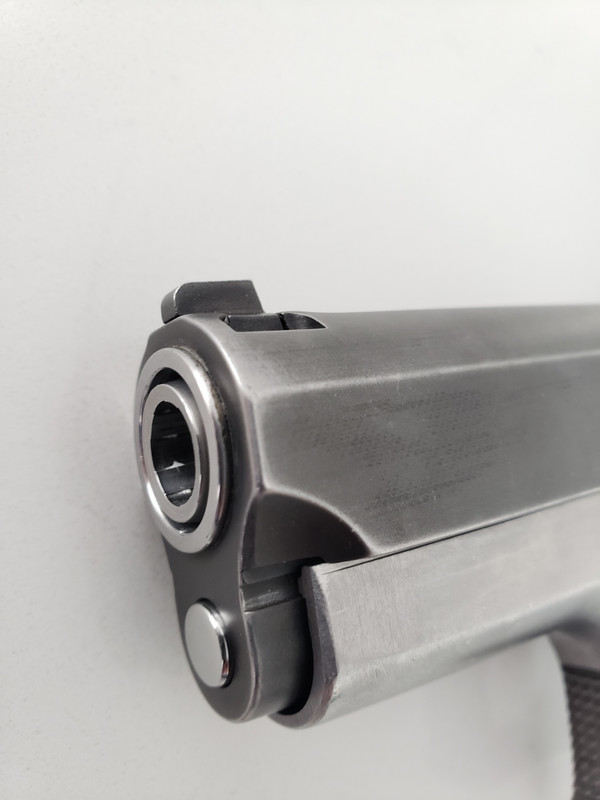
Just an aesthetics question, but can the front of the dustcover be trimmed back to be even with the ball cuts on the slide?
|
|
The Following User Likes This Post:
|
|
05-13-2020, 08:52 PM
|
|
Member
|
|
|
Join Date: Nov 2013
Posts: 630
Likes: 292
Liked 573 Times in 249 Posts
|
|
Quote:
Originally Posted by guzzitaco
Research and preparation for Hot Bluing at home
Initially I was going to re-finish the slide by using rust bluing. However, after all the effort that was done with fixing the slide, the extractor and everything, I kind of wanted something better. I have done rust bluing in the past, and maybe there is something that I do wrong, but I always get a smoky color that has hints of brown. I didnt want a brown slide.
I started doing research about hot bluing and found some interesting videos at Youtube.
Also, I found a lot of forums and websites that had a lot of info and formulas for HOT CAUSTIC BLUING. I even found online the gunsmithing book of Roy F. Dulnap that details formula and procedure.
In my 20s I worked in an oil field, so I was trained in properly handling some chemicals. If you are not trained or used to on how to handle chemicals, perhaps you shouldnt attempt to do this by yourself.
SAFETY NOTE: HOT CUASTING BLUING IS DANGEROUS STUFF. THE BATH BOILS AT 280 TO 295 DEGREES AND THE CAUSTIC SOLUTION CAN BURN YOUR FACE, SKIN, EYES. VAPORS SHOULDNT BE INHALED.
I CAN NOT STRESS ENOUGH HOW IMPORTANT IS THE PERSONAL PROTECTION EQUIPMENT WHEN DOING THIS: CHEMICAL GLOVES, RESPIRATOR, FACE MASK, LONG SLEVES, CLOSED SHOES, LONG PANTS AND APPRON IS THE MINIMAL PROTECTION GEAR THAT YOU SHOULD WEAR. If YOU DECIDE TO DOTHIS, YOU DO IT AT YOUR OWN RISK.
I adapted the formula to the size of stainless-steel pot that I have in the garage. I wanted to do a small batch just for the slide. I bought the materials at the Walmart and the hardware store. Total cost was $16.
Slide preparation:
The slide was already blasted and free of rust, but following the recommendation of a forum member I deiced to polish the flats of the slide, to get a better look. I sanded over a granite block, with 400, 600 and 800 paper. I didnt want a super polished look, so I left it there. The slide isnt totally squared but again, I was concerned of erasing the roll marks by over sanding. There were some tiny spots that were not 100% perfect, but I didnt want to risk it further. I polished the front of the barrel bushing same as the flats. I also prepared the trigger and the hammer to be blued. I had already stoned the circumference of the hammer, carefully without touching any of the cuts. There is a great thread about this:
4506 gets a few more "adjustments"
After handling the slide, I cleaned it again by using simple green and warm water. The dried if completely and the degreased it with acetone. Same with hammer and trigger.
Hot bluing first try
I decided to do all the process out in the open using the side burner of an old bbq grill. That wy the fumes would be less of an issue. It was a Friday afternoon.
I set the bath and started to raise the temp. When it reached 280 degrees, I decided to put the parts in. I left the parts in for 20 minutes. I was concerned of over cooking them. Also, I didnt pay proper attention and didnt get the temperature constant at 285 to 295 degrees. This was a mistake. (some people decided to come and visit in the middle of the quarantine, I am working with a hot chemical bath and Im being interrupted.)
After it was done. I rinsed the parts in water, dried them well and coated them with WD-40.
The slide looked great, but the more I looked at it under "artificial light" the more I realized the color was off...way off...it wasn't black...it was purple-brown I wasn't happy with the color...
I didn't like it like that and I was determined to fix it somehow...but first I needed to find out what went wrong...
more to come...
|
I think it looks great for the first time around.
|
|
The Following 3 Users Like Post:
|
|
05-13-2020, 08:58 PM
|
|
Member
|
|
|
Join Date: Sep 2018
Location: Pompano Beach, FL
Posts: 576
Likes: 1,136
Liked 2,155 Times in 380 Posts
|
|
Quote:
Originally Posted by ElectroMotive
Just an aesthetics question, but can the front of the dustcover be trimmed back to be even with the ball cuts on the slide?
|
Honestly, I don't know...never before thought about it...
I think all the short slide 3rd gen S&W look like this, with the exception of the M3913 NL and M3913 Ladysmith. Also, less noticeable in the value series...
I don't know if there is a technical reason for this, but I never thought of changing it for this project, since I wanted it to look like a M5967
Maybe someone with more experience can chip-in...
|
|
The Following User Likes This Post:
|
|
05-14-2020, 01:49 AM
|
|
SWCA Member
|
|
|
Join Date: Aug 2013
Location: Foothills of the Ozarks
Posts: 3,596
Likes: 10,678
Liked 5,588 Times in 2,179 Posts
|
|
Quote:
Originally Posted by ElectroMotive
Just an aesthetics question, but can the front of the dustcover be trimmed back to be even with the ball cuts on the slide?
|
I, too, noticed the misalignment, and was hoping you intended to address it in a subsequent post.
If I understand you correctly, the frame and slide are "orphans" and will become as one, henceforth.
Therefore, "mating" them would be a nice detail and would not violate my "prime directive" i.e. "Never modify a complete pistol to the extent it can not be easily returned to original condition." ")
As it would be easier to match the frame to the slide as opposed to the converse, that would be my vote, but I'm no expert.
Other than that, I heartily applaud your efforts and I'm extremely gratified to see that you are showing your family, as well as the Forum, what can be accomplished by a determined and resourceful individual, without having to resort to a financially crippling array of specialized tools and equipment.
Keep up the good work!
I'll go pop some more corn. 
John
|
|
The Following 2 Users Like Post:
|
|
05-14-2020, 10:56 AM
|
|
Member
|
|
|
Join Date: Apr 2007
Location: Virginia
Posts: 8,774
Likes: 19,538
Liked 11,881 Times in 5,393 Posts
|
|
I thought some shade of purple was the normal shade of blue for S&W's metal receiver centerfire pistols. The 39-2 that I had decades ago had a purple-blue slide, it was the factory blue. My current 439 has a purple-blue slide. The odd color may be the result of the steel alloy S&W used for their slides.
As for the receiver's dust cover extending past the ball cut in the slide, this seems to be a standard feature for their pistols with 3 1/2 inch barrels. I agree, it is unsightly.
__________________
VCDL, GOA, NRA
|
|
The Following 4 Users Like Post:
|
|
05-14-2020, 12:47 PM
|
|
Member
|
|
|
Join Date: Sep 2018
Location: Pompano Beach, FL
Posts: 576
Likes: 1,136
Liked 2,155 Times in 380 Posts
|
|
Quote:
Originally Posted by JohnHL
I, too, noticed the misalignment, and was hoping you intended to address it in a subsequent post.
If I understand you correctly, the frame and slide are "orphans" and will become as one, henceforth.
Therefore, "mating" them would be a nice detail and would not violate my "prime directive" i.e. "Never modify a complete pistol to the extent it can not be easily returned to original condition."
As it would be easier to match the frame to the slide as opposed to the converse, that would be my vote, but I'm no expert.
Other than that, I heartily applaud your efforts and I'm extremely gratified to see that you are showing your family, as well as the Forum, what can be accomplished by a determined and resourceful individual, without having to resort to a financially crippling array of specialized tools and equipment.
Keep up the good work!
I'll go pop some more corn.
John |
Thank you John for your kind comments...!!!
You have always been very supportive and helpful in answering my questions...
I will address the "misaligment" question/issue in a separate post...
|
|
The Following 2 Users Like Post:
|
|
05-14-2020, 12:51 PM
|
|
Member
|
|
|
Join Date: Sep 2018
Location: Pompano Beach, FL
Posts: 576
Likes: 1,136
Liked 2,155 Times in 380 Posts
|
|
Quote:
Originally Posted by stansdds
I thought some shade of purple was the normal shade of blue for S&W's metal receiver centerfire pistols. The 39-2 that I had decades ago had a purple-blue slide, it was the factory blue. My current 439 has a purple-blue slide. The odd color may be the result of the steel alloy S&W used for their slides.
As for the receiver's dust cover extending past the ball cut in the slide, this seems to be a standard feature for their pistols with 3 1/2 inch barrels. I agree, it is unsightly.
|
than you stansdds,
You are right, purple-bluish I would be happy with...but it was more brown with shades of purple...
I will address further in the next bluing post...
|
|
The Following User Likes This Post:
|
|
05-14-2020, 01:36 PM
|
|
Member
|
|
|
Join Date: Sep 2018
Location: Pompano Beach, FL
Posts: 576
Likes: 1,136
Liked 2,155 Times in 380 Posts
|
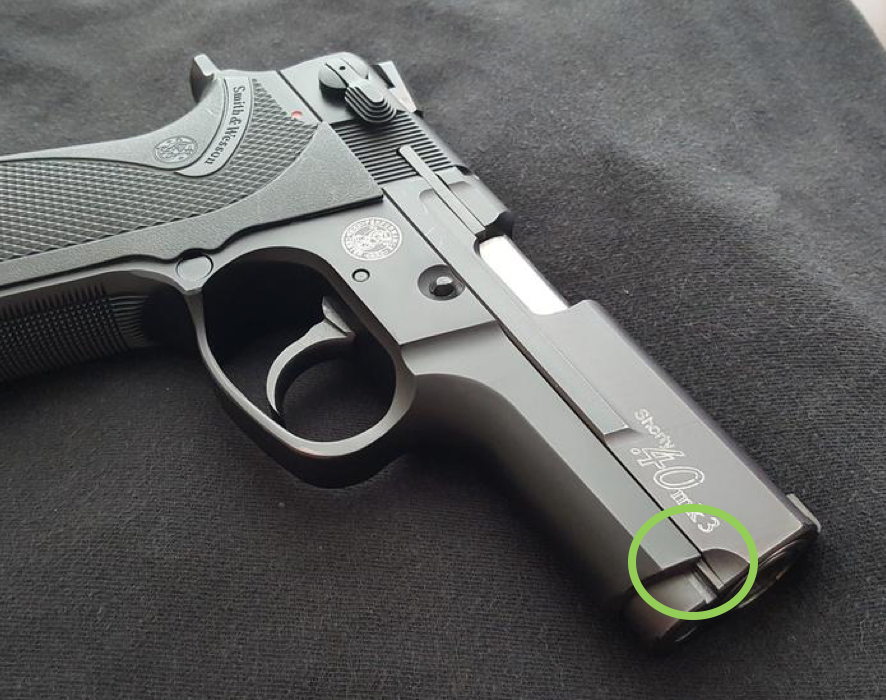
|
Misalignment comments
Misalignment concerns: I think I better tackle this in a separate post before we all get stuck in a "rabbit hole".
As I said in a previous post, to be totally honest, I never thought about addressing the slide/frame misalignment. I never paid much attention to it, since most of the 3rd gun S&W have it. And maybe it is kind of a "trademark" of a third gen.
To illustrate my point:
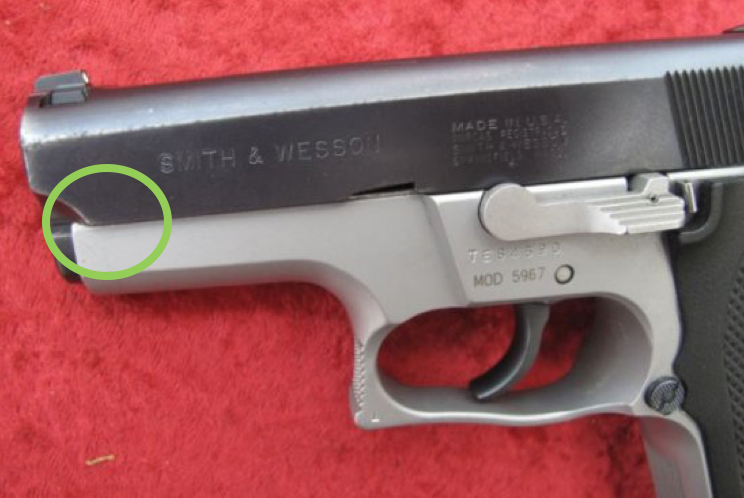
the M5967 that I am "inspired" by has it
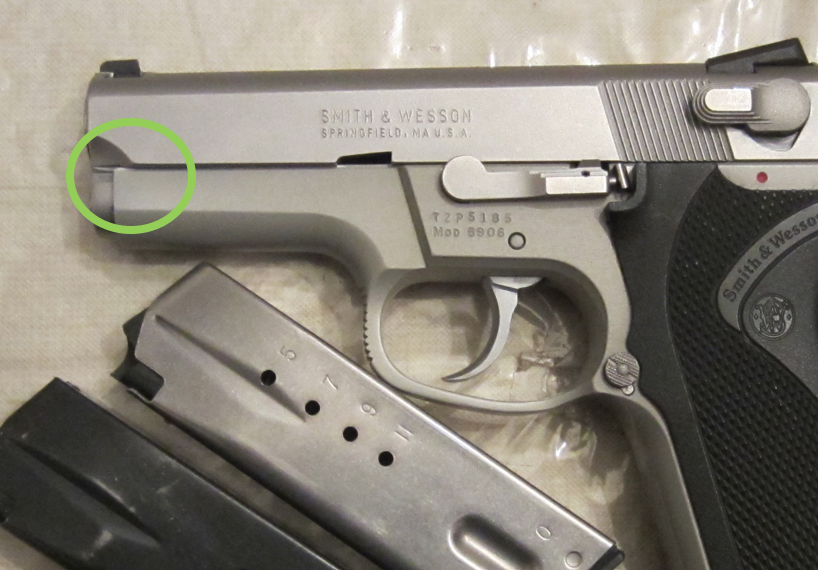
also the M6906
also my beautiful M5906 TSW

even some Performance Center pistols as this Shorty45
However, there are examples that I found where it was "corrected". All are Performance Center pistols.

the 3566 compact
the fantastic Shorty40
One thing is certain, I do not have 1/10 of the skill of one of the Performance Center guys that built those guns...
I don't know if I should try address it, because after that I might want to address it in all my S&W...and I would be hard to do it in all since there are aluminum frame ones (like the M6906) that would need to be re-anodized.
I have to think more about it, before attempting to tackle it...
Maybe in the future...
Anyway, thank you for the feedback...never thought about it...
more to come...
Last edited by guzzitaco; 05-14-2020 at 03:40 PM.
|
|
The Following 4 Users Like Post:
|
|
05-14-2020, 07:11 PM
|
|
Member
|
|
|
Join Date: Sep 2018
Location: Pompano Beach, FL
Posts: 576
Likes: 1,136
Liked 2,155 Times in 380 Posts
|
|
2nd time bluing is hotter
Understanding what went wrong with the first bluing attempt:
The day after the first bluing attempt was a Saturday. I woke up early and the house was very quiet. I took my time and went through all my notes and all my reading material. I discovered the following mistakes:
1) The formula was off: The potassium Nitrate concentration was low by 5%, whilst the water was over by the same 5%. My formula was too diluted, hence weak.
2) Time: I discovered that depending on the steel alloy the bath time should be longer, the 20-minute time was only used as a reference, not as a rule. So, I might need to cook it for a longer time.
3) Temperature: for the bath to have the proper black results, it should boil at 280 to 295 degrees. Every time I went to close to 295, I turn off the flame to let it cool down. This was a mistake. I should have added water to keep the boiling temp at 295. The problem is that adding water is DANGEROUS, since adding too much too quickly can cause a steam eruption that will splatter the hot solution in all directions!
By doing some more research online I found that a brown color was probably related to low temp. However, I needed to be careful because above 310 deg I could get a more purplish color.
So, I needed to mix a new solution and do it again. I had the materials, and the time. Everyone was sleeping and wouldnt bother me
sounds like a plan.
Bluing 2nd try
I disassembled the slide and cleaned it very well. Again, used simple green and warm water. Dried with compressed air. Then used acetone to degrease further. Clean gloves to handle everything. Avoid water marks. Use paper towels (clean and new) if/when necessary.
Set the bath again. Got the pieces in at 295 deg. Kept it at 295 deg for 50 minutes. I took it out a couple of times to check the color.
After it was done, I rinsed it in clean water, dried well and then spayed it with WD-40
Back in black:


Yes, we are back in black
more to come...
Last edited by guzzitaco; 05-15-2020 at 02:33 PM.
|
|
The Following 15 Users Like Post:
|
1775usmarine, 18DAI, 4T5GUY, BLUEDOT37, BMCM, g-dad, GaryS, GerSan69, JohnHL, nocents, Old_Cop, rosewood, shorty40, squidsix, stansdds |
05-14-2020, 07:54 PM
|
|
Member
|
|
|
Join Date: Nov 2013
Posts: 630
Likes: 292
Liked 573 Times in 249 Posts
|
|
Shoot me your address I got a cz82 you can do. Give me a price.
|
|
The Following 2 Users Like Post:
|
|
05-14-2020, 07:55 PM
|
|
Member
|
|
|
Join Date: Nov 2013
Posts: 630
Likes: 292
Liked 573 Times in 249 Posts
|
|
Looks awesome though.
|
|
The Following User Likes This Post:
|
|
05-15-2020, 11:33 AM
|
|
Member
|
|
|
Join Date: Apr 2007
Location: Virginia
Posts: 8,774
Likes: 19,538
Liked 11,881 Times in 5,393 Posts
|
|
Oh.... WOW!!!! Came out beautiful that time!
__________________
VCDL, GOA, NRA
|
|
The Following 3 Users Like Post:
|
|
05-15-2020, 02:23 PM
|
|
Member
|
|
|
Join Date: Sep 2005
Location: KY
Posts: 2,341
Likes: 1
Liked 2,245 Times in 1,108 Posts
|
|
Quote:
Originally Posted by guzzitaco
Misalignment concerns: I think I better tackle this in a separate post before we all get stuck in a "rabbit hole".
As I said in a previous post, to be totally honest, I never thought about addressing the slide/frame misalignment. I never paid much attention to it, since most of the 3rd gun S&W have it. And maybe it is kind of a "trademark" of a third gen.
|
This anomaly is best addressed with a LS/NL slide.
Last edited by jsbethel; 05-15-2020 at 02:24 PM.
|
|
The Following 3 Users Like Post:
|
|
05-15-2020, 03:34 PM
|
 |
Member
|

|
|
Join Date: Nov 2009
Location: Republic of Texas
Posts: 11,366
Likes: 9,383
Liked 17,300 Times in 6,650 Posts
|
|
Arguably, that's a better job of bluing than the factory did.
__________________
Can open, worms everywhere.
|
|
The Following 5 Users Like Post:
|
|
05-15-2020, 06:57 PM
|
|
Member
|
|
|
Join Date: Sep 2018
Location: Pompano Beach, FL
Posts: 576
Likes: 1,136
Liked 2,155 Times in 380 Posts
|
|
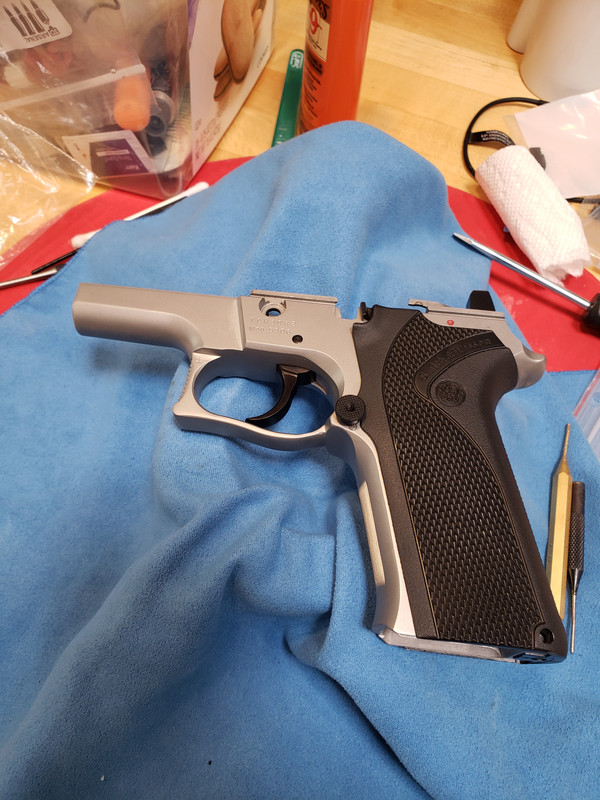
Putting it back together...
Frame Re-assembly
After the bluing of the hammer and the trigger was done, I was ready to start putting the frame together. Thankfully, I had ordered some parts long ago from Midway, because they took 3 weeks in arriving due to the massive backlog caused by the pandemic.
Re-assembly was supposed to be easy, but I had some issues:
1) Contamination of the workbench: When I brought the frame back from blasting, I gave it a "bath" but I wasn't a good "bath" (like a 5 year old, dirt behind the ears). Some media ended on my workbench and got in all the frame parts and the frame itself. I had to disassemble, clean the parts, clean the bench, and re-start. A pain in the neck. Blasint media get's into everything.
2) Sharp edges on the new grips: The new grips that I brought from Brownells had an unfinished corner that rub and scratch the frame when I put it on. Believe it or not, the plastic grip did a scratch on the stainless finish and yes the grips were clean (no media in them). It was a tiny scratch, and luckily it was covered by the grips. I sanded the inside of the grip with some 400 grit paper and the issue was gone. (never had a similar issue with another 3rd gen grip before)
Some pics of the re-assembly:

more to come...
|
|
The Following 8 Users Like Post:
|
|
05-16-2020, 06:35 PM
|
|
Member
|
|
|
Join Date: Jan 2013
Posts: 2,668
Likes: 3,512
Liked 1,578 Times in 912 Posts
|
|
Gorgeous.
I remember the Chinese Tokarevs and Russian Baikal IJ70 Makarovs having a brown tint when viewed in daylight.
__________________
What would Jim Cirillo do?
|
|
The Following 2 Users Like Post:
|
|
05-16-2020, 08:09 PM
|
|
Member
|
|
|
Join Date: Sep 2018
Location: Pompano Beach, FL
Posts: 576
Likes: 1,136
Liked 2,155 Times in 380 Posts
|
|
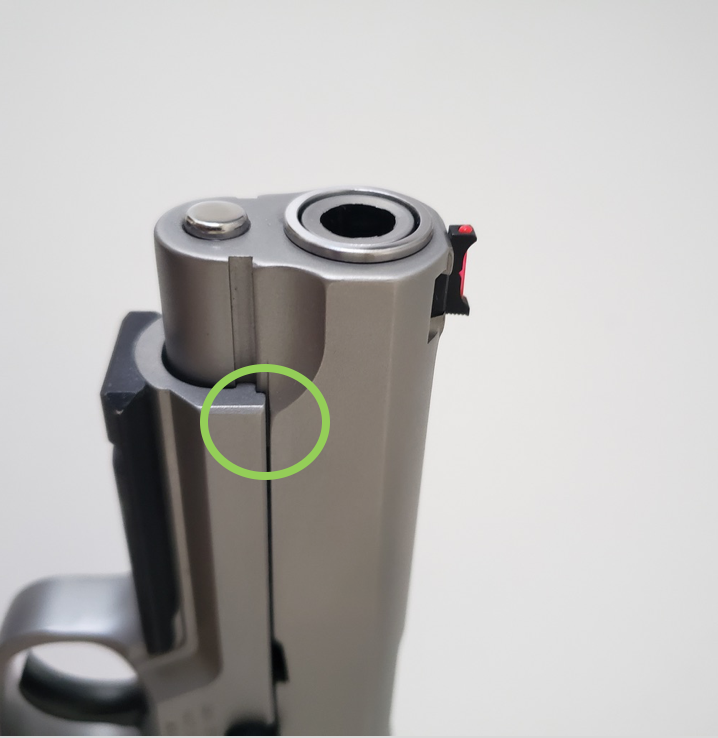
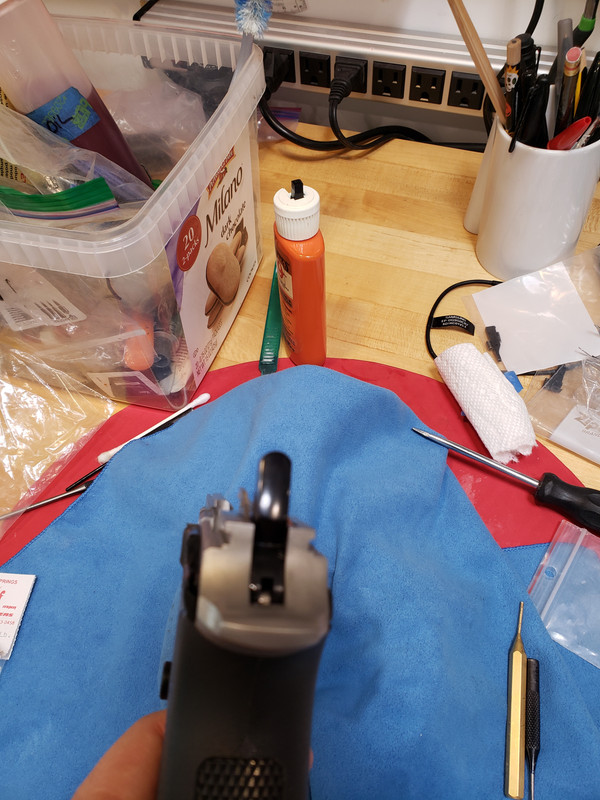
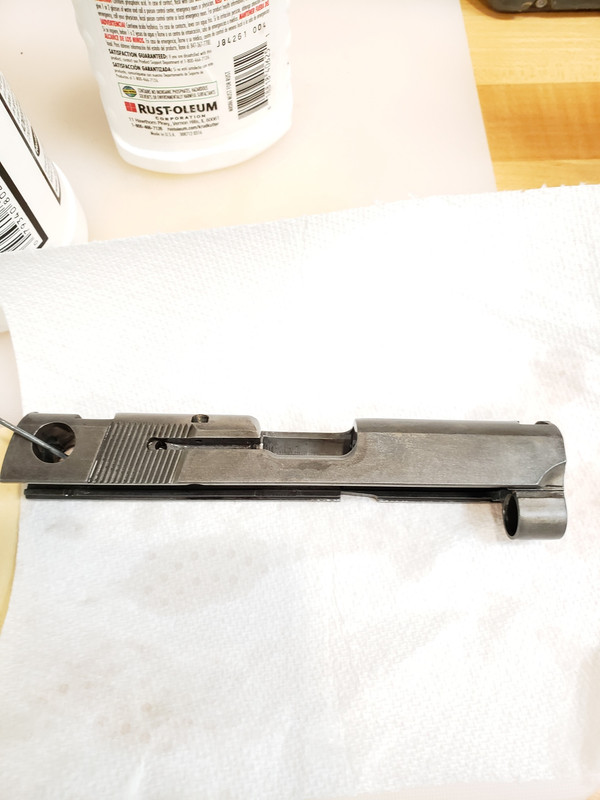
Slide re-assembly
Putting the slide together wasn't hard. I had only two concerns:
1) Installing the extractor
2) Installing the front sight, without scratching the finish
Extractor went in relatively easy, but it is a very tight fit. I used the extractor pin from a M910.

The front sight that came with the kit was in poor condition. So, I decided to order a new sight from Brownells (much faster delivery).
This is what it looked like before the front sight install

more to come...
|
|
The Following 7 Users Like Post:
|
|
05-16-2020, 09:35 PM
|
|
Member
|
|
|
Join Date: Aug 2010
Posts: 328
Likes: 17
Liked 40 Times in 26 Posts
|
|
that looks amazing.
What mag release is that?
__________________
5903TSW 5904 5906 6906 4006
|
05-16-2020, 10:07 PM
|
|
Member
|
|
|
Join Date: Sep 2018
Location: Pompano Beach, FL
Posts: 576
Likes: 1,136
Liked 2,155 Times in 380 Posts
|
|
Quote:
Originally Posted by Craig19
that looks amazing.
What mag release is that?
|
Hi Craig,
that's a M745 mag release...bought in Midway also available at Numrich (but I think they are closed). I have it on my M5906 TSW and I like it a lot.
Best...
|
|
The Following User Likes This Post:
|
|
05-16-2020, 10:45 PM
|
|
Member
|
|
|
Join Date: Apr 2015
Location: Oregon Coast
Posts: 1,857
Likes: 3,557
Liked 4,891 Times in 1,493 Posts
|
|
Still looking real good. Great job.
Since you are using an over size mag release button I assume your end result is not about carrying this new wonderful pistol around.
I bought many of the Ed Browns extended offerings a very long time ago and have an extended slide release that you can have if you want. Obviously it could work for you cause its for the 6906/5906 series. Its almost brand new and still fits in tight. Maybe you could use it in this project? I dont need it so its yours if you want it.
PM me your address and Ill get it going your way ASAP.
Jim
|
|
The Following 6 Users Like Post:
|
|
05-17-2020, 12:59 AM
|
|
Member
|
|
|
Join Date: Sep 2018
Location: Pompano Beach, FL
Posts: 576
Likes: 1,136
Liked 2,155 Times in 380 Posts
|
|
thank you
Quote:
Originally Posted by 4T5GUY
Still looking real good. Great job.
Since you are using an over size mag release button I assume your end result is not about carrying this new wonderful pistol around.
I bought many of the Ed Browns extended offerings a very long time ago and have an extended slide release that you can have if you want. Obviously it could work for you cause its for the 6906/5906 series. Its almost brand new and still fits in tight. Maybe you could use it in this project? I dont need it so its yours if you want it.
PM me your address and Ill get it going your way ASAP.
Jim
|
Thanks a lot for your kindness...yes I would love it !!!
PM inbound
|
|
The Following 2 Users Like Post:
|
|
|
|
 Posting Rules
|
|
|
|
 Similar Threads
|
| Thread |
Thread Starter |
Forum |
Replies |
Last Post |
|
908 Frankengun
|
joeregister |
Smith & Wesson Semi-Auto Pistols |
3 |
06-14-2017 10:03 PM |
|
Frankengun ?
|
lowhog |
S&W Hand Ejectors: 1896 to 1961 |
13 |
05-25-2014 07:41 AM |
|
38 DA Frankengun?
|
Speedo2 |
S&W Antiques |
4 |
12-31-2010 10:30 PM |
|
38 DA Frankengun?
|
Speedo2 |
S&W Antiques |
0 |
12-30-2010 06:17 PM |
|
frankengun
|
mr.magnum |
S&W Revolvers: 1980 to the Present |
3 |
08-29-2009 06:43 AM |
|


.jpg)


 Linear Mode
