HomeSmith Tech: Let's talk about springs

You can just make it "Pro" for brevity! :rolleyes:(kidding)

The main thing we're doing here that's different than common practice is doing quantifiable measurements and recording the results. Also, we are separating out the mainspring from the rest of the action, instead of just measuring the trigger pull.
These are important distinctions that lead to a better understanding of what is actually going on.

My hammer kit hammers have a hole in the top to hook the trigger pull gage in for exactly this purpose. I'm using the same gage as shown above. These are inexpensive and very repeatable. Some of the digital ones aren't as good in that department.

My findings have been the same as Shotguncoach's. The key here is to get the hammer stirrup as horizontal as practical. I put 2 bends in the OEM spring. The bends effectively shorten the spring to get this result. The Wilson spring is already shorter to provide the same effect. The bend at the top is for rebound slide clearance.

The easiest way to get a lighter trigger pull on a Smith is to put in the Wilson mainspring, an 11lb. rebound, and use Federal primers. The brand of primers used makes a huge difference in what the reliable trigger pull can be, but this is often ignored, assuming that all primers are more or less the same. Further refinements can be made with fitting and polishing parts, but just the first 3 steps will get you most of the way. No other brand of revolver will get there, not even the multi thousand dollar European ones.

The J frames are a different animal to the K,L, and N frames. Just a spring kit is about as good as it gets with them. The .22 rimfires need in the 60 to 72 oz. range, depending on what brand of ammo. They vary quite a bit, plus every gun is a little different in it's hammer fall requirements.
 
Last edited:
Just to

thats an interesting point, but I don’t think the rebound spring is ever at full extension unless you cut it wayyyy short
That's the extreme example to illustrate the concept.
Force = Spring rate x (free length - compressed length)

This is why spring length can effect force at different points through the operating range.
 
Last edited:
I’m curious if you have a hammer tension “benchmark” weight for a 22 Rimfire. Seems they need to be higher for reliable ignition.
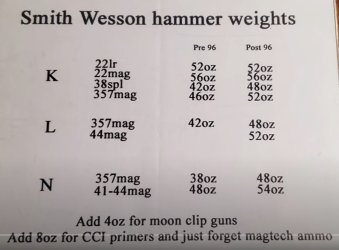
Here's a chart courtesy of Nelson Ford, taken as a screen shot from one of his YouTube videos:

2025-06-01 20_09_00-Nelson Ford on K Frame Action Work Part 1_ Hammer Spring Weight and Cylind...jpg

I arrived at the 48 ounce mark through my own testing and chose to stay with it because that one number works for everything centerfire. Based on Nelson's research, I could go lighter on the smaller centerfire calibers but I honestly haven't found the need.

Rimfires do indeed need more tension. The only rimfire I've worked on so far was a Model 48 in .22 magnum and it required quite a bit more tension. My notes say that in order for that one to be reliable with every brand of .22 magnum ammo I had, it needed 72 ounces of tension and ended up with a 9 lb double action pull. That was a very early project for me and I've learned quite a bit since then....I'll revisit that one with the knowledge gained from this adventure and see if I can improve it while still maintaining the reliability.
 
I need to get one to work on first….eventually I will.
There's some data points here which may give you some reference points to start with - when you eventually get to working a J. :)

Have to laugh about the CCI primers and Magtech in the screenshot. I suspect whatever primer Fiocchi was using must have been at least as hard as CCI. I've not had firing problems with Magtech's primers - just physical fit - as in the cylinder won't close.
 
Thank you for the link - that was an interesting read.

I keep a few boxes of Fiocchi .357 ammo around to use as my “final test”. If those go off, anything will. I think the concrete in my driveway is slightly softer than Fiocchi primers.
 
The responses are very technical in these times. Back in the day, a smith would work on the action by feel, a little cut here, stoning there, polishing here and there, and checked their work in a couple of unique ways; a master factory smith I knew well, would cover the firing pin hole with his thumb, then pull thru dbl action...if the pin nearly broke the skin on his thumb, the tension was good...another time I watched as he held the revolver vertical, inserted a pencil, eraser first into the barrel, pulled thru dbl action and watched to see how high the pencil was launched by the pin...today all these "hacks" would be perceived as too subjective...but in the day, some marvelous PPC and duty revolvers were made this way.
You are correct, sir. A smith that had a lot of things pass his bench could develop a feel I aspire to, but I’m stuck with what I’ve got. That’s why I love these threads that give us a starting point it might take years to reach otherwise.

I’m trying to remember when I did the pencil trick! Shot revolver USPSA IN THE 90’S
 
That is a good start on a trigger job, some asked why a lot, answer is how the parts react with each other On fit and burrs. Take the hammer block, it can add a pound on the trigger pull from a poor fit. It needs to be polished from one end to the other. Try taking it out and dry fire will tell the story. My 686 Has a 3-pound double action pull. The hammer has no spur to cock it with (to lite, would-be dangerous). I shoot bullseye with double action only. Takes me about a week for a expert trigger job to be done. The trigger pull is the same poundage from start to end. This post is a good start for the back yard range or carry gun, to lite on a carry gun can be very dangerous. Be SAFE
 

Latest posts

Back
Top