Pre War vs Post War Frame Studs

Joined
Mar 10, 2012
Messages
2,470
Reaction score
6,176
Location
Upstate, SC
I hope this isn't a redundant question. I couldn't find much with a forum search.
I would like to hear some ideas or opinions regarding the differences of the pre war vs. post war frame studs.

This is just based on my observations, and may not be correct, but...
On the pre war, it seems that the hammer, cylinder stop, trigger and rebound slide studs go through the frame and are visible on the left hand side. It seems that varying numbers may be proud or flush.
On the post war models, again if my understanding is correct, the studs are fitted to make their external appearance virtually invisible.

Does one method have any advantages?
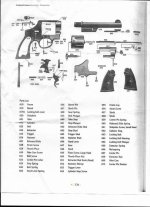
I see from an exploded view diagram for a pre war model that the four studs are each listed as individual parts with their own number.
Does this mean that the studs on the pre war models are more readily replaced or repaired if damaged or broken?

A recent thread in the gunsmithing sub-forum illustrated some of the inherent difficulties of dealing with a post war broken stud.

Thanks for your thoughts.
 

Attachments

  • TL schematic.jpg
    TL schematic.jpg
    60.2 KB · Views: 51
Last edited:
Register to hide this ad
Both pre war and post war studs go thru the frame.

Pre war the hammer stud is threaded, the others are pressed in with the stud ends left domed.

While post war the hammer stud is also pressed in and all studs are polished flush.

The advantage of the pre war dome ended studs is that they can be replaced without the difficulty of having to be polished flush and blued. Especially the threaded hammer stud.
 
Pre war the hammer stud is threaded, the others are pressed in with the stud ends left domed.
Incorrect. I do not know about small frames, but on K and N frames, Pre War studs are all threaded.
If a stud has the notches like this one, it is so the stud can be tightened with a spanner.


attachment.php
 

Attachments

  • IMG_0510 - Copy.JPG
    IMG_0510 - Copy.JPG
    165.7 KB · Views: 189
Just add to what Lee and Jim stated, I have noticed that the trigger stud on most of my K frames were polished flat back into the 1920s. Does anyone have a date when this stud started to be polished flat?
 
Last edited:
Just add to what Lee and Jim stated, I have noticed that the trigger stud on most of my K frames were polished flat back into the 1920s. Does anyone have a date when this stud started to be polished flat?

Ah yes, you're right. That stud was polished flush very early on. Lee knows I believe because he mentioned it once. I'll look at some of my pre war early guns.
 
Last edited:
The 1st model TL, 2nd model 44/455, and Model 1917 have a domed trigger stud. I don't have enough later examples to know when it changed or on which frame sizes pre war.

But the 1st hand Ejector, the Model 1896 has flat flush polished trigger studs. Probably due to lesser cyl clearance in the small frame window.
 
I have several K frames in the 100,000 to 300,000 range and the last one to have a rounded trigger stud is sn 281,785 that shipped August 1917. All lower numbers than that one also have the rounded trigger stud.

All my 1896 revolver have the trigger stud polished flat.
 
For the 1899's, 1902's and 1905's, there are three different stud sizes among the four studs. The hammer stud is the largest. The two trigger studs, one for the trigger rotation, and one for the trigger rebound, are exactly the same, and are the intermediate size. The cylinder stop stud is the smallest. All four of these studs are threaded, with three different thread sizes.

On the earlier revolvers, the threads are simply screwed in, and tightened up. Over time, and with a lot of use, the hammer stud will loosen up. It doesn't take much for it to start to bind between the frame and the side plate. Typically, users would simply loosen the side plate screws, to get the gun functioning again. At the least, the sideplate and hammer should be removed, and the stud tightened back up.

A set of hammer and trigger stud removal and tightening tools are available. One size is for the hammer, and one size is for the trigger.

At some point in the production of these guns, the factory recognized this problem, and implemented various peening techniques to keep the hammer stud tight.

its also worth mentioning that these studs do wear, and that has its effects on the performance and feel of the lockwork. Additionally, refinishing a gun without removing the studs first (before polishing) results in the heads of these domed studs being polished flat. Of course, the removed studs should be temporarily replaced with dummy studs, to keep the the threaded holes from becoming dished during polishing.

A set of new studs are available. They really do tighten up the lockwork, and, of course, make the gun look 'correct' if the domes have been worn or polished flat.

Regards, Mike
 
Last edited:
Thank You!

This is incredible information!
I don't think I've even seen reference to some of these things.

That's a great idea to remove the pins in the case of a refinish.
 
mp, where are the tools and studs available?

I found that, for about $20 in Walmart screwdrivers, one can make their own tools. Years ago I bought a few different size flat bladed screwdrivers, cut a slot in each to match the various diameters and lengths of the studs and thinned the blades to fit the slots on both sides of the studs. After soaking the frame for a few days, simply unscrew the studs, and also use the slotted screwdrivers to tighten loose studs.

I have never had a problem applying enough torque to fully tighten the studs, but if one purchases square shaft screwdrivers a wrench can be applied to the shaft.
 
As to the availability of the stud tools and replacement domed studs, they are available through me for K-frames. This is a project that I have been working on for the past two years. I have not verified whether or not these studs will fit an N-frame. The problem, of course, is that the thread specifications are more-less commercially obsolete, which means that its hard, but not impossible, finding the necessary dies and taps.

The tools are specialized spanner wrenches, made to fit the spanner plate drive of the studs.

Regards, Mike Priwer
 

Latest posts

Back
Top