DIY 1911 Trigger job. First attempt...

These particular ceramic stones sold by Brownells are very high quality. They have precision ground sides and very sharp 90 degree corners. They are perfect for use with jigs, are the proper length, and give a very clean, highly polished mirror finish on engagement surfaces. The black stone is medium fine and the white is extra fine. A great investment, and if properly cared for, will last a long, long time.

BROWNELLS 6" X 1/2" X 1/2" CERAMIC STONES | Brownells

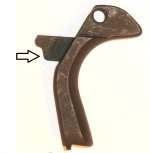
The stones sold by Brownell's are good stones - no argument there. I have had them for many years and do use them. The Arkansas Stones I was making reference to are smaller (3/16 square and 1/4" square), finer and get into places the Brownell's Stones can not. The small Arkansas are super useful when doing fine and critical work. They are agile enough to use on S&W Cylinder Ratchets and Notches to remove fine burrs without touching anything unintended. They fit in a 1911 trigger Track perfectly and you won't chance removing too much as they cut very very slowly and smoothly.

I also use Arkansas "mini-stones (or files as Dan's refer to them) to do the final dressing on Bubba'd screw heads (just before polishing on a wheel) when I restore them. It allows complete control of exactly what you want to stone and leaves other parts clean. These little A. S's are one of my most used GS-ing tools. Since I am not a professional and not doing this for a profit, I don't care how long it takes - I just want the best job I am capable of even if it takes longer.

PS: Since they are so fine it is critical to clean them out with Honing Oil after using them. This in turn keeps them clean and cutting properly. This also applies to all Stones IMO. :)
 
Quote:


Originally Posted by D Brown View Post

Great post overall, but your comment on the secondary sear angle being somehow tied to trigger pull weight leaves me doubting your understanding of the mechanics of the 1911 trigger.


Nope: Still not right. The secondary sear angle is cut to clear the sear notch on the hammer and prevent damage to that critical surface.

I have no information on your experience and/or qualifications with the 1911 trigger so unlike your first post I will refrain from any comments on your knowledge base regarding the subject.

However there is a plethora of opinion, assumption and unbiased theory that becomes "fact" in the world due to endless repetition by those who know no better. In the parlance of todays information availability this is often called "alternative facts".

Having been in a strictly provable fact based profession for over three decades, I made sure I did my research (not a quick google search either) on 1911 triggers before I even ordered the Brownells jig and stones. Here are some of the well established facts about the secondary angle that I found.

- The original John M Browning drawings for the 1911 trigger had no secondary angle.

- Early gunsmithing attempts to improve the 1911 trigger cut the secondary angle into the hammer hooks. When the softer hammer steels of the time lead to wear and unsafe triggers the secondary angle was moved to the sear.

- There are still very many "drop in" replacement sears that do not come with the secondary angle.

- Compared to the common "glass break" 1911 trigger the "rolling' 1911 trigger preferred by bullseye shooters, where there is a noticeable amount of "roll" leading to a "surprise trigger break" (often erroneously referred to as "creep") as the primary angle moves against the hammer hook face, has no secondary angle.

- The Ed Brown 1911 "Match" sear has no secondary angle as is designed to be used without one (by bullseye shooters and those who prefer the "rolling" trigger).

- Ed Brown, who has probably forgotten more about 1911 triggers than many will ever know, states in his instructions for his 1911 sear jig that the cut of the secondary angle is to reduce creep. I believe him over some "expert" whose credentials cannot be established.

- Even so called 'expert" gunsmiths, (often self designated "experts" promoting their own businesses and interests) can disagree on the angle and the depth of secondary angle that should be placed on the sear. The commonly accepted angle is 45º but anything from 40º-55º appears acceptable. And the amount of depth of the secondary angle across the face of the primary ranges from 25%-50% with 1/3 (33%) being the norm.

Now, while not alleging that my understanding off the secondary angle is the truth, the whole truth and nothing but the truth, my understanding is based on my research. Not common theory.

As to your "sear notch on the hammer" don't you mean the hammer hooks?

If you can point me to any recognised authoritative 1911 expert who states the purpose of the secondary sear is to clear the hammer hooks feel free to post here, or even PM me with the information.

I am always willing to learn from a recognised and authoritative source.
 
The secondary angle itself does not effect the trigger weight. The secondary angle reduces trigger creep. Taking too much material off the sear with the secondary angle however reduces the remaining surface area of the sear and the contact the sear has with the hammer. The less contact between the sear and the trigger will effect trigger weight. Take off too much off with the secondary angle and the trigger becomes unsafe due to insufficient surface area contact between the sear and trigger hooks.

I have no information on your experience and/or qualifications with the 1911 trigger so unlike your first post I will refrain from any comments on your knowledge base regarding the subject.

However there is a plethora of opinion, assumption and unbiased theory that becomes "fact" in the world due to endless repetition by those who know no better. In the parlance of todays information availability this is often called "alternative facts".

Having been in a strictly provable fact based profession for over three decades, I made sure I did my research (not a quick google search either) on 1911 triggers before I even ordered the Brownells jig and stones. Here are some of the well established facts about the secondary angle that I found.

- The original John M Browning drawings for the 1911 trigger had no secondary angle.

- Early gunsmithing attempts to improve the 1911 trigger cut the secondary angle into the hammer hooks. When the softer hammer steels of the time lead to wear and unsafe triggers the secondary angle was moved to the sear.

- There are still very many "drop in" replacement sears that do not come with the secondary angle.

- Compared to the common "glass break" 1911 trigger the "rolling' 1911 trigger preferred by bullseye shooters, where there is a noticeable amount of "roll" leading to a "surprise trigger break" (often erroneously referred to as "creep") as the primary angle moves against the hammer hook face, has no secondary angle.

- The Ed Brown 1911 "Match" sear has no secondary angle as is designed to be used without one (by bullseye shooters and those who prefer the "rolling" trigger).

- Ed Brown, who has probably forgotten more about 1911 triggers than many will ever know, states in his instructions for his 1911 sear jig that the cut of the secondary angle is to reduce creep. I believe him over some "expert" whose credentials cannot be established.

- Even so called 'expert" gunsmiths, (often self designated "experts" promoting their own businesses and interests) can disagree on the angle and the depth of secondary angle that should be placed on the sear. The commonly accepted angle is 45º but anything from 40º-55º appears acceptable. And the amount of depth of the secondary angle across the face of the primary ranges from 25%-50% with 1/3 (33%) being the norm.

Now, while not alleging that my understanding off the secondary angle is the truth, the whole truth and nothing but the truth, my understanding is based on my research. Not common theory.

As to your "sear notch on the hammer" don't you mean the hammer hooks?

If you can point me to any recognised authoritative 1911 expert who states the purpose of the secondary sear is to clear the hammer hooks feel free to post here, or even PM me with the information.

I am always willing to learn from a recognised and authoritative source.

You're exactly right. You have no information on my qualifications/experience with the 1911 trigger because I didn't volunteer that information. When I originally posted, I stated your original post was quite good overall with exception of a lack of understanding of the purpose of the secondary sear angle. Nothing you've posted since has done anything to convince me my original conclusion was out of line. I think I'm done with this discussion. Maybe some day, in another 35 years or so, you'll have enough experience with the 1911 where we can discuss concepts on a peer to peer level.

Best of luck.
 
I’m out of practice on 1911 trigger work, but I remember a little.

I'll remove what I just wrote and simply say: There is still some art to 1911 trigger work with each practitioner having his own ideas of the best method and terminology.

For me, e.g., adjusting the sear spring is a given. I prefer a full power 23 lb. main spring because Armand said so, but cutting coils there is OK.

Two points:

Not mentioned, unless I’m missing it, but surely you have … After changes to the hammer and sear, grip and thumb safety function must me checked. A new thumb safety is sometimes required.

The “tink” check is the minimum, but best to check visually that the thumb safety holds the sear with no movement. Look at the engagement with the grip safety removed, and with a Gold Cup style half-cock notch, you can see the sear looking down into the frame.

A special note with Kimbers: At one time, if not still, Kimber warned against removing the trigger stop screw or using a trigger without one because it could cause doubling and full auto fire. THAT caused a loud “HUH?” and a lot of head scratching before those in the discussion figured out that Kimber cut away the secondary trigger stop surface on their grip safeties. Without a trigger stop screw, the trigger can move too far and lift the sear spring off the sear. A simple way to confirm that is to view the action with the thumb safety removed.
 

Attachments

  • Colt Grip Safety trigger stop.jpg
    Colt Grip Safety trigger stop.jpg
    60.8 KB · Views: 6
Kiwi,

Jack Weigand makes some good points in this BenchTalk article from Brownells. Like most articles from Brownells, the verbage is designed not only to provide information, but to sell products, so you have to "throw out the bones", so to speak, and use what works for you. Obviously, the article is not talking about a service or carry gun when it references a "2.5 pound trigger" in the title, but the descriptions and techniques are the same when in pursuit of a slightly heavier (and safer) end result.

Jack describes the procedure for prepping each of the major components; the hammer, disconnector, sear, and the sear spring. This article of course, is limited in scope, and is only one source of information....but it's source (Weigand) has a lot of experience. Some of the information is very good. Kuhnhausen's book on the 1911 is also a good resource.

As you accumulate experience, tools, stones and jigs, I can offer a couple of pieces of advice after 40+ years of work on these machines..... purchase the very best, highest quality tools you can afford, and never compromise on either the quality of the replacement internal parts you select, or the key importance of safety in the final result.

2-1/2 lb. Trigger Pull | Brownells - Firearms, Reloading Supplies, Gunsmithing Tools, Gun Parts and Accessories
 
Last edited:
You're exactly right. You have no information on my qualifications/experience with the 1911 trigger because I didn't volunteer that information. When I originally posted, I stated your original post was quite good overall with exception of a lack of understanding of the purpose of the secondary sear angle. Nothing you've posted since has done anything to convince me my original conclusion was out of line. I think I'm done with this discussion. Maybe some day, in another 35 years or so, you'll have enough experience with the 1911 where we can discuss concepts on a peer to peer level.

Best of luck.

I don't have any experience with 1911 trigger work. It must really be exciting to have mastered the unbelievable complexity of a trigger mechanism. I am in awe of your amazing talents. Do you think in 5 years I might have enough experience in loading a magazine to discuss the various aspects of it with you? I suppose it would take quite a lot of study and practice. I cannot wait for the opportunity to bask in your glow.
 
So a guy walks into the Vatican and tells the Pope about meeting Jesus down on Main Street... What's the difference between them? One has spent a lifetime dedicated to religion and the other has had only a recent positive and moving experience. There's nothing wrong with either.
 
The results.

This past weekend I competed in a two day IPSC event (Classic Division) with my Kimber 9mm. One of the other Classic shooters is a Master grade shooter. A tool and die maker by trade he is known as a very good 1911 pistolsmith, one of only 3 in this country that my shooting mentor will allow to work on his own 1911’s.

I asked him to try my pistol and advise me on any further work needed.

Apart from replacing the currently standard (22-24Ib) mainspring with a 17/18 Ib one and adjusting the trigger overtravel to allow a faster reset (he let me try his gun to see how he sets his own up) he felt the trigger was pretty good. He said he would not alter it at all if he was shooting it.

I felt that I have done a reasonably good job on the pistol to date. The replacement mainsprings for all three of my 1911’s were ordered from my regular supplier by phone a few minutes later and should arrive in the next day or two. I’ll work on reducing the trigger overtravel when I have a few hours to spare after next week as it will involve breaking the set screw’s loctite bond, which I don’t want to do in a hurry.
 

Latest posts

Back
Top