
You are using an out of date browser. It may not display this or other websites correctly.
You should upgrade or use an alternative browser.
You should upgrade or use an alternative browser.
I have a Smith & Wesson Model 1950 chambered in .32 S&W Long. After being stored for many years without use, it developed a strange problem.It will
- Thread starter Vitera10
- Start date



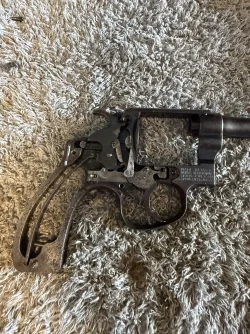
I have a Smith & Wesson Model 1950 chambered in .32 S&W Long. After being stored for many years without use, it developed a strange problem.
It will not stay cocked in single-action mode. Oddly, it works perfectly in single action when the side plate is removed. However, as soon as I reinstall the side plate, it no longer holds the hammer in the cocked position.
I can’t understand why this is happening. I have carefully inspected the internal parts and reassembled everything correctly, but I can’t find anything wrong. Nothing appears to be damaged, bent, or out of place.
Has anyone experienced this issue before or knows what could be causing it? Any advice or suggestions would be greatly appreciated. Thank you!
It will not stay cocked in single-action mode. Oddly, it works perfectly in single action when the side plate is removed. However, as soon as I reinstall the side plate, it no longer holds the hammer in the cocked position.
I can’t understand why this is happening. I have carefully inspected the internal parts and reassembled everything correctly, but I can’t find anything wrong. Nothing appears to be damaged, bent, or out of place.
Has anyone experienced this issue before or knows what could be causing it? Any advice or suggestions would be greatly appreciated. Thank you!

First , not a good idea to cock the hammer with the sideplate off with the mainspring under full tension. No support of the hammer stud
Second not sure exactly your issue. But I've had to clean the single action sear of varnished oil to return proper function.
Second not sure exactly your issue. But I've had to clean the single action sear of varnished oil to return proper function.
My problem is that the revolver will not stay cocked in single action. The hammer does not lock back—it immediately falls forward instead of being held by the single-action sear.
The strange part is that it works when the sideplate is removed, but as soon as I reinstall the sideplate, the hammer will no longer stay cocked in single action.
Could you please explain what you mean by cleaning the single-action sear? Do you think old, hardened oil alone could cause this exact symptom? I would really appreciate any additional advice. Thank you!
The strange part is that it works when the sideplate is removed, but as soon as I reinstall the sideplate, the hammer will no longer stay cocked in single action.
Could you please explain what you mean by cleaning the single-action sear? Do you think old, hardened oil alone could cause this exact symptom? I would really appreciate any additional advice. Thank you!
Here is the problem: it doesn’t work in single action. It works normally in double action, but the hammer won’t stay cocked or lock in place.First , not a good idea to cock the hammer with the sideplate off with the mainspring under full tension. No support of the hammer stud
Second not sure exactly your issue. But I've had to clean the single action sear of varnished oil to return proper function.
I inherited this revolver from my grandfather. It had been stored away for many years.

Hard to tell, but from the video it almost looks like the hammer is binding before it locks. Are there any loose pins? (just spit ballin' here).
Are you certain that the SA hammer push-off condition didn't already exist from long ago (caused by worn or modified hammer SA cocking notch and/or worn or modified trigger nose bevel), and you just now noticed it? At any rate, without looking at the gun, I theorize that when the side plate is installed, it captures the ends of the hammer and trigger studs, moving the studs slightly in a direction that creates the push-off condition. However, when the side plate is removed, the studs relax just enough that it permits SA cocking. You will need to take the gun to a competent gunsmith to inspect the SA hammer and trigger engagement surfaces. The push-off condition might be fixable by stoning the trigger bevel slightly to repair the SA bevel engagement edge. Otherwise you would likely need to replace either the hammer or trigger.
Thank you for your reply and for taking the time to explain your theory.
Unfortunately, there are no qualified gunsmiths anywhere near my region, so I’m trying to diagnose and fix the problem myself as carefully as I can.
I really appreciate your advice. If you have any additional suggestions or specific things I should inspect, I would be very grateful. Thank you again!
Unfortunately, there are no qualified gunsmiths anywhere near my region, so I’m trying to diagnose and fix the problem myself as carefully as I can.
I really appreciate your advice. If you have any additional suggestions or specific things I should inspect, I would be very grateful. Thank you again!

steelslaver
US Veteran
First thing I would do is get it bare metal clean. the trigger, the hammer and the rebound slide inside and out.
First off, I would thoroughly clean the inside frame and side plate surfaces and lockwork parts with a solvent to make sure there is no caked on, varnished oil/grease that could potentially impede sear engagement. Next, I would check to make sure the strain screw is fully tightened to provide sufficient mainspring pressure.
If you press the side plate into position but don’t torque the screws, does it then allow SA hammer cocking? Is the side plate preventing SA cocking as soon as it is pressed into position or only when side plate screws are tightened?
If you press the side plate into position but don’t torque the screws, does it then allow SA hammer cocking? Is the side plate preventing SA cocking as soon as it is pressed into position or only when side plate screws are tightened?
Miltfarrow
Member
- Joined
- Aug 16, 2010
- Messages
- 227
- Reaction score
- 337
It sounds hopeless. I'll take it off your hands.

handejector
Staff member
- Joined
- Mar 17, 2005
- Messages
- 31,163
- Reaction score
- 48,471
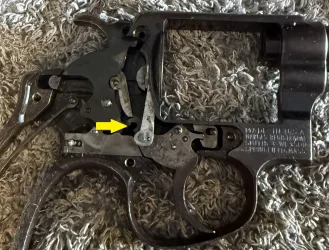
The single action notch looks like it has been altered. It is too deep and has the wrong angle.

max503
Member
Thanks' for the advice.First , not a good idea to cock the hammer with the sideplate off with the mainspring under full tension. No support of the hammer stud
Second not sure exactly your issue. But I've had to clean the single action sear of varnished oil to return proper function.
My favorite old-time gun writer, Major George C. Nonte advocated in his writings to take the side plate off your revolver then cycle the action in order to learn how the mechanism worked.
Hondo44
Member
All good advice from those above. Number one rule, clean and test. I agree that you have a minor wear problem. It's so minor that the change in tension like installing the side plate puts it over the edge so it malfunctions. The single action hammer notch and/or trigger sear need a little fitting. It's a simple process or it can be a disaster because it takes some skill.
Since you don't have a gunsmith available you'll need this manual for step by step instruction:
https://gunbooks.com/books/sw-revolver/
You could google some videos as well.
I don't know your skills but if you were able to get the side plate off w/o damaging it, just follow the manual for disassembly, trouble shooting (especially the trigger and hammer locating pins) and re-fitting the sear. You probably wont need new parts, but will need a few stones (as shown in the manual) for honing the parts if you don't have any.
Go slow and keep in mind that the older the revolver the harder it will be to find replacement parts if a mistake is made or something gets 'ruined'.
You have a .32 S&W Long Hand Ejector post war Transitional model I Frame. The manual doesn't refer to an I frame so refer to the J frame .32 instructions. The only mechanical difference is the mainspring; yours still has the pre war and immediate post war leaf flat spring. In the early 1950's it evolved to the coil spring of the J frame and is known as the Improved I frame. In early 1961 it was changed to being made on the slightly longer J frame.
Have fun and let us know how it goes.
Since you don't have a gunsmith available you'll need this manual for step by step instruction:
https://gunbooks.com/books/sw-revolver/
You could google some videos as well.
I don't know your skills but if you were able to get the side plate off w/o damaging it, just follow the manual for disassembly, trouble shooting (especially the trigger and hammer locating pins) and re-fitting the sear. You probably wont need new parts, but will need a few stones (as shown in the manual) for honing the parts if you don't have any.
Go slow and keep in mind that the older the revolver the harder it will be to find replacement parts if a mistake is made or something gets 'ruined'.
You have a .32 S&W Long Hand Ejector post war Transitional model I Frame. The manual doesn't refer to an I frame so refer to the J frame .32 instructions. The only mechanical difference is the mainspring; yours still has the pre war and immediate post war leaf flat spring. In the early 1950's it evolved to the coil spring of the J frame and is known as the Improved I frame. In early 1961 it was changed to being made on the slightly longer J frame.
Have fun and let us know how it goes.
Last edited:

- Joined
- May 15, 2010
- Messages
- 482
- Reaction score
- 1,048
- City & State/Province
- NW Arkansas Ozark mountains
Absolutely, once you get the internals cleaned of old dried oil, oil it well, amazing what a little fresh oil will fix.Do you think old, hardened oil alone could cause this exact symptom?
steelslaver
US Veteran
I have seen old oil that has gotten really hard, To the point it either needed soaked in a solvent or scraped out with a dental pick. In some case just spraying it with brake cleaner won't be enough.

Speaking as someone with no gunsmithing experience myself:
• If AFTER thorough cleaning, as suggested by several here, the OP still has a problem, and
• assuming Lee’s observation in post 12 is correct,
would not our Brazilian friend be better off procuring a replacement part rather than doing the stoning himself?
• If AFTER thorough cleaning, as suggested by several here, the OP still has a problem, and
• assuming Lee’s observation in post 12 is correct,
would not our Brazilian friend be better off procuring a replacement part rather than doing the stoning himself?
For cleaning, remove the side plate and then soak the action in denatured alcohol for about 30 minutes. Great solvent, but it won't hurt the finish at all, and evaporates quickly. Then lightly lube the internals and see if it helps.
Good luck.
Good luck.

H Richard
US Veteran
Agree with most above, but I would totally disassemble and soak all parts in Acetone, then clean with crud blaster. Lightly oil with Kroil and reassemble. good luck.
Hondo44
Member
For a 75 year old gun new parts are likely not available and if they are, can still require fitting And used parts may be worn more than his existing parts and actually need more fitting than the parts he has.Speaking as someone with no gunsmithing experience myself:
• If AFTER thorough cleaning, as suggested by several here, the OP still has a problem, and
• assuming Lee’s observation in post 12 is correct,
would not our Brazilian friend be better off procuring a replacement part rather than doing the stoning himself?
Last edited:

I bought a Colt Detective Special made in 1960 for my wife. Damn near unfired. I cycled it multiple times and the trigger would stay back like the internals were gummed. I removed the sideplate, soaked the guts in a degreaser, air-blasted, lather-rinse-repeat then doused with Slip 2000 Gun Lube. Took a bit for all that gunk to wear off but it works fine now. Of course, given the subject experts posting here, your problem may differ.
gew98
Member
Just finished cleaning an M1888/90 mannlicher rifle and a 1901 DWM naval gewehr...and as usual for these old rifles I found oil/grease so hard it prevented proper operation. Spent the day cleaning , scrubbing and lightly polishing bits and now both rifles are smooth and ready for the range.I have seen old oil that has gotten really hard, To the point it either needed soaked in a solvent or scraped out with a dental pick. In some case just spraying it with brake cleaner won't be enough.

You haven't experienced filth until you've bought a crate of paper-wrapped Chinese SKS's still in their 40 year old cosmoline...I used to take them to the carwash to remove the outer layers with the high pressure hot soapy wand before disassembly...Then I disassembled them one by one putting the parts in separate perforated baskets and back to the carwash to hose off the rest of the gunk...They worked pretty good after I got them back together, looked better too!... ...Ben
...BenI think I can top that! Years ago my department picked up over a hundred M14 rifles that had been stored for years. Came with 1 magazine. We need two per rifle, so looked around until we found a supplier who sold us a crate of Chinese M14 magazines *, packed completely in their version of cosmoline. Horrible stuff.
When we issued the rifles, we fished out the extra magazines, with instructions to each officer to clean the magazines thoroughly before showing up for familiarization, and NOT to do it in the house. Now, when I say "packed", I mean not only immersed in the goop, the insides of each had been pumped totally full, so cleaning started with wiping the outside, then pulling the floor plate and forcibly pushing the grease out with the follower. Turns out that the only effective solvent to remove the remaining stuff was gasoline or kerosine (I know!).
When we started familiarization, the majority of the troops, being troops, had done a poor job of cleaning, and were rewarded with face, glasses, hair and surroundings covered with smelly goop with every ejected round, an effective lesson in proper weapon cleaning.
Weapons worked great, though.
* Yes, our Asian friends made M14 magazines, as well as rifles, in impressive quantity and quality.
When we issued the rifles, we fished out the extra magazines, with instructions to each officer to clean the magazines thoroughly before showing up for familiarization, and NOT to do it in the house. Now, when I say "packed", I mean not only immersed in the goop, the insides of each had been pumped totally full, so cleaning started with wiping the outside, then pulling the floor plate and forcibly pushing the grease out with the follower. Turns out that the only effective solvent to remove the remaining stuff was gasoline or kerosine (I know!).
When we started familiarization, the majority of the troops, being troops, had done a poor job of cleaning, and were rewarded with face, glasses, hair and surroundings covered with smelly goop with every ejected round, an effective lesson in proper weapon cleaning.
Weapons worked great, though.
* Yes, our Asian friends made M14 magazines, as well as rifles, in impressive quantity and quality.
- Joined
- May 15, 2010
- Messages
- 482
- Reaction score
- 1,048
- City & State/Province
- NW Arkansas Ozark mountains
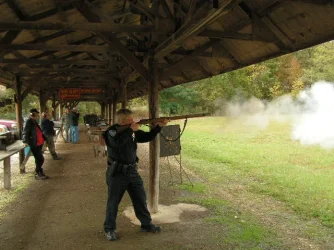
Kerosene is my go to solvent when cleaning old hardened gunk like cosmoline and I'm lucky to have my own pressure washer. Back in 2009, I bought an old Spandau 71/84 Mauser bolt action rifle. The outside stock and fittings all looked like new. However the bolt was frozen in so bad, I was afraid it had been welded to make it non-firing. I removed the barrel assembly and placed it in a tall container with kerosene to cover the bolt. then I poured kerosene in the muzzle. After a couple of days the bolt came right out.Disassembled it with some more kerosene and cleaned the bore with a brass brush looks like new.
All back together with a good oiling and my 43 Mauser cartridges loaded with black powder and it's a great impressive shooter.
All back together with a good oiling and my 43 Mauser cartridges loaded with black powder and it's a great impressive shooter.
A bit awkward for a patrol rifle, but certainly a show stopper!
Hondo44
Member
My son picked up a nice '86 Winchester octagon rifle in .45-70, 1st year production according to the serial number ! Opening the lever would only travel about 1". Gave $500 for it. Thank goodness no one had hammered on the lever!
Removed the wood and dropped it into a 50% Acetone, 50% ATF bath for a week. Which of course did not affect the bluing. Got the lever to move far enough to remove it and the bolt. But the firing pin (the source of the jamming) could not be removed from the bolt. Soaked the bolt some more and finally with a few other chemical cleaners and gentle nudging, the firing pin came out full of a black tar like substance. As near as we could tell it was 50 year's worth of black powder sludge and petrified lubricant.
Been offered between $3000-5000 for it a few times. Only slight pitting in the bore and it's a tack driver!
Removed the wood and dropped it into a 50% Acetone, 50% ATF bath for a week. Which of course did not affect the bluing. Got the lever to move far enough to remove it and the bolt. But the firing pin (the source of the jamming) could not be removed from the bolt. Soaked the bolt some more and finally with a few other chemical cleaners and gentle nudging, the firing pin came out full of a black tar like substance. As near as we could tell it was 50 year's worth of black powder sludge and petrified lubricant.
Been offered between $3000-5000 for it a few times. Only slight pitting in the bore and it's a tack driver!
- Joined
- May 15, 2010
- Messages
- 482
- Reaction score
- 1,048
- City & State/Province
- NW Arkansas Ozark mountains
There is a funny story that goes along with that picture. My Lt. was the one taking the pictures. I was sighting it in shooting at some clay birds someone had put out on the ranges berm at 125 yards.A bit awkward for a patrol rifle, but certainly a show stopper!
A couple of young men showed up with their AR's and started blasting away at the clay birds on the berm. After they expended several 20 round magazines each, they were making fun of my Mauser that was leaning against the bench.
I said it looks like y'all are having trouble breaking those clay birds, watch this. I racked a round in and took careful aim and boom a pink cloud of destroyed clay bird was clearly visible. That was when the Lt. caught the picture.
I looked at the group and said aimed fire will beat spray and pray every time. They decided they needed to go someplace else and packed up and left.
Similar threads
- Replies
- 11
- Views
- 385
- Replies
- 34
- Views
- 3K


- Replies
- 8
- Views
- 466

- Replies
- 18
- Views
- 783


