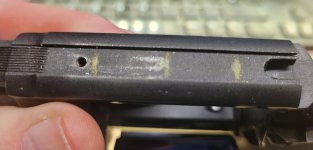
Drill and tap measurements for Factory drill K Frame??

99DC99

Member
Joined
Apr 12, 2022
Messages
39
Reaction score
34
Hi,

I want to drill and tap a S&W Model 17-3 to take a Weig-a-tinny mount for my red dot.

I know its sacrilege to drill and tap a m17 - but its not a collectors piece- it has been shot -its in pretty good condition but not perfect. Its one of my range guns so is a shooter. I use red dots so need to get it drilled and tapped to take the weig a tinny rail.

I am measuring the weig a tinny mounting holes to see what the drill hole off set would be - but if someone had the exact holes pattern (from S&W?) than that would be great too.

Thanks
 
Register to hide this ad
I just bought the weig tinny mount for my 610. Are you looking for the measurements between the holes? The mount holes are lining up with the drilled and tapped holes under my rear sight
 
Last edited:
I'm using an Allchin mount on my 625-8. The mount holes fit the S&W factory drilled holes perfectly.

I suggest you buy the mount first and have the gunsmith drill to fit the mount. If the mount is supposed to fit a factory drilled top strap then you have the pattern.
 
Hi,
Yes it’s the spacing between the holes and how far in from the recoils lug end is the measurement details I’m looking for.
I’m not doing the work myself but want to make sure that the machinist has some guidance on correct factory drilled holes.

My model 17 is pre factory drilled and tapped….

I do have a friend who has a 617 - i hope to put a digital calipers over this today.
It’s a weig a tinny mount i have. - says it fits the factory drilled holes. But on my measurements the spacing between the middle hole is different to the front and rear holes…
Having the S&W drawing would be a big help to start with…
Thanks for the help though.
 
The holes are #6-48 size. Starting at the recoil lug at the back for zero. You can use an edge finder for that. 1st hole going forward is at .562. 2nd hole is at 1.224, third hole is at 1.824. They are centered between the sides of the slot that holds the rear sight tang.
 
Last edited:
Hi,
Yes I'm looking for the measurements - my 17 is not factor drilled and tapped, so i need to get someone local here to doe i.
I'm not sure if they are able to clock the measurements on the mount. so i need to have an idea on what the accurate hole spacing is.
(I do not want someone to run a ruler over it - i am measuring it with a digital calliper's - but if i had a proper sketch from S&W that would be great!
 
The holes are #6-48 size. Starting at the recoil lug at the back for zero. You can use an edge finder for that. 1st hole going forward is at .562. 2nd hole is at 1.224, third hole is at 1.824. They are centred between the sides of the slot that holds the rear sight tang.

Cheers for that - that's pretty close to what I'm getting. (I have to convert from inches to metric :-( )

The Forward hole - the one at the muzzle end, is very close to the rear sight front screw. Is this the same on the factory drilled and tapped? or is it that my rear sight is particular to my age of model 17?
top strap.jpg
 
The factory drilled and tapped topstrap only has the 3 holes. The front one of them is for the rear sight tang. You will have an extra hole from the old front sight tang. There is just enough room for it to work out with the 2 holes that close together.
 
Hi,
Yes looking at it it will be quite close. It may even break into the old hole :-(

But as long as it is a bare touch and the machining is solid it should work...

Thanks for all the good info.

The factory drilled and tapped topstrap only has the 3 holes. The front one of them is for the rear sight tang. You will have an extra hole from the old front sight tang. There is just enough room for it to work out with the 2 holes that close together.
 
If it is really close, put a headless stub of a screw in the hole. Figure out how long to bottom out then trim to length and cut a slot in it with a thin Dremel disk. This will help support the wall where it is thin. Not on guns, butt on machines I have filled a hole with threads and then drilled a hole nearby that actually cut into the filler threads, tapped it and ran it. Adapter from bellhousing for Buick V6 to use various Jeep transmissions comes to mind and it took a lot more punishment than a revolver sight. LOL
 
Several people including myself have put the factory drilled mount like the mini weigatinny or alchemist mounts and only drilled the back two holes because their gunsmiths said it’s a 22 and should be fine which they are ,as they are used for hunting , target and some competition. Just some thoughts/ ideas from friends who did it.
 
I was just discussing thais with a range buddy.to do the rear two holes and that should hold the Weig a tinny mount that i have. And if i really do need the front hole then i could gat that done later...

My big problem is there are only amateur Gun Smiths here in my country. there are good machinists, but its a lotta risk to just let someone work on the gun. I'm handy my self and if i had access to a really good pillar drill - or better still a mill machine- i'd do it my self.

I might consider doing the rear two holes myself anyway....

Several people including myself have put the factory drilled mount like the mini weigatinny or alchemist mounts and only drilled the back two holes because their gunsmiths said it’s a 22 and should be fine which they are ,as they are used for hunting , target and some competition. Just some thoughts/ ideas from friends who did it.
 
The spacing of the holes was changed at a certain dash number that escapes me but when the FBI was concerned that the forward hole was directly over the barrel-cylinder gap, S&W moved that hole forward a little. I learned it is a fact when I bought a rear sight and found it didn't line up with my gun's holes.

Ed
 
Here is the mounting pattern, it was taken from a 610-3 in 2008. BTW click on the black image and you'll see the drawing in PDF format which you can download to your computer. Left click on the picture and you can save it as a JPG image file to your computer. Note, you are free to use these images.

attachment.php
 

Attachments

The drawing in post #15 is wrong. Don't drill your gun like that. You want the recoil lug on the scope base to be tight up against the back of the rear sight cutout. For a rimfire, it doesn't matter much, but on a centerfire, the recoil can shear off the mounting screws. I have drilled and tapped many, and none of them were those numbers.
 
Last edited:
I checked my measurements against the ones in post 15 and they were pretty close. (I’m using a hand digital callipers).

And yep it is 22lr rimfire so the recoil is not really an issue (but could be for others reading this posting in relation to CF rounds).

Still have’nt decided if I’ll visit a machine shop or not (I.e. do it myself. (I know what I’m doing but only have hand drill. But as the hole is so small it may be doable…might do a test drill on some scrap steel…)


The drawing in post #15 is wrong. Don't drill your gun like that. You want the recoil lug on the scope base to be tight up against the back of the rear sight cutout. For a rimfire, it doesn't matter much, but on a centerfire, the recoil can shear off the mounting screws. I have drilled and tapped many, and none of them were those numbers.
 
On screw holes that small you really need a drill press with a vice mounted on it. Align the bit then drill the hole, remove drill bit and install the tap. Turn the drill by hand with slight down pressure on tap till it starts. Doing it like this assures that the tap is perfectly aligned and vertical with the hole drilled for it and stays that way. Plus gives you complete control. If you feel it bind, back off a turn and then go forward. The number 1 cause of broken taps is misalignment.

A small broken tap in a frame or receiver would suck.

I keep thinking of setting a battery powered drill up in a press stand with a small vice, because battery powered drills have clutches and reverse.
 
Last edited:
Back
Top