|
|
 |

12-16-2016, 10:31 AM
|
 |
Member
|


|
|
Join Date: Oct 2010
Location: Finger Lakes of NY
Posts: 54
Likes: 1
Liked 64 Times in 11 Posts
|
|
 Expanding hammer nose rivet
Replacing my hammer nose rivet on 625-3. What is the technique to assure it expands while staying below the surface level of the hammer?
I am imagining putting two steel BBs on the ends of the installed rivet then squeezing them with either a vise or a set of vise grips.
Any other way to assure even expansion of the ends of that rivet?
|
12-16-2016, 10:43 AM
|
|
Member
|
|
|
Join Date: Jan 2009
Posts: 184
Likes: 0
Liked 60 Times in 32 Posts
|
|
There is an excellent video on' you tube ' that shows the entire process. I believe it is under the gunsmithing sections Smith and Wesson. Hope this helps.
|
12-16-2016, 11:13 AM
|
 |
Member
|


|
|
Join Date: May 2012
Location: Evansville, Indiana USA
Posts: 6,225
Likes: 484
Liked 11,391 Times in 3,522 Posts
|
|
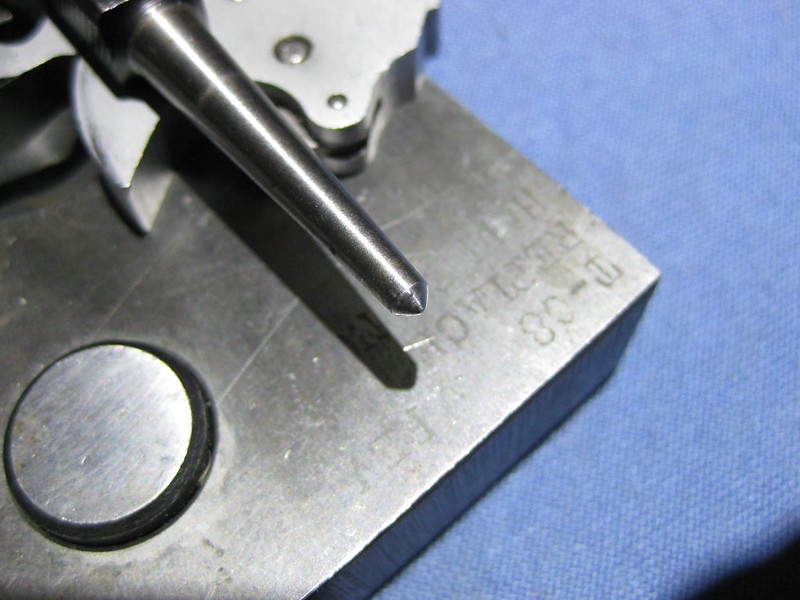
I use an approx 1/8" flat punch or a 1/8" center punch, laying the assembled hammer and parts down on a flat peening block. Strike each side of the rivet firmly, and then carefully center the rivet after staking by very lightly tapping on the side that is flush with the surface of the hammer itself, so that both ends of the staked rivet are slightly below the edge of the rivet cavity in the hammer.
After staking in completed, check the integrity of the staking by pushing on the rivet with a pin punch using hand pressure to verify it is secure, then simply verify free movement and rebound of the hammer nose as assembled on the rivet.
__________________
Ret. LE, FA Instr, S&W Armorer
Last edited by armorer951; 01-07-2017 at 05:35 PM.
|
|
The Following 3 Users Like Post:
|
|
12-16-2016, 01:18 PM
|
|
Member
|

|
|
Join Date: Jul 2008
Location: Las Vegas, NV
Posts: 3,428
Likes: 5,932
Liked 5,259 Times in 1,732 Posts
|
|
Make sure that you don't over tighten the riveting. The hammer nose has to be able to float up and down. Some of the older hammer nose came with a tiny spring to hold it in the desired position but still allowing it to move to center in the hammer bushing when the hammer is dropped by the trigger. ....
|
|
The Following User Likes This Post:
|
|
12-16-2016, 06:46 PM
|
|
Member
|
|
|
Join Date: Oct 2010
Location: Finger Lakes of NY
Posts: 54
Likes: 1
Liked 64 Times in 11 Posts
|
|
Quote:
Originally Posted by Big Cholla

Make sure that you don't over tighten the riveting. The hammer nose has to be able to float up and down. Some of the older hammer nose came with a tiny spring to hold it in the desired position but still allowing it to move to center in the hammer bushing when the hammer is dropped by the trigger. ....
|
Yes, I noted that the hole in the nose is larger than the rivet by a good margin.
The way I plan to flare the rivet with a hardened ball-tipped punch should keep the middle of the rivet at its original diameter. The punch is too large to fit inside the rivet, but the curve of the ball will reach in by 1/16 of an inch in.
Kind of like dropping a bowling ball into a 4" down spout...at least I HOPE it flares and peens out like that.
|
12-16-2016, 06:55 PM
|
|
Member
|
|
|
Join Date: May 2012
Location: Evansville, Indiana USA
Posts: 6,225
Likes: 484
Liked 11,391 Times in 3,522 Posts
|
|
You can re-invent the wheel if you want. The instructions I gave you are the technique taught at the armorer's school.
__________________
Ret. LE, FA Instr, S&W Armorer
|
|
The Following 4 Users Like Post:
|
|
12-16-2016, 08:06 PM
|
 |
Member
|

|
|
Join Date: Jan 2012
Location: OVER the hill in TEJAS
Posts: 2,725
Likes: 13,107
Liked 4,339 Times in 1,773 Posts
|
|
This is a lot better than reading a book. I have my ears open to the last post. Lots better than TV. I like all comments. I can replace a few parts & save money by looking at your posts. I work with my hands so this is right down my alley. Thanks to all the armorers.
|
|
The Following User Likes This Post:
|
|
12-16-2016, 08:37 PM
|
|
Member
|
|
|
Join Date: May 2012
Location: Evansville, Indiana USA
Posts: 6,225
Likes: 484
Liked 11,391 Times in 3,522 Posts
|
|
S&W calls the punch used to set the rivet a "flaring tool". Looks alot like a center punch to me.
__________________
Ret. LE, FA Instr, S&W Armorer
|
|
The Following 3 Users Like Post:
|
|
12-17-2016, 03:12 PM
|
|
US Veteran
|


|
|
Join Date: Feb 2005
Location: The SW Va Blue Ridge
Posts: 17,548
Likes: 89,905
Liked 24,944 Times in 8,538 Posts
|
|
Quote:
Originally Posted by armorer951
I use an approx 1/8" center punch or a 1/8" center punch, laying the assembled hammer and parts down on a flat peening block. Strike each side of the rivet firmly, and then carefully center the rivet after staking by very lightly tapping on the side that is flush with the surface of the hammer itself, so that both ends of the staked rivet are slightly below the edge of the rivet cavity in the hammer.
After staking in completed, check the integrity of the staking by pushing on the rivet with a pin punch using hand pressure to verify it is secure.
|
I've used the same method to expand the rivet.
__________________
John 3:16
WAR EAGLE!
|
|
The Following User Likes This Post:
|
|
12-18-2016, 01:34 AM
|
 |
Member
|
|
|
Join Date: Apr 2006
Posts: 17,832
Likes: 7,857
Liked 25,761 Times in 8,708 Posts
|
|
As they said above, ^^^^^^^^^^^ and just want to mention that back a bunch of years ago when the Rivets were hard to buy new, I learned how to remove the old Rivet so it could be used again. Yea, I much prefer to start with a fresh new Rivet, but just wanted to mention that if careful, the old one can be reused if need be. I believe new ones are now available at Powers Custom.
|
|
The Following User Likes This Post:
|
|
01-07-2017, 02:39 PM
|
|
Member
|
|
|
Join Date: Oct 2010
Location: Finger Lakes of NY
Posts: 54
Likes: 1
Liked 64 Times in 11 Posts
|
|
Thanks to all! Forgot to get back you you.
I used "centering" punches. Mounted static one in my vise and used a spring-loaded one to save the need for hitting it with a hammer.
Every thing working just fine. Thanks for the suggestions.
|
|
 Posting Rules
|
|
|
|
|


 Linear Mode

