|
|
 |

04-22-2013, 12:29 PM
|
|
Member
|


|
|
Join Date: Mar 2011
Location: Naples, Florida
Posts: 324
Likes: 165
Liked 190 Times in 89 Posts
|
|
 Pitting on Stainless Finish
I saw a friend's Model 67 Stainless at the range, and offered to help him get it looking better. The problem is that in a few areas there is pitting. 0000 steel wool helps a bit, but doesn't go deep enough. Mother's Mag polish also helps the overall appearance, but can't help with the pitting. Not his fault; he got a good price on it (used), but I'd like to fix the finish.
As a side note, if we took it to a LGS for a new finish, how do they first address the pitting, and what finish is inexpensive and covers this kind of blemish? Beadblast?
Any thoughts, please.
|
|
The Following User Likes This Post:
|
|
04-22-2013, 01:12 PM
|
 |
Member
|


|
|
Join Date: May 2012
Location: Evansville, Indiana USA
Posts: 6,341
Likes: 498
Liked 11,809 Times in 3,627 Posts
|
|
re: pitting
For the removal of pitting, I've used beadblasting and sandblasting (silica) in the past with good results.....both on revolvers and autos. Photo attached of 5906 blasted with silica.
__________________
Ret. LE, FA Instr, S&W Armorer
|
|
The Following 2 Users Like Post:
|
|
04-22-2013, 01:14 PM
|
|
Member
|

|
|
Join Date: Nov 2012
Posts: 1,787
Likes: 179
Liked 1,551 Times in 685 Posts
|
|
That's the first time I have seen a 5906 with grips that didn't look like ****. 
|
04-22-2013, 01:23 PM
|
|
Member
|
|
|
Join Date: Nov 2005
Location: Upstate SC
Posts: 3,639
Likes: 62
Liked 5,913 Times in 1,914 Posts
|
|
Is is not a stainless finish; it's stainless steel, the same inside and out all the way through. Consequently, surface damage can usually be removed and the entire gun repolished to even out the look. For light pitting, beadblasting is easy and works well if you like the resulting matte look. Alternatively, it can usually be filed out and the whole gun, or the applicable part thereof, can be hand polished with various abrasives to be as shiny or dull as you want. Some like a very shiny cylinder with the balance of the gun in a more subdued polish, for instance.
__________________
Pisgah
|
|
The Following User Likes This Post:
|
|
04-22-2013, 01:33 PM
|
 |
Member
|
|
|
Join Date: Dec 2010
Location: NW. Ohio
Posts: 365
Likes: 66
Liked 182 Times in 57 Posts
|
|
Last edited by chuck8388; 04-22-2013 at 01:39 PM.
|
|
The Following 2 Users Like Post:
|
|
04-22-2013, 04:48 PM
|
|
Member
|

|
|
Join Date: Feb 2010
Location: Rocky Mtns, CO
Posts: 986
Likes: 19
Liked 216 Times in 143 Posts
|
|
Quote:
|
0000 steel wool helps a bit
|
In general I would suggest you not use any steel wool. Some of the steel can get imbedded in the stainless and rust.
As others have mentioned, the stainless is quite forgiving on what you do to it. Without seeing a picture of the pitting, it is really difficult to assess the depth. But starting with the appropriate grit sandpaper, and finish by going finer. If you want brushed look, finish with Scotch-Brite pads. The light grey pads 7448 replicate most S&W brushed finishes.
For a breakdown of grit equivalent to sandpaper and steel wool of all the Scotch-Brite pads use this link. It's way beyond the green pot scrubber pad your buy for your sink.
Take care not to round edges, and if you sand too hard in a small area, you can create a divot so to speak.
|
|
The Following 3 Users Like Post:
|
|
04-22-2013, 05:37 PM
|
|
Member
|
|
|
Join Date: Mar 2011
Location: Naples, Florida
Posts: 324
Likes: 165
Liked 190 Times in 89 Posts
|
|
Thanks to all for the good advice.
Jepp2, a question please:
Will Lowe's or Home Depot have this degree of Scotch pads, or do I need to go to some sort of a speciality paint store? Also, If I start with a more agressive pad to get the worst areas, then transition to the lighter stuff after I've gotten to the bottom of the pitting, will I still need to do the entire gun in the light pads for uniformity of look?
|
04-22-2013, 05:59 PM
|
|
Member
|
|
|
Join Date: Feb 2010
Location: Rocky Mtns, CO
Posts: 986
Likes: 19
Liked 216 Times in 143 Posts
|
|
Quote:
|
Will Lowe's or Home Depot have this degree of Scotch pads, or do I need to go to some sort of a speciality paint store? Also, If I start with a more agressive pad to get the worst areas, then transition to the lighter stuff after I've gotten to the bottom of the pitting, will I still need to do the entire gun in the light pads for uniformity of look?
|
Yours might, mine didn't. I wound up buying mine on the on-line auction site. Amazon has them too.
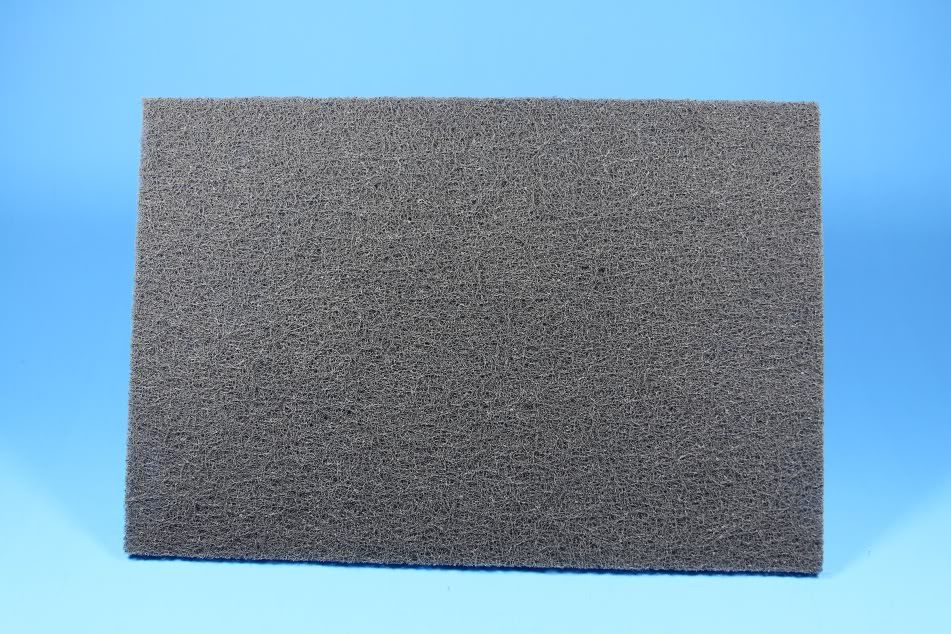
Depends on your technique. I can blend with the grey pad without having to do the entire handgun. But the finish might be different on yours. I have found the grey to be a really good match, but make sure you follow the "grain" of the original brushing. It is a lot like wood working. Never across grain. A picture of the grey pad is included. The pads are roughly 6 inches by 9 inches and about 1/4 inch thick.
Last caution. This works really well on the brushed finish. Don't try it on the bead blasted portion.
|
|
The Following User Likes This Post:
|
|
04-22-2013, 06:25 PM
|
|
Member
|

|
|
Join Date: Apr 2013
Location: S. Central Texas
Posts: 47
Likes: 0
Liked 3 Times in 2 Posts
|
|
Most automotive paint suppliers will have a good selection of 3M wet/dry sandpapers and scotchbrite pads. The NAPA warehouse in my neighborhood also carries both.
|
|
The Following User Likes This Post:
|
|
04-22-2013, 07:40 PM
|
|
Member
|
|
|
Join Date: Nov 2011
Location: SoCal
Posts: 160
Likes: 0
Liked 11 Times in 10 Posts
|
|
There's no harm in hitting your local big box stores, or even the smaller and (usually better) Ace Hardware stores. I have found that between the lot, I can normally find the full-range of Scotch pads.
I just finished rehabbing the finish on a used 66-2. Overall, it was a great shape, but had been carried some by the previous owner, so there were various scuffs and light scratches. I will say that the light grey Scotch pads are indeed close to factory. However, they are definitely a little more coarse. Just enough to notice if you pay attention to such things. What I do is use the grey, then the white. However, the white are almost too weak to really have much of an impact on stainless steel. So, I actually finish with some Mother's Mag polish. It's a delicate balance, because I you still want to have the brushed striations, but don't want them cut too deeply, as to have much texture.
It takes some practice, but it's fun, and if you proceed slowly enough, you really won't mess anything up which can't be fixed.

|
|
The Following User Likes This Post:
|
|
04-23-2013, 07:34 AM
|
|
Member
|
|
|
Join Date: Mar 2011
Location: Naples, Florida
Posts: 324
Likes: 165
Liked 190 Times in 89 Posts
|
|
Thanks again to all. I'll give it a shot. Might be a week or more before I post again because I have to find the pads. Yes, I'll post photos, but only if the final project looks good.
|
04-26-2013, 02:00 AM
|
|
US Veteran
|

|
|
Join Date: Oct 2011
Location: Southern Virginia
Posts: 1,960
Likes: 9,647
Liked 2,427 Times in 1,028 Posts
|
|
Probably get more comprehensive answers with a picture post of the "before"..... You said pitted, but most of the replies seem to have been directed to surface scuffs, and not the below surface pitting... Do not forget to mask, or otherwise protect the serial number and the S&W logo and barrel markings. For corrosive pitting, I expect bead blasting will be your solution. Don't forget, sand as a blast media removes material, while the beads seemingly do not .... I have seen a few badly corroded Smith & Wesson S S revolvers. Hard for me to comprehend the type of neglect it takes to attain such a thing. I do love a good reclaimation project though. Regards
|
|
The Following User Likes This Post:
|
|
05-03-2013, 08:18 PM
|
 |
Member
|

|
|
Join Date: Jul 2003
Location: Ohio, USA
Posts: 1,298
Likes: 26
Liked 452 Times in 234 Posts
|
|
FlaFlyer, the pictures BEFORE would be more of a help so as to "see' and determine just "how much, how hard and what to use" to get the pits out FIRST, then you can blend it all together to make it nice and pretty ( finished)......been doing this since the mid 1060s, and lots of hand work to get things off the ground...stay away from any and all power equipment, unless you know 'how"..................much depends on just where the pitting actually is, thus the need to "see" ( pictures)???
__________________
dan
NRA Benefactor,PMA
|
|
The Following User Likes This Post:
|
|
05-04-2013, 04:47 PM
|
|
Member
|
|
|
Join Date: Mar 2011
Location: Naples, Florida
Posts: 324
Likes: 165
Liked 190 Times in 89 Posts
|
|
Thanks to all for the sound advice. I have learned that I should have taken 'before' photos, both to get more precise recco's and to remind me how far the project was advanced. I also learned a lot more about the process of restoration.
The bad news was that the pitting was deep enough that I finally concluded I could never get it all out by hand sanding. Beadblasting was the best solution, and I got a very reasonable estimate on it. But the owned just wasn't interested in putting any money into it. He was honest from the beginning when he said that he just wanted a 'beater' and he was happy with the gun as it was. So, I cleaned it up, gave it a last polish with Mothers Mag Polish, and gave it back to him. He was delighted with the improvement since he gave it to me. I was a bit disappointed. Oh well, that's why they make vanilla and chocolate.
I will mention one last observation for the edification of anyone who reads this. The pits were on opposite sides of the cylinder, and one side of the barrel, right at the crown. What does this mean? I'm guessing the gun was stored for a long time (probably years) in a leather holster, without being wiped down with a silicon or oily cloth. I'm guessing the steel/leather touching, maybe with a little sweat mixed in, probably caused a chemical reaction, which damaged both objects. A lesson for us all.
If I ever attempt another restoration project, photos; I promise.
|
|
 Posting Rules
|
|
|
|
|


 Linear Mode

