Sargent Tom
Member
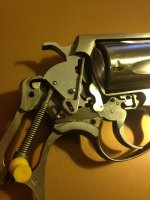
As you may have read, I have replaced my bobbed hammer with a factory-new trigger. The scraping problem has been fixed.
But a result of this project is as follows:
1. Operating the gun is perfect without the hammer block.The trigger snaps forward crisply as before the new hammer project.
2. After installing hammer block, the trigger will not completely reset forward unless I push it with my trigger finger. The hammer block can only be installed one way so probably not pilot error.
3. If I loosen the side plate, the trigger will then snap forward again. How weird, sounds like something binding-up.
4.. I have a new trigger (not installed) which came with the new hammer, however I don't think this would help since it is fine w/o the hammer block installed.
Any suggestions would be appreciated, thanks, Tom
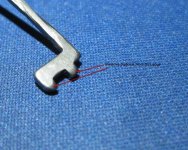
2nd pic shows the limit of trigger reset.
But a result of this project is as follows:
1. Operating the gun is perfect without the hammer block.The trigger snaps forward crisply as before the new hammer project.
2. After installing hammer block, the trigger will not completely reset forward unless I push it with my trigger finger. The hammer block can only be installed one way so probably not pilot error.
3. If I loosen the side plate, the trigger will then snap forward again. How weird, sounds like something binding-up.
4.. I have a new trigger (not installed) which came with the new hammer, however I don't think this would help since it is fine w/o the hammer block installed.
Any suggestions would be appreciated, thanks, Tom
2nd pic shows the limit of trigger reset.
Last edited: