|
|
 |

12-25-2016, 11:58 PM
|
 |
Member
|


|
|
Join Date: Dec 2016
Location: Wickiup Junction, OR
Posts: 874
Likes: 11
Liked 1,134 Times in 461 Posts
|
|
 Extractor and rod removal
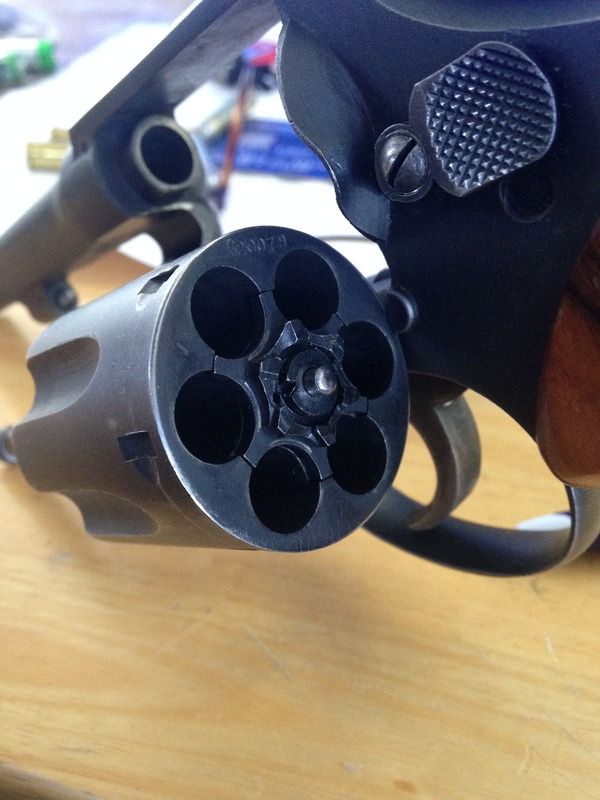
What is the best (and safest) ' home smithing' method of removing the extractor and rod from the cylinder?
|
|
The Following User Likes This Post:
|
|
12-26-2016, 01:15 AM
|
 |
US Veteran
|


|
|
Join Date: Oct 2013
Location: Central Montana
Posts: 13,822
Likes: 13,084
Liked 39,988 Times in 10,157 Posts
|
|
Remove cylinder and yoke from frame. Remove cylinder and rod from yoke. Put at least 3 empty cases in space in chambers. Place about 1 1/4" of ejector rod in clean drill chuck and tighten. If knurling on end of ejector goes from knurling to rod it is right hand thread (early models) If there is a small band machined between knurling and rod it is left hand thread (later models). Once you break it lose holding chuck with one hand and turning cylinder with the other, remove from chuck and finish with fingers. Some people use a vise with thick leather padding the rod. I have tried that and had it slip. Just fills the knurling with leather that needs brushed out.
Reinstall, by pressing against springs and turning in correct directions until it starts and turns easily, tighten by hand with empty cases, then go to chuck and firmly tighten.
My question is why do you want to remove the rod? If your not sure how to remove it what do you plan to do when it is removed?
|
|
The Following User Likes This Post:
|
|
12-26-2016, 03:17 AM
|
 |
Member
|

|
|
Join Date: Dec 2012
Location: N.E. OKLA.
Posts: 6,497
Likes: 5,907
Liked 9,371 Times in 3,507 Posts
|
|
I agree with steelslaver. Using a drill chuck (a keyless chuck is fine) worked for me, on very tight ones, when nothing else worked.
I'd suggest, though, that once you get the cylinder & rod inserted in the chuck that you double check your orientation before you try to unscrew it.
To me it seemed easy to look at it the wrong way, once it's removed from the gun, especially with the reverse threading. You don't want to tighten it instead of loosening it.
.
__________________
Waiting for the break of day
|
12-26-2016, 03:33 AM
|
|
Member
|
|
|
Join Date: Dec 2016
Location: Wickiup Junction, OR
Posts: 874
Likes: 11
Liked 1,134 Times in 461 Posts
|
|
Thanks. Actually I had the basic idea of removal as i once experienced the rod coming loose on a mod 19 i once had and took it apart completely to clean it, reinstall & tighten it. I am thinking my Victory needs a new extractor as it does not completely 'index' and lock into the cylinder stop every time and after the hammer locks back it sometimes takes a slight turn of the cylinder with a finger to complete its locking. Unless there is another issue here I am suspecting a worn star wheel on the extractor.
|
12-26-2016, 10:04 AM
|
 |
Member
|


|
|
Join Date: May 2012
Location: Evansville, Indiana USA
Posts: 6,245
Likes: 486
Liked 11,461 Times in 3,544 Posts
|
|
A slightly wider hand would also help with the carry up issue. The hand would likely be much easier to find and fit to the existing extractor, unless the extractor is damaged.
__________________
Ret. LE, FA Instr, S&W Armorer
|
12-26-2016, 10:26 AM
|
|
US Veteran
|
|
|
Join Date: Oct 2013
Location: Central Montana
Posts: 13,822
Likes: 13,084
Liked 39,988 Times in 10,157 Posts
|
|
It could be that your ratchet is worn. But, a couple things before you change your extractor star.
1 check that extractor rod is straight. Roll it on a piece of thick glass or chuck the threaded end up a 1/2 or so past the threads in a drill press and turn the drill chuck by hand with a square sided piece of metal on the drill table. If its bend it will wobble against the metal and away. You can straighten with side pressure. A bend rod can effect timing a little bit and cause drag on some chambers as well as other problems.
2 check end shake. The amount your cylinder moves back and forth while closed. Press it all the way forward towards barrel and using feeler gauges (available at any automotive parts store) find the thinnest one that will slip between barrel and cylinder and just barely drag as you move it in and out. Write this down. Then press cylinder to the rear towards recoil shield and check again. This will take a thicker gauge.
Subtract forward thickness from rearward thickness. Example .008-.003=.005 end shake. It should be .001-.002. If you have excess end shake what can happen is that as the hand presses on the ratchet the cylinder moves forward a bit and does not engage the ratchet as long. Slow timing. They sell shims that go between the end of the yoke tube and the surface inside the cylinder rides on the yoke tube. Does your yoke move back and forth a bit while closed up? If so a new side plate screw might meed fit there or the end "button" on the piece that slides into frame peened a little bit at location screw rides in close it up. Always check end shake before moving on to repair timing issues.
3 If your end shake is minimal .001-.002 (.003 isn't horrible) then before doing anything else, see which chambers it doesn't time on. Very slowly cock the hammer and check for lock up on each chamber. If a chamber doesn't lock up mark it. Check them all. If it is just 1 or 2 the ratchet teeth for those chambers may be adjusted to bring them into time. More on that in a second. If the majority of your chambers are slow, it is better to install a wider hand than replace the ratchet. More on ratchet replacement latter.
Rather than change the hand you can adjust the ratchet. Knowing which chambers are slow remove cylinder. Looking at cylinder from rear, the ratchet tooth for a chamber is 2 teeth to the right (clockwise) of said chamber, tooth one being almost centered between problem chamber and next chamber. Lay the cylinder on its side on a rag or towel, press down on cylinder with palm and hold a flat ended drift pin withabout a 3/16" tip against tooth and give it a tap with a hammer. A tap not a hard smack. Believe it or not this is the proper way to adjust a slow tooth. It swells the tooth out a little bit. Repeat on any slow chamber teeth. You can actually do them all. Reinstall cylinder and check each chamber. Repeat on any that are still slow.
You can replace the hand if all chambers are slow. Remove hand. Measure the thickness towards the end with good calibers. Purchase another that is .001 thicker and before installing in trigger make sure it will move freely in its slot in frame. If it does not you will need to clearance slot with very fine very thin file. Remove material on side of slot closest to center of recoil shield, You want inside edge of hand closer to center. Instal hand in trigger making sure you have end of little spring in trigger over the pin on hand. Install and make sure it cycles smoothly with cylinder out. (hold back on ejector thumb piece.) Now check chambers for timing again.
Replacing the ratchet can suck. First the little pins in the cylinder are not all exactly in the same place. So, all extractors do not smoothly fit over the pins. Couple things one can do. Fill original cylinder pin holes, either with tight pins and flush them or fill with quality metal epoxy like JB weld. Then install new star and with chambers filled with empty brass use a short drill of correct size and redrill holes using new star as guide. This requires a good drill vise and drill press or milling machine. Install new pins. Expose ends of pins need a tiny bit of rounding and the holes in ratchet a tiny bit of champer. Or go to another similar location and drill new holes through star and into cylinder. Remove star and drill holes in star to next size larger drill (use numerical drills, not fractional. Now you have a new ratchet that must still be timed to the gun. It maybe to fast and the bolt will lock up cylinder before hand slips by ratchet tooth, this means tooth needs filed correctly with a small fine file (I have a set of tiny, fine diamond files, some guys uses small stones). Obviously this is not a project for most people. You have to have the right tools, a ton of patience and skill with tools and a good understanding of what is happening at hand tooth engagement surfaces.
All in if fixing the end shake doesn't do it, your better off taking it to someone who know what they are doing. Unless your some one with lots of mechanical knowledge, tools and willing to chance a few mistakes and parts to learn. I learned a lot on a beat up model 10 and a pre model. then a worn model 28 and messing with cylinder swaps while making modifications. Unless a old gun is a collectors item or has some heirloom value, they are great learning tools. I have ended up with a pile of spare parts and experience.
Last edited by steelslaver; 12-26-2016 at 10:51 AM.
|
|
The Following 2 Users Like Post:
|
|
12-26-2016, 03:55 PM
|
|
Member
|
|
|
Join Date: Dec 2016
Location: Wickiup Junction, OR
Posts: 874
Likes: 11
Liked 1,134 Times in 461 Posts
|
|
Thanks Steel for all the hints and I will take it one step at a time. Fortunately I am a:
Quote:
|
some one with lots of mechanical knowledge, tools
|
But a little short on the 'finer' technical aspects of S & W revolvers.
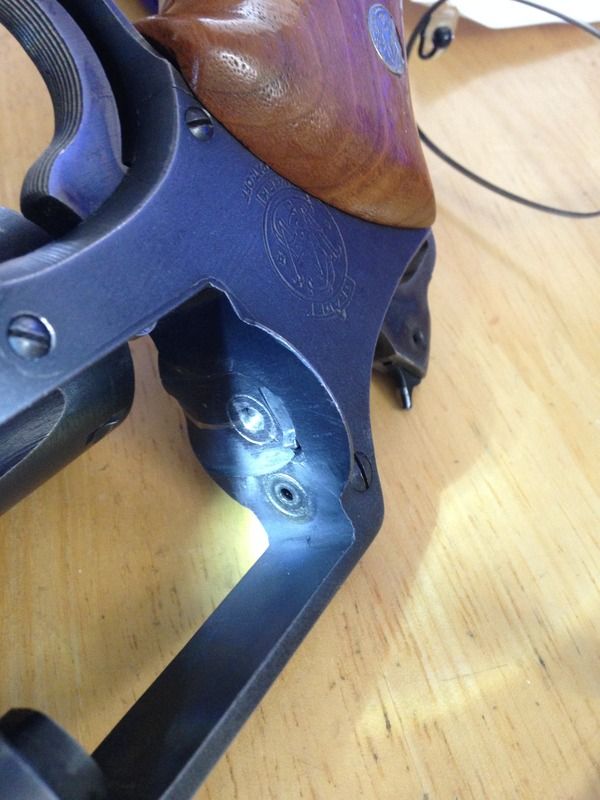
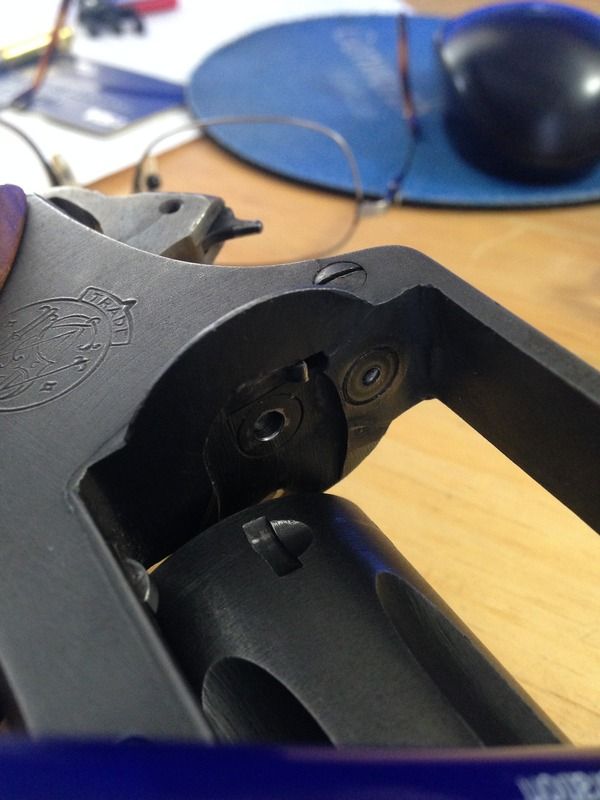
One thing however on examining the hand with with the cylinder opened and the hammer cocked the tip of the hand appears to be very worn and does not extend past the opening in the rear of the frame. Comparing this to my Mod 66 (which is nearly new and fired very little) the tip of the hand extends considerably more than on the Victory. Also a close examination of the teeth on the ratchet reveal them to be relatively 'sharp' when compared to the tip of the hand - so if I had to make a choice of where to start I am thinking the hand is a good starting point. I'll try to get some close up pictures of the area and post them for opinions. Thanks.
Last edited by Mistered; 12-26-2016 at 04:20 PM.
|
12-26-2016, 04:11 PM
|
|
Member
|
|
|
Join Date: May 2012
Location: Evansville, Indiana USA
Posts: 6,245
Likes: 486
Liked 11,461 Times in 3,544 Posts
|
|
If you decide to check the hand further have a look at the hand window in the frame. Shooting debris and lubricants can build up here, causing the hand to malfunction.....or not work as designed.
The hand spring could also be an issue, if it is not exerting proper pressure/tension.
If the ratchet surfaces appear to be good, you may be able to restore proper carry up by substituting a new or used similar width hand that does not exhibit wear on the top inside surface.
This might solve the issue without further intervention.
Steelslaver made an excellent point about checking for excessive headspace also. Too much rear gauge can contribute to carry up issues. If you have some feeler gauges, the gap between the breechface and the rear of the cylinder should be between .060" - .064". I would check the interface of the front sideplate screw and the yoke button as well for any evidence of end shake on the yoke itself.
__________________
Ret. LE, FA Instr, S&W Armorer
Last edited by armorer951; 12-26-2016 at 05:08 PM.
|
12-26-2016, 04:24 PM
|
 |
Member
|
|
|
Join Date: Mar 2015
Posts: 1,133
Likes: 1,565
Liked 1,365 Times in 561 Posts
|
|
Quote:
Originally Posted by Mistered

Thanks Steel for all the hints and I will take it one step at a time. Fortunately I am a:
But a little short on the 'finer' technical aspects of S & W revolvers.
One thing however on examining the hand with with the cylinder opened and the hammer cocked the tip of the hand appears to be very worn and does not extend past the opening in the rear of the frame. Comparing this to my Mod 66 (which is nearly new and fired very little) the tip of the hand extends considerably more than on the Victory. Also a close examination of the teeth on the ratchet reveal them to be relatively 'sharp' when compared to the tip of the hand - so if I had to make a choice of where to start I am thinking the hand is a good starting point. I'll try to get some close up pictures of the area and post them for opinions. Thanks.
|
Some great advice given here. The warning was great too and sounds just like I would put it. You really gotta be good with delicate mechanical parts and really understand how they operate. The more you practice, the better you get.
I do know ratchets are one thing I would rather not play with. You are better off trying an oversized hand first. I would also recommend getting the Jerry K. S&W shop manual. One of the best and why go into it blind.

|
12-26-2016, 04:41 PM
|
|
US Veteran
|
|
|
Join Date: Oct 2013
Location: Central Montana
Posts: 13,822
Likes: 13,084
Liked 39,988 Times in 10,157 Posts
|
|
Armorer made a great point about checking the hand window area and the hand and spring for cleanliness and function. The hand is harder than the ratchets and should wear slower.
|
|
 Posting Rules
|
|
|
|
|


 Linear Mode

