Botched trigger job help

Jwinks707

Member
Joined
Jun 2, 2023
Messages
10
Reaction score
21
Hello,

I am the owner of a 686 SSR pro and I am getting the feeling I just botched a trigger job. I have no prior gun smithing experience on revolvers but that does not mean I am mechanically illiterate. Prior to embarking on this adventure I bought Jerry Miculek's Trigger Job video. I followed step by step and after reassembly I thought I had successfully completed a trigger job. Aaaaaaaaand this is where the plot thickens.

Since I am pretty certain what the problem is, I am just going to focus on what I have found that definitely is not right just so I can make a long story short.

When i assemble my pistol, the first couple trigger pulls in double action feel normal. The hammer rises and falls, nice and smooth as it should. Eventually, right around 10 or 15 dry fires when pulling in double action the trigger stacks right at the end of the pull before the hammer drops. I found what is binding. My hand assembly is digging into the notches on my cylinder and becoming jammed. I think I have an idea as to why this is happening. I think I removed too much material from the sides of my rebound slide. Now the rebound slide has more room to walk sideways which is applying a force to my trigger lever which transmits to my trigger where the arm assembly is attached which throws the alignment of the arm assembly off.

I am pretty confident this is the problem, now I am worried that I just smoked a cylinder :(. I am about to order a new rebound slide. If that fixes the problem great, but now I have a cylinder that is marred from my misaligned arm assembly. My dumb *** should have known when to stop. I am hesitant to try and smooth out the marred surface on the cylinder because I am worried about throwing off the timing.

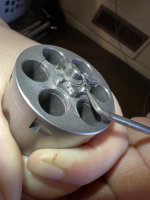
My thinking is that by the time the binding occurs, the cylinder is already locked into position. In a properly assembled pistol, the hand assembly moves straight up. In my pistol the arm assembly is not moving straight up, therefore the material I would remove from the cylinder might not affect the timing. I have a feeling it might not be that simple. I will try and post picks of what the cylinder looks like. I know pictures speak a thousand words.

I am probably going to send my gun to smith and wesson and have them repair what I did but I figured I would check here first and see if I can fix what I messed up. I think I already know the answer though because in the Jerry's video, the surface on the cylinder he said not to stone is the surface I messed up with my hand assembly.
 

Attachments

  • s and w.jpg
    s and w.jpg
    46.8 KB · Views: 309
Last edited by a moderator:
Register to hide this ad
If you followed Jerry's video completely I suspect your problem is NOT your rebound slide being undersized. Because I am quite certain he did NOT take the rebound slide to a bench grinder and started throwing sparks. What I expect that his method will show is simply smoothing the sides of the rebound slide on some 600 grit wet sandpaper or something similar. So what you removed was 1 or 2/10,000 inch.

I expect that you have done the same thing as every single one of us who have decided to try tuning the trigger. That is that you discovered that if the Strain Screw is backed out a turn or two the DA trigger pull is reduced by a lot. The problem with doing this is that as you work the trigger that Strain Screw will continue to back out. At some point there will be almost no bow at all in the mainspring and when that happens instead of working against a bowed spring you'll be trying to compress a straight rod end on. The solution is very simple, just tighten the strain screw until it is fully tightened.

BTW as I have access to a full Machine Shop I took the time to make up some shims that will fit into the recess under the strain screw. It allows me to tune my revolvers for a 9 lbs. trigger pull with the Strain Screw completely tight. As for why 9 lbs. even, it's simple. Before Covid Remington UMC ammunition requires a 9 lbs. DA trigger for reliable ignition. Unlike many tails told on the Net CCI is NOT the hardest primer, in fact the hardest primers are those used in Remington UMC ammunition. Which is the casing I prefer to reload with because Remington UMC universally has a flash hole that is 0.082 inch in diameter and wont jam with pins when you clean your brass with stainless steel pins. Spend a weekend drilling the Flash holes in 1000 pieces of Federal Cases picked up at a gun show and you'll soon come to appreciate Remington UMC.

I'll also note that one of my revolvers is a Dan Wesson 15-2 and time spent shooting one of those will give you the ability to curl 20 lbs with your trigger finger. So a 9 lbs. DA trigger is a cake walk. Heck, I can even shoot a CZ75 in double action with my weak hand.
 
I apologize, but I'm a bit confused. You state that "Eventually, right around 10 or 15 dry fires when pulling in double action the trigger stacks right at the end of the pull before the hammer drops."
Does the condition reset, and happen like you state, or does it do it with every trigger pull now, and not require 10-15 pulls to reoccur?
 
I have been trying to spend some time learning the correct terms for the parts in a reolver so I apologize if what I say does not make a lot of sense. I will try my best to clarify my original posting.

After following Jerry’s instructions to the best of my ability, I put my revolver back together. Once I had all the internals installed, I tightened the tension screw just enough to the point where it would keep my main spring from falling out of the gun. I left the side plate off as well as the cylinder. I made sure the internals would not walk out while I cycled the trigger in double action. In my opinion everything seemed to work correctly.

Next I installed the cylinder and the side plate and tightened the mainspring by screwing down the tension screw all the way. I began cycling the trigger in double action and the first couple trigger pulls felt really good. If my memory servers me correctly it was about after 10-15 trigger pulls that I started feeling resistance at the end of my DA trigger pull. Now whenever I pull the trigger in DA the resistance is pretty bad to the point where the trigger binds and I can let off the trigger and it does not reset. The trigger can be forced to follow through but it does not feel good.

So when I started investigating I found the arm assembly is chewing into the ratcheting mechanism on my extractor. The sad part is damage is already done to the ratchet on my extractor. When I start pulling on the trigger and the cylinder stop unlocks the cylinder rotates. Continuing through the pull the cylinder locks into place. The trigger starts to have a fair amount of resistance and then binds. It is at this point that the hand assembly is digging into the side of the ratchet. In the picture I posted I am pointing to the portion of the ratchet where the hand assembly is digging into the metal.

One of the things I tried while troubleshooting was to start with little tension on my tension screw and pull the trigger. The gun is completely put back together besides grips installed. Then I would make a half turn on the tension screw then stop to pull the trigger. I continued until the tension screw was all the way down. What I ran into was the binding did not occur until the tension screw was all the way in.

I also went back and colored all the surfaces I stoned with a blue sharpie. After cycling the gun I went back and inspected my work and the surfaces seem to be making better contact then when I first started.

In my original post I said my trigger was stacking but honestly I don’t even know what that means. I think binding is a better description of what is happening. Hopefully this makes things more clear. I appreciate all the help.
 
Sir, you should be able to just buy a extractor for it. I never liked Jerry's Guide line for a trigger Job. Plus it is something that you don't do without someone teaching you. I learn from a WV State Tropper that when to S&W school for gunsmithing close to 70 yeears ago. Hope this Helps. If you are near GA state I would fix it for you, no charge.
 
With the newer smiths, is there anything hand fitted at the factory? That would be really nice to just have to buy a new extractor but I am uneasy with not knowing what the root cause was that led to the failure. I have been thinking about it and when I dry fired my pistol with the side plate off, even with minimal pressure on the mainspring the posts that the hammer and trigger sit on were unsupported on one side. I hope I did not bend anything.

I did check to see if the posts were square the other day by using a metal ruler made by pec engineering. The ruler looked square to my eyes and the posts looked to be square as well.

The thing I can’t figure out is why did my handle arm dig into the extractor. When I dry fired with the side plate off the cylinder was not installed on the gun. Does anyone know of any components I should check as well as what to look for that might have caused this problem?

Also what is a good company to obtain smith and Wesson parts?

Where are you in CA?
 
You can diagnose what's going on with the extractor/hand interface by putting some Sharpie marker on the side of the ratchets, and then cycling the action in DA. This will show the contact surface between the hand and ratchets on the ratchet surface. (Sharpie marker will rub off at the point of contact)

If you didn't alter the hand or ratchet surfaces, then these parts are not toast. You may be correct in your assessment of a misaligned hand, which can cause binding at the end of the trigger pull. You may also have long ratchets, which is very common in new production revolvers.

You can confirm the hand/ratchet interface is the issue by removing the cylinder, and while holding back the thumbpiece, cycle the action without the cylinder. If it cycles normally in this configuration, you'll know the problem has something to do with the hand binding, or possibly the rear gauge (headspace).
 
Last edited:
I will do these checks when I get off work. What do you mean by long ratchets? Are you talking about the portion of the ratchet that is in the shape of a cup or the straight portion after the cup?

If the ratchets are long, why was it not a problem prior to performing stoning? It is very possible there was an issue with this prior to stoning I just didn’t have the knowledge to recognize it.

I did alter one side of the hand assembly. It was a surface Jerry stoned on his revolver in the video. It was the outboard side of the hand assembly, the side of the cover plate.

Either way I will do the checks. Thank you for the help.
 
OP: "My thinking is that by the time the binding occurs, the cylinder is already locked into position."


The "long ratchet" condition would have been present from the factory, as it is a failure in fitting the ratchet properly (left oversized), and may not be the culprit in this case. It could, however, be a contributing factor, particularly if the hand is now out of alignment as a result of your efforts.

The ratchet/cylinder below illustrates the position of the individual ratchets as they interact with what's called the hand "throat" the very top and inner surface of the hand. This portion of the hand is what interacts with the exposed sides of the ratchet during rotation of the cylinder. Your ratchets should look somewhat the same, although among revolver models, the individual ratchets often have slight differences in their actual shape and design.

The red, check-shaped mark illustrates the location of the sides of the surfaces on the ratchet that the hand interacts with during it's passage upward during the trigger pull phase....starting at the bottom of the ratchet "B" at the very start of the pull when the top (throat) of the hand moves out and engages the "bottom" surface on the ratchet. (left side of the red "check" mark)
As the upward movement of the hand continues, contact with the ratchet passes to the longer portion on the right marked in red. As the hand continues it's motion upward, it eventually "passes by" the ratchet as the cylinder locks into place, as illustrated in the ratchet marked "A", which is in the firing position.

If your hand is no longer at 90° to the trigger (canted), or not square with the hand slot in the frame, interference may be occurring in the hand slot, or at the end of the trigger pull, as the hand "passes by" the stationary ratchet, and there is excessive contact.

You can safely evaluate this "upward" hand motion and interaction by the hand by looking though the back of the hand slot as the action is carefully cycled without the mainspring and the hammer and with the sideplate removed. (do not cycle the action under mainspring tension with the sideplate off)


Photo below shows position of hand at rest, and at the end or "lock up" stage of rotation..........


If you are using Windows, you can use "Ctrl +" for larger and "Ctrl -" for smaller reference the photos.


Carter
 
Last edited:
I live in Santa Rosa and I am about to move to San Louis Obispo.

You may want to check with Sportsmans in Fairfield or Guns, Fishing & Stuff in Vacaville. I know there's a gunsmith in Vacaville, just don't recall his name.

My suggestion, if you didn't clip, cut or replace any other factory parts or springs is to replace the rebound slide and have it reassembled by someone who knows how to do it and can spot anything that is out of whack.
 
I left the side plate off as well as the cylinder. I made sure the internals would not walk out while I cycled the trigger in double action. In my opinion everything seemed to work correctly.

NEVER cycle the action with the sideplate off! The trigger & Hammer Pins etc are unsupported on none end when doing so and can bend slightly which can cause a number of unwanted things to happen. I thought Jerry's book warned about this.
 
Carter AKA armorer951,
Thanks for the explanation and photo's showing the hand/cylinder interaction.
As they say, a picture is worth a thousand words and your picture/illustrations said a couple of dozen pages of splainin' about what goes on with this simple yet critical revolver function.
 
Last edited:
Ok, that’s it.
I am moving to Evansville, Indiana USA. I getting tired of Oregon gun laws anyway.
Ok, just kidding……………….maybe.
Thanks Carter for your explanation and pictures. As usual very helpful. 👍👍
 
I haven't read all everyone has had to say here, so be charitable.

I don't know the first thing about Jerry Miculek's video. I do know about his Spring Kit. I bought it, installed it, and succeeded in locking up the gun tighter than Dick's hat band-------as the saying goes. Needless to say, I didn't bother reading the instructions, because replacing a couple of springs is child's play---or not.

On the other hand, having gone back to square one---and read---and followed the instructions, I discovered this kit allows you to set the DA trigger pull anywhere you please---with the proviso you don't go below 7 lbs., lest you risk FTF's with other than Federal ammo/primers. I set it at 7 lbs.----------which worked fine with WW ammo (because that's what I had on the shelf). The gun was absolutely transformed------smooth as silk!

"Try it---you'll like it!"

Ralph Tremaine
 
I wanted to say thank you to everyone who contributed their knowledge to help me. I have not solved the issue and chose to contact Craig in Woodland. I know now to never cycle the trigger with the hammer installed and side plate off. The things I have learned from my short time on this forum has been eye opening. I will try my best to stick around and soak up some more knowledge. I will let everyone know what the issue was after after Craig has a chance to look at it.
 

Latest posts

Back
Top