Grip refinish?

45Smashemflat

Member
Joined
Sep 16, 2023
Messages
539
Reaction score
965
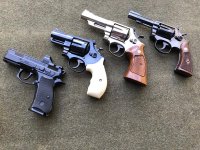
Good morning. I have a nice set of combats on a 25-2 that was round butted some time ago. I worked with the grip maker to match the grip frame using tracings. It’s close, but not as tight as I would like. I figure I can use sand paper and sneak up on it.

However, the grips are spayed with catalyzed lacquer. I’m looking for tips on removing this finish, and what a DIY guy might use as a new coating. (Wood is American Holly.)

Tips or thoughts?
 
Register to hide this ad
Sand the insides of the grip panels on increasingly fine papers on perfectly flat surface. You will quickly get them perfectly flat. The lacquer can be removed with any good paint stripper and a nylon brush (follow the instructions), followed by removing the residue with acetone. After all of the VOCs have evaporated away (best to do this outside or in another well-ventilated place), you can re-stain the grips with the stain of your choice. I restored the messed-with grips of an old Colt Police Positive for a friend. They turned out beautifully.
 
You have a lot of choices on finish. Don't know what catalyzed lacquer is verses what I think of as lacquer but I would strip them with acetone but be sure to use as directed.

You could apply a lacquer finish with a rattle can for a high shine finish, urethane with a brush or spray can for a very durable finish or one of the several oil type finishes like Tru-Oil or Minwax Tung Oil finish for a matt or shiny finish as desired.

Advantage of lacquer is that you can apply coat after coat without sanding as it dries so quickly and it melts into the previous coats. It does require some buffing to smooth the surface in my limited experience, with a rattle can. Minwax Tung Oil Finish will avoid any of the plastic or clear coat appearance, more like 1950s factory stocks.
 
Last edited:
The flats are not the issue, the problem is that the round butted profile does not follow the frame as tight as I would like. (No fault of the grip maker, he did not have the grip frame to work with.)

Thanks for the tips on the finishes. I’ve done several rubbed oil finishes. I need to see if I can find examples of how Holly takes/darkens with oil. I do like how “ivory-like” it is now.
 
Last edited:
Personally I love a tung oil finish on my grips, but it might darken holly more than you want. I hear hemp oil is a good alternative that won't darken much if at all.
 
The Holly itself will darken with age, exposure to light and the oils from your hand. Just something to consider.

Pictures?

This is a newer set of Holly Magnas on my Model 1950 Army.

strawhat-albums-strawhat-s-stuff-picture29084-img-9663-a.jpeg


strawhat-albums-strawhat-s-stuff-picture29085-img-9661-a.jpeg


(I need to capture better images of this pair.)

Kevin
 
Last edited:
If you worked with the grip maker to have them made, why not work with them for the finish removal and reapplication? Once you have that info, a little sanding here and there should get you where you need to be.
 
I’ve posted it before, the 25-2 snubby in this photo.

Good tip on reaching back out to the grip maker.
 

Attachments

  • IMG_9864.jpg
    IMG_9864.jpg
    135.9 KB · Views: 51
To mark the excess grip material that is above the grip frame edges,,
Place the grips on the gun and tighten.
Then with a very sharp and thin bladed knife,,mark the grip material by dragging the point of the knife along grip right where it meets the frame.
An Exacto-Knife is good for this or anything close to it.

You want to tilt the knife blade so that it marks the grip material with a scribed line and not make any mark on the blued steel of course.
It doesn't take much pressure to make the scribed line into the wood (or ivory).

Then remove the grip panels and take a soft pencil (the ever popular #2) and scribble over that scribed line,,then wipe of erasure it off.
That'll leave the scribed line a darkened line on this type of wood and easy to see when working.

Take one panel and put it in a vise so the area you are working on is comfortably above the vise jaws.
Protect the grip with padding of course.

Now take the excess grip material away. That from outside that scribed line and down to the scribbed line.
But DO NOT remove the scribed line itself,,at least not yet.
That will be the very last in fitting depending on how close you choose to go.

When removing this material, work from the inside of the grip panel towards the outside of the finished surface.
Don't try and do any shaping to the outside like blending the cuts in just yet.
At this point just file away that excess so it ends up being a flat edge itself that is 90* to the flat inside surface of the panel.

Don't taper it towards the center of the outside of the panel, you may take too much off and end up with a low spot when it comes to final shaping. Straight out from the scribed line.

Working from the inside of the panel towards the outside will help avoid splintering the edges as well when filing away matr'l.

When you think you have all the areas taken down to the line, place one of the panels back on and check the fit of the area to the grip frame.
You will likely need some more matr'l taken off here and there to get that perfect wood to metal fit.

Now the tedious work of that last final fitting. You can get as close as you feel you want to doing this. Just remember that if you take the wood below the grip frame at any point,,thats where it will be on the final product.

When satisfied with the best fit possible, of both panels,,place them both back on the gun and put the gun in the vise. Now shape the outside of the grips in the area where the work was done.
File those areas back to conform with the orig wanted shape of that style and sand it smooth.
Careful when working around the metal work and the last bit of sanding at the edges can be done with the grips off of the frame.

Fine NEW grit paper backed with a file or hardwood can be used here to just barely touch up those delicate edges and protect them from getting rolled over by sanding heavily and w/o any backing.
The orig idea of trimming down the wood to the scribed line but leaving the line still visible was to allow for the very last delicate fitting & sanding and not end up with the grip being lower/smaller than the frame.
 
The advice to contact the stock maker is solid advice. Let them correct the error.

Unless you are very good at matching finishes, you are merely pissing in the wind. Matching existing finishes by guessing? Not a good idea.

Did the stock maker stain the Holly? What finish did they use? How was it applied? Can it be touched up or does it need to be stripped? Can it be stripped or does it need to be sanded? There are a lot more questions but you should get the idea.

Kevin
 

Latest posts

Back
Top