How to make a 15rd OEM S&W magazine (pics)

Heatwave3

Well-known member
Joined
Feb 16, 2013
Messages
106
Reaction score
63
Location
NJ
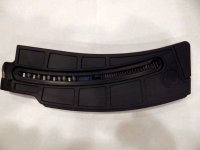
Since I couldn't find a thread with good instructions and pictures for converting a 25rd S&W mag into a 15rd mag, I figured I would give it a try and report back. I considered using the tacticool mag restrictor but I also wanted to reduce the overall length of the mag for bench shooting. I live in NJ which has a 15rd mag limit. Colorado is the only other state with a 15rd mag limit so I figured it was unlikely the manufacturers will ever make a 15rd mag.

I just received 4 new 10rd Long magazines from S&W and figured I'd give it a try and report back. The end result was even better than I expected. Here's the steps I took with pics.

Step 1: I removed the factory restrictor pin from the 10rd Long mag from S&W. This took about 30 secs. Long screw driver press against the restrictor pin. I placed the mag on a folded towel on a concrete floor and hit the screwdriver gently but firmly with a hammer. 3 strikes later the pin fell out.

Step 2: I loaded the unrestricted mag with 15 rds to take measurements to determine where to make cuts.
attachment.php


Step 3: I determined that I needed to make 2 cuts. 1st cut just above the baseplate. I used painter's tape to mark the cut.
attachment.php


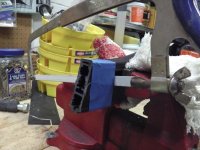
Step 4: I decided to make the cut using a hacksaw with a brand new blade. The saw made the cut in less than 2 minutes and I was taking my time and using a vac to clean the plastic dust as I cut to ensure I had a clear view of the cut. This step was alot easier than I thought it would be.
attachment.php


Step 5: I used a small exacto knife to remove the debris from the baseplate.

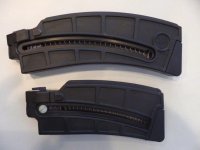
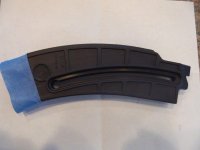
Step 6: I used the painter's tape again to mark above the first rib up from the bottom of the oem mag based on my measurements. I made the cut approx. "half a .22 casing diameter" above this rib. By locating the cut in this location, the new mag will only hold 15rds but you'll be able to use the stock spring just as it is. No cutting of the factory spring is needed. Here's how the baseplate and the rib cut look afterwards.
attachment.php


Step 7: I have a grinder and gently ground the surfaces of both the baseplate and the mag while doing dry tests to get as close to a perfect mating as possible across all cut surfaces.

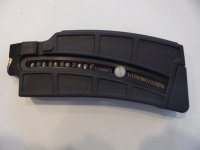
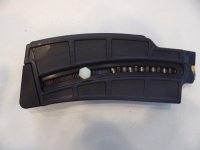
Step 8: I inserted the blue follower in the opening of the main mag in the proper position but as close to the new cut as possible. By placing the follower in this location, you'll be able to maintain the proper dimensions of the channel as you glue the baseplate on to the bottom of the mag.

Step 8: I used normal liquid superglue. I carefully place superglue on all of the new cut surfaces on both the faceplate and the main mag. (Be careful not to get any superglue on the blue follower.) I then matched the wet surfaces together while aligning the outer surfaces and seams for as close to a perfect mating as I could get.

Step 9: I doubled a bunch (6-8) rubber bands lengthwise around the mag and left it alone for about 2 hrs.
attachment.php
 

Attachments

  • IMGA0589.jpg
    IMGA0589.jpg
    76.2 KB · Views: 1,197
  • IMGA0591.jpg
    IMGA0591.jpg
    67.6 KB · Views: 1,141
  • IMGA0595.jpg
    IMGA0595.jpg
    108.6 KB · Views: 1,156
  • IMGA0597.jpg
    IMGA0597.jpg
    69 KB · Views: 1,147
  • IMGA0599.jpg
    IMGA0599.jpg
    69.2 KB · Views: 1,142
Last edited:
That looks great! Let us know how the superglue holds up. I imagine this could be done to make a long 10 round mag into a short 10 round mag. Maybe?
 
Step 10: After 2 hrs I removed the rubber bands. The next step was actually a surprise and believe it or not took more time than just about everything else. Inserting the spring was abit of a challenge. Its hard to explain but because of the alignment of the opening in the baseplate vs the channel in the mag, inserting the spring is a challenge. Essentially you have to take your time and gently insert each segment of the spring by guiding it into the channel with a flathead screwdriver. It takes some patience but eventually it goes in. I then took it out just to see how difficult it is to remove. It take an equal amount of patience to remove since you'll need to guide each loop of the spring with a screwdriver to get the entire spring out. It's not a real big deal but it's somewhat of a pain. I figure the need to remove the sping will be very infrequent, if ever, so no big deal from my perspective.

Once the spring is back in, just replace the spring cap and then slide the shoe back onto the baseplate. I also decided to install a #10/24 nylon bolt with a nylon locking nut to serve as a load assist button. It worked perfect but I needed to grind the nut down just abit to ensure it didn't interfere with loading to the magwell. With the nylon locking nut from my local ace hardware, I needed to grind the nut down by about 1/3. Here's how it looks compared to the original factory 25 rd mag.
attachment.php


Step 11: Load your new custom mag with 15rds.
attachment.php

Opposite side
attachment.php


Step 12: Enjoy your new 15rd mag in your M&P 15-22. As you can see its a much better fit with my bi-pod grip, particularly for bench shooting. Good luck if you decide to take this on. It's actually much easier then it sounds and I suspect I can probably do the next mag in 30 mins (not including drying time.)
attachment.php
 

Attachments

  • IMGA0603.jpg
    IMGA0603.jpg
    73.3 KB · Views: 1,135
  • IMGA0604.jpg
    IMGA0604.jpg
    62.5 KB · Views: 1,135
  • IMGA0608.jpg
    IMGA0608.jpg
    59.4 KB · Views: 1,125
  • IMGA0614.jpg
    IMGA0614.jpg
    175.4 KB · Views: 1,126
Last edited:
Nicely done.

Have you actually used them yet? If so, have you had any problems with the full length springs?
 
That looks great! Let us know how the superglue holds up. I imagine this could be done to make a long 10 round mag into a short 10 round mag. Maybe?

Yes this would work but I think you'll have to reverse the baseplate to get the opening in the baseplate to align with the spring channel in the mag. I think this 15rd mag design is the smallest you could make and still keep the baseplate facing in the same direction as the 25rd factory design. (This is why loading the spring becomes abit of a challenge when making a 15rd mag. But once the spring is loaded, your mag is good to go.)
 
Last edited:
Nicely done.

Have you actually used them yet? If so, have you had any problems with the full length springs?

I haven't fired with the new mag yet but the operation is identical in tension and feel to loading and unloading the factory 25rd mag. I probably won't be able to get to the range until mid-week or next weekend. I'll report back after firing multiple loadings of the new mag.
 
I haven't fired with the new mag yet but the operation is identical in tension and feel to loading and unloading the factory 25rd mag. I probably won't be able to get to the range until mid-week or next weekend. I'll report back after firing multiple loadings of the new mag.

I hope everything works as expected. Again, nice job!
 
You probably already know this, but for anyone else considering this mod, you can drill a hole out at the bottom of your follower channel in the "same" location as on the stock mag so you can use the factory load assist button.

Good work! I'm interested in a follow-up post whenever you have time to send appreciable rounds downrange.

Shorter mags have more appeal to me simply for comfort reasons. I shoot a lot from prone and with the 25 round mags, I end up in a more unnatural shooting posture. Of course it's a trade off - we all want max. round count in the smallest mag possible.

10,000 smiles to someone that develops a SureFire-esque 100rd coffin mag...... :cool:
 
Unlike NJ, we are supposed to be able to still own the 30 rnd mags, we just can't buy them or sell them after 01 July.

At least until the next election.

We shall see.. Make sure to register and tell everyone you can so this can be reversed someday. I am glad El Paso county has said they don't care..
 
I had a chance to go to the range this afternoon/evening to try out my new 15rd oem-modified S&W magazine.

The short summary is that it was flawless.

I ran 12 mag loads (I was also zeroing in a scope) and had a blast. I was the only one at the range which also made it fun.

I ran 180rds through my modified 15rd mag and I didn't have a single FTL, FTF or FTE. On one mag load I ran through it as fast as I could pull the trigger to be sure the loading from the full length factory spring in this design wouldn't create a problem. Even running "full speed" this setup ran flawless.

The modified mag with my "load assist" button (nylon bolt & nut described above) was excellent. It made for easy loading. The length of mag is also excellent for my setup with a grip bipod. The nylon bolt and nylon locknut (10/24 x .75in) can be found at your local ACE hardware. I have a bench grinder so it was quick and easy to get the bolt/nut combo to the correct size. I installed the bolt thru the follower, tightened the nylon locknut till it was snug to the mag and then backed it off to the point where there was no friction but also no looseness. Then I snipped the bolt that extended past the nut and gently ground the nut and bolt to be flush. Then I simply removed the bolt/nut from the mag and put it back together while it was removed from the mag. I did this to prevent any damage to the mag while doing the final grinding. I reinserted the bolt into the nut till it was flush again and ground the nut/bolt until the nut was about half its original thickness. Finally I reattached the bolt/locknut back onto the mag.

By taking these steps I ensured there was no interference from the nylon load assist button with the magwell. It was also flawless. The mag loaded crisply and dropped out cleanly. I was very pleased with the function of the design. The bonus is that this load assist button costs about 30 cents to make.

I only ran one type of ammo. Centurion 1250fps. By the way, this ammo I find to be excellent and accurate, at least measured by my modest skills.

Here's a pic of one of my targets while zeroing in my scope at 25 yards. The 3 shots below and to the right of the bullseye were me zeroing in the scope. The other shots surrounded and took out the entire bullseye. At that point I used the left edge of the target as a new bullseye. Believe it or not, every single one of those patches were on the target before I started shooting. Any shots off the target are from previous range time as I reuse the targets alot.
attachment.php


I then re-zeroed the scope at 50 yds. With the 2.5-10/40 scope fully zoomed in and with the scope zeroed at 50yds, my 15-22 was on the crosshairs at 50yds in the pic below. I was at 1 mildot below the crosshairs for shooting at 25 yds and about a half a mildot down at 100yds. This gun is excellent even at 100yds as I was shooting at a 5" nylon rolling ball target and rarely missed moving it at 100yds. It was a very nice evening at the range. I'm now planning to convert 3 more of my S&W 10rd Longs into 15rd mags.
attachment.php


(If the moderators think its worth it, they might consider making this thread a sticky.)
 

Attachments

  • IMG_0299.jpg
    IMG_0299.jpg
    117 KB · Views: 958
  • IMG_0301.jpg
    IMG_0301.jpg
    114.8 KB · Views: 957
Last edited:
Excellent!!

Glad to hear it worked out, I love it when someone has a wild plan and makes it work....
 
Nice job indeed. My only concern would be if the glue will be able to hold up to the constant spring tension over time.
 
Nice job indeed. My only concern would be if the glue will be able to hold up to the constant spring tension over time.

My thoughts too. Super Glue isn't the best for long term use. I've had more failure than success with it and some "plastics". Has to due with being brittle,getting brittle over time,vibration from the weapon firing and dropping on a hard surface. IF it does fail (by chance),use a two part epoxy. It has a better bonding agent and "marries" the two parts together for a much better over-all bond between the two pieces.

Good idea though. Hope it works as planned. :D

Time will tell for sure. It's worth noting that the superglue softened/melted the plastic, so I'm guessing it became somewhat "welded" in addition to the superglue bonding. So far it feels like it would be impossible to separate, short of trying to break it apart. Hopefully it holds up as intended.
 
Time will tell for sure. It's worth noting that the superglue softened/melted the plastic, so I'm guessing it became somewhat "welded" in addition to the superglue bonding. So far it feels like it would be impossible to separate, short of trying to break it apart. Hopefully it holds up as intended.

I was thinking about the old time plastic model cement that actually welded parts together, wonder if it would work or if there is another product that would weld it?
 
Time will tell for sure. It's worth noting that the superglue softened/melted the plastic, so I'm guessing it became somewhat "welded" in addition to the superglue bonding. So far it feels like it would be impossible to separate, short of trying to break it apart. Hopefully it holds up as intended.
I have had very good luck with JB Weld.
 
1st post for me, this thread pushed me over the edge to join. Been liking what i have read all over this forum...

Since I don't want to mess up my only factory mag, I will try this sometime soon with a plinker tactical 35rndr I got a couple weeks ago. I also just ordered two 10rndr long mags from midway. I can un pin those since i am in a gun friendly state, and then if I screw up the PT I am not out any mags, thanks for the post and idea!
 

some filler used for plastic modeling kits would make the cut invisible, rub in and sand it away with light grit, works on plastic airplanes, why not on plastic mags? and a litlle careful cleaning with mineral spirits would get rid of the glue residue, i would try that on a scrap piece first of course
 
some filler used for plastic modeling kits would make the cut invisible, rub in and sand it away with light grit, works on plastic airplanes, why not on plastic mags? and a litlle careful cleaning with mineral spirits would get rid of the glue residue, i would try that on a scrap piece first of course

I think plastic on plastic would be better for adhesion with the epoxy. Just file both pieces down as evenly as possible.
FYI, the plastic JB-Weld is rated at 2424 PSI tensile strength. Still, I think this is one of those wait and see tests.
 
Back
Top